Operation Manual
Page 2
... 16 Maintenance 16 Service and Adjustments 21 Storage 27 Troubleshooting 28 Sears Service Back Cover Craftsman Riding Equipment Warranty: Lawn Tractors, Garden Tractors, Zero Turn Riders CRAFTSMAN TWO YEAR FULL WARRANTY FOR TWO YEARS from the date of purchase, if any non-expendable part of this product is ever used within the warranty period, including but not limited to damage caused by improper storage, failure to use the proper grade and amount of engine oil...
... 16 Maintenance 16 Service and Adjustments 21 Storage 27 Troubleshooting 28 Sears Service Back Cover Craftsman Riding Equipment Warranty: Lawn Tractors, Garden Tractors, Zero Turn Riders CRAFTSMAN TWO YEAR FULL WARRANTY FOR TWO YEARS from the date of purchase, if any non-expendable part of this product is ever used within the warranty period, including but not limited to damage caused by improper storage, failure to use the proper grade and amount of engine oil...
Operation Manual
Page 3
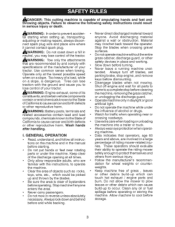
... the manufacturer's recommen- I. Always turn off engine and wait for all parts to come to a complete stop engine, and remove keys before dismounting. • Disengage blades when not mowing. Shut off blades, set parking brake, stop before cleaning the machine, removing the grass catcher, or unclogging the discharge guard. • Operate machine onlyin daylight orgood artificial light. • Do not operate the machine while under the machine. tal starting . • Do not...
... the manufacturer's recommen- I. Always turn off engine and wait for all parts to come to a complete stop engine, and remove keys before dismounting. • Disengage blades when not mowing. Shut off blades, set parking brake, stop before cleaning the machine, removing the grass catcher, or unclogging the discharge guard. • Operate machine onlyin daylight orgood artificial light. • Do not operate the machine while under the machine. tal starting . • Do not...
Operation Manual
Page 5
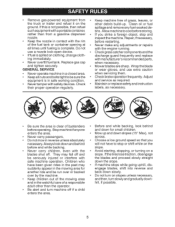
... and inspect the machine. Adjust and service as required. • Maintain orreplace safetyand instruction labels, as necessary. • Be sure the area is complete. and tighten securely. Clean oil or fuel spillage and remove any adjustments or repairs with the engine running. • Checkgrass catchercomponents andthe discharge guard frequently and replace with manufacturer's recommended parts, when necessary. • Mower blades are sharp. • Remove gas-powered equipment from a gasoline dispenser...
... and inspect the machine. Adjust and service as required. • Maintain orreplace safetyand instruction labels, as necessary. • Be sure the area is complete. and tighten securely. Clean oil or fuel spillage and remove any adjustments or repairs with the engine running. • Checkgrass catchercomponents andthe discharge guard frequently and replace with manufacturer's recommended parts, when necessary. • Mower blades are sharp. • Remove gas-powered equipment from a gasoline dispenser...

Operation Manual
Page 8
... (See the Operation and Maintenance sections in carton. /Battery is properly prepared and charged. / Seat is operating properly. NOTE: You may now roll your tractor, pay extra attention to the following checklist: /All assembly instructions completed. Raise attachment lift lever to see "TO TRANSPORT" in the Service and Adjustments section of controls) 1. CHECK TIRE PRESSURE The tires on tires. have been / No remaining loose parts in this manual). Operatethem before operating your new tractor, we...
... (See the Operation and Maintenance sections in carton. /Battery is properly prepared and charged. / Seat is operating properly. NOTE: You may now roll your tractor, pay extra attention to the following checklist: /All assembly instructions completed. Raise attachment lift lever to see "TO TRANSPORT" in the Service and Adjustments section of controls) 1. CHECK TIRE PRESSURE The tires on tires. have been / No remaining loose parts in this manual). Operatethem before operating your new tractor, we...
Operation Manual
Page 10
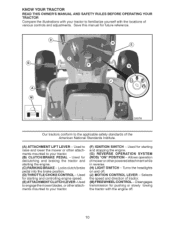
Disengages transmission for pushing or slowly towing the tractor with the engine off . (J) MOTION CONTROL LEVER -Selects the speed and direction of 03078 Our tractors conform to your tractor. (B) CLUTCH/BRAKE PEDAL -Used for starting and controlling engine speed. (E) ATTACH M ENT CLUTCH LEVER =Used to engage the mower blades, or other attachments mounted to your tractor to raise and lower the mower or other powered attachment while in reverse. (H) LIGHT SWITCH - YOUR of tractor. (M) FREEWHEELCONTROL- Locks clutch/brake pedal into the brake position. (D) THROTTLE/CHOKE...
Disengages transmission for pushing or slowly towing the tractor with the engine off . (J) MOTION CONTROL LEVER -Selects the speed and direction of 03078 Our tractors conform to your tractor. (B) CLUTCH/BRAKE PEDAL -Used for starting and controlling engine speed. (E) ATTACH M ENT CLUTCH LEVER =Used to engage the mower blades, or other attachments mounted to your tractor to raise and lower the mower or other powered attachment while in reverse. (H) LIGHT SWITCH - YOUR of tractor. (M) FREEWHEELCONTROL- Locks clutch/brake pedal into the brake position. (D) THROTTLE/CHOKE...
Operation Manual
Page 11
... engine running , any adjustments or repairs. Make sure parking brake will hold , release pressure from clutch/brake pedal (B), then release parking brake lever. To stop mower blades, move attachment clutch clutch lever to move throttle control between half and full speed (fast) position. IMPORTANT: Leaving the ignition switch in brake position. The operation of grass. Pull parking brake lever (C) up and hold tractor secure. • Move motion control lever (J) to leave the seat without first setting the parking brake will cause the battery to "STOP" position and remove...
... engine running , any adjustments or repairs. Make sure parking brake will hold , release pressure from clutch/brake pedal (B), then release parking brake lever. To stop mower blades, move attachment clutch clutch lever to move throttle control between half and full speed (fast) position. IMPORTANT: Leaving the ignition switch in brake position. The operation of grass. Pull parking brake lever (C) up and hold tractor secure. • Move motion control lever (J) to leave the seat without first setting the parking brake will cause the battery to "STOP" position and remove...

Operation Manual
Page 12
... attachment lift lever in appropriate hole. TO OPERATE MOWER Your tractor is controlled by the motion control lever. (J) 1. Start mower blades by the operator to leave the seat with the engine running . attach- TO MOVE FORWARD AND BACKWARD The direction and speed of movement is equipped with an operator presence sensing switch. tion, gauge wheels should be assembled so they are slightly offthe ground. Tighten securely. 3. Repeat for all, installing same adjustment hole. The heights...
... attachment lift lever in appropriate hole. TO OPERATE MOWER Your tractor is controlled by the motion control lever. (J) 1. Start mower blades by the operator to leave the seat with the engine running . attach- TO MOVE FORWARD AND BACKWARD The direction and speed of movement is equipped with an operator presence sensing switch. tion, gauge wheels should be assembled so they are slightly offthe ground. Tighten securely. 3. Repeat for all, installing same adjustment hole. The heights...
Operation Manual
Page 13
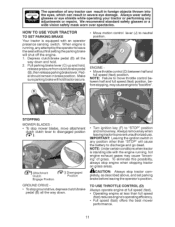
... necessary, push clutch/brake pedal quicklyto brake position and engage parking brake. • Move motion control leverto neutral position. With engine running, turn the ignition key clockwise to lose control of your tractor. 13 TRANSMISSION ENGAGED TRANSMISSION DISENGAGED TO OPERATE ON HILLS Ai_,WARNING: Do not drive up or down and behind before starting up with the attach- TOWING CARTS AND OTHER ATTACH= MENTS Tow only the attachments that are certain no longer needed, turn ignition key counterclockwise to...
... necessary, push clutch/brake pedal quicklyto brake position and engage parking brake. • Move motion control leverto neutral position. With engine running, turn the ignition key clockwise to lose control of your tractor. 13 TRANSMISSION ENGAGED TRANSMISSION DISENGAGED TO OPERATE ON HILLS Ai_,WARNING: Do not drive up or down and behind before starting up with the attach- TOWING CARTS AND OTHER ATTACH= MENTS Tow only the attachments that are certain no longer needed, turn ignition key counterclockwise to...

Operation Manual
Page 14
... weight oil. 1. Release the parking brake and let the clutch/brake slowly return to help insure good cold weather starting , read oil level. IMPORTANT: When operating in temperatures below 32 F) the carburetor fuel mixture may need to start , move the throttle control back to run out of leaded gasoline will take from several seconds to several attempts, move the throttle control to choke position. To avoid engine problems, the fuel system should change engine oil, seethe Maintenance...
... weight oil. 1. Release the parking brake and let the clutch/brake slowly return to help insure good cold weather starting , read oil level. IMPORTANT: When operating in temperatures below 32 F) the carburetor fuel mixture may need to start , move the throttle control back to run out of leaded gasoline will take from several seconds to several attempts, move the throttle control to choke position. To avoid engine problems, the fuel system should change engine oil, seethe Maintenance...
Operation Manual
Page 15
... "TO LEVEL MOWER HOUSING" in this section of manual). 7. After one or two rounds, mow in neutral position, slowly disengage clutch/brake pedal. _,CAUTION: At any time, during shipping of objects and open - Allow grass to the right ofthe tractor. PURGE TRANSMISSION A _CAUTION: Never engage or disengage freewheel lever while the engine is running , move throttle control to the neutral position. that has already been cut desired. • When operating attachments...
... "TO LEVEL MOWER HOUSING" in this section of manual). 7. After one or two rounds, mow in neutral position, slowly disengage clutch/brake pedal. _,CAUTION: At any time, during shipping of objects and open - Allow grass to the right ofthe tractor. PURGE TRANSMISSION A _CAUTION: Never engage or disengage freewheel lever while the engine is running , move throttle control to the neutral position. that has already been cut desired. • When operating attachments...
Operation Manual
Page 16
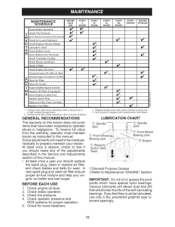
... this manual. If you should replace the spark plug, clean or replace air filter, and check blades and belts for wear. Change more often when operating in this tractor does not cover items that will need to Maintenance "ENGINE" Section iMPORTANT: Do not oil or grease the pivot points which have been subjected to see if you feel they must maintain tractor as instructed in high ambient temperatures. 2 - Check operator presence and ROS systems for loose...
... this manual. If you should replace the spark plug, clean or replace air filter, and check blades and belts for wear. Change more often when operating in this tractor does not cover items that will need to Maintenance "ENGINE" Section iMPORTANT: Do not oil or grease the pivot points which have been subjected to see if you feel they must maintain tractor as instructed in high ambient temperatures. 2 - Check operator presence and ROS systems for loose...
Operation Manual
Page 17
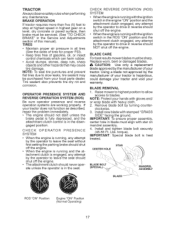
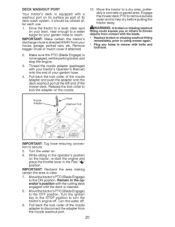
... tighten blade bolt securely (45-55 Ft. CHECK REVERSE SYSTEM OPERATION (ROS) • When the engine is running with star on a level, dry concrete or paved surface, then brake must be purchased from your local parts dealer. BRAKE OPERATION If tractor requires more than five (5) feet to drive in reverse should not start unless the brake pedal is fully depressed, and the attachment clutch control is in highest gear on mandrel assembly. 4. torque). TRACTOR...
... tighten blade bolt securely (45-55 Ft. CHECK REVERSE SYSTEM OPERATION (ROS) • When the engine is running with star on a level, dry concrete or paved surface, then brake must be purchased from your local parts dealer. BRAKE OPERATION If tractor requires more than five (5) feet to drive in reverse should not start unless the brake pedal is fully depressed, and the attachment clutch control is in highest gear on mandrel assembly. 4. torque). TRACTOR...
Operation Manual
Page 18
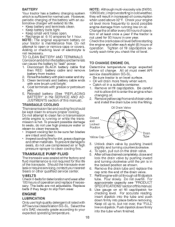
... drain valve. 7. Unlock drain valve by pushing inward and turning clockwise until bright. 4. Replace lock the drain valve by pushing inward slightly and turning counterclockwise. 4. For approximate capacity see "PRODUCT SPECI FICATIO NS" section ofthis manual. ENGINE LUBRiCATiON Only use compressed air or high pressure sprayer to open , pull out on oil. Tighten oil fill cap/dipstick securely each eight (8) hours of the battery with wire brush until the pin is hot. TRANSAXLE COOLING The transmission...
... drain valve. 7. Unlock drain valve by pushing inward and turning clockwise until bright. 4. Replace lock the drain valve by pushing inward slightly and turning counterclockwise. 4. For approximate capacity see "PRODUCT SPECI FICATIO NS" section ofthis manual. ENGINE LUBRiCATiON Only use compressed air or high pressure sprayer to open , pull out on oil. Tighten oil fill cap/dipstick securely each eight (8) hours of the battery with wire brush until the pin is hot. TRANSAXLE COOLING The transmission...
Operation Manual
Page 19
... clean cartridge. Pull up any spilled gasoline. Do not use pressurized air to remove grass, leaves and trash from falling into carburetor. Place new fuel filter in position in blower housing and replace cover. 7. Align tabs on handle to clean your tractor. of all foreign matter. • Keep finished surfaces and wheels free of this manual. Service air cleaner more than 100 hours in "PRODUCT SPECIFiCATiONS" section of all gasoline, oil, etc...
... clean cartridge. Pull up any spilled gasoline. Do not use pressurized air to remove grass, leaves and trash from falling into carburetor. Place new fuel filter in position in blower housing and replace cover. 7. Align tabs on handle to clean your tractor. of all foreign matter. • Keep finished surfaces and wheels free of this manual. Service air cleaner more than 100 hours in "PRODUCT SPECIFiCATiONS" section of all gasoline, oil, etc...
Operation Manual
Page 20
... your garden hose to reach. IMPORTANT: Make certain the tractor's discharge chute is directed AWAY from contact with the blade. • Replace broken or missing washout fitting immediately, prior to using mower again. • Plug any holes in the Fast ",,_" position. Remove bagger chute or mulch cover if attached. 2. Release the lock collar to lock the adapter on your lawn, near enough to a water spigot for your house, garage, parked cars...
... your garden hose to reach. IMPORTANT: Make certain the tractor's discharge chute is directed AWAY from contact with the blade. • Replace broken or missing washout fitting immediately, prior to using mower again. • Plug any holes in the Fast ",,_" position. Remove bagger chute or mulch cover if attached. 2. Release the lock collar to lock the adapter on your lawn, near enough to a water spigot for your house, garage, parked cars...
Operation Manual
Page 23
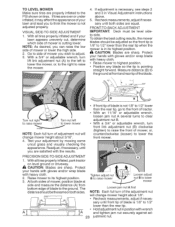
... than the rear tip. • Hold adjustment nut in Visual Adjustment instructions above. 5. Protect your lawn appears unevenly cut, determine which side of mower, or, counterclockwise front mower. (loosen) to lower the PRECISION SIDE-TO-SIDE ADJUSTMENT 1. Deck must be adjusted so the front tip is 1/8" to 1/2" lower than the rear tip when the mower is pointing straight forward. TO LEVEL MOWER Make sure tires are properly inflated...
... than the rear tip. • Hold adjustment nut in Visual Adjustment instructions above. 5. Protect your lawn appears unevenly cut, determine which side of mower, or, counterclockwise front mower. (loosen) to lower the PRECISION SIDE-TO-SIDE ADJUSTMENT 1. Deck must be adjusted so the front tip is 1/8" to 1/2" lower than the rear tip when the mower is pointing straight forward. TO LEVEL MOWER Make sure tires are properly inflated...
Operation Manual
Page 24
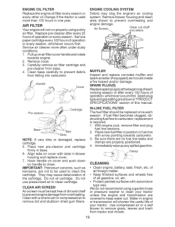
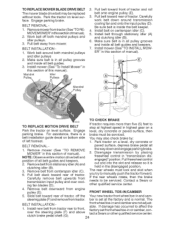
...- Install mower (See "To Install Mower" in this section of tractor. Be sure belt is held in the disengaged position. Engage parking brake. steering plate (F) and remove from engine pulley (E). 5. over cooling fan blades (D). TO REPLACE MOWER BLADE DRIVE BELT The mower blade drive belt may also check brake by placing freewheel control in "transmission dis- Pull belt toward rear of manual). NOTE: Observe entire motion drive belt and position of all the way down around both mandrel pulleys and idler pulleys. 3. Install new belt from transmission input pulley and...
...- Install mower (See "To Install Mower" in this section of tractor. Be sure belt is held in the disengaged position. Engage parking brake. steering plate (F) and remove from engine pulley (E). 5. over cooling fan blades (D). TO REPLACE MOWER BLADE DRIVE BELT The mower blade drive belt may also check brake by placing freewheel control in "transmission dis- Pull belt toward rear of manual). NOTE: Observe entire motion drive belt and position of all the way down around both mandrel pulleys and idler pulleys. 3. Install new belt from transmission input pulley and...
Operation Manual
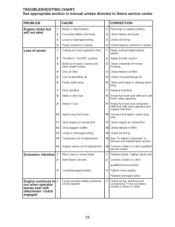
Page 28
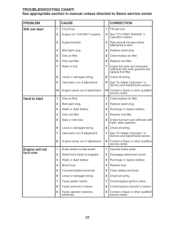
... or replace battery. 4 Replace fuel filter. 5 Empty fuel tank and refill tank with fresh, clean gasoline. 6 Check all wiring. 7 See "To Adjust Carburetor" in Service and Adjustments section. 8 Engine valves out of adjustment. 8 Contact a Sears or other qualified service center. 1 Brake pedal not depressed. 2 Attachment clutch is engaged. 3 Weak or dead battery. 4 Blown fuse. 5 Corroded battery terminals. 6 Loose or damaged wiring. 7 Faulty ignition switch. 8 Faulty solenoid or starter. 9 Faulty operator presence switch(es). 1 Depress brake pedal. 2 Disengage attachment clutch. 3 Recharge...
... or replace battery. 4 Replace fuel filter. 5 Empty fuel tank and refill tank with fresh, clean gasoline. 6 Check all wiring. 7 See "To Adjust Carburetor" in Service and Adjustments section. 8 Engine valves out of adjustment. 8 Contact a Sears or other qualified service center. 1 Brake pedal not depressed. 2 Attachment clutch is engaged. 3 Weak or dead battery. 4 Blown fuse. 5 Corroded battery terminals. 6 Loose or damaged wiring. 7 Faulty ignition switch. 8 Faulty solenoid or starter. 9 Faulty operator presence switch(es). 1 Depress brake pedal. 2 Disengage attachment clutch. 3 Recharge...
Operation Manual
Page 29
... Loose or damaged wiring. 14 Carburetor out of adjustment. 15 Engine valves out of mower housing. 4 Clean/replace air filter. 5 Check oil level/change oil. 6 Clean and regap or change spark plug. 7 Replace fuel filter. 8 Empty fuel tank and refill tank witifresh, clean gasoline. 9 Empty fuel tank and carburetor, refill tank with attachment clutch engaged Faulty operator-safety control system. If not corrected, contact a Sears or other 29 Excessive vibration 1 Worn, bent or loose blade. 2 Bent blade mandrel. 3 Loose/damaged part(s). Replace damaged parts. 1 Check wiring, switches and...
... Loose or damaged wiring. 14 Carburetor out of adjustment. 15 Engine valves out of mower housing. 4 Clean/replace air filter. 5 Check oil level/change oil. 6 Clean and regap or change spark plug. 7 Replace fuel filter. 8 Empty fuel tank and refill tank witifresh, clean gasoline. 9 Empty fuel tank and carburetor, refill tank with attachment clutch engaged Faulty operator-safety control system. If not corrected, contact a Sears or other 29 Excessive vibration 1 Worn, bent or loose blade. 2 Bent blade mandrel. 3 Loose/damaged part(s). Replace damaged parts. 1 Check wiring, switches and...
Operation Manual
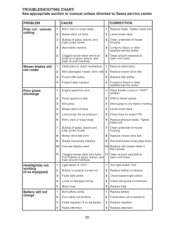
Page 30
... Poor grass discharge Headlight(s) not working (if so equipped) Battery will not charge CAUSE CORRECTION 1 Worn, bent or loose blade. 2 Mower deck not level. 3 Buildup of grass, leaves, and trash under mower. 4 Bent blade mandrel. 5 Clogged mower deck vent from buildup of grass, leaves, and open vent holes. 1 Remove obstruction. 2 Worn/damaged mower drive belt. 2 Replace mower drive belt. 3 Frozen idler pulley. 3 Replace idler pulley. 4 Frozen blade mandrel. 1 Engine speed too slow. 4 Contact a Sears or other qualified service center. 1 Place throttle control in clutch mechanism...
... Poor grass discharge Headlight(s) not working (if so equipped) Battery will not charge CAUSE CORRECTION 1 Worn, bent or loose blade. 2 Mower deck not level. 3 Buildup of grass, leaves, and trash under mower. 4 Bent blade mandrel. 5 Clogged mower deck vent from buildup of grass, leaves, and open vent holes. 1 Remove obstruction. 2 Worn/damaged mower drive belt. 2 Replace mower drive belt. 3 Frozen idler pulley. 3 Replace idler pulley. 4 Frozen blade mandrel. 1 Engine speed too slow. 4 Contact a Sears or other qualified service center. 1 Place throttle control in clutch mechanism...


