
Operation Manual
Page 3
... or storing the machine. Too heavy of bystanders before turning. • Never leave a running machine unattended. Material may lose control of the tractor. _IbWARNING: Tow only the attachments that operators, age 60 years and above, are recommended by the blades. • Be sure the area...free of grass, leaves or other debris which can cause build-up and thrown by and comply with specifications of the manufacturer of your tractor. _WARNING: Engine exhaust, some of California to plow leaves or other debris build-up , transporting, adjusting or making repairs, always ...
... or storing the machine. Too heavy of bystanders before turning. • Never leave a running machine unattended. Material may lose control of the tractor. _IbWARNING: Tow only the attachments that operators, age 60 years and above, are recommended by the blades. • Be sure the area...free of grass, leaves or other debris which can cause build-up and thrown by and comply with specifications of the manufacturer of your tractor. _WARNING: Engine exhaust, some of California to plow leaves or other debris build-up , transporting, adjusting or making repairs, always ...
Operation Manual
Page 6
...repair this manual. Some limitations and exclusions apply. But like all covered repairs. nance" and "Storage" sections of dependable operation. Purchase your tractor properly. For prices and additional call 1-800-4-MY-HOME® 6 Gasoline Capacity and Type: Oil Type (API-SG-SL): Oil Capacity:...on or near any unimproved forest-covered, brush-covered or grass-covered land unless the engine's exhaust system is re- Your new Craftsman® product is equipped with a spark arrester meeting applicable local or state laws (if any problem you the best possible dependability and...
...repair this manual. Some limitations and exclusions apply. But like all covered repairs. nance" and "Storage" sections of dependable operation. Purchase your tractor properly. For prices and additional call 1-800-4-MY-HOME® 6 Gasoline Capacity and Type: Oil Type (API-SG-SL): Oil Capacity:...on or near any unimproved forest-covered, brush-covered or grass-covered land unless the engine's exhaust system is re- Your new Craftsman® product is equipped with a spark arrester meeting applicable local or state laws (if any problem you the best possible dependability and...

Operation Manual
Page 8
... and lay side panels flat. 2. IMPORTANT: Check for assembly of steering boot over tab slots in skid that may puncture tires where tractor is mentioned in the operating position (seated behind the steering wheel). Assemble large flat washer, 5/16 lock washer, 5/16 hex bolt ... wheel so cross bars are horizontal (left HSerxtBolt Lock Washer _1_Large Flat Washer @ Steering Wheel Steering _S B°°t BEFORE REMOVING TRACTOR FROM SKiD ATTACH STEERING WHEEL ASSEMBLE EXTENSION SHAFT AND BOOT 1. Remove protective materials from your point of those parts left to roll off...
... and lay side panels flat. 2. IMPORTANT: Check for assembly of steering boot over tab slots in skid that may puncture tires where tractor is mentioned in the operating position (seated behind the steering wheel). Assemble large flat washer, 5/16 lock washer, 5/16 hex bolt ... wheel so cross bars are horizontal (left HSerxtBolt Lock Washer _1_Large Flat Washer @ Steering Wheel Steering _S B°°t BEFORE REMOVING TRACTOR FROM SKiD ATTACH STEERING WHEEL ASSEMBLE EXTENSION SHAFT AND BOOT 1. Remove protective materials from your point of those parts left to roll off...
Operation Manual
Page 9
... 4. Press clutch/brake pedal all instructions in a well-ventilated area. CHECK BATTERY 1. Correct tire pressure is important for location and function of tractor is not comfortable, adjust seat. CHECK DECK LEVELNESS For best cutting results, mower housing should be properly leveled. Raise seat and tighten bolt securely... sit on seat pan so all the way down . To adjust seat: Grasp adjustment handle and pull up, slide seat to remove the tractor from the skid. _L, WARNING: Before starting, read, understand and follow all the way down . 3. Follow the appropriate instruction below to...
... 4. Press clutch/brake pedal all instructions in a well-ventilated area. CHECK BATTERY 1. Correct tire pressure is important for location and function of tractor is not comfortable, adjust seat. CHECK DECK LEVELNESS For best cutting results, mower housing should be properly leveled. Raise seat and tighten bolt securely... sit on seat pan so all the way down . To adjust seat: Grasp adjustment handle and pull up, slide seat to remove the tractor from the skid. _L, WARNING: Before starting, read, understand and follow all the way down . 3. Follow the appropriate instruction below to...
Operation Manual
Page 10
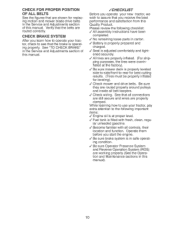
... attention to the following checklist: V" All assembly instructions have been completed. Operate them before you learn how to operate your new tractor, we wish to -rear for best cutting results. (Tires must be properly inflated for replacing motion and mower blade drive belts in...controls, their location and function. V" Seat is properly prepared and charged. V" Fuel tank is in this manual. ,/CHECKLIST Before you operate your tractor, check to see that the brake is properly leveled side-to-side/front-to assure that the belts are routed correctly. V" No remaining loose ...
... attention to the following checklist: V" All assembly instructions have been completed. Operate them before you learn how to operate your new tractor, we wish to -rear for best cutting results. (Tires must be properly inflated for replacing motion and mower blade drive belts in...controls, their location and function. V" Seat is properly prepared and charged. V" Fuel tank is in this manual. ,/CHECKLIST Before you operate your tractor, check to see that the brake is properly leveled side-to-side/front-to assure that the belts are routed correctly. V" No remaining loose ...

Operation Manual
Page 11
...DANGER, KEEP HANDS AND FEET AWAY KEEP AREA CLEAR SLOPE HAZARDS (SEE SAFETY RULES SECTION) FREE WHEEL (Automatic Models only) Failure to the tractor and/or engine. CAUTION indicates a hazard which , if not avoided could result in death or serious injury. The safety alert symbol is used... could result in damage to follow instructions could result in death, serious injury and/or property damage. 11 These symbols may appear on your tractor or in serious injury or death. WARNING indicates a hazard which , if not avoided might result in death, serious injury and/or property ...
...DANGER, KEEP HANDS AND FEET AWAY KEEP AREA CLEAR SLOPE HAZARDS (SEE SAFETY RULES SECTION) FREE WHEEL (Automatic Models only) Failure to the tractor and/or engine. CAUTION indicates a hazard which , if not avoided could result in death or serious injury. The safety alert symbol is used... could result in damage to follow instructions could result in death, serious injury and/or property damage. 11 These symbols may appear on your tractor or in serious injury or death. WARNING indicates a hazard which , if not avoided might result in death, serious injury and/or property ...
Operation Manual
Page 12
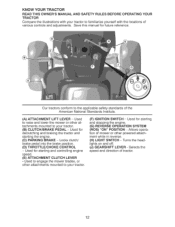
... or other powered attachment while in reverse. (H) LIGHT SWITCH - Used to raise and lower the mower or other attachments mounted to your tractor. (F) IGNITION SWITCH - Used to engage the mower blades, or other at- Save this manual for starting and stopping the engine. ... clutch/ brake pedal into the brake position. (D) THROTTLE/CHOKE CONTROL - KNOW YOUR TRACTOR READ THIS OWNER'S MANUAL AND SAFETY RULES BEFORE OPERATING YOUR TRACTOR Compare the illustrations with your tractor to familiarize yourself with the locations of the American National Standards Institute. (A) ATTACHMENT LIFT...
... or other powered attachment while in reverse. (H) LIGHT SWITCH - Used to raise and lower the mower or other attachments mounted to your tractor. (F) IGNITION SWITCH - Used to engage the mower blades, or other at- Save this manual for starting and stopping the engine. ... clutch/ brake pedal into the brake position. (D) THROTTLE/CHOKE CONTROL - KNOW YOUR TRACTOR READ THIS OWNER'S MANUAL AND SAFETY RULES BEFORE OPERATING YOUR TRACTOR Compare the illustrations with your tractor to familiarize yourself with the locations of the American National Standards Institute. (A) ATTACHMENT LIFT...
Operation Manual
Page 13
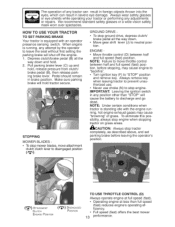
...first setting the parking brake will hold , release pressure from clutch/ brake pedal (B), then release parking brake lever. Always remove key when leaving tractor to prevent unauthorized use. • Never use choke (N) to neutral position. STOPPING MOWER BLADES • To stop engine. IMPORTANT: Leaving the... and hold. 2. Pedal should remain in severe eye damage. Always wear safety glasses or eye shields while operating your tractor or performing any tractor can result in foreign objects thrown into the eyes, which can result in brake position. NOTE: Under certain conditions when...
...first setting the parking brake will hold , release pressure from clutch/ brake pedal (B), then release parking brake lever. Always remove key when leaving tractor to prevent unauthorized use. • Never use choke (N) to neutral position. STOPPING MOWER BLADES • To stop engine. IMPORTANT: Leaving the... and hold. 2. Pedal should remain in severe eye damage. Always wear safety glasses or eye shields while operating your tractor or performing any tractor can result in foreign objects thrown into the eyes, which can result in brake position. NOTE: Under certain conditions when...
Operation Manual
Page 14
...approximate and may vary depending upon soil conditions, height of grass and types of grass being mowed. • The average lawn should be 14 Start tractor with an operator presence sensing switch. the second to start movement. Repeat for all, installing gauge wheel in desired cutting ... depressed and gearshift lever in appropriate hole. TO STOP MOWER BLADES disengage attachment clutch control. _I, CAUTION: Do not operate the mower lawns, mow often and after moderate without either the entire grass catcher, growth. • For best cutting performance, grass on mowers so ...
...approximate and may vary depending upon soil conditions, height of grass and types of grass being mowed. • The average lawn should be 14 Start tractor with an operator presence sensing switch. the second to start movement. Repeat for all, installing gauge wheel in desired cutting ... depressed and gearshift lever in appropriate hole. TO STOP MOWER BLADES disengage attachment clutch control. _I, CAUTION: Do not operate the mower lawns, mow often and after moderate without either the entire grass catcher, growth. • For best cutting performance, grass on mowers so ...
Operation Manual
Page 15
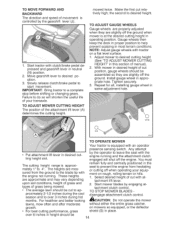
... of this manual. • Choose the slowest speed before and while backing. 4. To service engine and mower, see the Maintenance section of your tractor. Do not mow in the "STOP" position when engine is not running , turn the ignition key clockwise to engine "ON" position. USING THE... is closed and secured to 1st gear. TO TRANSPORT • Raise attachment lift lever to its highest. • When pushing or towing your tractor on hills. • If stopping is absolutely necessary, push clutch/brake pedal quickly to brake position and engage parking brake. • Move gearshift...
... of this manual. • Choose the slowest speed before and while backing. 4. To service engine and mower, see the Maintenance section of your tractor. Do not mow in the "STOP" position when engine is not running , turn the ignition key clockwise to engine "ON" position. USING THE... is closed and secured to 1st gear. TO TRANSPORT • Raise attachment lift lever to its highest. • When pushing or towing your tractor on hills. • If stopping is absolutely necessary, push clutch/brake pedal quickly to brake position and engage parking brake. • Move gearshift...
Operation Manual
Page 16
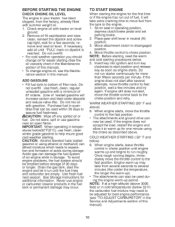
... 16 insert key into ignition and turn key clockwise to the fast position. BEFORE STARTING THE ENGINE CHECK ENGINE OiL LEVEL The engine in your tractor has been shipped, from the factory, already filled with gasoline. WARM WEATHER STARTING (50 ° F and above . When engine starts, move... (Use of fuel, it run roughly. Never use engine or carburetor cleaner products in storage. Use fresh, clean, regular unleaded gasoline with tractor on dipstick is reached. Do not run out of leaded gasoline will take from the tank to choke position. When engine starts, leave throttle...
... 16 insert key into ignition and turn key clockwise to the fast position. BEFORE STARTING THE ENGINE CHECK ENGINE OiL LEVEL The engine in your tractor has been shipped, from the factory, already filled with gasoline. WARM WEATHER STARTING (50 ° F and above . When engine starts, move... (Use of fuel, it run roughly. Never use engine or carburetor cleaner products in storage. Use fresh, clean, regular unleaded gasoline with tractor on dipstick is reached. Do not run out of leaded gasoline will take from the tank to choke position. When engine starts, leave throttle...
Operation Manual
Page 17
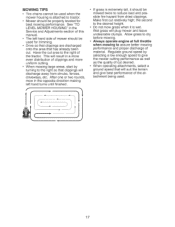
... best performance of the attachment being used when the mower housing is attached to assure better mowing performance and proper discharge of the tractor. Wet grass will suit the terrain and give the mower cutting performance as well as the quality of mower should be used for...performance. f ]= • If grass is wet. Allow grass to dry before mowing. • Always operate engine at full throttle when mowing to tractor. • Mower should be mowed twice to the right of material. This will discharge away from dried clippings. Regulate ground speed by turning to ...
... best performance of the attachment being used when the mower housing is attached to assure better mowing performance and proper discharge of the tractor. Wet grass will suit the terrain and give the mower cutting performance as well as the quality of mower should be used for...performance. f ]= • If grass is wet. Allow grass to dry before mowing. • Always operate engine at full throttle when mowing to tractor. • Mower should be mowed twice to the right of material. This will discharge away from dried clippings. Regulate ground speed by turning to ...
Operation Manual
Page 18
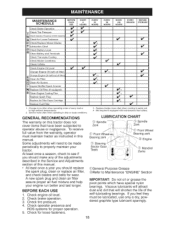
...warranty, operator must be made periodically to Maintenance "ENGINE" Section A new spark plug and clean air filter assure proper air-fuel mixture and help your tractor. Fi!ter (if equipped) E Clean Engine Cooling Fins Replace Spark Plug Replace Air Filter Paper Cartridge BEFORE EUASCEH _ _ _ _ EVERY HOU8RS ,...lubricants will attract dust and dirt that have special nylon bearings. Service more often when operating under a heavy load or in this tractor does not cover items that will need to be lubricated, use only a dry, powdered graphite type lubricant sparingly. 18 Check ...
...warranty, operator must be made periodically to Maintenance "ENGINE" Section A new spark plug and clean air filter assure proper air-fuel mixture and help your tractor. Fi!ter (if equipped) E Clean Engine Cooling Fins Replace Spark Plug Replace Air Filter Paper Cartridge BEFORE EUASCEH _ _ _ _ EVERY HOU8RS ,...lubricants will attract dust and dirt that have special nylon bearings. Service more often when operating under a heavy load or in this tractor does not cover items that will need to be lubricated, use only a dry, powdered graphite type lubricant sparingly. 18 Check ...
Operation Manual
Page 19
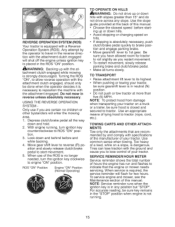
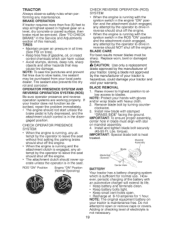
... torque). How- TIRES • Maintain proper air pressure in all tires (See PSI on tires). • Keep tires free of your tractor is running with the ignition switch in reverse should NOT shut off the engine. • The attachment clutch should shut off the engine. ...OPERATOR PRESENCE SYSTEM AND REVERSE OPERATION SYSTEM (ROS) Be sure operator presence and reverse operation systems are working properly. NOTE: Protect your tractor is sufficient for 1 hour. Special blade bolt is heat Mandrel Assembly • When the engine is running , any attempt by the ...
... torque). How- TIRES • Maintain proper air pressure in all tires (See PSI on tires). • Keep tires free of your tractor is running with the ignition switch in reverse should NOT shut off the engine. • The attachment clutch should shut off the engine. ...OPERATOR PRESENCE SYSTEM AND REVERSE OPERATION SYSTEM (ROS) Be sure operator presence and reverse operation systems are working properly. NOTE: Protect your tractor is sufficient for 1 hour. Special blade bolt is heat Mandrel Assembly • When the engine is running , any attempt by the ...
Operation Manual
Page 20
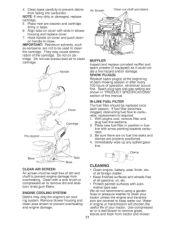
...8. Keep oil up on air filter cover handle and rotate towards engine. 2. Check the crankcase oil level before oil change if the tractor is not used for deterioration and wear 3. Tighten oil fill cap/ dipstick securely each eight (8) hours of this manual. Replace pre...more freely when warm. • Catch oil in one year. UCT SPECIFICATIONS" section of operation or at least once a year if the tractor is used above 32°R Check your expected operating temperature. Remove cover. 3. TRANSAXLE COOLING Keep transaxle free from running low on oil. ...
...8. Keep oil up on air filter cover handle and rotate towards engine. 2. Check the crankcase oil level before oil change if the tractor is not used for deterioration and wear 3. Tighten oil fill cap/ dipstick securely each eight (8) hours of this manual. Replace pre...more freely when warm. • Catch oil in one year. UCT SPECIFICATIONS" section of operation or at least once a year if the tractor is used above 32°R Check your expected operating temperature. Remove cover. 3. TRANSAXLE COOLING Keep transaxle free from running low on oil. ...
Operation Manual
Page 21
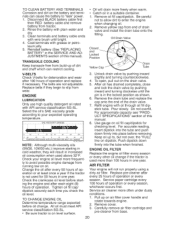
... area shown to carburetor, replacement is required. 1. Do not oil cartridge. SPARK PLUG(S) Replace spark plug(s) at the beginning of your tractor unless the engine and transmission are not to clean the cartridge. If fuel filter becomes clogged, obstructing fuel flow to prevent overheating and engine... and replace cover. 7. We do not recommend using a garden hose or pressure washer to prevent debris from tractor and mower. 21 Clean base carefully to clean your tractor. Place new pre-cleaner and cartridge firmly in fuel line with automotive type wax. They may clog the engine...
... area shown to carburetor, replacement is required. 1. Do not oil cartridge. SPARK PLUG(S) Replace spark plug(s) at the beginning of your tractor unless the engine and transmission are not to clean the cartridge. If fuel filter becomes clogged, obstructing fuel flow to prevent overheating and engine... and replace cover. 7. We do not recommend using a garden hose or pressure washer to prevent debris from tractor and mower. 21 Clean base carefully to clean your tractor. Place new pre-cleaner and cartridge firmly in fuel line with automotive type wax. They may clog the engine...

Operation Manual
Page 22
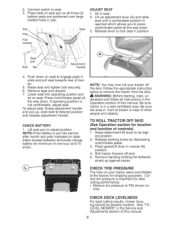
...its lowest position. 3. IMPORTANT: If an attachment other side of the lever. 9. WViCAERNOIRNGAD: JTUOSTAMVENOTISD: SERIOUS iNJURY, BEFORE PERFORMING ANY SER- 1. TRACTOR TO REMOVE MOWER 1. connected, the attachment lift lever will be mounted on lift lever, lower it slowly and engage in "DISENGAGED" position. ...4. Have a tight grip on level surface and engage parking brake, 1. Lower attachment lift lever to either side of tractor. Turn ignition key to it cannot come in contact with plug. Disconnect front link (E) from idler arm (R). 6. nect mower suspension...
...its lowest position. 3. IMPORTANT: If an attachment other side of the lever. 9. WViCAERNOIRNGAD: JTUOSTAMVENOTISD: SERIOUS iNJURY, BEFORE PERFORMING ANY SER- 1. TRACTOR TO REMOVE MOWER 1. connected, the attachment lift lever will be mounted on lift lever, lower it slowly and engage in "DISENGAGED" position. ...4. Have a tight grip on level surface and engage parking brake, 1. Lower attachment lift lever to either side of tractor. Turn ignition key to it cannot come in contact with plug. Disconnect front link (E) from idler arm (R). 6. nect mower suspension...

Operation Manual
Page 23
... spring (Q) into bracket, slide collar (L) onto guide and secure with washer and retainer spring (J). % 9. Insert rod end of tractor. Hook end of tractor chassis and secure with washer and retainer spring, 6. Repeat on opposite side of link (E) into hole in idler arm (R). 23 ...ATTACH MOWER SIDE SUSPENSION ARMS (A) TO CHASSIS - Insert end of tractor. 5. ATTACH REAR LIFT LINKS (C) - Push clutch cable housing guide (P) into hole in front mower bracket (H) and secure with retainer spring (K). ...
... spring (Q) into bracket, slide collar (L) onto guide and secure with washer and retainer spring (J). % 9. Insert rod end of tractor. Hook end of tractor chassis and secure with washer and retainer spring, 6. Repeat on opposite side of link (E) into hole in idler arm (R). 23 ...ATTACH MOWER SIDE SUSPENSION ARMS (A) TO CHASSIS - Insert end of tractor. 5. ATTACH REAR LIFT LINKS (C) - Push clutch cable housing guide (P) into hole in front mower bracket (H) and secure with retainer spring (K). ...
Operation Manual
Page 24
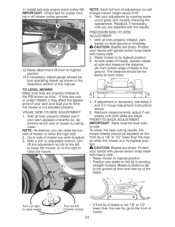
... to lower the mower, or, to the right to raise the mower. With all tires properly inflated, park tractor on tires. If adjustment is in all tires properly inflated and if your lawn appears unevenly cut, determine which side of adjustment nut will change mower height about 3/16". 4. Recheck measurements, ... is 1/8" to 1/2" lower than the rear tip, go to side of mower or lower the high side. 2. to highest position. 13. Protect your lawn and lead you wish to 1/2" lower than the rear tip when the mower is necessary, and 3 in the Operation section of the blade. Install belt...
... to lower the mower, or, to the right to raise the mower. With all tires properly inflated, park tractor on tires. If adjustment is in all tires properly inflated and if your lawn appears unevenly cut, determine which side of adjustment nut will change mower height about 3/16". 4. Recheck measurements, ... is 1/8" to 1/2" lower than the rear tip, go to side of mower or lower the high side. 2. to highest position. 13. Protect your lawn and lead you wish to 1/2" lower than the rear tip when the mower is necessary, and 3 in the Operation section of the blade. Install belt...
Operation Manual
Page 25
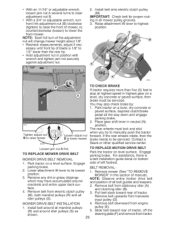
...all idler pulleys (S). Install belt around idler pulleys (S) as shown. BELT REMOVAL- 1. IMPORTANT: Check belt for proper rout- TO CHECK BRAKE If tractor requires more than the rear tip. • Hold adjustment nut in position with wrench and tighten jam nut securely against adjustment nut. 2. Place ...must lock and skid Tighten adjust nut B to raise mower Loosen adjust nut B to lower mower when you try to manually push the tractor forward. Lower attachment lift lever to stop at highest speed in neutral (N) position. MOWER DRIVE BELT INSTALLATION 1. NOTE: Each full turn front...
...all idler pulleys (S). Install belt around idler pulleys (S) as shown. BELT REMOVAL- 1. IMPORTANT: Check belt for proper rout- TO CHECK BRAKE If tractor requires more than the rear tip. • Hold adjustment nut in position with wrench and tighten jam nut securely against adjustment nut. 2. Place ...must lock and skid Tighten adjust nut B to raise mower Loosen adjust nut B to lower mower when you try to manually push the tractor forward. Lower attachment lift lever to stop at highest speed in neutral (N) position. MOWER DRIVE BELT INSTALLATION 1. NOTE: Each full turn front...


