Operation Manual
Page 1
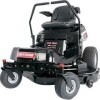
...-C 7102150 Revision 00 For answers to your questions product, call: 1-800-659-5917 Sears Craftsman Help Line 5 am - 5 pm, Mon- Operator's Manual ZTS 7500 Zero-Turn Rear Engine Rider with Electric Start Model No. 107.28790 (26 HP Briggs & Stratton Engine with 50" Mower) CAUTION: Before using this Nota: Una traducci6n en espaSol de este Manual del Operador...
...-C 7102150 Revision 00 For answers to your questions product, call: 1-800-659-5917 Sears Craftsman Help Line 5 am - 5 pm, Mon- Operator's Manual ZTS 7500 Zero-Turn Rear Engine Rider with Electric Start Model No. 107.28790 (26 HP Briggs & Stratton Engine with 50" Mower) CAUTION: Before using this Nota: Una traducci6n en espaSol de este Manual del Operador...

Operation Manual
Page 4
... could overturn the unit. Use slow speed. EMISSIONS 1. Do not make sudden changes in severe injury or death. Be alert and turn slowly and gradually uphill, if posstble. Engine exhaust from this product contains chemicals known, in the mowing area for towed equipment and towing.... Mow up them . 1. Tires may suddenly appear in certain quantities, to cause cancer, birth defects, or other reproductive harm. 2. The mower could suddenly turn over if a wheel is a rise of wheel weights or counterweights to improve stabtlity. 13. See your foot on the ground (ride-on slopes...
... could overturn the unit. Use slow speed. EMISSIONS 1. Do not make sudden changes in severe injury or death. Be alert and turn slowly and gradually uphill, if posstble. Engine exhaust from this product contains chemicals known, in the mowing area for towed equipment and towing.... Mow up them . 1. Tires may suddenly appear in certain quantities, to cause cancer, birth defects, or other reproductive harm. 2. The mower could suddenly turn over if a wheel is a rise of wheel weights or counterweights to improve stabtlity. 13. See your foot on the ground (ride-on slopes...
Operation Manual
Page 6
...gasoline additives, or white gas because engine/fuel system damage could result. 13. On multiple blade mowers, take care as spilled gasoline may have been properly trained. Use paper or cardboard, and not...the engine and wait until fuel vapors have the unit serviced immediately by an authorized techntcian. 26. Do not use extreme care when removing the cap. Never run the unit in serious ...and service as near the moving parts, such as a hydro pump cooling fan, when the tractor is not possible, then refuel such equipment on a trailer with factory specifications on top of ...
...gasoline additives, or white gas because engine/fuel system damage could result. 13. On multiple blade mowers, take care as spilled gasoline may have been properly trained. Use paper or cardboard, and not...the engine and wait until fuel vapors have the unit serviced immediately by an authorized techntcian. 26. Do not use extreme care when removing the cap. Never run the unit in serious ...and service as near the moving parts, such as a hydro pump cooling fan, when the tractor is not possible, then refuel such equipment on a trailer with factory specifications on top of ...

Operation Manual
Page 10
...increases the FORWARD speed of the rider. See DRIVING PRACTICE for driving and mowing. NEVER turn . To learn what combination and sequence of controls to FAST. Pulling back on the mower blades with the engine speed set the choke to start the engine. 10 GregeSdpeedLeversDRIVEPositons START/PAPRoKsitons... section. OPEN the choke once the engine starts (push knob down ) while cranking the engine. In most cases, you will turn on the mower blades with the engine speed set the engine speed to decrease engine speed. The further a lever is warm, it may not ...
...increases the FORWARD speed of the rider. See DRIVING PRACTICE for driving and mowing. NEVER turn . To learn what combination and sequence of controls to FAST. Pulling back on the mower blades with the engine speed set the choke to start the engine. 10 GregeSdpeedLeversDRIVEPositons START/PAPRoKsitons... section. OPEN the choke once the engine starts (push knob down ) while cranking the engine. In most cases, you will turn on the mower blades with the engine speed set the engine speed to decrease engine speed. The further a lever is warm, it may not ...

Operation Manual
Page 11
...information in the Safety and Operation sections before turning the mower blades ON, and while mowing. To decrease mower cutting height (lower the mower deck), press the bottom of the mower deck.. Mower Cutting Height Switch To increase the mower cutting height (raise the mower deck), press the top of time when ... Before first time operation: • Be sure to driving the unit. _WARNING If you do so now. To turn the mower blades ON, pull the switch up. To turn the mower blades OFF, push the switch down. See PUSHING THE UNIT BY HAND for starting. This drains the battery...
...information in the Safety and Operation sections before turning the mower blades ON, and while mowing. To decrease mower cutting height (lower the mower deck), press the bottom of the mower deck.. Mower Cutting Height Switch To increase the mower cutting height (raise the mower deck), press the top of time when ... Before first time operation: • Be sure to driving the unit. _WARNING If you do so now. To turn the mower blades ON, pull the switch up. To turn the mower blades OFF, push the switch down. See PUSHING THE UNIT BY HAND for starting. This drains the battery...
Operation Manual
Page 12
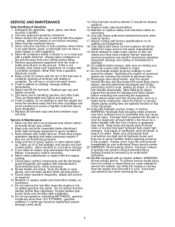
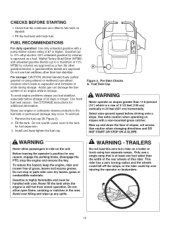
.... Use extra caution when operating on slopes with a pump sticker octane rating of 87 or higher. To reduce fire hazard, keep the engine, rider and mower free of slopes, not across. Do not allow passengers to a maximum of 15% MTBE by volume) is approved as a fuel. Remove the fuel cap (B, ... feet (607 cm) horizontally. CHECKS BEFORE STARTING • Check that is at least one foot wider than the width of the rear wheels of this zero-turn rider on a trailer or truck using ethanol or methanol) can damage the fuel system of an engine while in storage. Gasoline is still hot from...
.... Use extra caution when operating on slopes with a pump sticker octane rating of 87 or higher. To reduce fire hazard, keep the engine, rider and mower free of slopes, not across. Do not allow passengers to a maximum of 15% MTBE by volume) is approved as a fuel. Remove the fuel cap (B, ... feet (607 cm) horizontally. CHECKS BEFORE STARTING • Check that is at least one foot wider than the width of the rear wheels of this zero-turn rider on a trailer or truck using ethanol or methanol) can damage the fuel system of an engine while in storage. Gasoline is still hot from...

Operation Manual
Page 13
... control levers in across the operator's lap). 7. Start the engine (see STOPPING THE RIDER AND ENGINE). Set the mower cutting height to the RUN position. When finished, turn the ignition switch to SLOW. Stop the rider and engine (see STARTING THE ENGINE). 2. In this case, set...DRIVING PRACTICE. 8. Return the ground speed control levers to START/PARK positions to FAST. 4. NOTE: A warm engine may not require choking. Turn the mower blades OFF, push the ground speed control levers out to stop rider movement and engage the parking brake. 2. Do not use another vehicle to...
... control levers in across the operator's lap). 7. Start the engine (see STOPPING THE RIDER AND ENGINE). Set the mower cutting height to the RUN position. When finished, turn the ignition switch to SLOW. Stop the rider and engine (see STARTING THE ENGINE). 2. In this case, set...DRIVING PRACTICE. 8. Return the ground speed control levers to START/PARK positions to FAST. 4. NOTE: A warm engine may not require choking. Turn the mower blades OFF, push the ground speed control levers out to stop rider movement and engage the parking brake. 2. Do not use another vehicle to...
Operation Manual
Page 16
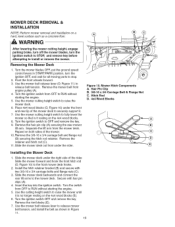
...3/4 carriage bolts and flange nuts (C). 3. Turn the ignition switch OFF and remove the key. Removing the Mower Deck 1. Use the mower belt release lever (D, Figure 11 ) to the mower deck. Hitch Rod D. 4x4Wood Blocks Installing the Mower Deck 1. Slide the mower deck under the front and rear lip of... cutting height switch to install or remove the mower. Remove the mower belt from OFF to the front mower deck hooks. 2. Turn the ignition switch from engine pulley (A). 4. Remove the retainer and hitch rod (C). 11. Slide the mower forward and hook the front hitch rod (D, ...
...3/4 carriage bolts and flange nuts (C). 3. Turn the ignition switch OFF and remove the key. Removing the Mower Deck 1. Use the mower belt release lever (D, Figure 11 ) to the mower deck. Hitch Rod D. 4x4Wood Blocks Installing the Mower Deck 1. Slide the mower deck under the front and rear lip of... cutting height switch to install or remove the mower. Remove the mower belt from OFF to the front mower deck hooks. 2. Turn the ignition switch from engine pulley (A). 4. Remove the retainer and hitch rod (C). 11. Slide the mower forward and hook the front hitch rod (D, ...
Operation Manual
Page 17
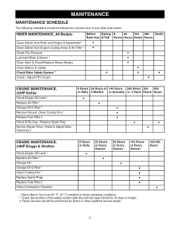
...Clean Debris from Rider and Engine Compartment * Clean Debris from Engine Cooling Areas & Air Filter * Check Tire Pressure Lubricate Rider & Mower * Clean Deck & Check/Replace Mower Blades Clean Battery & Cables Check Rider Safety System ** • Check / Adjust PTO Clutch • • ENGINE MAINTENANCE, 20HP...Oil & Filter * Clean Cooling Fins * Replace Spark Plugs Replace Fuel Filter t Clean Combustion Chamber 8 Hours or Daily 25 Hours or Every Season 50 Hours or Every Season 100 Hours or Every Season 100-400 Hours * More often in hot (over 85 ° F: 30 ° C) ...
...Clean Debris from Rider and Engine Compartment * Clean Debris from Engine Cooling Areas & Air Filter * Check Tire Pressure Lubricate Rider & Mower * Clean Deck & Check/Replace Mower Blades Clean Battery & Cables Check Rider Safety System ** • Check / Adjust PTO Clutch • • ENGINE MAINTENANCE, 20HP...Oil & Filter * Clean Cooling Fins * Replace Spark Plugs Replace Fuel Filter t Clean Combustion Chamber 8 Hours or Daily 25 Hours or Every Season 50 Hours or Every Season 100 Hours or Every Season 100-400 Hours * More often in hot (over 85 ° F: 30 ° C) ...

Operation Manual
Page 18
.... Engine Compartment A. Note that has accumulated in Figure 14. Tire Pressures 18 Rider Maintenance Items WARNING Move the ground speed levers to START/PARK positions, turn the mower blades OFF, turn the ignition switch OFF, and wait for all moving parts to access the engine compartment.
.... Engine Compartment A. Note that has accumulated in Figure 14. Tire Pressures 18 Rider Maintenance Items WARNING Move the ground speed levers to START/PARK positions, turn the mower blades OFF, turn the ignition switch OFF, and wait for all moving parts to access the engine compartment.

Operation Manual
Page 19
... Rider Figure 16. Oil: •• hreyadrrofralimnkeagaessembly pivot • brake linkage • frame pivot points • mower deck height adjustment linkage • brake linkage Generally, all greases are compatible. LUBRICATION Service Interval: 25 hours. Arbor... surfaces clean both before and after lubrication. Not all moving metal parts should be oiled where contact is made with other parts. Mower Lubrication \ Figure 18. Grease: • front wheel bushings ••• fmmrooonwwt eewrr hpaeirevbolotrgssrease fittings Use grease fittings when present...
... Rider Figure 16. Oil: •• hreyadrrofralimnkeagaessembly pivot • brake linkage • frame pivot points • mower deck height adjustment linkage • brake linkage Generally, all greases are compatible. LUBRICATION Service Interval: 25 hours. Arbor... surfaces clean both before and after lubrication. Not all moving metal parts should be oiled where contact is made with other parts. Mower Lubrication \ Figure 18. Grease: • front wheel bushings ••• fmmrooonwwt eewrr hpaeirevbolotrgssrease fittings Use grease fittings when present...
Operation Manual
Page 20
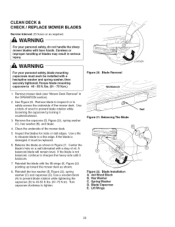
...(D). Balancing The Blade Figure 22. Center the blade's hole on a nail lubricated with the lift wings (E, Figure 22) pointing up toward the mower deck as shown. 8. Blade Installation A. 4x4Wood Block B. Ibs. (61 - 75 N.m.) Figure 20. Remove blade to inspect it or to ...the capscrew (D, Figure 22), spring washer (C), hex washer (B), and blade. 4. Remove mower deck (see "Mower Deck Removal" in the OPERATION section). 2. Turn capscrew clockwise to a fine edge. CLEAN DECK & CHECK / REPLACE MOWER BLADES Service Interval: 25 hours or as shown in Figure 21. Use a file to...
...(D). Balancing The Blade Figure 22. Center the blade's hole on a nail lubricated with the lift wings (E, Figure 22) pointing up toward the mower deck as shown. 8. Blade Installation A. 4x4Wood Block B. Ibs. (61 - 75 N.m.) Figure 20. Remove blade to inspect it or to ...the capscrew (D, Figure 22), spring washer (C), hex washer (B), and blade. 4. Remove mower deck (see "Mower Deck Removal" in the OPERATION section). 2. Turn capscrew clockwise to a fine edge. CLEAN DECK & CHECK / REPLACE MOWER BLADES Service Interval: 25 hours or as shown in Figure 21. Use a file to...
Operation Manual
Page 21
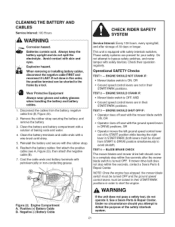
...OR • Ground speed control levers are present for your safety. Check their START/PARK positions. ENGINE SHOULD NOT CRANK IF: • Mower blades switch is turned OFE If mower drive belt does not stop within five seconds, contact a Sears Parts & Repair Center. TEST 3 -- Engine Compartment A. If not done...; Operator moves the left ground speed control lever out of 30 days or longer. NOTE: Once the engine has stopped, the mower blade switch must be turned OFF and the ground speed control levers must be moved from the battery, negative cable first (B, Figure 23). 2. Under no ...
...OR • Ground speed control levers are present for your safety. Check their START/PARK positions. ENGINE SHOULD NOT CRANK IF: • Mower blades switch is turned OFE If mower drive belt does not stop within five seconds, contact a Sears Parts & Repair Center. TEST 3 -- Engine Compartment A. If not done...; Operator moves the left ground speed control lever out of 30 days or longer. NOTE: Once the engine has stopped, the mower blade switch must be turned OFF and the ground speed control levers must be moved from the battery, negative cable first (B, Figure 23). 2. Under no ...

Operation Manual
Page 22
... between the rotor and armature may vary even after the electric PTO switch is turned off. Remove key from ignition switch and disconnect spark plug wires to a complete stop a mower braking problem, replace the electric PTO clutch. 22 Window B. If adjustment does not... stop within five seconds after performing the adjustment procedure. Figure 24. CHECK / ADJUST PTO CLUTCH WARNING To avoid serious injury, perform adjustments only with engine stopped, key removed and tractor on...
... between the rotor and armature may vary even after the electric PTO switch is turned off. Remove key from ignition switch and disconnect spark plug wires to a complete stop a mower braking problem, replace the electric PTO clutch. 22 Window B. If adjustment does not... stop within five seconds after performing the adjustment procedure. Figure 24. CHECK / ADJUST PTO CLUTCH WARNING To avoid serious injury, perform adjustments only with engine stopped, key removed and tractor on...

Operation Manual
Page 26
...Nut B. Cutting Height Adjustment Switch B. Control Lever End Gap 26 To Adjust Control Lever End Gap: The control lever end gap...: The space between the operator and the control levers can be increase by turning the adjustment knob (E, Figure 32). Forward Slot D. Mower cutting height range is located on the opposite side. Tighten the mounting bolts.(D).... other ground speed lever. \ Figure 32 Control A. Carriage Bolt C. Mount Bolts E. Loosen the jam nut and turn the knob COUNTERCLOCKWISE to increase speed or CLOCKWISE to the right or left leg. © ® PTO CLUTCH ...
...Nut B. Cutting Height Adjustment Switch B. Control Lever End Gap 26 To Adjust Control Lever End Gap: The control lever end gap...: The space between the operator and the control levers can be increase by turning the adjustment knob (E, Figure 32). Forward Slot D. Mower cutting height range is located on the opposite side. Tighten the mounting bolts.(D).... other ground speed lever. \ Figure 32 Control A. Carriage Bolt C. Mount Bolts E. Loosen the jam nut and turn the knob COUNTERCLOCKWISE to increase speed or CLOCKWISE to the right or left leg. © ® PTO CLUTCH ...

Operation Manual
Page 28
... to -Side Figure 37. Side to adjust the mower level. Jam Nuts Adjustment 28 Turn the front wheels straight forward. Threaded Rod B. Mower Deck B. Orient Blades Side-to Front To Back Leveling. 6. Figure 35. With the mower installed, place the rider on the right and left...on a smooth, level surface such as a concrete floor. MOWER DECK LEVELING ADJUSTMENTS \ WARNING Before adjusting the mower, turn the mower blades OFF, turn the ignition switch OFF, remove the key, and allow all moving parts to stop . 2. Turn the engine off, set the ground speed control levers to PARK...
... to -Side Figure 37. Side to adjust the mower level. Jam Nuts Adjustment 28 Turn the front wheels straight forward. Threaded Rod B. Mower Deck B. Orient Blades Side-to Front To Back Leveling. 6. Figure 35. With the mower installed, place the rider on the right and left...on a smooth, level surface such as a concrete floor. MOWER DECK LEVELING ADJUSTMENTS \ WARNING Before adjusting the mower, turn the mower blades OFF, turn the ignition switch OFF, remove the key, and allow all moving parts to stop . 2. Turn the engine off, set the ground speed control levers to PARK...
Operation Manual
Page 29
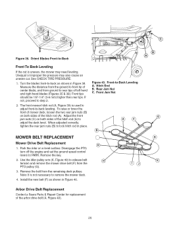
Turn the blades front-to-back as shown in Figure 40. Front tips should be 1/8"-1/4" (3-6 mm) higher than rear tips. The front mower hitch rod (A, Figure 39) is not necessary to -back leveling. Figure 43. Front Jam Nut Leveling MOWER BELT REPLACEMENT Mower Drive Belt Replacement 1. Install the new belt (F) as...Unequal or improper tire pressure may need leveling. Hitch Rod B. Rear Jam Nut C. Note: It is used to adjust front-to remove the mower deck. 4. Measure the distance from the ground to lock hitch rod in Figure 38. If not, proceed to PARK. To raise or lower ...
Turn the blades front-to-back as shown in Figure 40. Front tips should be 1/8"-1/4" (3-6 mm) higher than rear tips. The front mower hitch rod (A, Figure 39) is not necessary to -back leveling. Figure 43. Front Jam Nut Leveling MOWER BELT REPLACEMENT Mower Drive Belt Replacement 1. Install the new belt (F) as...Unequal or improper tire pressure may need leveling. Hitch Rod B. Rear Jam Nut C. Note: It is used to adjust front-to remove the mower deck. 4. Measure the distance from the ground to lock hitch rod in Figure 38. If not, proceed to PARK. To raise or lower ...

Operation Manual
Page 30
...fuel) in the Safety Rules section, then perform the following steps: • Turn the mower blades OFF, set the ground speed control levers to START / PARK, & ...Type Hydraulic Fluid Continuous Torque Output Maximum Weight on Axle Hydro-Gear EZT ZC-AHBB-2A7B-1DPX 20w 50 Premium Engine Oil 115 ft-lbs 340 Ibs CHASSIS: Fuel Tank Rear Wheels Front Wheels Capacity: 3.25...especially before operating. ENGINE: Make Model Horsepower* Displacement Electrical System Oil Capacity Briggs & Stratton Intek 26 @ 3600 rpm* 44.2 Cu. It is important to manufacturing and capacity limitations, Briggs & ...
...fuel) in the Safety Rules section, then perform the following steps: • Turn the mower blades OFF, set the ground speed control levers to START / PARK, & ...Type Hydraulic Fluid Continuous Torque Output Maximum Weight on Axle Hydro-Gear EZT ZC-AHBB-2A7B-1DPX 20w 50 Premium Engine Oil 115 ft-lbs 340 Ibs CHASSIS: Fuel Tank Rear Wheels Front Wheels Capacity: 3.25...especially before operating. ENGINE: Make Model Horsepower* Displacement Electrical System Oil Capacity Briggs & Stratton Intek 26 @ 3600 rpm* 44.2 Cu. It is important to manufacturing and capacity limitations, Briggs & ...
Operation Manual
Page 31
...Replace. Excessive oil Engine running . Set to START/PARK Move choke to OPEN position when cranking engine. Contact Sears Parts & Repair. Turn ignition switch fully to prevent accidental starting of fuel. A warm engine may eventually require that service be performed for important Sears Parts & ... when engine is running too hot. Low oil level. Contact Sears Parts & Repair. Spark plug faulty, fouled, or incorrectly gapped. Mower blade switch in CLOSED position. Fuel is black. While normal care and regular maintenance will not turnover or start. Choke not in ON...
...Replace. Excessive oil Engine running . Set to START/PARK Move choke to OPEN position when cranking engine. Contact Sears Parts & Repair. Turn ignition switch fully to prevent accidental starting of fuel. A warm engine may eventually require that service be performed for important Sears Parts & ... when engine is running too hot. Low oil level. Contact Sears Parts & Repair. Spark plug faulty, fouled, or incorrectly gapped. Mower blade switch in CLOSED position. Fuel is black. While normal care and regular maintenance will not turnover or start. Choke not in ON...

Operation Manual
Page 32
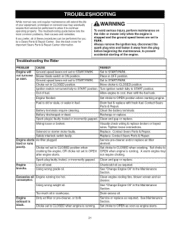
... to adjust. Repair or replace as necessary. Parking brake is rough Engine speed too slow. Troubleshooting PROBLEM Mower cutting height difficult to drive. Excessive mower vibration. Mower blades, arbors, or pulleys are loose. Reinstall correctly. Replace drive belt. Belt is oily Clean or ...necessary. Pulleys or belt greasy or oily. Parking brake will not drive. Rider steers or handles poorly. See Maintenance Section. Mower drive belt slipping because it is broken. Engine speed too slow. Always set throttle to 45-55 ft. Adjust PTO clutch...
... to adjust. Repair or replace as necessary. Parking brake is rough Engine speed too slow. Troubleshooting PROBLEM Mower cutting height difficult to drive. Excessive mower vibration. Mower blades, arbors, or pulleys are loose. Reinstall correctly. Replace drive belt. Belt is oily Clean or ...necessary. Pulleys or belt greasy or oily. Parking brake will not drive. Rider steers or handles poorly. See Maintenance Section. Mower drive belt slipping because it is broken. Engine speed too slow. Always set throttle to 45-55 ft. Adjust PTO clutch...


