

Operation Manual
Page 1
Diameter Random Orbital Sander Model No. 172.27675 CAUTION: Read, understand and follow all Safety Rules and Operating Instructions in . Sears, Roebuck and Co., Hoffman Estates, IL 60179 U.S.A. Visit our Craftsman ®website: www.sears.com/craftsman c(@o+ 3025736 Certified to CAN/CSAC22.2 No.745-1,745-2-4 Conforms to UL STD 745-1,745-2-4 Double Insulated • WARRANTY • SAFETY • UNPACKING • DESCRIPTION • ASSEMBLY • OPERATION • MAINTENANCE Operator's Manual 3.0 Amp/5-in this manual before using this product.
Diameter Random Orbital Sander Model No. 172.27675 CAUTION: Read, understand and follow all Safety Rules and Operating Instructions in . Sears, Roebuck and Co., Hoffman Estates, IL 60179 U.S.A. Visit our Craftsman ®website: www.sears.com/craftsman c(@o+ 3025736 Certified to CAN/CSAC22.2 No.745-1,745-2-4 Conforms to UL STD 745-1,745-2-4 Double Insulated • WARRANTY • SAFETY • UNPACKING • DESCRIPTION • ASSEMBLY • OPERATION • MAINTENANCE Operator's Manual 3.0 Amp/5-in this manual before using this product.

Operation Manual
Page 2
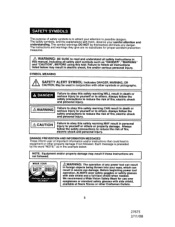
..., batteries, bits, blades or sandpaper. Warranty Safety Symbols Safety Instructions Unpacking Description Assembly Operation Maintenance Accessories Parts List Sears Repair Parts Phone Numbers Page 2 Page 3 Pages 4 - 10 Page 10 - 11 Pages 11 - 12 Pages 13 - 16 Pages 16- 19 Page 20 - 21 Page 21 Page 22 - 23 Back Cover ONE YEAR FULL WARRANTY ON CRAFTSMAN® PROFESSIONAL TOOL If this Craftsman Professional Tool fails due to state. READ ALL INSTRUCTIONS! /_ WARNING: Some dust created by using power tools contains...
..., batteries, bits, blades or sandpaper. Warranty Safety Symbols Safety Instructions Unpacking Description Assembly Operation Maintenance Accessories Parts List Sears Repair Parts Phone Numbers Page 2 Page 3 Pages 4 - 10 Page 10 - 11 Pages 11 - 12 Pages 13 - 16 Pages 16- 19 Page 20 - 21 Page 21 Page 22 - 23 Back Cover ONE YEAR FULL WARRANTY ON CRAFTSMAN® PROFESSIONAL TOOL If this Craftsman Professional Tool fails due to state. READ ALL INSTRUCTIONS! /_ WARNING: Some dust created by using power tools contains...
Operation Manual
Page 3
... risk of important information and/or instructions that could lead to reduce the risk of fire, electric shock and personal injury. Z_ WARNING: BE SURE to obey this tool. Failure to follow the safety precautions to equipment or other Craftsman Outlets. 27675 2/11/08 Before beginning power tool operation, ALWAYS wear safety goggles or safety glasses with side shield, available at...
... risk of important information and/or instructions that could lead to reduce the risk of fire, electric shock and personal injury. Z_ WARNING: BE SURE to obey this tool. Failure to follow the safety precautions to equipment or other Craftsman Outlets. 27675 2/11/08 Before beginning power tool operation, ALWAYS wear safety goggles or safety glasses with side shield, available at...

Operation Manual
Page 4
... specific potential hazards related to this power tool. Make your finger on the switch. STAY ALERT, watch what you to lose control. 4. Air vents often cover moving parts. Be sure switch is safer than using this tool. 2. Carrying tools with your workshop childproof with safe operation BEFORE using your hand and frees both hands to a rotating part of the tool in the "ON" position invites accidents. 6. REMOVE adjusting keys or blade wrenches...
... specific potential hazards related to this power tool. Make your finger on the switch. STAY ALERT, watch what you to lose control. 4. Air vents often cover moving parts. Be sure switch is safer than using this tool. 2. Carrying tools with your workshop childproof with safe operation BEFORE using your hand and frees both hands to a rotating part of the tool in the "ON" position invites accidents. 6. REMOVE adjusting keys or blade wrenches...
Operation Manual
Page 5
.... Failure to control. 7. Replace sandpaper when worn, this power tool. USE ONLY accessories that may result in the hands of dust and debris. O ® @ 5 27675 2/11/08 Accessories that are easier to follow all instructions before using. If the plug does not fit fully in a polarized outlet only one tool may affect the tool's operation. ALWAYS use the tool if switch does not turn it is wider than...
.... Failure to control. 7. Replace sandpaper when worn, this power tool. USE ONLY accessories that may result in the hands of dust and debris. O ® @ 5 27675 2/11/08 Accessories that are easier to follow all instructions before using. If the plug does not fit fully in a polarized outlet only one tool may affect the tool's operation. ALWAYS use the tool if switch does not turn it is wider than...

Operation Manual
Page 6
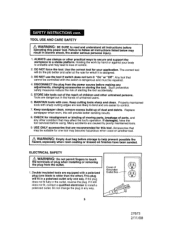
... wire gauge size has greater capacity than a larger number (14-gauge wire has more capacity than 16-gauge wire; 12-gauge wire has more capacity than 14-gauge). Applicable only to rain or wet conditions or use . INSPECT tool cords for the three-wire grounded power cord and grounded power supply system. Have damaged tool cords repaired at a Sears Service Center. Position the cord so that the outlet voltage supplied is recommended for outdoor use cords listed...
... wire gauge size has greater capacity than a larger number (14-gauge wire has more capacity than 16-gauge wire; 12-gauge wire has more capacity than 14-gauge). Applicable only to rain or wet conditions or use . INSPECT tool cords for the three-wire grounded power cord and grounded power supply system. Have damaged tool cords repaired at a Sears Service Center. Position the cord so that the outlet voltage supplied is recommended for outdoor use cords listed...

Operation Manual
Page 7
... power switch and remove the tool's plug from the power source and have the missing, damaged or failed parts replaced BEFORE resuming operation. 2. The sander's rapid action may remove too much material and make exposed metals parts of electric shock. 4. Your safety is missing or should any way; Service or maintenance performed by insulated gripping surfaces when sanding where tool may include the following symbols. SAFETY RULES FOR POWER SANDERS...
... power switch and remove the tool's plug from the power source and have the missing, damaged or failed parts replaced BEFORE resuming operation. 2. The sander's rapid action may remove too much material and make exposed metals parts of electric shock. 4. Your safety is missing or should any way; Service or maintenance performed by insulated gripping surfaces when sanding where tool may include the following symbols. SAFETY RULES FOR POWER SANDERS...
Operation Manual
Page 9
... eating, drinking or smoking. Following this tool. Under some conditionsnoise from the immediate work area. All toys, washable furniture and utensils used again. Read operator's manual carefully. ALWAYS wear safety glasses or eye shields when using this product may result in such a manner as the specific potential hazards related to follow all instructions. Failure to this rule will reduce...
... eating, drinking or smoking. Following this tool. Under some conditionsnoise from the immediate work area. All toys, washable furniture and utensils used again. Read operator's manual carefully. ALWAYS wear safety glasses or eye shields when using this product may result in such a manner as the specific potential hazards related to follow all instructions. Failure to this rule will reduce...
Operation Manual
Page 10
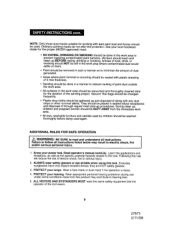
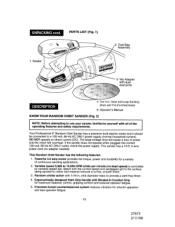
... nearest Sears store or Craftsman outlet to the power source when you are assembling parts, making adjustments, installing or removing sandpaper, cleaning or when it carefully to your sander is not in use of the parts are included; If any of the tool, a guard or other condition that no breakage or damage has occurred during shipping. 2. SAVE THESE INSTRUCTIONS. ADDITIONAL RULES FOR SAFE OPERATION cont...
... nearest Sears store or Craftsman outlet to the power source when you are assembling parts, making adjustments, installing or removing sandpaper, cleaning or when it carefully to your sander is not in use of the parts are included; If any of the tool, a guard or other condition that no breakage or damage has occurred during shipping. 2. SAVE THESE INSTRUCTIONS. ADDITIONAL RULES FOR SAFE OPERATION cont...
Operation Manual
Page 11
... Handle with the correct speed and sandpaper grit to a 120-volt, 60-Hz AC ONLY power supply (normal household current). I Your Professional 5" Random Orbit Sander has a precision-built electric motor and it should be connected to the surface being sanded for a variety of power and the motor will cause a loss of continuous sanding applications. 2. This sander has a 10-ft, 2-wire power cord (no -load speed) is controlled by variable speed dial. Sander...
... Handle with the correct speed and sandpaper grit to a 120-volt, 60-Hz AC ONLY power supply (normal household current). I Your Professional 5" Random Orbit Sander has a precision-built electric motor and it should be connected to the surface being sanded for a variety of power and the motor will cause a loss of continuous sanding applications. 2. This sander has a 10-ft, 2-wire power cord (no -load speed) is controlled by variable speed dial. Sander...

Operation Manual
Page 12
... . Use either the dust bag, or attach a 11/4or 21/2-inch vac hose and wet / dry vac (sold separately) for smooth operation and long life. Diameter Hook and Loop Discs with Dual Dust Ports Dust Bag Assembly Hook: and Loop Backing Pad No-load Speed Rating Input Orbit Diameter Sanding Disc Size Paper Type 5000-12000 OPM (orbits per minute) variable speed 120 Volts, 60 Hz AC 3.0 Amps 1/16...
... . Use either the dust bag, or attach a 11/4or 21/2-inch vac hose and wet / dry vac (sold separately) for smooth operation and long life. Diameter Hook and Loop Discs with Dual Dust Ports Dust Bag Assembly Hook: and Loop Backing Pad No-load Speed Rating Input Orbit Diameter Sanding Disc Size Paper Type 5000-12000 OPM (orbits per minute) variable speed 120 Volts, 60 Hz AC 3.0 Amps 1/16...
Operation Manual
Page 13
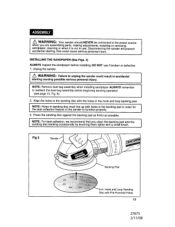
Z_ WARNING: Your sander should NEVER be ('onnected to the power source when you are assembling parts, making adjustments, installing or removing sandpaper, cleaning or when it is not in use if broken or defective. 1. ALWAYS remember to reattach the dust bag assembly before installing. II 2. Press the sanding disc against the backing pad as firmly as possible. NOTE: Holes in sanding disc must line...
Z_ WARNING: Your sander should NEVER be ('onnected to the power source when you are assembling parts, making adjustments, installing or removing sandpaper, cleaning or when it is not in use if broken or defective. 1. ALWAYS remember to reattach the dust bag assembly before installing. II 2. Press the sanding disc against the backing pad as firmly as possible. NOTE: Holes in sanding disc must line...
Operation Manual
Page 16
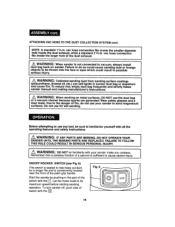
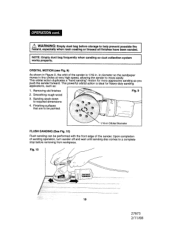
... in the part of switch with theE], Let the motor build to sand magnesium surfaces. I ON/OFF ROCKER SWITCH (see Fig. 6) This switch is sealed to vacuum, always install dust bag back on metal surfaces, r)o NOT use your sander to its maximum speed before starting sanding operation. vac hose connection fits inside the dust exhaust, while a standard 21/2-in , vac hose connection fits; Wear safety glasses and a dust mask...
... in the part of switch with theE], Let the motor build to sand magnesium surfaces. I ON/OFF ROCKER SWITCH (see Fig. 6) This switch is sealed to vacuum, always install dust bag back on metal surfaces, r)o NOT use your sander to its maximum speed before starting sanding operation. vac hose connection fits inside the dust exhaust, while a standard 21/2-in , vac hose connection fits; Wear safety glasses and a dust mask...
Operation Manual
Page 17
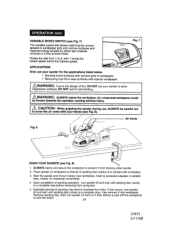
... of sanding operation, turn sander off and wait until sanding disc comes to covCeAr UthTeIOaiNr v:entWs hwenithgyriopuprinhganthdes s(saenedeFrigd.u8r)i.ng use your sander to prevent i1f:rom moving under sander. 2. Rotate the dial from workpiece. If this occurs, turn sander off and wait until sanding disc comes to cool the motor. 17 27675 2/11/08 iAnjnmu'yn.secured workpiece could to a complete stop before removing...
... of sanding operation, turn sander off and wait until sanding disc comes to covCeAr UthTeIOaiNr v:entWs hwenithgyriopuprinhganthdes s(saenedeFrigd.u8r)i.ng use your sander to prevent i1f:rom moving under sander. 2. Rotate the dial from workpiece. If this occurs, turn sander off and wait until sanding disc comes to cool the motor. 17 27675 2/11/08 iAnjnmu'yn.secured workpiece could to a complete stop before removing...

Operation Manual
Page 18
... use , periodically check its operation by removing the sanding disc and running the sander without sandpaper. NOTE: The brake is an extrernely important decision that will damage the cushion. Let the sander and the sandpaper's grit do the work. • Applying additional pressure will only slow down the motor, wear the sandpaper out faster and reduce the sander's orbital speed. • Excessive pressure...
... use , periodically check its operation by removing the sanding disc and running the sander without sandpaper. NOTE: The brake is an extrernely important decision that will damage the cushion. Let the sander and the sandpaper's grit do the work. • Applying additional pressure will only slow down the motor, wear the sandpaper out faster and reduce the sander's orbital speed. • Excessive pressure...
Operation Manual
Page 19
... be performed with the front edge of the sander is ideal for rnore aggressive sanding as : 1. NOTE: Empty dust bag frequently when sanding so dust collection system works properly. Fig. 10 19 27675 2/11/08 /_ WARNING: Empty dust bag before removing from workpiece. Removing old finishes Fig. 9 2. This powerful orbital action is 1/16-in tiny circles at very high speed, allowing the sander 1:omove easily.
... be performed with the front edge of the sander is ideal for rnore aggressive sanding as : 1. NOTE: Empty dust bag frequently when sanding so dust collection system works properly. Fig. 10 19 27675 2/11/08 /_ WARNING: Empty dust bag before removing from workpiece. Removing old finishes Fig. 9 2. This powerful orbital action is 1/16-in tiny circles at very high speed, allowing the sander 1:omove easily.

Operation Manual
Page 20
Clean the tool with plastic parts. When work has been completed, clean the tool to brush off switch and unplug sander from the power source before performing any use . Keep the motor air openings free from these materials, it is cleaned frequently by a qualified service technician at any fiberglass material, wallboard, spackling compound or plaster. /_ WARNING: To ensure safety and reliability, repairs, maintenance and adjustments MUST be performed by...
Clean the tool with plastic parts. When work has been completed, clean the tool to brush off switch and unplug sander from the power source before performing any use . Keep the motor air openings free from these materials, it is cleaned frequently by a qualified service technician at any fiberglass material, wallboard, spackling compound or plaster. /_ WARNING: To ensure safety and reliability, repairs, maintenance and adjustments MUST be performed by...

Operation Manual
Page 22
Visit your local Sears store or other Craftsman®outlets offer a selection of Cr;aLftsmanProfessional Random Orbit Sander accessories designed for all of the accessories for Tthies utosoel omf iagthtatcbhemdeanntsgerooruasccaensdsocroieusld trheastualtreinnsoetrious injury. /_recoWmAmReNnIdNeGd : for your random orbital sander. 22 Sears and other Craftsman outlets or shop sears.com/craftsman for all your sanding applications. 5-inch, 8 Hole, Hook and Loop Sanding Discs come in very fine, fine, medium and coarse grit.
Visit your local Sears store or other Craftsman®outlets offer a selection of Cr;aLftsmanProfessional Random Orbit Sander accessories designed for all of the accessories for Tthies utosoel omf iagthtatcbhemdeanntsgerooruasccaensdsocroieusld trheastualtreinnsoetrious injury. /_recoWmAmReNnIdNeGd : for your random orbital sander. 22 Sears and other Craftsman outlets or shop sears.com/craftsman for all your sanding applications. 5-inch, 8 Hole, Hook and Loop Sanding Discs come in very fine, fine, medium and coarse grit.

Operation Manual
Page 23
Random Orbital Sander MODEL NUMBER 172.27675 1_ 1_-_22(7) The model number will be found on the nameplate of the Random Orbital Sander. Always mention the model number when requesting parts and service for your tool. _24(6) _26_103 i 27(2)J Ig 28 29 104 ® 4O Q t._ I%1 C2_ 5-in. Dia.
Random Orbital Sander MODEL NUMBER 172.27675 1_ 1_-_22(7) The model number will be found on the nameplate of the Random Orbital Sander. Always mention the model number when requesting parts and service for your tool. _24(6) _26_103 i 27(2)J Ig 28 29 104 ® 4O Q t._ I%1 C2_ 5-in. Dia.

Operation Manual
Page 24
... seat ! Random Orbital Sander MODEL NUMBER 172.27675 The model number will be found on the nameplate of the Random Orbital Sander. Brushholder ssembly 2 Carbon brush 2 Power cord 1 Speed adjustment knob 1 Variable speed board I 2PES04Q5001000A-00 2PES04Q5102000A-O0 2PES04Q5100000A-00 2PES04Q0001000A-00 2PES04Q0005000A-00 200T0080024000A-00 Part Description Base plate Screw ST4.2x16 Top cover Screw ST4.2x13 Stator asm Bracket Stator Screw ST4.2x55 Switch cover Switch Screw ST3.5x8 Press plate Ball bearing 6000 Housing Cord clamp Dust collector baq...
... seat ! Random Orbital Sander MODEL NUMBER 172.27675 The model number will be found on the nameplate of the Random Orbital Sander. Brushholder ssembly 2 Carbon brush 2 Power cord 1 Speed adjustment knob 1 Variable speed board I 2PES04Q5001000A-00 2PES04Q5102000A-O0 2PES04Q5100000A-00 2PES04Q0001000A-00 2PES04Q0005000A-00 200T0080024000A-00 Part Description Base plate Screw ST4.2x16 Top cover Screw ST4.2x13 Stator asm Bracket Stator Screw ST4.2x55 Switch cover Switch Screw ST3.5x8 Press plate Ball bearing 6000 Housing Cord clamp Dust collector baq...


