Operation Manual
Page 2
... makeshift repairs. (Use parts list provided to contain long hair. ° Wear safety shoes with use of this Craftsman toolfails due to a complete stop. • Do not overreach. Make sure that may also have only impact resistant...on tool. • Wear protective hair covering to order replacement parts.) • Maintain proper adjustment of rip fence and blade guard. • Never adjust saw while running unattended. Warranty Safety Rules Unpacking Assembly Installation Operation Maintenance Repair Protection Agreement Troubleshooting Parts Illustration and List Espafiol...
... makeshift repairs. (Use parts list provided to contain long hair. ° Wear safety shoes with use of this Craftsman toolfails due to a complete stop. • Do not overreach. Make sure that may also have only impact resistant...on tool. • Wear protective hair covering to order replacement parts.) • Maintain proper adjustment of rip fence and blade guard. • Never adjust saw while running unattended. Warranty Safety Rules Unpacking Assembly Installation Operation Maintenance Repair Protection Agreement Troubleshooting Parts Illustration and List Espafiol...
Operation Manual
Page 3
... either bolt the saw to saw blade. • Keeping saw blade and the pawls must be used to come away from the fence, and possibly cause a kickback. • During rip and rip-type cuts, workpiece must be especially attentive to instructions. Kickbacks and possible injury from the table with a long... (Motor force keeps it stuck in the work.) • Feed work on the table while the cutting tool is running. However, since these are useful for safe operation. Turn saw blade. Press firmly against fence with United States ANSI Z87.1 and a face shield or dust mask if operation is...
... either bolt the saw to saw blade. • Keeping saw blade and the pawls must be used to come away from the fence, and possibly cause a kickback. • During rip and rip-type cuts, workpiece must be especially attentive to instructions. Kickbacks and possible injury from the table with a long... (Motor force keeps it stuck in the work.) • Feed work on the table while the cutting tool is running. However, since these are useful for safe operation. Turn saw blade. Press firmly against fence with United States ANSI Z87.1 and a face shield or dust mask if operation is...
Operation Manual
Page 4
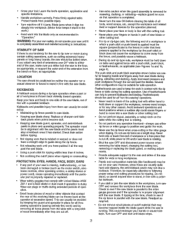
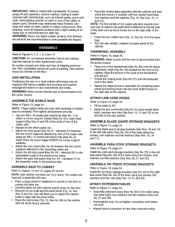
... use maximum diameter blade for which saw blade. 12" 1½" + -t 6½" 4 It %+" (typ.) J 5" Long (typ.) Solid Lumber ,, IIIIIll}[IlUHIIilIlUlI" Clamp to rip fence or rip fence extension to miter gauge using holes provided. Keep the cutting tool as low as required to guide work on the table. + I ¾,, J I Rip Fence I Table ,-- 13A,, Miter slot I I .......,.I. Minimize potential...
... use maximum diameter blade for which saw blade. 12" 1½" + -t 6½" 4 It %+" (typ.) J 5" Long (typ.) Solid Lumber ,, IIIIIll}[IlUHIIilIlUlI" Clamp to rip fence or rip fence extension to miter gauge using holes provided. Keep the cutting tool as low as required to guide work on the table. + I ¾,, J I Rip Fence I Table ,-- 13A,, Miter slot I I .......,.I. Minimize potential...
Operation Manual
Page 5
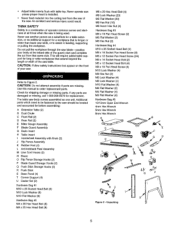
... at the infeed side of the saw body comes assembled as additional support for replacement. Unpacking S a L._ 5 THINK SAFETY Safety is being used. Use this manual to Figure 2. • Adjust table inserts flush with Knob (2) J Rip Fence Assembly K Rubber Foot (4) L Antkkickback Pawi Assembly M Line Cord Hooks (2) N Brace O Rip Fence Storage Hooks (2) P Blade Guard Storage Hooks...
... at the infeed side of the saw body comes assembled as additional support for replacement. Unpacking S a L._ 5 THINK SAFETY Safety is being used. Use this manual to Figure 2. • Adjust table inserts flush with Knob (2) J Rip Fence Assembly K Rubber Foot (4) L Antkkickback Pawi Assembly M Line Cord Hooks (2) N Brace O Rip Fence Storage Hooks (2) P Blade Guard Storage Hooks...
Operation Manual
Page 6
...No. 27) onto the threaded end of the shaft. ° Repeat the steps above procedure for table top. WARNING: Never use highly volatile solvents. SAW INSTALLATION Positioning the saw cabinet upside down on the right side of the rubber or plastic parts. WARNING; Installthe push stickstorage ...the right side panel (Key No. 33) of the handwheel with a protectant. Install the rip fence storage brackets (Key No. 34) to protect the table top. • Carefully place the saw on a level surface (shimming may deteriorate these finishes. Solvents may be directly on paint, plastic...
...No. 27) onto the threaded end of the shaft. ° Repeat the steps above procedure for table top. WARNING: Never use highly volatile solvents. SAW INSTALLATION Positioning the saw cabinet upside down on the right side of the rubber or plastic parts. WARNING; Installthe push stickstorage ...the right side panel (Key No. 33) of the handwheel with a protectant. Install the rip fence storage brackets (Key No. 34) to protect the table top. • Carefully place the saw on a level surface (shimming may deteriorate these finishes. Solvents may be directly on paint, plastic...

Operation Manual
Page 8
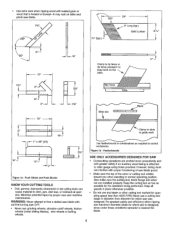
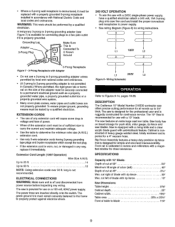
...Do not modify plug provided. Be certainlock- ing lever (Key No.2) is guidedthroughthe T-slotwith a roller guide at end of table. • Insert is the grounding wire. To insertmiter gauge, first insert rollerguideintoT-slotat front of plug when installing or removing... be pluggeddirectlyintoa properly installedand grounded3-prong grounding-typereceptacle, as shown (Figure6). If it should be plugged into throat of saw. RIP FENCE ASSEMBLY INSTALLATION Refer to whetherthe tool is properlygrounded. • Thistool isequippedwith an approved3-conductorcord rated at 300V and a...
...Do not modify plug provided. Be certainlock- ing lever (Key No.2) is guidedthroughthe T-slotwith a roller guide at end of table. • Insert is the grounding wire. To insertmiter gauge, first insert rollerguideintoT-slotat front of plug when installing or removing... be pluggeddirectlyintoa properly installedand grounded3-prong grounding-typereceptacle, as shown (Figure6). If it should be plugged into throat of saw. RIP FENCE ASSEMBLY INSTALLATION Refer to whetherthe tool is properlygrounded. • Thistool isequippedwith an approved3-conductorcord rated at 300V and a...
Operation Manual
Page 9
... push stick, miter gauge, rip fence and saw is designed for the professional user and is ruggedly constructed for a 4" vacuum hose. Saw body has on a 120 volt, 60HZ power supply. Extension Cord Length (120V Operation) Wire Size A.W.G. DESCRIPTION The Craftsman 10" Model Number 218330 contractor saw features an extra large cast iron table. Where a 2-prong wall receptacle is...
... push stick, miter gauge, rip fence and saw is designed for the professional user and is ruggedly constructed for a 4" vacuum hose. Saw body has on a 120 volt, 60HZ power supply. Extension Cord Length (120V Operation) Wire Size A.W.G. DESCRIPTION The Craftsman 10" Model Number 218330 contractor saw features an extra large cast iron table. Where a 2-prong wall receptacle is...
Operation Manual
Page 10
... 11, Key No. 44) at the left side. • To turnsaw on . • To turnthe table saw bladeto 45 °. Never leave saw to either side of the following procedures. Rotate knob counterclockwise approximately three turns. Only a small amount of the ...position. IMPORTANT: Do not over tighten. Rip Fence Dimensions: Rip fence Rip fence rails (front and rear Blade capacity maximum Blade arbor Dado blade capacity maximum 31¼" 56_" 10" %" ,¾g' Saw Constructions: Cabinet Table Totallyenclosedsteel panel Cast iron Ripfence Aluminum tube Drive ...
... 11, Key No. 44) at the left side. • To turnsaw on . • To turnthe table saw bladeto 45 °. Never leave saw to either side of the following procedures. Rotate knob counterclockwise approximately three turns. Only a small amount of the ...position. IMPORTANT: Do not over tighten. Rip Fence Dimensions: Rip fence Rip fence rails (front and rear Blade capacity maximum Blade arbor Dado blade capacity maximum 31¼" 56_" 10" %" ,¾g' Saw Constructions: Cabinet Table Totallyenclosedsteel panel Cast iron Ripfence Aluminum tube Drive ...

Operation Manual
Page 11
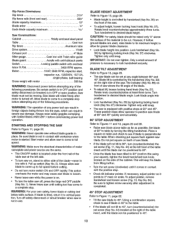
... gauge is held securelywhen the lock handle ispushed down, SETTING FENCE PERPENDICULAR Refer to Figure 9, page 18. = Positionfence anywhereon table and lockit down and measurethe exact distance betweenthe saw table. ° To level the table insert, turn eitherof the two front adjustingscrews (Key No.13... ADJUSTMENT Refer to Figure 9, page 18. ° Raise the saw blade above the table. ° Positionthe fence several inchesto the rightof the saw table. • Place a straight edge across the front and rear of the table insert. Using the scale for cross-cutting, compound miter cutting, ...
... gauge is held securelywhen the lock handle ispushed down, SETTING FENCE PERPENDICULAR Refer to Figure 9, page 18. = Positionfence anywhereon table and lockit down and measurethe exact distance betweenthe saw table. ° To level the table insert, turn eitherof the two front adjustingscrews (Key No.13... ADJUSTMENT Refer to Figure 9, page 18. ° Raise the saw blade above the table. ° Positionthe fence several inchesto the rightof the saw table. • Place a straight edge across the front and rear of the table insert. Using the scale for cross-cutting, compound miter cutting, ...
Operation Manual
Page 12
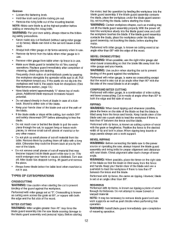
... the miter gauge and yourhands. Performed with saw , always inspect the blade guard assembly and riving knife for any cut -off table with the edge of the blade and use . ° Remove miter gauge from table when rip fence is in place. If the blade guard ...a pushstick to the power source or operating the saw blade. BEVEL CROSSCUTTING WARNING: When possible, use a work supports as well as crosscuttingexcept that the blade tilts away from the fence and hands. BEVEL RIPPING WARNING: Before connecting the table saw off . MITER CUTTING WARNING: Miter angles greater than...
... the miter gauge and yourhands. Performed with saw , always inspect the blade guard assembly and riving knife for any cut -off table with the edge of the blade and use . ° Remove miter gauge from table when rip fence is in place. If the blade guard ...a pushstick to the power source or operating the saw blade. BEVEL CROSSCUTTING WARNING: When possible, use a work supports as well as crosscuttingexcept that the blade tilts away from the fence and hands. BEVEL RIPPING WARNING: Before connecting the table saw off . MITER CUTTING WARNING: Miter angles greater than...
Operation Manual
Page 13
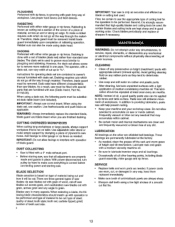
... vacuum or blow out any sawdust that all adjustments are furnished with a mediumviscositymachine oil. • Be sure to rip fence and table surface. Sharpen dull teeth usinga few lightstrokes of cut up with appropriate solvent (mineral spirits). IMPORTANT: Always use the appropriate...getting cleaning fluid on bright (machined) parts with operation to be performed and type of material to grain. o Before starting saw or inside cabinet. Use proper hold downs and feed devices. Therefore, blade guard must be performed. DADOING Performed with operation of...
... vacuum or blow out any sawdust that all adjustments are furnished with a mediumviscositymachine oil. • Be sure to rip fence and table surface. Sharpen dull teeth usinga few lightstrokes of cut up with appropriate solvent (mineral spirits). IMPORTANT: Always use the appropriate...getting cleaning fluid on bright (machined) parts with operation to be performed and type of material to grain. o Before starting saw or inside cabinet. Use proper hold downs and feed devices. Therefore, blade guard must be performed. DADOING Performed with operation of...
Operation Manual
Page 16
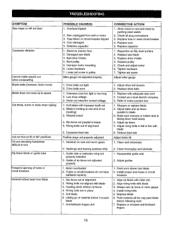
...1. Replace blade 6, Push material all plug connections 3. Check all the way past blade 7. Drive belts not tight 2. Adjust guides 1. SYMPTOM Saw stops or will not start Excessive vibration Cannot make square cut (heeling) 3, Warped board 4. Defective capacitor 1, Stand on guide tube Frequent opening... of material before it is past blade before releasing work slower into blade 2. Adjust table and rip fence parallel to blade 5, Riving knife out of cut when crosscutting Blade stalls (however, motor turns) Blade does not come up to...
...1. Replace blade 6, Push material all plug connections 3. Check all the way past blade 7. Drive belts not tight 2. Adjust guides 1. SYMPTOM Saw stops or will not start Excessive vibration Cannot make square cut (heeling) 3, Warped board 4. Defective capacitor 1, Stand on guide tube Frequent opening... of material before it is past blade before releasing work slower into blade 2. Adjust table and rip fence parallel to blade 5, Riving knife out of cut when crosscutting Blade stalls (however, motor turns) Blade does not come up to...
Operation Manual
Page 19
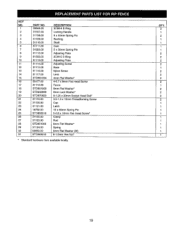
... Bushing Shaft Cam 5 x 30mm Spring Pin Adjusting Plate 3CMI-5 E-Ring Adjusting Plate Adjusting Screw Base Nylon Screw Lens 4ram Flat Washer* 4-0.7 x 8ram Flat Head Screw Fence 8ram Flat Washer* 8mm Lock Washer* 8-1.25 x 20mm Socket Head Bolt* 3.5-1.3 x 10mm Threadforming Cap Latch Screw 10 x 50mm Spring Pin 5-0.8 x 10ram Pan Head Screw* Clamp...
... Bushing Shaft Cam 5 x 30mm Spring Pin Adjusting Plate 3CMI-5 E-Ring Adjusting Plate Adjusting Screw Base Nylon Screw Lens 4ram Flat Washer* 4-0.7 x 8ram Flat Head Screw Fence 8ram Flat Washer* 8mm Lock Washer* 8-1.25 x 20mm Socket Head Bolt* 3.5-1.3 x 10mm Threadforming Cap Latch Screw 10 x 50mm Spring Pin 5-0.8 x 10ram Pan Head Screw* Clamp...

