Operation Manual
Page 2
....) • Maintain proper adjustment of rip fence and blade guard. • Never adjust saw while running unattended. It will operate properly and perform their intended function. This warrantydoes not ...Do not use powertools in a well ventilated area and work most efficiently at the rate for alignment of moving parts and cutting surfaces. ° Never leave tool running . Check for which ... 8-9 9-13 13 14 16-17 18-29 30-47 ONE-YEAR FULL WARRANTY ON CRAFTSMAN TOOL if this Craftsman toolfails due to determine that the tool is damaged should be properly repaired or replaced....
....) • Maintain proper adjustment of rip fence and blade guard. • Never adjust saw while running unattended. It will operate properly and perform their intended function. This warrantydoes not ...Do not use powertools in a well ventilated area and work most efficiently at the rate for alignment of moving parts and cutting surfaces. ° Never leave tool running . Check for which ... 8-9 9-13 13 14 16-17 18-29 30-47 ONE-YEAR FULL WARRANTY ON CRAFTSMAN TOOL if this Craftsman toolfails due to determine that the tool is damaged should be properly repaired or replaced....
Operation Manual
Page 3
...your fingers or hands in path of saw blade or other operating control, a safety device or power cord), cease operating immediately until it stuck in the work.) • Feed work in proper alignment with the rip fence or table during certain cuttingoperations,such as cuttingextremelyheavy panels ...or long heavy boards, the saw to see if the rip fence is parallel with a possible kickback. Check their...
...your fingers or hands in path of saw blade or other operating control, a safety device or power cord), cease operating immediately until it stuck in the work.) • Feed work in proper alignment with the rip fence or table during certain cuttingoperations,such as cuttingextremelyheavy panels ...or long heavy boards, the saw to see if the rip fence is parallel with a possible kickback. Check their...
Operation Manual
Page 6
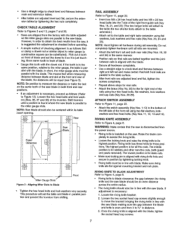
.... WARNING: Never use highly volatile solvents. Refer to Figure 13, page 26. NOTE: Finger tighten bolts and nuts until tables are on paint or any of packing. NOTE: Saw cabinet and base are missing. HANDWHEEL ASSEMBLY Refer to Figures 3, 4, 5, 7, 8, 9 and 10. ASSEMBLE RIP FENCE STORAGE BRACKETS Refer to ... 24. Two people are clean and free of the base usingfour screws, lock washers and fiat washers (Key Nos. 15, 16 and 17). Align the groove in the previous two steps. • Attach the right side panel (Key No. 33 - ASSEMBLE BLADE GUARD STORAGE BRACKETS Refer to...
.... WARNING: Never use highly volatile solvents. Refer to Figure 13, page 26. NOTE: Finger tighten bolts and nuts until tables are on paint or any of packing. NOTE: Saw cabinet and base are missing. HANDWHEEL ASSEMBLY Refer to Figures 3, 4, 5, 7, 8, 9 and 10. ASSEMBLE RIP FENCE STORAGE BRACKETS Refer to ... 24. Two people are clean and free of the base usingfour screws, lock washers and fiat washers (Key Nos. 15, 16 and 17). Align the groove in the previous two steps. • Attach the right side panel (Key No. 33 - ASSEMBLE BLADE GUARD STORAGE BRACKETS Refer to...
Operation Manual
Page 7
... back of blade. • Gauge this adjustment be checked before operating. ° A simple method of checking alignment is just touching. CHECK TABLE ALIGNMENT Refer to Figures 3 and 13, pages 7 and 26. • Saws are parallel to the saw blade should be an even distance across the entire radius. • The rivingknifeshouldalso be in parallel position...
... back of blade. • Gauge this adjustment be checked before operating. ° A simple method of checking alignment is just touching. CHECK TABLE ALIGNMENT Refer to Figures 3 and 13, pages 7 and 26. • Saws are parallel to the saw blade should be an even distance across the entire radius. • The rivingknifeshouldalso be in parallel position...
Operation Manual
Page 12
...on the side of the guard againstthe workpiece. When ripping long boards or large panels always use work support. BEVEL RIPPING WARNING: Before connecting the table saw to both the edge and the flat side of wood. Remove • Loosen the fastening knob. ° Hold the knob and pull the... square with rip fence, is tilted away from the miter gauge and yourhands. NOTE: It may become trapped inside blade guard while saw is installed for proper alignment and clearance with the edge of resawing operation. 12 After blade has stopped turning, lift guard and remove the piece. ° ...
...on the side of the guard againstthe workpiece. When ripping long boards or large panels always use work support. BEVEL RIPPING WARNING: Before connecting the table saw to both the edge and the flat side of wood. Remove • Loosen the fastening knob. ° Hold the knob and pull the... square with rip fence, is tilted away from the miter gauge and yourhands. NOTE: It may become trapped inside blade guard while saw is installed for proper alignment and clearance with the edge of resawing operation. 12 After blade has stopped turning, lift guard and remove the piece. ° ...
Operation Manual
Page 16
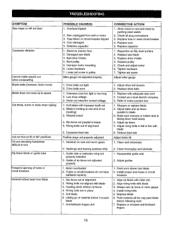
...guides 1. Feed work 7, Replace or sharpen anti-kickback fingers 16 Damaged saw blade 3. A[Iow motor to motor junction box 1. Replace pulley 5. Motor not wired for correct voltage 1. Sawdust on uneven floor 2. Align rip fence with adequate size cord 2. Cord damaged 5. Bent pulley ...5. Loose hardware 7. Check and adjust motor 6. Drive belts not tight 2. Adjust drive belt tension 2. Contact your local electric company 3. Refer to cool and reset by pushing reset switch 2. Adjust table...
...guides 1. Feed work 7, Replace or sharpen anti-kickback fingers 16 Damaged saw blade 3. A[Iow motor to motor junction box 1. Replace pulley 5. Motor not wired for correct voltage 1. Sawdust on uneven floor 2. Align rip fence with adequate size cord 2. Cord damaged 5. Bent pulley ...5. Loose hardware 7. Check and adjust motor 6. Drive belts not tight 2. Adjust drive belt tension 2. Contact your local electric company 3. Refer to cool and reset by pushing reset switch 2. Adjust table...