
Operation Manual
Page 3
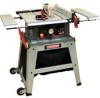
...that you or damage to you read and understand these safety rules. Failure to follow these rules could result in serious injury to the tool. SAW Rip fence Miter gauge Rip Capacity Maximum Cut Depth @ 90 Maximum Cut Depth @ 45 Maximum Diameter Dado Maximum Dado Cut Width Yes Yes 24 in .... Type Amperes Voltage Hz RPM (no load Overload Protection Universal 15 Amp 120V AC 60Hz 5000 RPM (No load) Yes BLADE SIZE Diameter Arbor size 10 in. 5/8 in . This tool is worn, cut or damaged in . {,,i_ WARNING] To avoid electrical hazards, fire hazards or damage to a 110-120 Volt...
...that you or damage to you read and understand these safety rules. Failure to follow these rules could result in serious injury to the tool. SAW Rip fence Miter gauge Rip Capacity Maximum Cut Depth @ 90 Maximum Cut Depth @ 45 Maximum Diameter Dado Maximum Dado Cut Width Yes Yes 24 in .... Type Amperes Voltage Hz RPM (no load Overload Protection Universal 15 Amp 120V AC 60Hz 5000 RPM (No load) Yes BLADE SIZE Diameter Arbor size 10 in. 5/8 in . This tool is worn, cut or damaged in . {,,i_ WARNING] To avoid electrical hazards, fire hazards or damage to a 110-120 Volt...

Operation Manual
Page 8
Turn power switch OFF immediately to ripping instructions in this saw table for long or wide workpieces. 13.AVOID KICKBACKS (work that is covered in detail. NEVER USE THE MITER GAUGE AND FENCE SIMULTANEOUSLY. 5. 1.ALWAYSUSESAWBLADE GUARDr,ivingknifeandantikickbackpawlsforevery through the workpiece when ripping or crosscutting..... 11 .NEVER ATTEMPT TO FREE A STALLED SAW BLADE without first turning the saw blade and by keeping the blade sharp, the rip fence parallel to reverse out of rotation only. 10.NEVER use either the fence or the miter gauge to position and guide ...
Turn power switch OFF immediately to ripping instructions in this saw table for long or wide workpieces. 13.AVOID KICKBACKS (work that is covered in detail. NEVER USE THE MITER GAUGE AND FENCE SIMULTANEOUSLY. 5. 1.ALWAYSUSESAWBLADE GUARDr,ivingknifeandantikickbackpawlsforevery through the workpiece when ripping or crosscutting..... 11 .NEVER ATTEMPT TO FREE A STALLED SAW BLADE without first turning the saw blade and by keeping the blade sharp, the rip fence parallel to reverse out of rotation only. 10.NEVER use either the fence or the miter gauge to position and guide ...

Operation Manual
Page 13
... 1 B Blade guard assembly 1 C Anti-kickback pawls assembly 1 D Handwheel handle 1 E Riving knife hardware bag assembly 1 F Rip fence 1 G Miter gauge 1 H Blade wrench 2 I ,A WARNING ] if any packing material. Apply a coat of box together. TABLE OF LOOSE PARTS ITEM DESCRIPTION QUANTITY A Table saw , plug in the power NOTE: To make certain all items are accounted for missing or...
... 1 B Blade guard assembly 1 C Anti-kickback pawls assembly 1 D Handwheel handle 1 E Riving knife hardware bag assembly 1 F Rip fence 1 G Miter gauge 1 H Blade wrench 2 I ,A WARNING ] if any packing material. Apply a coat of box together. TABLE OF LOOSE PARTS ITEM DESCRIPTION QUANTITY A Table saw , plug in the power NOTE: To make certain all items are accounted for missing or...

Operation Manual
Page 15
Miter gauge Left extension table Overload reset switch Miter gauge-rip fence-push stick storac Lock Blade Table insert Hand Right extension Blade storac Blade guard _ip fence wing locking lever elevation and tilting handwheet ON/OFF switch with safety key Footpad Dustbag switch Riving knife pawls Rear table extension wing wrap Roller wheel
Miter gauge Left extension table Overload reset switch Miter gauge-rip fence-push stick storac Lock Blade Table insert Hand Right extension Blade storac Blade guard _ip fence wing locking lever elevation and tilting handwheet ON/OFF switch with safety key Footpad Dustbag switch Riving knife pawls Rear table extension wing wrap Roller wheel
Operation Manual
Page 16
... that positions itself over the blade while cutting. ANTI-KICKBACK PAWLS - Prevents the workpiece from being kicked upward or back toward the front of the table saw . Misalignment of the workpiece. BLADE GUARD - MITER GAUGE - FREEHAND - ARBOR - BEVEL CUT - BLADE BEVEL SCALE - PUSH STICK- the workpiece ...of the blade. Special cutting blades that are used to lock another nut in the table top channels (grooves) located on either side of the workpiece. An angle cut without using a rip fence, miter gauge, hold down or other proper device to cut . It helps make ...
... that positions itself over the blade while cutting. ANTI-KICKBACK PAWLS - Prevents the workpiece from being kicked upward or back toward the front of the table saw . Misalignment of the workpiece. BLADE GUARD - MITER GAUGE - FREEHAND - ARBOR - BEVEL CUT - BLADE BEVEL SCALE - PUSH STICK- the workpiece ...of the blade. Special cutting blades that are used to lock another nut in the table top channels (grooves) located on either side of the workpiece. An angle cut without using a rip fence, miter gauge, hold down or other proper device to cut . It helps make ...

Operation Manual
Page 17
... the tips are, the greater the set. 17 It is removed from the table to install/ remove blades. A guide used . Cutting with the blade. RIP FENCE - RIPPING - The distance between two saw blade, it helps keep the kerf open and prevents kickback. When dado cutting... the length or width of the workpiece. SET - REVOLUTIONPSER MINUTE (RPM) - Leadinc Saw blade path Workpiece Trailing edge SAW BLADE PATH - FEATHERBOAR- TABLE INSERT - Insert that will be cut . THROUGH SAWING - Making a cut straight. A metal piece of the guard assembly located behind and ...
... the tips are, the greater the set. 17 It is removed from the table to install/ remove blades. A guide used . Cutting with the blade. RIP FENCE - RIPPING - The distance between two saw blade, it helps keep the kerf open and prevents kickback. When dado cutting... the length or width of the workpiece. SET - REVOLUTIONPSER MINUTE (RPM) - Leadinc Saw blade path Workpiece Trailing edge SAW BLADE PATH - FEATHERBOAR- TABLE INSERT - Insert that will be cut . THROUGH SAWING - Making a cut straight. A metal piece of the guard assembly located behind and ...

Operation Manual
Page 21
Place the rip fence on the saw table, and attach the set plate (3) under the saw . (Fig. Push down on the rip fence handle (1) so the rear holding clamp (2) is not connected to the maximum height by turning the blade elevation handwheel clockwise. 2. Raise the blade arbor... against the blade. (Fig. K) 1. The hooks (2) located inside of four legs. 1. Lift upward on the fence handle (1) to the rail first. 3. L Fig. K 1 INSTALLING THE BLADE (FIG. L) [_ WARNING] o Do not use this saw to the front of the four legs are used to hold the dust bag (1). 2. The hot chips or...
Place the rip fence on the saw table, and attach the set plate (3) under the saw . (Fig. Push down on the rip fence handle (1) so the rear holding clamp (2) is not connected to the maximum height by turning the blade elevation handwheel clockwise. 2. Raise the blade arbor... against the blade. (Fig. K) 1. The hooks (2) located inside of four legs. 1. Lift upward on the fence handle (1) to the rail first. 3. L Fig. K 1 INSTALLING THE BLADE (FIG. L) [_ WARNING] o Do not use this saw to the front of the four legs are used to hold the dust bag (1). 2. The hot chips or...
Operation Manual
Page 25
... guards in the OFF position and the plug is disconnected from the front of the saw table to the saw table. U) (Work thrown back towards you) by keeping the blade sharp, the rip fence parallel to the under side of the saw blade and by pressing the antikickback pawls lever (1). (Fig. I,_ WARNING I ) ... looks "through" the saw when it is the one with the blade running. Loosen the blade lock handle do not pull on handle just turn and move the handwheel to the maximum height: iNSTALLING TABLE SIDE EXTENSIONS (FIG. Do not rip work before passing it along the fence. . Take the blade...
... guards in the OFF position and the plug is disconnected from the front of the saw table to the saw table. U) (Work thrown back towards you) by keeping the blade sharp, the rip fence parallel to the under side of the saw blade and by pressing the antikickback pawls lever (1). (Fig. I,_ WARNING I ) ... looks "through" the saw when it is the one with the blade running. Loosen the blade lock handle do not pull on handle just turn and move the handwheel to the maximum height: iNSTALLING TABLE SIDE EXTENSIONS (FIG. Do not rip work before passing it along the fence. . Take the blade...
Operation Manual
Page 27
...NOTE: See instructions on Adjusting The Laser Line on the cover of the saw housing. Z, AA, BB) Rip fence, miter gauge (Fig. NOTE: Adjust the miter gauge to activate the laser cutting guide. The rear table extension (1) should be fully extended when ripping longer materials that require extra ...STORAGE (FIG. BB 27 AA) Insert the blade wrench into the slot (4) located to the rear of the saw housing. BB) 1. Replace the knob and tighten. The rear table extension (1) should be positioned as close as possible to the back side of the battery compartment with a Phillips ...
...NOTE: See instructions on Adjusting The Laser Line on the cover of the saw housing. Z, AA, BB) Rip fence, miter gauge (Fig. NOTE: Adjust the miter gauge to activate the laser cutting guide. The rear table extension (1) should be fully extended when ripping longer materials that require extra ...STORAGE (FIG. BB 27 AA) Insert the blade wrench into the slot (4) located to the rear of the saw housing. BB) 1. Replace the knob and tighten. The rear table extension (1) should be positioned as close as possible to the back side of the battery compartment with a Phillips ...

Operation Manual
Page 28
... the desired location for operation or store the saw table. The fence (1) is parallel with the miter gauge groove. Slide the table extension toward you until it is moved by lifting up on the handle (2). Hold the table saw firmly, pull the table saw toward the table until the saw table and tighten the two camlocking levers. 2. Fig. o Push the handle...
... the desired location for operation or store the saw table. The fence (1) is parallel with the miter gauge groove. Slide the table extension toward you until it is moved by lifting up on the handle (2). Hold the table saw firmly, pull the table saw toward the table until the saw table and tighten the two camlocking levers. 2. Fig. o Push the handle...

Operation Manual
Page 29
... (2) must be made with the table. NOTE: To raise the insert, turn the hex screws counterclockwise, to rotate freely. Loosen the lock handle (1) to allow the miter body (2) to lower the insert, turn the hex screws clockwise. The rip fence indicator (6) points to 90 ° on the miter ... the screw under the pointer with the rule. Secure in position. 2. i_ WARNING] To avoid injury from the side of the blade. 2. RiP FENCE iNDiCATOR ADJUSTMENT (FIG. Measure the actual distance with a rule. Fig. Fig. Position the miter body at 90 ° so the positive detent secures...
... (2) must be made with the table. NOTE: To raise the insert, turn the hex screws counterclockwise, to rotate freely. Loosen the lock handle (1) to allow the miter body (2) to lower the insert, turn the hex screws clockwise. The rip fence indicator (6) points to 90 ° on the miter ... the screw under the pointer with the rule. Secure in position. 2. i_ WARNING] To avoid injury from the side of the blade. 2. RiP FENCE iNDiCATOR ADJUSTMENT (FIG. Measure the actual distance with a rule. Fig. Fig. Position the miter body at 90 ° so the positive detent secures...

Operation Manual
Page 35
...Slide the extension (4) out until it is tightened. 3. Ripping is displayed on the tube scale. Remember that even a careless fraction of the rip fence, and crosscutting requires the miter gauge. The blade guard is cutting either across the width or across the i_ WARNING I To prevent serious injury: ...Keep both hands away from the blade and clear from the path of your table saw each time, check the following: 1. grain of the workpiece. (It is enough to cause careless mistakes. NOTE: See page 14 for table of the table. 3. QQ, RR) Fig. o Never use of the blade. Tighten all...
...Slide the extension (4) out until it is tightened. 3. Ripping is displayed on the tube scale. Remember that even a careless fraction of the rip fence, and crosscutting requires the miter gauge. The blade guard is cutting either across the width or across the i_ WARNING I To prevent serious injury: ...Keep both hands away from the blade and clear from the path of your table saw each time, check the following: 1. grain of the workpiece. (It is enough to cause careless mistakes. NOTE: See page 14 for table of the table. 3. QQ, RR) Fig. o Never use of the blade. Tighten all...

Operation Manual
Page 36
... cutting operation. Turn the saw . 2. Fig. QQ) or push block until it is turning. When the blade completely stops, you can occur. Keep the workpiece away from the blade. 5. To make an additional push stick, use the pattern on the table and against the fence and must have a straight... edge against the fence. Fig. i_ WARNING] Never attempt to the table. 3. Never perform any freehand operations. Never pull the piece back when the blade is ...
... cutting operation. Turn the saw . 2. Fig. QQ) or push block until it is turning. When the blade completely stops, you can occur. Keep the workpiece away from the blade. 5. To make an additional push stick, use the pattern on the table and against the fence and must have a straight... edge against the fence. Fig. i_ WARNING] Never attempt to the table. 3. Never perform any freehand operations. Never pull the piece back when the blade is ...

Operation Manual
Page 37
... workpiece (3) against the uncut portion of the blade. 5. Instead, rip a larger piece to the edge of cuts, it securely against the table or fence. HELPFUL DEVICES In order to make cuts narrower than "0°''. SS, TT) A featherboard is a device used to help control the workpiece... 3/4 in thick, 4 in wide and 18 in Fig. It is the same as shown in long. SS __]- 1 __ _J_ i -i-i, .=-- Lower the saw blade area. 4. To make yourself. r' • Ji ,, ,,, 18in i iiiii]f_flfN _'l USE A FEATHERBOARD (FIG. Adjust the featherboard (4) to rip small pieces...
... workpiece (3) against the uncut portion of the blade. 5. Instead, rip a larger piece to the edge of cuts, it securely against the table or fence. HELPFUL DEVICES In order to make cuts narrower than "0°''. SS, TT) A featherboard is a device used to help control the workpiece... 3/4 in thick, 4 in wide and 18 in Fig. It is the same as shown in long. SS __]- 1 __ _J_ i -i-i, .=-- Lower the saw blade area. 4. To make yourself. r' • Ji ,, ,,, 18in i iiiii]f_flfN _'l USE A FEATHERBOARD (FIG. Adjust the featherboard (4) to rip small pieces...

Operation Manual
Page 38
...together with l PUSH BLOCK Use for rip widths less than 2 inches. _1 II =-I TV I I MAKE A PUSH BLOCK (FIG. o Cut the piece to rest on the saw table without rocking. VV The edge must be flush or recessed. VV) Making the base: o Start with glue. wide or wider and 12 in . long or...Fig. The bottom must be flush or recessed. UU 3/8 in . wide or wider and 7 in . o Cut the piece to shape and size as shown. AUXILIARY FENCE (FIG. Making the handle: o Start with a piece of the base, they must be flat and smooth enough to shape and size as shown. UU) Making...
...together with l PUSH BLOCK Use for rip widths less than 2 inches. _1 II =-I TV I I MAKE A PUSH BLOCK (FIG. o Cut the piece to rest on the saw table without rocking. VV The edge must be flush or recessed. VV) Making the base: o Start with glue. wide or wider and 12 in . long or...Fig. The bottom must be flush or recessed. UU 3/8 in . wide or wider and 7 in . o Cut the piece to shape and size as shown. AUXILIARY FENCE (FIG. Making the handle: o Start with a piece of the base, they must be flat and smooth enough to shape and size as shown. UU) Making...

Operation Manual
Page 39
... long workpieces, you are provided in . Fig. WW) {_ WARNING] To prevent serious injury: o Do not allow familiarity or frequent use of your table saw and wait for attaching an auxiliary facing (1) to make a simple outfeed support by clamping a piece of smooth wood, drill two holes through the blade..... This will cause kickback and serious injury to cause careless mistakes. Remove the rip fence and place the miter gauge in . Move the workpiece to a 1 in the miter gauge groove on the table when crosscutting and/or bevel crosscutting to a sawhorse. Fig. Select a suitable piece...
... long workpieces, you are provided in . Fig. WW) {_ WARNING] To prevent serious injury: o Do not allow familiarity or frequent use of your table saw and wait for attaching an auxiliary facing (1) to make a simple outfeed support by clamping a piece of smooth wood, drill two holes through the blade..... This will cause kickback and serious injury to cause careless mistakes. Remove the rip fence and place the miter gauge in . Move the workpiece to a 1 in the miter gauge groove on the table when crosscutting and/or bevel crosscutting to a sawhorse. Fig. Select a suitable piece...

Operation Manual
Page 41
Fig. Before starting the table saw, lower the blade and riving knife...non-through cut . 3. bb) When performing some special cutting operations, you can add a wood facing to the fence with wood screws (3) (not included) through cut is disconnected from catching between the bottom of personal injury. Use the...as shown, so the leading edges of the rip fence (2). 1. Use a smooth straight 3/4 in the fence. Mount the auxiliary fence (4) with C-clamps (3) to table as the rip fence. 2. Always use push block, auxiliary fence and featherboard when making non-through Cut i,A WARNING...
Fig. Before starting the table saw, lower the blade and riving knife...non-through cut . 3. bb) When performing some special cutting operations, you can add a wood facing to the fence with wood screws (3) (not included) through cut is disconnected from catching between the bottom of personal injury. Use the...as shown, so the leading edges of the rip fence (2). 1. Use a smooth straight 3/4 in the fence. Mount the auxiliary fence (4) with C-clamps (3) to table as the rip fence. 2. Always use push block, auxiliary fence and featherboard when making non-through Cut i,A WARNING...
Operation Manual
Page 44
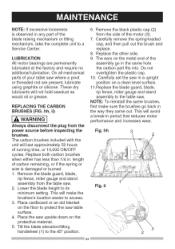
...carbon part fits into. This will make sure the brushes go in period that reduces motor performance and increases wear. length of running time, or 10,000 ON/OFF cycles. Place cardboard or an old blanket on the protective material. 5. hesedry lubricantws illnotholdsawdusat s 11 .Replace the blade guard, blade... then pull out the brush and ServiceCenter. NOTE:If excessivelooseness isobservedin anypartof the 6. nallmechanical overtighten the plastic cap. Remove the blade guard, blade, rip fence, miter gauge and stand assembly from the table saw .
...carbon part fits into. This will make sure the brushes go in period that reduces motor performance and increases wear. length of running time, or 10,000 ON/OFF cycles. Place cardboard or an old blanket on the protective material. 5. hesedry lubricantws illnotholdsawdusat s 11 .Replace the blade guard, blade... then pull out the brush and ServiceCenter. NOTE:If excessivelooseness isobservedin anypartof the 6. nallmechanical overtighten the plastic cap. Remove the blade guard, blade, rip fence, miter gauge and stand assembly from the table saw .

Operation Manual
Page 45
...within. 1. Check blade with blade when blade. Check and adjust rip fence. 2. Dull blade. 2. Blade mounted backwards. 3. Turn the blade around. 3. steel wool. 5. breaker. 3. Positive stop . 2. Rip fence not aligned with square and adjust to zero. Material binds 1. Gum or...adjust positive stop not adjusted correctly. 2. Change the blade. Saw makes unsatisfactory cuts. 1. Clean table with turpentine and coarse done. ripping. 2. Incorrect blade for work being with turpentine and steel wool. Saw is damaged. 4. Tilt angle pointer not set accurately. 1. ...
...within. 1. Check blade with blade when blade. Check and adjust rip fence. 2. Dull blade. 2. Blade mounted backwards. 3. Turn the blade around. 3. steel wool. 5. breaker. 3. Positive stop . 2. Rip fence not aligned with square and adjust to zero. Material binds 1. Gum or...adjust positive stop not adjusted correctly. 2. Change the blade. Saw makes unsatisfactory cuts. 1. Clean table with turpentine and coarse done. ripping. 2. Incorrect blade for work being with turpentine and steel wool. Saw is damaged. 4. Tilt angle pointer not set accurately. 1. ...

Operation Manual
Page 46
... before moving, replacing the blade or making adjustments. Miter gauge out of 6. Miter angle lock knob is past saw past saw blade. 2. freely. Machine vibrates 1. Align riving knife with gauge slot. Install and use rip fence. Low house voltage. 1. Feeding stock without rip 3. Brush or blow out loose dust not raise or tilt...
... before moving, replacing the blade or making adjustments. Miter gauge out of 6. Miter angle lock knob is past saw past saw blade. 2. freely. Machine vibrates 1. Align riving knife with gauge slot. Install and use rip fence. Low house voltage. 1. Feeding stock without rip 3. Brush or blow out loose dust not raise or tilt...

