Operation Manual
Page 13
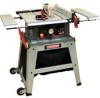
...-843-1682 for roller wheel 1 AA Bottom short support bracket 1 BB Top short support bracket 2 CC Roller wheel hardware bag assembly 1 TABLE OF LOOSE PARTS ITEM DESCRIPTION QUANTITY A Table saw assembly 1 B Blade guard assembly 1 C Anti-kickback pawls assembly 1 D Handwheel handle 1 E Riving knife hardware bag assembly 1 F Rip fence 1 G Miter gauge 1 H Blade wrench 2 I ,A WARNING ] if any packing material. I Push stick...
...-843-1682 for roller wheel 1 AA Bottom short support bracket 1 BB Top short support bracket 2 CC Roller wheel hardware bag assembly 1 TABLE OF LOOSE PARTS ITEM DESCRIPTION QUANTITY A Table saw assembly 1 B Blade guard assembly 1 C Anti-kickback pawls assembly 1 D Handwheel handle 1 E Riving knife hardware bag assembly 1 F Rip fence 1 G Miter gauge 1 H Blade wrench 2 I ,A WARNING ] if any packing material. I Push stick...

Operation Manual
Page 23
... (4) and slot in the correct position. Tighten the bevel lock handle. Remove the blade guard and antikickback pawl assembly. 3. Loosen the locking knob (3) from the power source outlet. Remove the table insert 2. Take the lock knob (6) and insert thru the washer (5), middle hole ...4. P-1 3 _54 6 Aligning the riving knife (Fig. Q) I ) 1. Remove the table insert and raise the blade to 0 ° and place the table insert in place for all through the mounting bracket (3) located behind the saw , please follow the instructions on the bevel scale. 4. b. Insert the washer (5) between ...
... (4) and slot in the correct position. Tighten the bevel lock handle. Remove the blade guard and antikickback pawl assembly. 3. Loosen the locking knob (3) from the power source outlet. Remove the table insert 2. Take the lock knob (6) and insert thru the washer (5), middle hole ...4. P-1 3 _54 6 Aligning the riving knife (Fig. Q) I ) 1. Remove the table insert and raise the blade to 0 ° and place the table insert in place for all through the mounting bracket (3) located behind the saw , please follow the instructions on the bevel scale. 4. b. Insert the washer (5) between ...


