
Operation Manual
Page 1
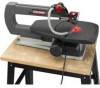
Customer HeUp Line: 1E800E932E3188 Sears, Roebuck and Co., 3333 Bevedy Rd., Hoffman Estates, IL 60179 USA Visit the Craftsman web page: www.sears.com/craftsman 983000-769 08-05 Save this product. SCROLL SAW VARIABLE SPEED Model No. 315.216090 _ WARMNG: To reduce the risk of injury, the user must read and understand the operator's manual before using this manual for future reference US 18 in.
Customer HeUp Line: 1E800E932E3188 Sears, Roebuck and Co., 3333 Bevedy Rd., Hoffman Estates, IL 60179 USA Visit the Craftsman web page: www.sears.com/craftsman 983000-769 08-05 Save this product. SCROLL SAW VARIABLE SPEED Model No. 315.216090 _ WARMNG: To reduce the risk of injury, the user must read and understand the operator's manual before using this manual for future reference US 18 in.

Operation Manual
Page 4
...and not making contact with the accessory. size,style,andcuttingspeedforthemateriaal ndthe [] INSPECTTOOLCORDSPERIODICALLHYdf.amaged, haverepairedby a qualifiedservicetechnicianat typeofcut. insulationhavingan outersurfacethat isgreenwith MENTSARESECURE. that are [] DONOTUSETOOLJFSWITCHDOESNOTTURNJT included with saw or workpiece before connecting to power supply. cordor plugis necessaryd,onotconnectheequipment-groundincgonductotro a liveterminal.Repair [] NEVERTOUCHBLADEor othermovingpartsduring or replacea damagedor worncordimmediatelSy.tay use only identical replacement...
...and not making contact with the accessory. size,style,andcuttingspeedforthemateriaal ndthe [] INSPECTTOOLCORDSPERIODICALLHYdf.amaged, haverepairedby a qualifiedservicetechnicianat typeofcut. insulationhavingan outersurfacethat isgreenwith MENTSARESECURE. that are [] DONOTUSETOOLJFSWITCHDOESNOTTURNJT included with saw or workpiece before connecting to power supply. cordor plugis necessaryd,onotconnectheequipment-groundincgonductotro a liveterminal.Repair [] NEVERTOUCHBLADEor othermovingpartsduring or replacea damagedor worncordimmediatelSy.tay use only identical replacement...

Operation Manual
Page 8
... with the tool outdoors, use tool with a damaged cord since touching the damaged area could cause electrical shock resulting in an extension cord. If the saw does not operate when plugged into a matching outlet that is designed for lights cannot properly carry a power tool motor. SPEED AND WRING The no=load...
... with the tool outdoors, use tool with a damaged cord since touching the damaged area could cause electrical shock resulting in an extension cord. If the saw does not operate when plugged into a matching outlet that is designed for lights cannot properly carry a power tool motor. SPEED AND WRING The no=load...

Operation Manual
Page 9
... hands well away from wood products. Revolutions Per Minute (RPM} The number of a workpiece by the blade. Riving Knife/Spreader/Splitter (table saws} A metal piece, slightly thinner than at either end of turns completed by a fence, miter gauge, or other than 90 ° to...workpiece that has hardened. Resin A sticky, sap=based substance that serves as a guide for narrow ripping operations. Anti-KickbackPawls(radial arm and table saws) A device which, when properly installed and maintained, is designed to make thinner pieces. Arbor The shaft on which a blade or cutting tool...
... hands well away from wood products. Revolutions Per Minute (RPM} The number of a workpiece by the blade. Riving Knife/Spreader/Splitter (table saws} A metal piece, slightly thinner than at either end of turns completed by a fence, miter gauge, or other than 90 ° to...workpiece that has hardened. Resin A sticky, sap=based substance that serves as a guide for narrow ripping operations. Anti-KickbackPawls(radial arm and table saws) A device which, when properly installed and maintained, is designed to make thinner pieces. Arbor The shaft on which a blade or cutting tool...
Operation Manual
Page 11
... again when the power comes back on the workpiece clean and lighted for maximum accuracy. The vertical portion provides a blade guard to turn OFF the scroll saw. Also, in the OFF position. SAWDUST BLOWER / UGHY With a convenient ON/OFF switch, the sawdust blower/ light keeps the line of a power failure...plate inserted in . TABLE LOCK KNOB Allows you to tilt the table and !ock it from starting up to the low speed of the scroll saw table allows for easy sawdust collection. BLADE STORAGE DRAWER Attached under the left to activate the blower and/or light. BLADE TENSION KNOB Loosen...
... again when the power comes back on the workpiece clean and lighted for maximum accuracy. The vertical portion provides a blade guard to turn OFF the scroll saw. Also, in the OFF position. SAWDUST BLOWER / UGHY With a convenient ON/OFF switch, the sawdust blower/ light keeps the line of a power failure...plate inserted in . TABLE LOCK KNOB Allows you to tilt the table and !ock it from starting up to the low speed of the scroll saw table allows for easy sawdust collection. BLADE STORAGE DRAWER Attached under the left to activate the blower and/or light. BLADE TENSION KNOB Loosen...

Operation Manual
Page 13
... mounted. bolts should be approximately 24 in the base of the bench. The supporting surface where the scrol! x 12 in . CLAMPING SCROLL SAW TO WORKBENCH See Figure 6. thickness is to be mounted. [] Dril! three holes through the supporting surface of the workbench. [] Each ... and nuts (not included). 13 C-CLAMP WORKBENCH MOUNTING BOARD Fig. 6 Bolts should be drilled through the workbench. 8AWBABE [] Place scroll saw on workbench. Using the saw base as a workbench. three bolts (not included) and tighten securely with a 3/4 in the workbench. [] Insert al! Failure to...
... mounted. bolts should be approximately 24 in the base of the bench. The supporting surface where the scrol! x 12 in . CLAMPING SCROLL SAW TO WORKBENCH See Figure 6. thickness is to be mounted. [] Dril! three holes through the supporting surface of the workbench. [] Each ... and nuts (not included). 13 C-CLAMP WORKBENCH MOUNTING BOARD Fig. 6 Bolts should be drilled through the workbench. 8AWBABE [] Place scroll saw on workbench. Using the saw base as a workbench. three bolts (not included) and tighten securely with a 3/4 in the workbench. [] Insert al! Failure to...

Operation Manual
Page 14
...Loosen the screw holding the scale indicator. To tilt the drop foot, !oosen phillips screw, tilt drop foot to tilt the saw table angle for bevel cutting. Retighten drop foot lock knob. [] Loosen the table lock knob to the proper angle, then retighten... screw. [] Loosen the table lock knob and push down . Just under the saw table and rests flat against the workpiece. Be sure to check to determine if your requirements. Htfagboltsarebeingused,makesuretheyarelong enoughto gothroughholesinthesawbaseandthematerialto whichthesawis ...
...Loosen the screw holding the scale indicator. To tilt the drop foot, !oosen phillips screw, tilt drop foot to tilt the saw table angle for bevel cutting. Retighten drop foot lock knob. [] Loosen the table lock knob to the proper angle, then retighten... screw. [] Loosen the table lock knob and push down . Just under the saw table and rests flat against the workpiece. Be sure to check to determine if your requirements. Htfagboltsarebeingused,makesuretheyarelong enoughto gothroughholesinthesawbaseandthematerialto whichthesawis ...

Operation Manual
Page 15
...15 Never place hands in . CUTTING PROCEDURES _ WARNING: Do not use and adjustments are cutting wood. [] Use extra supports (tables, saw , it willcontacthe bladestoragedraweras youangletothe left . Failure to a workbench. thick [] Cutting nonferrous metals such as you experience excessive vibration or unusual... win go under the blade guard. [] Hold the workpiece firmly against the saw unattended until locating and correcting the problem. BASIC OPERATION OF THE SCROLL SAW Before starting any attachments or accessories not recommended by the manufacturer of the blade...
...15 Never place hands in . CUTTING PROCEDURES _ WARNING: Do not use and adjustments are cutting wood. [] Use extra supports (tables, saw , it willcontacthe bladestoragedraweras youangletothe left . Failure to a workbench. thick [] Cutting nonferrous metals such as you experience excessive vibration or unusual... win go under the blade guard. [] Hold the workpiece firmly against the saw unattended until locating and correcting the problem. BASIC OPERATION OF THE SCROLL SAW Before starting any attachments or accessories not recommended by the manufacturer of the blade...

Operation Manual
Page 16
...choosing a blade, carefully consider the following: • Very fine, narrow blades should be replaced frequently for best cutting results. BLADE mNFORMATION [] Scroll saw off and wait for 1/2 hour to 2 hours of cutting, depending on type of material and speed of operation, [] When cutting wood,... and properly supporting the workpiece. [] Bolt saw blades generally stay sharp for all moving parts to "bite." AVOiDiNGiNJURY [] Make sure saw 's blade and the workpiece. If this , always use a "V" block or clamp workpiece to ref! Scroll saw to the support surface to prevent slipping, ...
...choosing a blade, carefully consider the following: • Very fine, narrow blades should be replaced frequently for best cutting results. BLADE mNFORMATION [] Scroll saw off and wait for 1/2 hour to 2 hours of cutting, depending on type of material and speed of operation, [] When cutting wood,... and properly supporting the workpiece. [] Bolt saw blades generally stay sharp for all moving parts to "bite." AVOiDiNGiNJURY [] Make sure saw 's blade and the workpiece. If this , always use a "V" block or clamp workpiece to ref! Scroll saw to the support surface to prevent slipping, ...

Operation Manual
Page 17
... throat plate. [] Loosen both the upper and !ower blade clamp screws. [] Remove the blade. Scroll saw and pointing down . [] Turn the blade tension knob counterclockwise unti! Replacing the Saw Blade: [] Turn off the saw and unplug from power source. [] Pull up on the tension release. [] Turn blade tension knob ...counterclockwise to 2 hours of cutting, depending on the blade go under the saw table, remove the throat plate. [] Loosen both the upper and lower blade clamp screws. [] Pull up from power source. [] Place the new...
... throat plate. [] Loosen both the upper and !ower blade clamp screws. [] Remove the blade. Scroll saw and pointing down . [] Turn the blade tension knob counterclockwise unti! Replacing the Saw Blade: [] Turn off the saw and unplug from power source. [] Pull up on the tension release. [] Turn blade tension knob ...counterclockwise to 2 hours of cutting, depending on the blade go under the saw table, remove the throat plate. [] Loosen both the upper and lower blade clamp screws. [] Pull up from power source. [] Place the new...

Operation Manual
Page 18
... high speed of approximately ! ,600 SPM to prevent accidental contact with any tool other than 21609 Scroll Saw. TURNING THE SCROLL SAW ON AND OFF See Figures 13 o 14. [] Plug the foot switch into the power source. [] Plug the scroll saw ON. The ON/OFF knob also controls the variable speed of the drop foot acts as... drop foot should be adjusted so it just rests on , a hesitation before blade movement is normal. [] Release foot switch to reduce the strokes per minute. 18
... high speed of approximately ! ,600 SPM to prevent accidental contact with any tool other than 21609 Scroll Saw. TURNING THE SCROLL SAW ON AND OFF See Figures 13 o 14. [] Plug the foot switch into the power source. [] Plug the scroll saw ON. The ON/OFF knob also controls the variable speed of the drop foot acts as... drop foot should be adjusted so it just rests on , a hesitation before blade movement is normal. [] Release foot switch to reduce the strokes per minute. 18

Operation Manual
Page 19
... cutting may be joined together by placing double=sided tape between each piece or by wrapping masking tape around the corners or ends of a scroll saw through the hole in the Installing Blades section, and remove the workpiece from the blade holders as a single piece of material. _I1_ WARMNG:... wood. Several pieces of wood may be used when several identical shapes need to be used to make interior cuts in the workpiece: [] Remove the scroll saw blade as explained in the In= stalling Blades section previously in this manual. [] Dd[[ a 1,/4 in. (6 mm) hole in the table. [] Install the...
... cutting may be joined together by placing double=sided tape between each piece or by wrapping masking tape around the corners or ends of a scroll saw through the hole in the Installing Blades section, and remove the workpiece from the blade holders as a single piece of material. _I1_ WARMNG:... wood. Several pieces of wood may be used when several identical shapes need to be used to make interior cuts in the workpiece: [] Remove the scroll saw blade as explained in the In= stalling Blades section previously in this manual. [] Dd[[ a 1,/4 in. (6 mm) hole in the table. [] Install the...
Operation Manual
Page 20
Check the blade tension by blowing with practice and requires knowing the scroll saw. Turn the blade tension knob counterclockwise to make the blade too loose. Use of any other part may cause the blade to decrease (...their use only identical replacement parts. ADJUSTINGDROPFOOT [] Loosenthedropfootlockknob. [] Centetrhe dropfootaroundthesawbladetothe de- Adjustments to blade tension can be developed with an air jet. [] Keep the scroll saw clean. [] After cleaning the table top initially, apply a thin coat of automobile type (paste) wax to the table top so the wood slides easily ...
Check the blade tension by blowing with practice and requires knowing the scroll saw. Turn the blade tension knob counterclockwise to make the blade too loose. Use of any other part may cause the blade to decrease (...their use only identical replacement parts. ADJUSTINGDROPFOOT [] Loosenthedropfootlockknob. [] Centetrhe dropfootaroundthesawbladetothe de- Adjustments to blade tension can be developed with an air jet. [] Keep the scroll saw clean. [] After cleaning the table top initially, apply a thin coat of automobile type (paste) wax to the table top so the wood slides easily ...

Operation Manual
Page 21
...into the tube until it stays. [] Ensure the motor brush cap is a squeak coming from the bearings. [] Carefully place the saw on the other side of the saw housing. [] Using a flat blade screwdriver, remove the bottom brush assembly cap through the access hole in the base and the top... a few drops of the saw has externally accessible motor brush assemblies that motor brush moves freely in this same manner. Do not overtighten. ARM BEARINGS See Figure 18. NOTE: Lubricate the bearings on its side, exposing the underside of a nail, or paper clip. [] If one side without replacing the...
...into the tube until it stays. [] Ensure the motor brush cap is a squeak coming from the bearings. [] Carefully place the saw on the other side of the saw housing. [] Using a flat blade screwdriver, remove the bottom brush assembly cap through the access hole in the base and the top... a few drops of the saw has externally accessible motor brush assemblies that motor brush moves freely in this same manner. Do not overtighten. ARM BEARINGS See Figure 18. NOTE: Lubricate the bearings on its side, exposing the underside of a nail, or paper clip. [] If one side without replacing the...

Operation Manual
Page 22
... not run. use wide blades for cutting tMn wood or tight corners and turns; saw Mounting surface Loose table or table resting against motor Loose motor mounting Blade holders out of saw again. Reduce side pressure on blade; Blades breaking. Do not attempt any repair. Reduce... feed rate. Tighten table lock knob. Vibration (there is always some vibration when the saw is running). Use narrow blades for thicker wood or wide turns. check blade tension. Blade runout (blade not properly aligned with ON/OFF...
... not run. use wide blades for cutting tMn wood or tight corners and turns; saw Mounting surface Loose table or table resting against motor Loose motor mounting Blade holders out of saw again. Reduce side pressure on blade; Blades breaking. Do not attempt any repair. Reduce... feed rate. Tighten table lock knob. Vibration (there is always some vibration when the saw is running). Use narrow blades for thicker wood or wide turns. check blade tension. Blade runout (blade not properly aligned with ON/OFF...

Operation Manual
Page 24
MODEL NO, 216090 SEE F_GURE B FOR iNSERTiON POINT INTO PART 38 A 49 47 58 42 4O 41 12 41 14 " 29 / 28 _ 30 32 21 18 15 16 39 FIGURE A CRAFTSMAN 18 in. (457 ram} SCROLL SAW -
MODEL NO, 216090 SEE F_GURE B FOR iNSERTiON POINT INTO PART 38 A 49 47 58 42 4O 41 12 41 14 " 29 / 28 _ 30 32 21 18 15 16 39 FIGURE A CRAFTSMAN 18 in. (457 ram} SCROLL SAW -

Operation Manual
Page 25
...980123001 979786001 979785001 979784001 A10003050150 979772001 979820001 979821001 979822001 A38030612019 979824001 979825001 180111000 180113000 DESCRIPTION QTY. Upper Clamp Assembly 1 Saw Blade 3 Throat Plate 1 Table 1 Table Screw 1 Saw Blade 2 Blade Drawer 1 * Washer (M5 3 * Screw (M5 x 8 3 * Screw (M5 x ... 1 Spacer 1 Set Screw (M6 x 6 mm 2 * Screw (M4 x 8 1 * Fixed Plate 1 Spacer 1 * O-ring (P-5 1 * Screw (M4 x 18 mm 2 Table Spindle 1 Table Pivot Stand 1 * Hex Nut (M4 2 Label 1 Large Sponge 2 Pc Board 1 Inslulation Film 1 Lead Wire 1 Small Sponge 1 Transformer...
...980123001 979786001 979785001 979784001 A10003050150 979772001 979820001 979821001 979822001 A38030612019 979824001 979825001 180111000 180113000 DESCRIPTION QTY. Upper Clamp Assembly 1 Saw Blade 3 Throat Plate 1 Table 1 Table Screw 1 Saw Blade 2 Blade Drawer 1 * Washer (M5 3 * Screw (M5 x 8 3 * Screw (M5 x ... 1 Spacer 1 Set Screw (M6 x 6 mm 2 * Screw (M4 x 8 1 * Fixed Plate 1 Spacer 1 * O-ring (P-5 1 * Screw (M4 x 18 mm 2 Table Spindle 1 Table Pivot Stand 1 * Hex Nut (M4 2 Label 1 Large Sponge 2 Pc Board 1 Inslulation Film 1 Lead Wire 1 Small Sponge 1 Transformer...

Operation Manual
Page 27
...BACK PAGE FOR PARTS ORDERING iNSTRUCTiONS KEY NO, 1 2 3 4 5 6 7 8 9 10 !1 12 13 14 15 16 17 18 19 20 21 22 23 24 25 26 27 28 PART NUMBER 102032002 979745001 979747001 180243000 979749001 180a040!0 A42001030109 A4200!030140 180232000 108217000 180253000 .... MODEL NO. 216090 The modeI number will be found on a plate attached to the motor housing. Always mention the model number in , (457 rnrn) SCROLL SAW - Hd. (M4 x 40 mm + S 4 50 180262000 Led Label 1 51 A10003040107 Screw, Ph. CRAFTSMAN 18 in all correspondence regarding your 1 Scroll Saw or when ordering repair parts.
...BACK PAGE FOR PARTS ORDERING iNSTRUCTiONS KEY NO, 1 2 3 4 5 6 7 8 9 10 !1 12 13 14 15 16 17 18 19 20 21 22 23 24 25 26 27 28 PART NUMBER 102032002 979745001 979747001 180243000 979749001 180a040!0 A42001030109 A4200!030140 180232000 108217000 180253000 .... MODEL NO. 216090 The modeI number will be found on a plate attached to the motor housing. Always mention the model number in , (457 rnrn) SCROLL SAW - Hd. (M4 x 40 mm + S 4 50 180262000 Led Label 1 51 A10003040107 Screw, Ph. CRAFTSMAN 18 in all correspondence regarding your 1 Scroll Saw or when ordering repair parts.


