

Operation Manual
Page 1
SAFETY ASSEMBLY OPERATION MAINTENANCE Operator's Manual Oscillating Spindle SANDER Model No. 351.215000 CAUTION: Read and follow all Safety Rules and Operating Instructions before First Use of this manual with tool. Sears, Roebuck and Co., Hoffman Estates, IL 60179 U.S.A. www.sears.com/craftsman 25759.00 Draft (01/22/08) PARTS LIST ESPAÑOL Keep this Product.
SAFETY ASSEMBLY OPERATION MAINTENANCE Operator's Manual Oscillating Spindle SANDER Model No. 351.215000 CAUTION: Read and follow all Safety Rules and Operating Instructions before First Use of this manual with tool. Sears, Roebuck and Co., Hoffman Estates, IL 60179 U.S.A. www.sears.com/craftsman 25759.00 Draft (01/22/08) PARTS LIST ESPAÑOL Keep this Product.
Operation Manual
Page 2
.... Turn the power off and do this type of injury to persons. • Handle the workpiece correctly. Protect hands from these chemicals: work area clean. TABLE OF CONTENTS Warranty 2 Safety Rules 2-3 Unpacking 3 Assembly 3-4 Installation 4-5 Operation 5-6 Maintenance 6 Troubleshooting 7 Parts Illustration and List 8-9 Español 12-19 WARRANTY ONE-YEAR FULL WARRANTY ON CRAFTSMAN TOOL If this Craftsman tool fails due to a defect in working order. CAUTION: Always follow proper operating procedures as lamps, batteries, bits or blades. Sears...
.... Turn the power off and do this type of injury to persons. • Handle the workpiece correctly. Protect hands from these chemicals: work area clean. TABLE OF CONTENTS Warranty 2 Safety Rules 2-3 Unpacking 3 Assembly 3-4 Installation 4-5 Operation 5-6 Maintenance 6 Troubleshooting 7 Parts Illustration and List 8-9 Español 12-19 WARRANTY ONE-YEAR FULL WARRANTY ON CRAFTSMAN TOOL If this Craftsman tool fails due to a defect in working order. CAUTION: Always follow proper operating procedures as lamps, batteries, bits or blades. Sears...
Operation Manual
Page 3
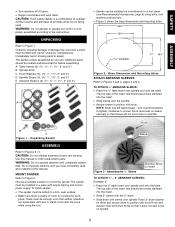
... tool. • Sander can be bolted to order replacement parts. The top side of room for before assembling. Knob Sleeve Figure 3 - Check for shipping damage. turn counterclockwise to tighten, clockwise to Figures 2 - 5. Place 2″ drum washer on Insert TO ATTACH ¾″ - 3″ ABRASIVE SLEEVES: Example: 2″ • Place the 2″ table insert over spindle and onto the table. Attaching the ½″ Sleeve Direction...
... tool. • Sander can be bolted to order replacement parts. The top side of room for before assembling. Knob Sleeve Figure 3 - Check for shipping damage. turn counterclockwise to tighten, clockwise to Figures 2 - 5. Place 2″ drum washer on Insert TO ATTACH ¾″ - 3″ ABRASIVE SLEEVES: Example: 2″ • Place the 2″ table insert over spindle and onto the table. Attaching the ½″ Sleeve Direction...
Operation Manual
Page 4
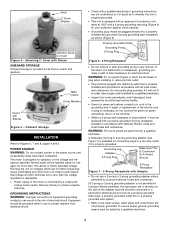
... national codes and ordinances. (A 3-prong to the motor is encountered, it is equipped with Adapter • Do not use . Knob 2″ Drum Washer Direction Arrow on the voltage and frequency specified. Table Inserts Drum Washers Drums with Sleeve ONBOARD STORAGE Onboard storage is designed for all assembly steps have repaired by an authorized service facility. • Green (or green and yellow) conductor in cord...
... national codes and ordinances. (A 3-prong to the motor is encountered, it is equipped with Adapter • Do not use . Knob 2″ Drum Washer Direction Arrow on the voltage and frequency specified. Table Inserts Drum Washers Drums with Sleeve ONBOARD STORAGE Onboard storage is designed for all assembly steps have repaired by an authorized service facility. • Green (or green and yellow) conductor in cord...
Operation Manual
Page 5
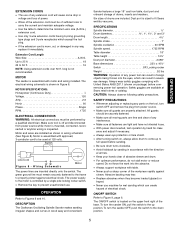
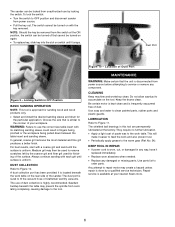
... the tool, turn the sander OFF, push the switch to the down position. 5 DESCRIPTION The Craftsman Oscillating Spindle Sander makes sanding irregular shapes and curves in severe eye damage. Abrasive backing may tear. • Replace abrasives when they become loaded (glazed) or frayed. • Never use machine for clear- To turn switch OFF and remove the plug from power source while motor is mounted, connected, reconnected or anytime wiring...
... the tool, turn the sander OFF, push the switch to the down position. 5 DESCRIPTION The Craftsman Oscillating Spindle Sander makes sanding irregular shapes and curves in severe eye damage. Abrasive backing may tear. • Replace abrasives when they become loaded (glazed) or frayed. • Never use machine for clear- To turn switch OFF and remove the plug from power source while motor is mounted, connected, reconnected or anytime wiring...
Operation Manual
Page 6
The sander can be turned off but cannot be turned on again. • To replace key, slide key into the slot on with the key removed. The switch cannot be turned on switch until it is located beneath the work table on the tool. Locking Switch in fingers being pinched or the workpiece being pulled down between the table insert and sanding sleeve. WARNING: Failure to use the correct size table insert with each grit...
The sander can be turned off but cannot be turned on again. • To replace key, slide key into the slot on with the key removed. The switch cannot be turned on switch until it is located beneath the work table on the tool. Locking Switch in fingers being pinched or the workpiece being pulled down between the table insert and sanding sleeve. WARNING: Failure to use the correct size table insert with each grit...
Operation Manual
Page 7
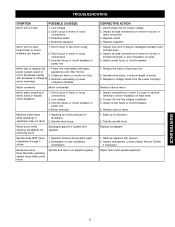
... too much pressure to develop full 1. Reduce load on motor 1. Defective capacitor Motor will not start ; General overloading of appliances and other motors motor decreases rapidly 2. sandpaper not removing wood Sandpaper glazed or loaded with vacuum 2. Tighten spindle knob Replace sandpaper 1. Low voltage 2. Open circuit in motor or loose connections 2. Inspect line cord or plug for proper voltage 2. Contact Sears Service Center if necessary Adjust motor and spindle alignment MAINTENANCE 7 Inspect...
... too much pressure to develop full 1. Reduce load on motor 1. Defective capacitor Motor will not start ; General overloading of appliances and other motors motor decreases rapidly 2. sandpaper not removing wood Sandpaper glazed or loaded with vacuum 2. Tighten spindle knob Replace sandpaper 1. Low voltage 2. Open circuit in motor or loose connections 2. Inspect line cord or plug for proper voltage 2. Contact Sears Service Center if necessary Adjust motor and spindle alignment MAINTENANCE 7 Inspect...
Operation Manual
Page 9
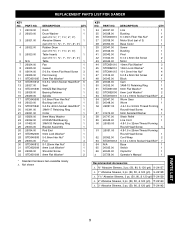
...Set Screw 2 Motor 1 10mm Flat Washer* 3 10mm Lock Washer* 4 10-1.5mm Hex Nut* 4 5-0.8 x 8mm Set Screw 2 Block 1 Cam 1 3AMI-15 Retaining Ring 1 6mm Flat Washer* 9 6mm Lock Washer* 2 6-1.0 x 16mm Socket Head Bolt* 2 Worm Gear 1 Worm 1 4.2-1.6 x 9.5mm Thread Forming Round Head Screw 4 5mm Serrated Washer 1 Strain Relief 1 Line Cord 1 4.8-1.6 x 32mm Thread Forming Round Head Screw 3 4.8-1.6 x 25mm Thread Forming Round Head Screw 1 Cord Wrap 2 6-1.0 x 12mm Socket Head Bolt* 7 Base 1 Switch 1 Capacitor 1 Operator's Manual 1 Recommended Accessories...
...Set Screw 2 Motor 1 10mm Flat Washer* 3 10mm Lock Washer* 4 10-1.5mm Hex Nut* 4 5-0.8 x 8mm Set Screw 2 Block 1 Cam 1 3AMI-15 Retaining Ring 1 6mm Flat Washer* 9 6mm Lock Washer* 2 6-1.0 x 16mm Socket Head Bolt* 2 Worm Gear 1 Worm 1 4.2-1.6 x 9.5mm Thread Forming Round Head Screw 4 5mm Serrated Washer 1 Strain Relief 1 Line Cord 1 4.8-1.6 x 32mm Thread Forming Round Head Screw 3 4.8-1.6 x 25mm Thread Forming Round Head Screw 1 Cord Wrap 2 6-1.0 x 12mm Socket Head Bolt* 7 Base 1 Switch 1 Capacitor 1 Operator's Manual 1 Recommended Accessories...

Operation Manual
Page 12
...® (1-800-469-4663) Call anytime, day or night (U.S.A. and Canada) www.sears.com www.sears.ca Our Home For repair of carry-in your home or ours! For the replacement parts, accessories and owner's manuals that you need to do-it ! Your Home For expert troubleshooting and home solutions advice: www.managemyhome.com For repair - Get it fixed, at your home -
...® (1-800-469-4663) Call anytime, day or night (U.S.A. and Canada) www.sears.com www.sears.ca Our Home For repair of carry-in your home or ours! For the replacement parts, accessories and owner's manuals that you need to do-it ! Your Home For expert troubleshooting and home solutions advice: www.managemyhome.com For repair - Get it fixed, at your home -


