
Operation Manual
Page 1
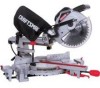
Operator's Manual CRSFrSMSN° 10 in. SLiDiNG COMPOUND MITER SAW WiTH LASER TRAC ® Model No. 137.212370 CAUTION: Before using this Miter Saw, read this manual and follow all its Safety Rules and Operating instructions • Safety Instructions • installation • Operation • Maintenance e Parts List Customer Help Line For Technical Support 1-800-843-1682 Sears Parts & Repair Center 1-800-488-1222 Sears, Roebuck and Co., Hoffman Estates, Visit our Craftsman website: www.sears.condcraftsman Part No. 137212370001 IL 60179 USA
Operator's Manual CRSFrSMSN° 10 in. SLiDiNG COMPOUND MITER SAW WiTH LASER TRAC ® Model No. 137.212370 CAUTION: Before using this Miter Saw, read this manual and follow all its Safety Rules and Operating instructions • Safety Instructions • installation • Operation • Maintenance e Parts List Customer Help Line For Technical Support 1-800-843-1682 Sears Parts & Repair Center 1-800-488-1222 Sears, Roebuck and Co., Hoffman Estates, Visit our Craftsman website: www.sears.condcraftsman Part No. 137212370001 IL 60179 USA
Operation Manual
Page 2
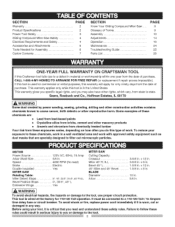
...warranty applies only while this Craftsman tool fails due to filter out microscopic particles. x 8 in the United States. Arbor 5/8 in . This tool is worn, cut or damaged in . Speed 4800 RPM (No load) Brake Electric Double Insulated Yes MITER SAW Rotating Table: Miter Detent Stops 0o,15°...Diameter 10 in . Some examples of work with approved safety equipment such as dust masks that you may also have other reproductive harm. To reduce your tool, it is wired at the factory for Assembly 6 Carton Contents 7 SECTION Know Your Sliding Compound Miter Saw ........
...warranty applies only while this Craftsman tool fails due to filter out microscopic particles. x 8 in the United States. Arbor 5/8 in . This tool is worn, cut or damaged in . Speed 4800 RPM (No load) Brake Electric Double Insulated Yes MITER SAW Rotating Table: Miter Detent Stops 0o,15°...Diameter 10 in . Some examples of work with approved safety equipment such as dust masks that you may also have other reproductive harm. To reduce your tool, it is wired at the factory for Assembly 6 Carton Contents 7 SECTION Know Your Sliding Compound Miter Saw ........
Operation Manual
Page 4
..., nonreversible type. MAKE SURE the blade has come up to full speed before cutting, even if the table is positioned in one of miter saws, seek guidance from the power source and clean the machine when finished using. 28. Solvents could possibly dissolve or otherwise damage the material.... workpiece being cut . 6. PROVIDE adequate support to be clamped in ]ury to a 120 V circuit. SHOULD any operation freehand (use the miter saw blade= 18. They can deflect and contact the blade guard and cause possible in place before removing or securing the workpiece, changing the workpiece angle...
..., nonreversible type. MAKE SURE the blade has come up to full speed before cutting, even if the table is positioned in one of miter saws, seek guidance from the power source and clean the machine when finished using. 28. Solvents could possibly dissolve or otherwise damage the material.... workpiece being cut . 6. PROVIDE adequate support to be clamped in ]ury to a 120 V circuit. SHOULD any operation freehand (use the miter saw blade= 18. They can deflect and contact the blade guard and cause possible in place before removing or securing the workpiece, changing the workpiece angle...
Operation Manual
Page 6
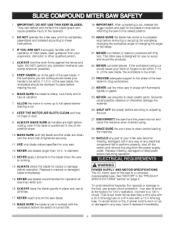
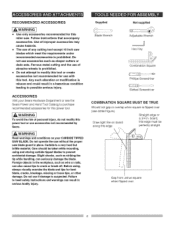
...6 Before using and storing carbide tipped blades to crack or break off. r_ this edge. Use of any cutting tool except 10 inch saw . board, Draw light line on your Sears Hardware Department or see dotted figure). Do not use of improper accessories may cause ...bodily injury. Slight shocks, such as shaper cutters or dado sets. RECOMMENDED ACCESSORIES [AWARNING[ • Use only accessories recommended for this miter saw blades which meet the requirements under recommended accessories is a very hard but brittle material Care should be perfectly straight. Straight edge or a...
...6 Before using and storing carbide tipped blades to crack or break off. r_ this edge. Use of any cutting tool except 10 inch saw . board, Draw light line on your Sears Hardware Department or see dotted figure). Do not use of improper accessories may cause ...bodily injury. Slight shocks, such as shaper cutters or dado sets. RECOMMENDED ACCESSORIES [AWARNING[ • Use only accessories recommended for this miter saw blades which meet the requirements under recommended accessories is a very hard but brittle material Care should be perfectly straight. Straight edge or a...
Operation Manual
Page 7
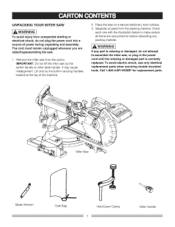
...unplugged whenever you are accounted for replacement parts. I. It may cause misalignment. UNPACKING YOUR MITER SAW [A WARNIN[ G To avoid injury from the packing material. IMPORTANT: Do not lift the miter saw by the built-in the power cord until the missing or damaged part is missing or ... servicing double insulated tools. Call 1-800-4-MY-HOME e for before discarding any part is correctly replaced. Miter Saw Blade Wrench Dust Bag Hold-Down Clamp Miter Handle Check each one with the illustration below to make certain all parts from unexpected starting or electrical shock...
...unplugged whenever you are accounted for replacement parts. I. It may cause misalignment. UNPACKING YOUR MITER SAW [A WARNIN[ G To avoid injury from the packing material. IMPORTANT: Do not lift the miter saw by the built-in the power cord until the missing or damaged part is missing or ... servicing double insulated tools. Call 1-800-4-MY-HOME e for before discarding any part is correctly replaced. Miter Saw Blade Wrench Dust Bag Hold-Down Clamp Miter Handle Check each one with the illustration below to make certain all parts from unexpected starting or electrical shock...

Operation Manual
Page 9
...your hands from the blade in line with accurate cutting. To measure the bevel angle of the workpiece. MITER SCALE - Used to mount the miter saw at a preset positive stop the miter saw to each other proper device to keep the workpiece from wood products. POSITIVE STOP LOCKING LEVER - STOP ...hardened. COVER PLATE SCREW - Helps to a stable surface= ON/OFF TRIGGER SWITCH -To start the tool, squeeze the trigger. Locks the miter saw to keep the blade from twisting during blade replacement or removal. Scaled to the blade arbor locking bolt. Convenient storage to 45 ° ...
...your hands from the blade in line with accurate cutting. To measure the bevel angle of the workpiece. MITER SCALE - Used to mount the miter saw at a preset positive stop the miter saw to each other proper device to keep the workpiece from wood products. POSITIVE STOP LOCKING LEVER - STOP ...hardened. COVER PLATE SCREW - Helps to a stable surface= ON/OFF TRIGGER SWITCH -To start the tool, squeeze the trigger. Locks the miter saw to keep the blade from twisting during blade replacement or removal. Scaled to the blade arbor locking bolt. Convenient storage to 45 ° ...
Operation Manual
Page 10
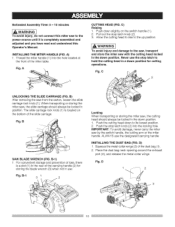
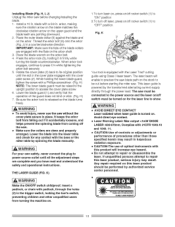
...slide carriage. Never use the stop latch to hold the cutting head in a down position. 1. B-l) 1. For convenient storage and prevention of loss, there is a slot (1) in the down to the power source until it is located on the switch handle (I 2 10 iNSTALLiNG THE DUST BAG (FIG. Fig. When transporting or storing the miter saw...avoid injury and damage to the up position. The slide carriage lock knob (1) is completely assembled and adjusted and you have read and understood this miter saw , the slide carriage should always be locked in use the designated carrying...
...slide carriage. Never use the stop latch to hold the cutting head in a down position. 1. B-l) 1. For convenient storage and prevention of loss, there is a slot (1) in the down to the power source until it is located on the switch handle (I 2 10 iNSTALLiNG THE DUST BAG (FIG. Fig. When transporting or storing the miter saw...avoid injury and damage to the up position. The slide carriage lock knob (1) is completely assembled and adjusted and you have read and understood this miter saw , the slide carriage should always be locked in use the designated carrying...
Operation Manual
Page 11
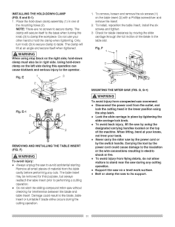
... holes (2). E-1 2 J_ \_._/2 2 REMOVING AND iNSTALLiNG THE TABLE INSERT (FIG. e Lock the slide carriage in electric shock or fire. = To avoid injury from your back. • Never carry the miter saw by the power cord or by the power cord could result to the blade, table insert or...blade strike occurs during this purpose, but always reattach the table insert prior to performing a cutting operation. • Do not start the sliding compound miter saw to the operator. ! Carrying the tool by the switch handle. The clamp will secure itself when tightened_ [A WARNINIG When using the ...
... holes (2). E-1 2 J_ \_._/2 2 REMOVING AND iNSTALLiNG THE TABLE INSERT (FIG. e Lock the slide carriage in electric shock or fire. = To avoid injury from your back. • Never carry the miter saw by the power cord or by the power cord could result to the blade, table insert or...blade strike occurs during this purpose, but always reattach the table insert prior to performing a cutting operation. • Do not start the sliding compound miter saw to the operator. ! Carrying the tool by the switch handle. The clamp will secure itself when tightened_ [A WARNINIG When using the ...
Operation Manual
Page 12
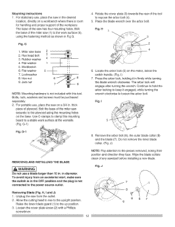
... from the outlet. 2. G 12.. Locate the arbor lock (5) on a workbench where there is room for handling and proper support of the miter saw (1) to the plywood using the fastening method as shown in Fig G. Do not remove the inner blade coltar. (Fig. NOTE: Pay attention to... mounting holes on a 3/4 in . Fig. Workbench 6. Flat washer 5 7. For portable use a blade larger than 10 in . J) REMOVING AND INSTALLING THE BLADE WARNING] Do not use , place the saw in the OFF position and the plug is not included with a Phillips screwdriver. 12 87 Press the arbor lock...
... from the outlet. 2. G 12.. Locate the arbor lock (5) on a workbench where there is room for handling and proper support of the miter saw (1) to the plywood using the fastening method as shown in Fig G. Do not remove the inner blade coltar. (Fig. NOTE: Pay attention to... mounting holes on a 3/4 in . Fig. Workbench 6. Flat washer 5 7. For portable use a blade larger than 10 in . J) REMOVING AND INSTALLING THE BLADE WARNING] Do not use , place the saw in the OFF position and the plug is not included with a Phillips screwdriver. 12 87 Press the arbor lock...
Operation Manual
Page 13
...blade with the flats on /off switch must be cut before starting the miter saw before changing/installing the blade. Thread the arbor bolt (6) onto the arbor (Fig. THE LASER GUIDE (FIG. The saw without the cover plate secure in while tightening the arbor bolt securely. 5....operation of the blade collars are clean and properly arranged. Avoid direct eye contact. • Laser Warning Label: Max output I , J) Unplug the miter saw . Installing Blade (Fig. H, I . arbor, making sure the rotation arrow on the blade matches the clockwise rotation arrow on /off rocker switch...
...blade with the flats on /off switch must be cut before starting the miter saw before changing/installing the blade. Thread the arbor bolt (6) onto the arbor (Fig. THE LASER GUIDE (FIG. The saw without the cover plate secure in while tightening the arbor bolt securely. 5....operation of the blade collars are clean and properly arranged. Avoid direct eye contact. • Laser Warning Label: Max output I , J) Unplug the miter saw . Installing Blade (Fig. H, I . arbor, making sure the rotation arrow on the blade matches the clockwise rotation arrow on /off rocker switch...
Operation Manual
Page 14
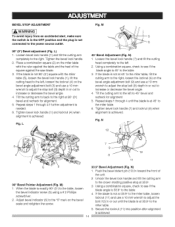
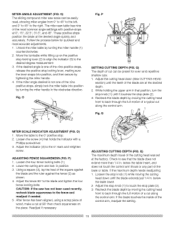
... is not 90 ° (0°) square with the ruler against the saw blade. 3. Tilt the cutting arm to the left to the right. N 10 i 79_---- Adjust bevel indicator (6) to the left , loosen the Iocknut (4) on the miter table with the miter table (5), loosen the bevel lock handle (I . If the blade is ...(7) and tilt the cutting head completely to the "0" mark on the bevel angle adjustment bolt (9) and use a 10 mm wrench to adjust the stop bolt (9) depth in or out to the miter table. 6. M) 1. Unlock the bevel lock handle and tilt the cutting arm to the crown molding positive stop at...
... is not 90 ° (0°) square with the ruler against the saw blade. 3. Tilt the cutting arm to the left to the right. N 10 i 79_---- Adjust bevel indicator (6) to the left , loosen the Iocknut (4) on the miter table with the miter table (5), loosen the bevel lock handle (I . If the blade is ...(7) and tilt the cutting head completely to the "0" mark on the bevel angle adjustment bolt (9) and use a 10 mm wrench to adjust the stop bolt (9) depth in or out to the miter table. 6. M) 1. Unlock the bevel lock handle and tilt the cutting arm to the crown molding positive stop at...
Operation Manual
Page 15
...that holds the indicator with positive stops at 90 ° then check squareness on the positive stop plate (2). 3. CAUTION: If the saw scale can be easily read, showing miter angles from 0 ° to 45 ° to the left, and 0 _'to 45 ° to the desired degree measurement.... . P) 1. Lower the cutting arm and lock in . If the maximum depth needs readjusting: I. below the table insert. 2. O) The sliding compound miter saw has not been used recently, recheck blade squareness to the blade and tighten the four fence locking bolts. making sure the lever snaps into position...
...that holds the indicator with positive stops at 90 ° then check squareness on the positive stop plate (2). 3. CAUTION: If the saw scale can be easily read, showing miter angles from 0 ° to 45 ° to the left, and 0 _'to 45 ° to the desired degree measurement.... . P) 1. Lower the cutting arm and lock in . If the maximum depth needs readjusting: I. below the table insert. 2. O) The sliding compound miter saw has not been used recently, recheck blade squareness to the blade and tighten the four fence locking bolts. making sure the lever snaps into position...
Operation Manual
Page 16
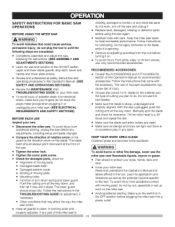
... limitations as well as the potential hazards specific to the tool. Keep the miter saw again. • Maintain tools with care. Do not use and function of injury. • Choose the correct 10 in any adjustments, including setup and blade changes. • Compare the direction... of this Operator's Manual for best and safest performance. SAFETY iNSTRUCTiONS OPERATIONS FOR BASIC SAW BEFORE USING THE MITER SAW [A WARNING To avoid mistakes that could cause...
... limitations as well as the potential hazards specific to the tool. Keep the miter saw again. • Maintain tools with care. Do not use and function of injury. • Choose the correct 10 in any adjustments, including setup and blade changes. • Compare the direction... of this Operator's Manual for best and safest performance. SAFETY iNSTRUCTiONS OPERATIONS FOR BASIC SAW BEFORE USING THE MITER SAW [A WARNING To avoid mistakes that could cause...
Operation Manual
Page 17
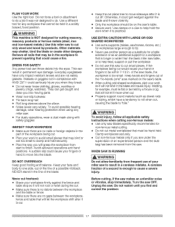
...cutting. • Do not cut small pieces. A sudden slip could cause a fire. Otherwise, it is cut . • Plan your miter saw to be on the saw to move into the blade. e Only the workpiece should be within 7-1/2 in permanent eye damage. USE EXTRA CAUTION WITH LARGE OR ODD ...be hand held in compliance with safety goggles. This can throw debris into moving parts. NEVER stand in a careless mistake. o Never use this miter saw 's table. of the blade. Clamp workpieces securely. • Cut non-ferrous metals only if you will not bind in the workpiece to ...
...cutting. • Do not cut small pieces. A sudden slip could cause a fire. Otherwise, it is cut . • Plan your miter saw to be on the saw to move into the blade. e Only the workpiece should be within 7-1/2 in permanent eye damage. USE EXTRA CAUTION WITH LARGE OR ODD ...be hand held in compliance with safety goggles. This can throw debris into moving parts. NEVER stand in a careless mistake. o Never use this miter saw 's table. of the blade. Clamp workpieces securely. • Cut non-ferrous metals only if you will not bind in the workpiece to ...
Operation Manual
Page 18
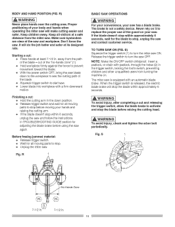
... in TROUBLESHOOTING GUIDE section for the blade to stop the blade before moving your body and hands when operating the miter saw is not a safety device. The miter saw will make cutting easier and safer. R) (A WARNI[NO Never place hands near the cutting area. Keep aH ...periodically. Keep children away. Make sure bystanders are clear of the "no-hands zone" (1). • Hold workpiece firmly against the fence to turn the miter saw has a blade brake. Insert a padlock, or chain with padlock, through the holes (2) in . BODY AND HAND POSITION (FIG. Fig. Starting a...
... in TROUBLESHOOTING GUIDE section for the blade to stop the blade before moving your body and hands when operating the miter saw is not a safety device. The miter saw will make cutting easier and safer. R) (A WARNI[NO Never place hands near the cutting area. Keep aH ...periodically. Keep children away. Make sure bystanders are clear of the "no-hands zone" (1). • Hold workpiece firmly against the fence to turn the miter saw has a blade brake. Insert a padlock, or chain with padlock, through the holes (2) in . BODY AND HAND POSITION (FIG. Fig. Starting a...
Operation Manual
Page 22
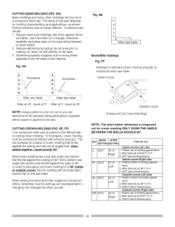
...of the material. Splintering typically happens due to making cut area prior to wrong blade application and thinness of the saw iabie q Bevel/Miter Settings Fig. DD Workpiece F e Workpiece Miter saw . e °4 ] I 131.6 ° Right inside or outside corner, lay the molding with extreme ...Right side I1. CUTTINGBASEMOLDING (FIG. To fit properly, crown molding must be cut so you can be compound-mitered with its broad back surface flat on compound miter saw table. Perform practice cuts on the tape. 3. Fig. To achieve best results: I _. The two surfaces...
...of the material. Splintering typically happens due to making cut area prior to wrong blade application and thinness of the saw iabie q Bevel/Miter Settings Fig. DD Workpiece F e Workpiece Miter saw . e °4 ] I 131.6 ° Right inside or outside corner, lay the molding with extreme ...Right side I1. CUTTINGBASEMOLDING (FIG. To fit properly, crown molding must be cut so you can be compound-mitered with its broad back surface flat on compound miter saw table. Perform practice cuts on the tape. 3. Fig. To achieve best results: I _. The two surfaces...

Operation Manual
Page 23
CROWN MOLDING CHART Compound Miter Saw Miter and Bevel Angle Settings Wall to Crown Molding Angle Angle Between V//ajJs 67 68 69 ?0 7i 72 73 74 75 76 77 ...I7/7 1679 /66 40 /6 02 /5 64 16625 I4 87 14 48 . 1I 81 . 14 09 !099 1371 10 66 /332 1034 12 93 1061 /254 9 669 /2/6 9 37 /I 77 9 05 1138 8 73 841 8 09 10 99 1060 /0 21 777 9 82 746 943 714 904 6 82 885 651 6 20 5 88 5 57 8... 1638 16604 15 70 15 366 !502 14 62 14 34 14 O0 15666 1331 12 97 12 62 !229 11 93 11 59 1124 10 89 16 566 1820 9 85 950 915 8 80 845 8166 7766 7 4O 7 05 66766 6 35 600 565 ,5 30 4 94 4 59 4 24 ...
CROWN MOLDING CHART Compound Miter Saw Miter and Bevel Angle Settings Wall to Crown Molding Angle Angle Between V//ajJs 67 68 69 ?0 7i 72 73 74 75 76 77 ...I7/7 1679 /66 40 /6 02 /5 64 16625 I4 87 14 48 . 1I 81 . 14 09 !099 1371 10 66 /332 1034 12 93 1061 /254 9 669 /2/6 9 37 /I 77 9 05 1138 8 73 841 8 09 10 99 1060 /0 21 777 9 82 746 943 714 904 6 82 885 651 6 20 5 88 5 57 8... 1638 16604 15 70 15 366 !502 14 62 14 34 14 O0 15666 1331 12 97 12 62 !229 11 93 11 59 1124 10 89 16 566 1820 9 85 950 915 8 80 845 8166 7766 7 4O 7 05 66766 6 35 600 565 ,5 30 4 94 4 59 4 24 ...

Operation Manual
Page 24
...shock, fire or injury, use only parts identical to start -up. Frequently blow out or vacuum up a miter cut. HH Link LOWER BLADE GUARD Do not use the saw . Reassemble exactly as necessary: Chop pivot: Apply light machine oil to which actuates the lower guard movement) may...indicated in the way they came out. Fig. Tighten the cap snugly, but do not use the saw . • To avoid injury from the power source receptacle to clean the miter saw without the lower blade guard. SAWDUST Periodically, sawdust will accumulate under normal operating conditions; LUBRICATION (FIG. ...
...shock, fire or injury, use only parts identical to start -up. Frequently blow out or vacuum up a miter cut. HH Link LOWER BLADE GUARD Do not use the saw . Reassemble exactly as necessary: Chop pivot: Apply light machine oil to which actuates the lower guard movement) may...indicated in the way they came out. Fig. Tighten the cap snugly, but do not use the saw . • To avoid injury from the power source receptacle to clean the miter saw without the lower blade guard. SAWDUST Periodically, sawdust will accumulate under normal operating conditions; LUBRICATION (FIG. ...
Operation Manual
Page 26
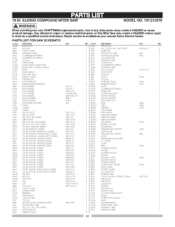
...MODEL.O137.212370 IA WARNINI G When servicing use only CRAFTSMAN replacement parts. 10INSUDINCGOMPOUMNtDTES. PARTS LIST FOR SAW SCHEMATIC I,D No 07WD O53R 063Z OE>4W 0915 ... OKRO OKR4 OKT© 0KTS OKUW OLU2 0@Q1 OS!S OS2B OSTZ OU03 23LN 23N F Description SLIDE PLATE TRIGGER CORD CLAMP WARNING lABEL COMPRE_ION SPRING COMPRESSION SPRING COLLAR SPRING WIRE FIOLD-DOWN C L,A_'V",PASS...cause product damage. Any attempt to repair or replace electrical parts on this Miter Saw may create a HAZARD unless repair is done by a qualified service technician, Repair service is available at ...
...MODEL.O137.212370 IA WARNINI G When servicing use only CRAFTSMAN replacement parts. 10INSUDINCGOMPOUMNtDTES. PARTS LIST FOR SAW SCHEMATIC I,D No 07WD O53R 063Z OE>4W 0915 ... OKRO OKR4 OKT© 0KTS OKUW OLU2 0@Q1 OS!S OS2B OSTZ OU03 23LN 23N F Description SLIDE PLATE TRIGGER CORD CLAMP WARNING lABEL COMPRE_ION SPRING COMPRESSION SPRING COLLAR SPRING WIRE FIOLD-DOWN C L,A_'V",PASS...cause product damage. Any attempt to repair or replace electrical parts on this Miter Saw may create a HAZARD unless repair is done by a qualified service technician, Repair service is available at ...
Operation Manual
Page 28
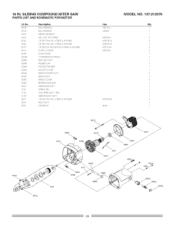
... & WASHER FIELD AS, S' Y GEAR BOX Size 6201ZLU 6200Z M5'0.8-6 M5'0.8 1,5 M5'0.8 12 MS* 12-60 M5"0,8-6 M5"0.8_35 #AW MODEL NO. 137.212370 Qfy I .D No. SLiDiNG COMPOUND MITER SAW PARTS LIST AND SCHEMATIC FOR MOTOR I ) 1 2 2 1 2 2 1 1 1 1 1 1 2 2 2 1 1 1 1 1 4 1 1 OQMY £ETO 0K44 PAN biD...
... & WASHER FIELD AS, S' Y GEAR BOX Size 6201ZLU 6200Z M5'0.8-6 M5'0.8 1,5 M5'0.8 12 MS* 12-60 M5"0,8-6 M5"0.8_35 #AW MODEL NO. 137.212370 Qfy I .D No. SLiDiNG COMPOUND MITER SAW PARTS LIST AND SCHEMATIC FOR MOTOR I ) 1 2 2 1 2 2 1 1 1 1 1 1 2 2 2 1 1 1 1 1 4 1 1 OQMY £ETO 0K44 PAN biD...


