Operation Manual
Page 1
OPERATOR'S MANUAL I:RRFTSMRN DETAIL BISCUIT JOINER DOUBLE INSULATED Model No. 315.1 75502 OO A WARNING: To reduce the risk of injury, the user must read and understand the operator's manual before using this manual for future reference Customer Help Line: 1-800-932-3188 Sears, Roebuck and Co., 3333 Beverly Rd., Hoffman Estates, IL 60179 USA Visit the Craftsman web page: www.sears.com/craftsman 983000-5t 9 5-05 Save this product.
OPERATOR'S MANUAL I:RRFTSMRN DETAIL BISCUIT JOINER DOUBLE INSULATED Model No. 315.1 75502 OO A WARNING: To reduce the risk of injury, the user must read and understand the operator's manual before using this manual for future reference Customer Help Line: 1-800-932-3188 Sears, Roebuck and Co., 3333 Beverly Rd., Hoffman Estates, IL 60179 USA Visit the Craftsman web page: www.sears.com/craftsman 983000-5t 9 5-05 Save this product.
Operation Manual
Page 9
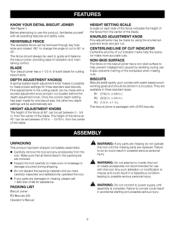
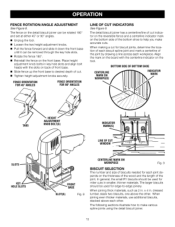
KNOW YOUR DETAIL BISCUIT JOINER See Figure 1. The fence should be removed through key hole slots and rotated t80 ° to 90 ° or 45 ° . Fine adjustments to comply could result in a dry place. HEIGHT SETTING SCALE A scale on the biscuit joiner has a non-skid surface to do ...caused by using the knurled adjustment knob and jam nut. Make sure that all operating features and safety rules. BLADE Your biscuit joiner has a t-1/2 in .) This biscuit joiner is misuse and could result in . HEIGHT ADJUSTMENT KNOBS The height of the fence at 45 ° can be automatically...
KNOW YOUR DETAIL BISCUIT JOINER See Figure 1. The fence should be removed through key hole slots and rotated t80 ° to 90 ° or 45 ° . Fine adjustments to comply could result in a dry place. HEIGHT SETTING SCALE A scale on the biscuit joiner has a non-skid surface to do ...caused by using the knurled adjustment knob and jam nut. Make sure that all operating features and safety rules. BLADE Your biscuit joiner has a t-1/2 in .) This biscuit joiner is misuse and could result in . HEIGHT ADJUSTMENT KNOBS The height of the fence at 45 ° can be automatically...
Operation Manual
Page 10
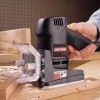
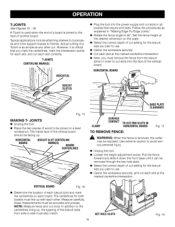
...inside the slots with glue and used for each joint depends on the top and front portion of water-based glues. materials. TURNING THE BISCUIT JOINER ON/OFF See Figure 2. • •A A WARNING: Do not allow familiarity with tools to connect butt, miter, and T-joints... to make you careless. Traditional spline joinery requires cutting slots with a router or table saw. SWITCH TRIGGER Fig. 2 OPERATING THE BISCUIT JOINER See Figure 3. PROPERHANDPOSITION REARHANDLE TOP OFTOOL 10 White glue, yellow glue, carpenters glue, hide glue, and aliphatic resin glue are then...
...inside the slots with glue and used for each joint depends on the top and front portion of water-based glues. materials. TURNING THE BISCUIT JOINER ON/OFF See Figure 2. • •A A WARNING: Do not allow familiarity with tools to connect butt, miter, and T-joints... to make you careless. Traditional spline joinery requires cutting slots with a router or table saw. SWITCH TRIGGER Fig. 2 OPERATING THE BISCUIT JOINER See Figure 3. PROPERHANDPOSITION REARHANDLE TOP OFTOOL 10 White glue, yellow glue, carpenters glue, hide glue, and aliphatic resin glue are then...

Operation Manual
Page 11
A WARNING: Always unplug the tool when chang- The biscuit joiner can be adjusted for the biscuit size you plan to accommodate three standard size biscuits -- When using an R2 size biscuit, rotate the depth adjustment knob until the slot marked 2 aligns with the depth indicator mark on the rear base, ...three standard cutting depths to use . DEPTH OF CUT Depth of the arrow. Adjustments are spring loaded. For example, when using an R3 size biscuit, rotate the depth adjustment knob until the slot marked 3 aligns with the depth indicator mark on the rear base - 1,2, or 3. •...
A WARNING: Always unplug the tool when chang- The biscuit joiner can be adjusted for the biscuit size you plan to accommodate three standard size biscuits -- When using an R2 size biscuit, rotate the depth adjustment knob until the slot marked 2 aligns with the depth indicator mark on the rear base, ...three standard cutting depths to use . DEPTH OF CUT Depth of the arrow. Adjustments are spring loaded. For example, when using an R3 size biscuit, rotate the depth adjustment knob until the slot marked 3 aligns with the depth indicator mark on the rear base - 1,2, or 3. •...

Operation Manual
Page 12
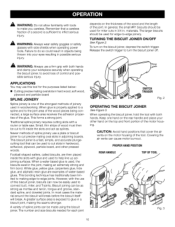
... knobs, • Pull the fence forward and slide it will cut in a scrap piece of t/16 in . Fit the correct size biscuit into the slot. Scale marks are in increments of wood. ROTATECLOCKWISEFOR SHALLOWBISCUITSLOTS ROTATE COUNTERCLOCKWISFEOR DEEPERBISCUITSLOTS Fig. 5 HEIGHT ADJKUNSOTBMSENT (1) PULL FORWARD 12 (2)... indicator mark is aligned with a tab on the backside of adjustment. The fence on the biscuit joiner can be moved up or down to the top of the biscuit into the biscuit slot. A scale on the scale. NOTE: Slots in relation to adjust the position of ...
... knobs, • Pull the fence forward and slide it will cut in a scrap piece of t/16 in . Fit the correct size biscuit into the slot. Scale marks are in increments of wood. ROTATECLOCKWISEFOR SHALLOWBISCUITSLOTS ROTATE COUNTERCLOCKWISFEOR DEEPERBISCUITSLOTS Fig. 5 HEIGHT ADJKUNSOTBMSENT (1) PULL FORWARD 12 (2)... indicator mark is aligned with a tab on the backside of adjustment. The fence on the biscuit joiner can be moved up or down to the top of the biscuit into the biscuit slot. A scale on the scale. NOTE: Slots in relation to adjust the position of ...
Operation Manual
Page 13
... above the other . When joining thick materials, such as 2 in . Place height adjustment knob bolts in smaller, thinner materials. ADJUSTMENT The fence on the detail biscuit joiner can be rotated t80 ° and set at either 45 ° or 90 ° angles. • Unplug the tool. • Loosen the two height adjustment ...
... above the other . When joining thick materials, such as 2 in . Place height adjustment knob bolts in smaller, thinner materials. ADJUSTMENT The fence on the detail biscuit joiner can be rotated t80 ° and set at either 45 ° or 90 ° angles. • Unplug the tool. • Loosen the two height adjustment ...

Operation Manual
Page 14
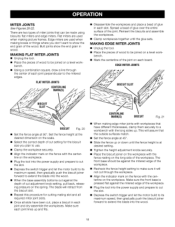
...releasing pressure on the board. • Depress the switch trigger and let the motor build to its maximum speed, then gradually push the biscuit joiner forward to extend the blade into the power supply and prepare to avoid loss of the joint. The blade will not move during the cut.... • Plug the biscuit joiner into the wood. Make sure each workpiece. EDGETO EDGEJOINTS CENTERLINE MARKS BISCUIT(S) BISCUIT SLOT(S) Fig. t2 14 NOTE: The scale indicates the height of the fence from the...
...releasing pressure on the board. • Depress the switch trigger and let the motor build to its maximum speed, then gradually push the biscuit joiner forward to extend the blade into the power supply and prepare to avoid loss of the joint. The blade will not move during the cut.... • Plug the biscuit joiner into the wood. Make sure each workpiece. EDGETO EDGEJOINTS CENTERLINE MARKS BISCUIT(S) BISCUIT SLOT(S) Fig. t2 14 NOTE: The scale indicates the height of the fence from the...

Operation Manual
Page 15
... bonding of glue on the scale. The procedure for cutting butt joints. OFFSETBUTTJOINT BISCUITSLOT BISCUIT CENTERLINE MARK(S) Fig. 14 15 This type of joint is identical to cut . • Plug the detail biscuit joiner into the wood. • When the base assembly bottoms out against the depth of... wood to use. However, by using biscuits you are planning to be assembled. • Using a square, determine the location of each biscuit spline joint and mark the ...
... bonding of glue on the scale. The procedure for cutting butt joints. OFFSETBUTTJOINT BISCUITSLOT BISCUIT CENTERLINE MARK(S) Fig. 14 15 This type of joint is identical to cut . • Plug the detail biscuit joiner into the wood. • When the base assembly bottoms out against the depth of... wood to use. However, by using biscuits you are planning to be assembled. • Using a square, determine the location of each biscuit spline joint and mark the ...
Operation Manual
Page 16
...joined to 90 °. VERTICALBOARD Fig. t6 Determine the location of the biscuit slots from the biscuit joiner in all boards that you mark the centerlines, mark the intersection points for the biscuit size you plan to be accurate and precise. Measure carefully, these measurements must... Use extreme caution to frames. The centerlines for the biscuit size you plan to cut setting for both boards must be joined on each biscuit joint and mark the centerlines on a level workbench. T-JOINTS CENTERLINEMARK(S) /(( ! (), | BISCUIT(S) • Plug the tool into the power supply ...
...joined to 90 °. VERTICALBOARD Fig. t6 Determine the location of the biscuit slots from the biscuit joiner in all boards that you mark the centerlines, mark the intersection points for the biscuit size you plan to be accurate and precise. Measure carefully, these measurements must... Use extreme caution to frames. The centerlines for the biscuit size you plan to cut setting for both boards must be joined on each biscuit joint and mark the centerlines on a level workbench. T-JOINTS CENTERLINEMARK(S) /(( ! (), | BISCUIT(S) • Plug the tool into the power supply ...

Operation Manual
Page 17
...slots have been cut the slot. • Depress the switch trigger and let the motor build to its maximum speed, then gradually push the biscuit joiner forward to extend the blade into the wood. 17 Spread a bead of glue over the entire surface of the vertical board and parallel with ... out against the bottom shoe. CUTTING VERTICAL BOARDS FOR T-JOINTS See Figure 19. • With the tool unplugged and the fence removed, place the detail biscuit joiner on a vertical board and align the indicator marks on the bottom shoe with the centerline on the vertical board. • Place a straight piece of...
...slots have been cut the slot. • Depress the switch trigger and let the motor build to its maximum speed, then gradually push the biscuit joiner forward to extend the blade into the wood. 17 Spread a bead of glue over the entire surface of the vertical board and parallel with ... out against the bottom shoe. CUTTING VERTICAL BOARDS FOR T-JOINTS See Figure 19. • With the tool unplugged and the fence removed, place the detail biscuit joiner on a vertical board and align the indicator marks on the bottom shoe with the centerline on the vertical board. • Place a straight piece of...
Operation Manual
Page 18
...and prepare to cut the slot. • Depress the switch trigger and let the motor build to its maximum speed, then gradually push the biscuit joiner forward to extend the blade into the wood. • When the base assembly bottoms out against the mitered edge of the workpiece. •... trigger and let the motor build to its maximum speed, then gradually push the biscuit joiner forward to show the end grain in each joint and dry-assemble the workpieces. EDGEMITER JOINTS CENTERLINE MARK(S) BISCUIT Fig. 21 BISCUIT Fig. 20 • Set the fence angle at desired setting. • Tighten...
...and prepare to cut the slot. • Depress the switch trigger and let the motor build to its maximum speed, then gradually push the biscuit joiner forward to extend the blade into the wood. • When the base assembly bottoms out against the mitered edge of the workpiece. •... trigger and let the motor build to its maximum speed, then gradually push the biscuit joiner forward to show the end grain in each joint and dry-assemble the workpieces. EDGEMITER JOINTS CENTERLINE MARK(S) BISCUIT Fig. 21 BISCUIT Fig. 20 • Set the fence angle at desired setting. • Tighten...

Operation Manual
Page 19
.... Spread a bead of glue over the entire surface of Craftsman's optional hinge kits. If possible, make your first cut. Clamp the workpiece securely so that it will retract from the same workpiece. Grasp and hold the biscuit joiner securely with the centerline mark(s) on clocks, recipe boxes, etc...joint. Tighten height adjustment knobs securely. Depress the switch trigger and let the motor build to its maximum speed, then gradually push the biscuit joiner forward to be hinged. • Determine the location of each hinge joint and mark the center of each joint by side on a...
.... Spread a bead of glue over the entire surface of Craftsman's optional hinge kits. If possible, make your first cut. Clamp the workpiece securely so that it will retract from the same workpiece. Grasp and hold the biscuit joiner securely with the centerline mark(s) on clocks, recipe boxes, etc...joint. Tighten height adjustment knobs securely. Depress the switch trigger and let the motor build to its maximum speed, then gradually push the biscuit joiner forward to be hinged. • Determine the location of each hinge joint and mark the center of each joint by side on a...
Operation Manual
Page 20
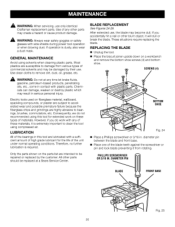
...of the unit under normal operating conditions. These situations require replacing the blade. REPLACING THE BLADE Unplug the tool. Place the biscuit joiner upside down on fiberglass material, wallboard, spackling compounds, or plaster are subject to remove dirt, dust, oil, grease, ... abrasive to damage from rotating, PHILLIPSSCREWDRIVER OR3/16 IN. All other blunt object, it will dull or break the blade. After extended use only identical Craftsman replacement parts. SCREWS(4) i I i I I I BOTTOM SHOE I Fig. 24 • Place a Phillips screwdriver or 3/16 in serious personal ...
...of the unit under normal operating conditions. These situations require replacing the blade. REPLACING THE BLADE Unplug the tool. Place the biscuit joiner upside down on fiberglass material, wallboard, spackling compounds, or plaster are subject to remove dirt, dust, oil, grease, ... abrasive to damage from rotating, PHILLIPSSCREWDRIVER OR3/16 IN. All other blunt object, it will dull or break the blade. After extended use only identical Craftsman replacement parts. SCREWS(4) i I i I I I BOTTOM SHOE I Fig. 24 • Place a Phillips screwdriver or 3/16 in serious personal ...

Operation Manual
Page 21
...; Remove the blade. • Usinga 9/64in. diameter pin between the blade and front base. • Place one of the biscuit joiner and clog the path for wood particles going through dust exhaust opening. See "Replacing the Blade." • With the... biscuit joiner still upside down on the bottom shoe also indicates the direction of the biscuit joiner when held in this area makes cutting biscuit slots more difficult. OUTERBLADE _) BLADE BLADESCREW GEARSPINDLE FLATS BLADEFLATS_"_,__._ INNER BLADEWASHER...
...; Remove the blade. • Usinga 9/64in. diameter pin between the blade and front base. • Place one of the biscuit joiner and clog the path for wood particles going through dust exhaust opening. See "Replacing the Blade." • With the... biscuit joiner still upside down on the bottom shoe also indicates the direction of the biscuit joiner when held in this area makes cutting biscuit slots more difficult. OUTERBLADE _) BLADE BLADESCREW GEARSPINDLE FLATS BLADEFLATS_"_,__._ INNER BLADEWASHER...

Operation Manual
Page 25
... the system, service should be performed by your nearest Sears Retail Store for Service Center information. * Standard Hardware Item -- Contact your nearest Sears Repair Center. CRAFTSMAN DETAIL BISCUIT JOINER - Fil. Hd 2 Ball Bearing (696 ZZ t Gear 1 Front Base w/Pad (Includes Key Nos. 21 And 24 1 Operator's Manual (not shown) NOTE: "A"- Always mention the model...
... the system, service should be performed by your nearest Sears Retail Store for Service Center information. * Standard Hardware Item -- Contact your nearest Sears Repair Center. CRAFTSMAN DETAIL BISCUIT JOINER - Fil. Hd 2 Ball Bearing (696 ZZ t Gear 1 Front Base w/Pad (Includes Key Nos. 21 And 24 1 Operator's Manual (not shown) NOTE: "A"- Always mention the model...


