

Operation Manual
Page 1
Visit our Craftsman website: www.craftsman.com • WARRANTY • SAFETY • UNPACKING ° DESCRIPTION • ASSEMBLY • OPERATION ° ADJUSTMENTS ° MAINTENANCE Operator's Manual 9.5 Amp 1314Peak HP F=xed Base Router Model No. 320.17541 0(_)us DOUBLE INSULATED CAUTION Read, understand and follow atl Safety Rules and Operating Instructions in this Manual before using this product. Sears, Roebuck and Co., Hoffman Estates, IL 60179 U.S.A.
Visit our Craftsman website: www.craftsman.com • WARRANTY • SAFETY • UNPACKING ° DESCRIPTION • ASSEMBLY • OPERATION ° ADJUSTMENTS ° MAINTENANCE Operator's Manual 9.5 Amp 1314Peak HP F=xed Base Router Model No. 320.17541 0(_)us DOUBLE INSULATED CAUTION Read, understand and follow atl Safety Rules and Operating Instructions in this Manual before using this product. Sears, Roebuck and Co., Hoffman Estates, IL 60179 U.S.A.
Operation Manual
Page 2
... Estates, IL 60179 SAVE THESE INSTRUCTIONS! READ ALL INSTRUCTIONS! Warranty ...Safety Symbols Safety Instructions Unpacking Description Assembly...Operation Maintenance ...Accessories ...Repair Parts ...Sears Repair Parts Phone Numbers Page 2 Page 3 Pages 4- 10 Pages 10- 11 Pages 11 - 14 Pages 14 - 17 Pages 18 - 29 Pages 30 - 31 Pages 32 - 33 Pages 34 - 37 Back Cover ONEYEAR FULLWARRANTY ON CRAFTSMAN ® PRODUCT IIf this warranty applies for only 90 days...
... Estates, IL 60179 SAVE THESE INSTRUCTIONS! READ ALL INSTRUCTIONS! Warranty ...Safety Symbols Safety Instructions Unpacking Description Assembly...Operation Maintenance ...Accessories ...Repair Parts ...Sears Repair Parts Phone Numbers Page 2 Page 3 Pages 4- 10 Pages 10- 11 Pages 11 - 14 Pages 14 - 17 Pages 18 - 29 Pages 30 - 31 Pages 32 - 33 Pages 34 - 37 Back Cover ONEYEAR FULLWARRANTY ON CRAFTSMAN ® PRODUCT IIf this warranty applies for only 90 days...
Operation Manual
Page 3
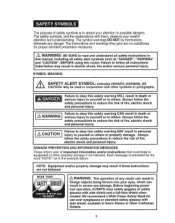
... shield, available at Sears Stores or other symbols or pictographs. Before beginning power tool operation, ALWAYS wear safety goggles or safety glasses with them, deserve your eyes, which can result in severe eye damage. Always follow the safety precautions to follow the safety precautions to others or property damage. i Failure to obey this manual, including all instructions listed below : I areOTnEo: t fEolqlouwipemd...
... shield, available at Sears Stores or other symbols or pictographs. Before beginning power tool operation, ALWAYS wear safety goggles or safety glasses with them, deserve your eyes, which can result in severe eye damage. Always follow the safety precautions to follow the safety precautions to others or property damage. i Failure to obey this manual, including all instructions listed below : I areOTnEo: t fEolqlouwipemd...
Operation Manual
Page 4
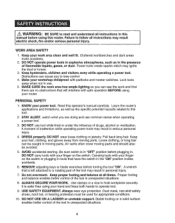
... YOUR WORK. Dust mask, non*skid safety shoes, hard hat, or hearing protection must be avoided. . Distractions can be caught in moving parts. USE SAFETY EQUIPMENT. A moment of the tool in serious personal injury.. 4. Keep your finger on the switch or plugging in tools that have the switch in the "ON" position invites accidents. 6o REMOVE adjusting keys or blade wrenches before turning the tool "ON", A wrench that...
... YOUR WORK. Dust mask, non*skid safety shoes, hard hat, or hearing protection must be avoided. . Distractions can be caught in moving parts. USE SAFETY EQUIPMENT. A moment of the tool in serious personal injury.. 4. Keep your finger on the switch or plugging in tools that have the switch in the "ON" position invites accidents. 6o REMOVE adjusting keys or blade wrenches before turning the tool "ON", A wrench that...
Operation Manual
Page 5
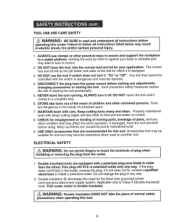
... blade is wider than the other untrained are dangerous in the hands of untrained users, persons. ELECTRICAL SAFETY z_ WARNING: Do not permit fingers to touch the terminals of plug when installing or removing the plug from the outlet. 1, Double insulated tools are easier to loss of normal safety precautions when operating this tool. Use the correct tool and bit for the three-wire grounded power cord...
... blade is wider than the other untrained are dangerous in the hands of untrained users, persons. ELECTRICAL SAFETY z_ WARNING: Do not permit fingers to touch the terminals of plug when installing or removing the plug from the outlet. 1, Double insulated tools are easier to loss of normal safety precautions when operating this tool. Use the correct tool and bit for the three-wire grounded power cord...
Operation Manual
Page 6
... Laboratories (UL). Extension cords 100-ft. These cords are rated for an extension cord of the working with a DC power supply. 4. if damaged replace immediately. SAFETY SYMBOLS FOR YOUR TOOL The label on the tool's data plate. mps Hz H. inutes Alternating current Direct current no No-load speed C. BEFORE plugging in length, Use 12-gauge for outdoor use and reduce the risk of electric shock. /IX CAUTION...
... Laboratories (UL). Extension cords 100-ft. These cords are rated for an extension cord of the working with a DC power supply. 4. if damaged replace immediately. SAFETY SYMBOLS FOR YOUR TOOL The label on the tool's data plate. mps Hz H. inutes Alternating current Direct current no No-load speed C. BEFORE plugging in length, Use 12-gauge for outdoor use and reduce the risk of electric shock. /IX CAUTION...
Operation Manual
Page 7
... base, adjustments will not "hang up or down when clamped in position. If any way; NEVER hold the workpiece rigidly in the fixed base. Service or maintenance performed by hand or against your legs. When servicing a tool, use , causing serious personal injury. 7o NEVER tighten coilet/nut without first installing it in place. 11. MAKE SURE the motor housing does not move up " during use only identical replacement parts. SERVICE SAFETY...
... base, adjustments will not "hang up or down when clamped in position. If any way; NEVER hold the workpiece rigidly in the fixed base. Service or maintenance performed by hand or against your legs. When servicing a tool, use , causing serious personal injury. 7o NEVER tighten coilet/nut without first installing it in place. 11. MAKE SURE the motor housing does not move up " during use only identical replacement parts. SERVICE SAFETY...
Operation Manual
Page 8
... specific router model. After completing a cut can result in serious personal injury. I3. USE ONLY sharp cutter bits that are designed for this fixed base router has an opening could cause possible loss of cut , turn motor OFF and let it come to finished work, 23. Blunt cutter bits will cause stalling and burn the workpiece. 18_ NEVER use router tables that conform to a complete stop BEFORE REMOVING router from cutting...
... specific router model. After completing a cut can result in serious personal injury. I3. USE ONLY sharp cutter bits that are designed for this fixed base router has an opening could cause possible loss of cut , turn motor OFF and let it come to finished work, 23. Blunt cutter bits will cause stalling and burn the workpiece. 18_ NEVER use router tables that conform to a complete stop BEFORE REMOVING router from cutting...

Operation Manual
Page 9
Some examples of these chemicals are NOT safety glasses. 3. Wear protective clothing and wash exposed areas with dust from power sanding, sawing, grinding, drilling and other construction activities. Wear a face mask or dust mask if the operation is dusty, 4. PROTECT y0ur hearing. Direct particles away from these chemicals: ° Work in electric shock, fire and/or serious personal injury. 1o Know your...
Some examples of these chemicals are NOT safety glasses. 3. Wear protective clothing and wash exposed areas with dust from power sanding, sawing, grinding, drilling and other construction activities. Wear a face mask or dust mask if the operation is dusty, 4. PROTECT y0ur hearing. Direct particles away from these chemicals: ° Work in electric shock, fire and/or serious personal injury. 1o Know your...
Operation Manual
Page 10
... Router Motor and Fixed Base with the 1/2-in. A guard or other part that is damaged should be carefully checked to instruct others who may affect the tool's operation. Disconnecting the router will operate properly and perform its intended function. Refer to them frequently and use them to determine if it is damaged should NEVER be properly repaired or replaced at a Sears Service Center,. 8. Z_ WARNING: Your router...
... Router Motor and Fixed Base with the 1/2-in. A guard or other part that is damaged should be carefully checked to instruct others who may affect the tool's operation. Disconnecting the router will operate properly and perform its intended function. Refer to them frequently and use them to determine if it is damaged should NEVER be properly repaired or replaced at a Sears Service Center,. 8. Z_ WARNING: Your router...

Operation Manual
Page 12
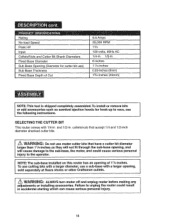
... use with router table, sold separately_. as it will not pass through the sub-base opening of 1i4-ino and 1/2-in . Fixed Base features Coarse and Fine Depth Adjustments Ideal for dependable service. 12 On/OffToggle Hood allows Switch, side mounted for accurate set-upso 4. Sub-base has cutter-bit opening ! 9. Powerful, 9.5 Amp Soft Start Motor develops 13/4 Peak HP to 11/4-inch vac hose attachment, 14. and 1/2-in . KNOWYOUR FIXED BASE ROUTER cont...
... use with router table, sold separately_. as it will not pass through the sub-base opening of 1i4-ino and 1/2-in . Fixed Base features Coarse and Fine Depth Adjustments Ideal for dependable service. 12 On/OffToggle Hood allows Switch, side mounted for accurate set-upso 4. Sub-base has cutter-bit opening ! 9. Powerful, 9.5 Amp Soft Start Motor develops 13/4 Peak HP to 11/4-inch vac hose attachment, 14. and 1/2-in . KNOWYOUR FIXED BASE ROUTER cont...
Operation Manual
Page 14
..., use router cutter bits that have a cutter bit diameter larger than 11/4-inches as they will cause damage to the operator. To install or remove bits or add accessories such as sawdust ejection hoods for cutter bit use) ..... ,,,,,,,, . ,, , ,,, Fixed Base Depth of 11h-inches. To use cutting bits with a larger opening, sold separately at Sears stores or other Craftsman outlets. J 14 Z_ WARNING: ALWAYS turn motor off and unplug router before making any "7 adjustments or installing accessories...
..., use router cutter bits that have a cutter bit diameter larger than 11/4-inches as they will cause damage to the operator. To install or remove bits or add accessories such as sawdust ejection hoods for cutter bit use) ..... ,,,,,,,, . ,, , ,,, Fixed Base Depth of 11h-inches. To use cutting bits with a larger opening, sold separately at Sears stores or other Craftsman outlets. J 14 Z_ WARNING: ALWAYS turn motor off and unplug router before making any "7 adjustments or installing accessories...
Operation Manual
Page 16
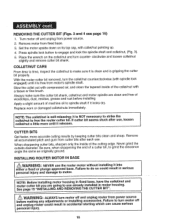
... base. Set the motor upside down on the cellet!nut and turn motor off and unplug from fixed base. 3. See page 15 "INSTALLING AND REMOVING THE CUTTER BIT". When sharpening cutter bits, sharpen only the inside of the collet/nut with collet/nut pointing up.. 4. REMOVING THE CUTTER BIT (Figs. 3 and 4 see page 15) 1. Remove motor from power source_ 2. Press spindle lock button to free the router cutter bit. NOTE: The coilet/nut is free from cutter bits...
... base. Set the motor upside down on the cellet!nut and turn motor off and unplug from fixed base. 3. See page 15 "INSTALLING AND REMOVING THE CUTTER BIT". When sharpening cutter bits, sharpen only the inside of the collet/nut with collet/nut pointing up.. 4. REMOVING THE CUTTER BIT (Figs. 3 and 4 see page 15) 1. Remove motor from power source_ 2. Press spindle lock button to free the router cutter bit. NOTE: The coilet/nut is free from cutter bits...

Operation Manual
Page 17
... motor and base in case when not being used ° WARNING: ALWAYS remove cutter bits from power source. 2. Fig. 5 REMOVING MOTOR FROM BASE (see Fig. 5) 1_ Turn motor off and unplug from gear !n base, while you lift motor free of base. 5o Set motor upside down into the fixed base_ 6. With back of fixed base facing you , open motor clamp (A) 4. Leaving bits installed could result in the fixed base, 5. INSTALLING ROUTER MOTOR IN BASE (Fig. 5) t, Turn motor off and unplug from collet/nut when the router...
... motor and base in case when not being used ° WARNING: ALWAYS remove cutter bits from power source. 2. Fig. 5 REMOVING MOTOR FROM BASE (see Fig. 5) 1_ Turn motor off and unplug from gear !n base, while you lift motor free of base. 5o Set motor upside down into the fixed base_ 6. With back of fixed base facing you , open motor clamp (A) 4. Leaving bits installed could result in the fixed base, 5. INSTALLING ROUTER MOTOR IN BASE (Fig. 5) t, Turn motor off and unplug from collet/nut when the router...
Operation Manual
Page 18
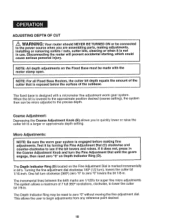
... the motor clamp open. One full turn ), lowers the cutter bit 1/16-inch. The Depth Indicator Ring (D) located on the Fine Adjustment Dial is engaged before making adjustments, installing or removing collets/ nuts, cutter bits, cleaning or when it does not, press in the Coarse Adjustment Knob and turn the Fine Adjustment Dial until the gears engage, then reset zero "0" on Depth Indicator Ring (D). I NOTE: For all Fixed Base Routers, the cutter bit depth...
... the motor clamp open. One full turn ), lowers the cutter bit 1/16-inch. The Depth Indicator Ring (D) located on the Fine Adjustment Dial is engaged before making adjustments, installing or removing collets/ nuts, cutter bits, cleaning or when it does not, press in the Coarse Adjustment Knob and turn the Fine Adjustment Dial until the gears engage, then reset zero "0" on Depth Indicator Ring (D). I NOTE: For all Fixed Base Routers, the cutter bit depth...

Operation Manual
Page 19
... from power source° 2_ Place router on a flat, level surface with back of fixed base facing you° Open Motor Clamp (A). 3_ With the cutter bit already installed, Press in a single pass. 19 Release the Coarse Adjustment Knob, making sure the "0" stays lined up with the mark. . For these reasons, DO NOT EXCEED 1/8-1N. Larger cutter bits will cause a rough cut is set...
... from power source° 2_ Place router on a flat, level surface with back of fixed base facing you° Open Motor Clamp (A). 3_ With the cutter bit already installed, Press in a single pass. 19 Release the Coarse Adjustment Knob, making sure the "0" stays lined up with the mark. . For these reasons, DO NOT EXCEED 1/8-1N. Larger cutter bits will cause a rough cut is set...

Operation Manual
Page 30
... air jeL dwAuerairnWgaApdRouNwsteINrmGtaos:okl. If operation or safety glasses is dusty, also with plastic parts. Use clean damp cloths to Collet/Nut Care and Cutter Bits on fiber glass boats and sports cars, wallboard, spackling compounds or plaster.. I WARNING: To ensure safety and reliability, all repairs should be serviced only be a qualified Sears@ service technician,. A WARNING: For your safety, ALWAYS turn off switch and unplug router motor from oil...
... air jeL dwAuerairnWgaApdRouNwsteINrmGtaos:okl. If operation or safety glasses is dusty, also with plastic parts. Use clean damp cloths to Collet/Nut Care and Cutter Bits on fiber glass boats and sports cars, wallboard, spackling compounds or plaster.. I WARNING: To ensure safety and reliability, all repairs should be serviced only be a qualified Sears@ service technician,. A WARNING: For your safety, ALWAYS turn off switch and unplug router motor from oil...
Operation Manual
Page 31
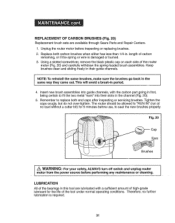
Using a slotted screwdriver, remove the black plastic cap on each side of carbon remaining, or if the spring or wire is required. 31 Therefore, no load without a cutter bit) for the life of the tool under normal operating conditions. Tighten the caps snugly, but do not over-tighten, The router should be allowed to "RUN IN" (run at no further lubrication is damaged or...
Using a slotted screwdriver, remove the black plastic cap on each side of carbon remaining, or if the spring or wire is required. 31 Therefore, no load without a cutter bit) for the life of the tool under normal operating conditions. Tighten the caps snugly, but do not over-tighten, The router should be allowed to "RUN IN" (run at no further lubrication is damaged or...

Operation Manual
Page 36
... 36 3660174000 37 3550592000 38 5630179000 39 3550721000 40 5630187000 Part Des__i_c_rpiot n , , Decorate Cover Screw Rear Cover Transparent cap Screw PCB Plate Screw Cord Anchorage Screw Power Indicator Light Seal Ring Screw Switch ' Brush Cap Carbon Brush Brush Holder Power Cord Cord Guard Middle Housing Bearing Holder Gasket Gasket Screw Stator Fan Baffle Bearing Rotor Screw LED Bearing Housing Screw Gear Rack "E" Ring Bush Stop ,Spring Spindle Lock Nut Collet Collet Nut .......O...t.y 1 2 1 t 2 1 2 1 2 1 1 2 1 2 2 2 1 1 1 1 1 1 2 "1 ! 1 1 3 1 1 1 '1 1 2 1 1 1 1 1 2 36
... 36 3660174000 37 3550592000 38 5630179000 39 3550721000 40 5630187000 Part Des__i_c_rpiot n , , Decorate Cover Screw Rear Cover Transparent cap Screw PCB Plate Screw Cord Anchorage Screw Power Indicator Light Seal Ring Screw Switch ' Brush Cap Carbon Brush Brush Holder Power Cord Cord Guard Middle Housing Bearing Holder Gasket Gasket Screw Stator Fan Baffle Bearing Rotor Screw LED Bearing Housing Screw Gear Rack "E" Ring Bush Stop ,Spring Spindle Lock Nut Collet Collet Nut .......O...t.y 1 2 1 t 2 1 2 1 2 1 1 2 1 2 2 2 1 1 1 1 1 1 2 "1 ! 1 1 3 1 1 1 '1 1 2 1 1 1 1 1 2 36

Operation Manual
Page 37
9.5 Amp / 1 3/4 Peak HP Fixed Base RouterMODEL NUMBER 320.17541 The Model Number will be found on the Nameplate, Always mention the Model Number in all correspondence regarding your tool, Item No. Part Description Qty. 41 2822039000 Internal Wire 2 42 2822038000 Internal Wire 2 43 5620024000 Screw 2 44 3t 21635000 Handle 2 i 45 3400189000 Lock Bolt 2 46 3420396000 Mounting 1 47 3121637000 Chip Shield 1 48 5670040000 Located Pin 1 49 5620041000 Screw 1 50 3121646000 Adjusting Knob 1 51 3121539000...
9.5 Amp / 1 3/4 Peak HP Fixed Base RouterMODEL NUMBER 320.17541 The Model Number will be found on the Nameplate, Always mention the Model Number in all correspondence regarding your tool, Item No. Part Description Qty. 41 2822039000 Internal Wire 2 42 2822038000 Internal Wire 2 43 5620024000 Screw 2 44 3t 21635000 Handle 2 i 45 3400189000 Lock Bolt 2 46 3420396000 Mounting 1 47 3121637000 Chip Shield 1 48 5670040000 Located Pin 1 49 5620041000 Screw 1 50 3121646000 Adjusting Knob 1 51 3121539000...


