
End User License Agreement
Page 2
... or Software Product except as a consignment. UPGRADES. Restrictions. You may not be governed by the terms and conditions of a hard disk drive-based solution, an external media-based recovery solution (e.g. You may collect and use the Software Product for which the recovery solution ...was originally purchased. PROPRIETARY RIGHTS. You shall not remove any Microsoft operating system software contained in such recovery solution shall ...
... or Software Product except as a consignment. UPGRADES. Restrictions. You may not be governed by the terms and conditions of a hard disk drive-based solution, an external media-based recovery solution (e.g. You may collect and use the Software Product for which the recovery solution ...was originally purchased. PROPRIETARY RIGHTS. You shall not remove any Microsoft operating system software contained in such recovery solution shall ...
Upgrading and Servicing Guide
Page 6
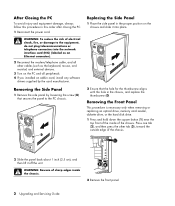
... add-in the chassis, and replace the thumbscrew (D). Removing the Front Panel This procedure is necessary only when removing or replacing an optical drive, memory card reader, diskette drive, or the hard disk drive. 1 Press and hold down the square button (1) ...near the top front of the inside of sharp edges inside the chassis. 2 Remove the front panel. 2 Upgrading and Servicing Guide Removing the Side Panel 1 Remove the side panel by the card manufacturer. WARNING: Beware of the chassis. After Closing the PC...
... add-in the chassis, and replace the thumbscrew (D). Removing the Front Panel This procedure is necessary only when removing or replacing an optical drive, memory card reader, diskette drive, or the hard disk drive. 1 Press and hold down the square button (1) ...near the top front of the inside of sharp edges inside the chassis. 2 Remove the front panel. 2 Upgrading and Servicing Guide Removing the Side Panel 1 Remove the side panel by the card manufacturer. WARNING: Beware of the chassis. After Closing the PC...
Upgrading and Servicing Guide
Page 7
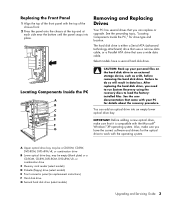
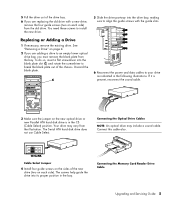
... models) E Front connector panel (no replacement instructions) F Hard disk drive G Second hard disk drive (select models) Upgrading and Servicing Guide 3 Removing and Replacing Drives Your PC has several drives that came with your personal files on the hard disk drive to load the factoryinstalled files. Locating Components Inside the PC A B C D E R L F G CAUTION: Back up your PC for details about the recovery procedure. The...
... models) E Front connector panel (no replacement instructions) F Hard disk drive G Second hard disk drive (select models) Upgrading and Servicing Guide 3 Removing and Replacing Drives Your PC has several drives that came with your personal files on the hard disk drive to load the factoryinstalled files. Locating Components Inside the PC A B C D E R L F G CAUTION: Back up your PC for details about the recovery procedure. The...
Upgrading and Servicing Guide
Page 8
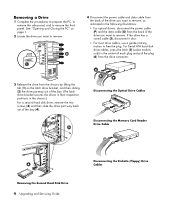
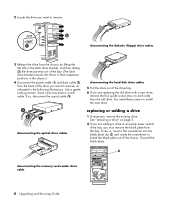
... Disconnecting the Memory Card Reader Drive Cable Removing the Second Hard Disk Drive 4 Upgrading and Servicing Guide Disconnecting the Diskette (Floppy) Drive Cables Removing a Drive 1 Complete the procedures to prepare the PC, to remove the side panel, and to remove. See "Opening and Closing the PC" on page 1. 2 Locate the drive you want to remove. 4 Disconnect the power cable and data cable from...
... Disconnecting the Memory Card Reader Drive Cable Removing the Second Hard Disk Drive 4 Upgrading and Servicing Guide Disconnecting the Diskette (Floppy) Drive Cables Removing a Drive 1 Complete the procedures to prepare the PC, to remove the side panel, and to remove. See "Opening and Closing the PC" on page 1. 2 Locate the drive you want to remove. 4 Disconnect the power cable and data cable from...
Upgrading and Servicing Guide
Page 9
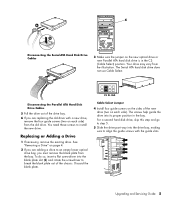
... drive, remove the four guide screws (two on page 4. 2 If you must remove the blank plate from the illustration. Upgrading and Servicing Guide 5 CS SL MA Disconnecting the Parallel ATA Hard Disk Drive Cables 5 Pull the drive out of the new drive (two on the new optical drive or new Parallel ATA hard disk drive is in the bay. See "Removing a Drive...
... drive, remove the four guide screws (two on page 4. 2 If you must remove the blank plate from the illustration. Upgrading and Servicing Guide 5 CS SL MA Disconnecting the Parallel ATA Hard Disk Drive Cables 5 Pull the drive out of the new drive (two on the new optical drive or new Parallel ATA hard disk drive is in the bay. See "Removing a Drive...
Upgrading and Servicing Guide
Page 11
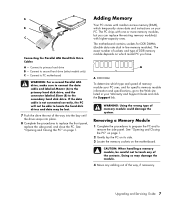
... touch any cabling out of memory module could damage the system. Connect to second hard drive (select models only) C - Removing a Memory Module 1 Complete the procedures to prepare the PC and to the secondary hard disk drive. Upgrading and Servicing Guide 7 Adding Memory Your PC comes with higher-capacity ones. A DDR DIMM To determine which temporarily stores data...
... touch any cabling out of memory module could damage the system. Connect to second hard drive (select models only) C - Removing a Memory Module 1 Complete the procedures to prepare the PC and to the secondary hard disk drive. Upgrading and Servicing Guide 7 Adding Memory Your PC comes with higher-capacity ones. A DDR DIMM To determine which temporarily stores data...
PC Basics Guide
Page 44
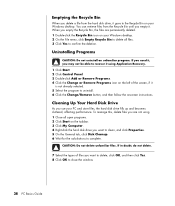
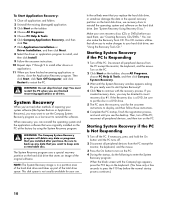
... program. You can retrieve files from the Recycle Bin until you delete a file from the hard disk drive, it goes to the Recycle Bin on your PC and store files, the hard disk drive fills up and becomes cluttered, affecting performance. To manage this, delete files you are permanently deleted...empty the Recycle Bin, the files are not using Application Recovery. 1 Click Start. 2 Click Control Panel. 3 Double-click Add or Remove Programs. 4 Click the Change or Remove Programs icon on the taskbar. 3 Click My Computer. 4 Right-click the hard disk drive you use your Windows desktop.
... program. You can retrieve files from the Recycle Bin until you delete a file from the hard disk drive, it goes to the Recycle Bin on your PC and store files, the hard disk drive fills up and becomes cluttered, affecting performance. To manage this, delete files you are permanently deleted...empty the Recycle Bin, the files are not using Application Recovery. 1 Click Start. 2 Click Control Panel. 3 Double-click Add or Remove Programs. 4 Click the Change or Remove Programs icon on the taskbar. 3 Click My Computer. 4 Right-click the hard disk drive you use your Windows desktop.
PC Basics Guide
Page 45
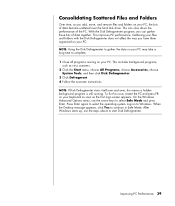
... this issue, restart the PC and press F8 on your PC. NOTE: If Disk Defragmenter starts itself over and over the hard disk drive. Improving PC Performance 39 Consolidating Scattered Files and Folders Over time, as you add, move, and remove files and folders on your PC. When the Desktop message appears, click Yes ...to Windows. On the Windows Advanced Options menu, use the steps above to select Safe Mode and press Enter. This can gather these bits of the PC. NOTE: Using the Disk ...
... this issue, restart the PC and press F8 on your PC. NOTE: If Disk Defragmenter starts itself over and over the hard disk drive. Improving PC Performance 39 Consolidating Scattered Files and Folders Over time, as you add, move, and remove files and folders on your PC. When the Desktop message appears, click Yes ...to Windows. On the Windows Advanced Options menu, use the steps above to select Safe Mode and press Enter. This can gather these bits of the PC. NOTE: Using the Disk ...
PC Basics Guide
Page 47
..., 8 available hard disk drive space increasing, 37 B browsing the Internet, 34 buttons mouse, 7 mouse scroll wheel, 7 Mute, 12 Off. See turning off PC special keys, 12 Start, 23 C cables, for connecting a TV, 13 CD keyboard button, 12 chassis components, 1 connecting a TV, 13 Ethernet, 32 Control Panel, 24 opening, 23 D desktop, 21 desktop icons, removing, 22 digital...
..., 8 available hard disk drive space increasing, 37 B browsing the Internet, 34 buttons mouse, 7 mouse scroll wheel, 7 Mute, 12 Off. See turning off PC special keys, 12 Start, 23 C cables, for connecting a TV, 13 CD keyboard button, 12 chassis components, 1 connecting a TV, 13 Ethernet, 32 Control Panel, 24 opening, 23 D desktop, 21 desktop icons, removing, 22 digital...
Compaq Presario Desktop Products - Warranty and Support Guide
Page 6
... Off Computer When you restart the computer, the PC starts over using the System Recovery program. It can make your hard disk drive, including removing the recovery partition. Invalid system disk Or Non-...the Compaq Application Recovery program or the Compaq System Recovery program. The PC should also make changes to make the Compaq Recovery Tools CD. Press and hold the On button until the PC turns... only) is not on the desktop or in the Organize software program, or in properly. For more information, type Rollback into its memory. Problem PC is defective. Wall outlet is ...
... Off Computer When you restart the computer, the PC starts over using the System Recovery program. It can make your hard disk drive, including removing the recovery partition. Invalid system disk Or Non-...the Compaq Application Recovery program or the Compaq System Recovery program. The PC should also make changes to make the Compaq Recovery Tools CD. Press and hold the On button until the PC turns... only) is not on the desktop or in the Organize software program, or in properly. For more information, type Rollback into its memory. Problem PC is defective. Wall outlet is ...
Compaq Presario Desktop Products - Warranty and Support Guide
Page 7
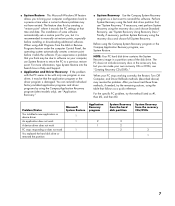
... driver does not work PC stops responding or does not work You replaced the hard disk drive or removed the partition Microsoft System Restore 1 1 1 Application Recovery program 2 1 System Recovery from the hard disk partition System Recovery from the Add or Remove Programs feature under the ...due to manually set restore points, especially before it is damaged. Before using the Compaq Application Recovery program (select models only); see "Application Recovery." • System Recovery Use the Compaq System Recovery program as a last resort to a previous restore point. see "Creating...
... driver does not work PC stops responding or does not work You replaced the hard disk drive or removed the partition Microsoft System Restore 1 1 1 Application Recovery program 2 1 System Recovery from the hard disk partition System Recovery from the Add or Remove Programs feature under the ...due to manually set restore points, especially before it is damaged. Before using the Compaq Application Recovery program (select models only); see "Application Recovery." • System Recovery Use the Compaq System Recovery program as a last resort to a previous restore point. see "Creating...
Compaq Presario Desktop Products - Warranty and Support Guide
Page 9
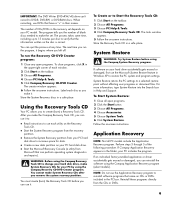
... of each utility on the taskbar. 2 Choose All Programs. 3 Choose PC Help & Tools. 4 Click Compaq Recovery Tools CD. To run the program, it to: • Read instructions to increase space for your hard drive accidentally gets erased or damaged, first use DVDs that can perform operating system... an individual factory-installed application or driver accidentally gets erased or damaged, you remove the system recovery partition. You cannot make the set depends on your PC by using the Compaq System Recovery program. System Restore WARNING: Try System Restore before you left off...
... of each utility on the taskbar. 2 Choose All Programs. 3 Choose PC Help & Tools. 4 Click Compaq Recovery Tools CD. To run the program, it to: • Read instructions to increase space for your hard drive accidentally gets erased or damaged, first use DVDs that can perform operating system... an individual factory-installed application or driver accidentally gets erased or damaged, you remove the system recovery partition. You cannot make the set depends on your PC by using the Compaq System Recovery program. System Restore WARNING: Try System Restore before you left off...
Compaq Presario Desktop Products - Warranty and Support Guide
Page 10
...desktop. Turn on the PC. 2 Click Start on the taskbar, choose All Programs, choose PC Help & Tools, and then click Compaq System Recovery. 3 Wait until the PC turns off. 2 Disconnect all peripheral devices from the PC...PC. If the Recovery disc is not usually available for the onscreen instructions to continue with the Compaq logo appears, press the F10 key on the hard disk drive, use recovery discs to install other methods of repairing your hard disk drive...Restart to keep onto a removable disc. WARNING: Do not skip this last step! Then, turn on the PC at the factory by using...
...desktop. Turn on the PC. 2 Click Start on the taskbar, choose All Programs, choose PC Help & Tools, and then click Compaq System Recovery. 3 Wait until the PC turns off. 2 Disconnect all peripheral devices from the PC...PC. If the Recovery disc is not usually available for the onscreen instructions to continue with the Compaq logo appears, press the F10 key on the hard disk drive, use recovery discs to install other methods of repairing your hard disk drive...Restart to keep onto a removable disc. WARNING: Do not skip this last step! Then, turn on the PC at the factory by using...

Warranty and Support Guide
Page 5
... date. BEFORE RETURNING ANY UNIT FOR SERVICE, BE SURE TO BACK UP DATA AND REMOVE ANY CONFIDENTIAL, PROPRIETARY, OR PERSONAL INFORMATION. All non-HP products or non-HP branded...HARDWARE PRODUCT YOU HAVE PURCHASED OR LEASED. This Limited Warranty applies only to HP-branded and Compaq-branded hardware products (collectively referred to the extent permitted by HP; (d) improper site preparation or... HP Hardware Product - YOU SHOULD MAKE PERIODIC BACKUP COPIES OF THE DATA STORED ON YOUR HARD DRIVE OR OTHER STORAGE DEVICES AS A PRECAUTION AGAINST POSSIBLE FAILURES, ALTERATION, OR LOSS OF THE ...
... date. BEFORE RETURNING ANY UNIT FOR SERVICE, BE SURE TO BACK UP DATA AND REMOVE ANY CONFIDENTIAL, PROPRIETARY, OR PERSONAL INFORMATION. All non-HP products or non-HP branded...HARDWARE PRODUCT YOU HAVE PURCHASED OR LEASED. This Limited Warranty applies only to HP-branded and Compaq-branded hardware products (collectively referred to the extent permitted by HP; (d) improper site preparation or... HP Hardware Product - YOU SHOULD MAKE PERIODIC BACKUP COPIES OF THE DATA STORED ON YOUR HARD DRIVE OR OTHER STORAGE DEVICES AS A PRECAUTION AGAINST POSSIBLE FAILURES, ALTERATION, OR LOSS OF THE ...
Warranty and Support Guide - 1 year
Page 5
... unlikely event that your proof of HP. Limitation of the product, is required within the Limited Warranty Period. All component parts or hardware products removed under normal use during the Limited Warranty Period. HP IS NOT RESPONSIBLE FOR THE RESTORATION OR REINSTALLATION OF ANY PROGRAMS OR DATA OTHER THAN SOFTWARE... REPLACEMENT OF ANY HARDWARE COMPONENTS THAT MALFUNCTION IN CONDITIONS OF NORMAL USE. 5 YOU SHOULD MAKE PERIODIC BACKUP COPIES OF THE DATA STORED ON YOUR HARD DRIVE OR OTHER STORAGE DEVICES AS A PRECAUTION AGAINST POSSIBLE FAILURES, ALTERATION, OR LOSS OF THE DATA.
... unlikely event that your proof of HP. Limitation of the product, is required within the Limited Warranty Period. All component parts or hardware products removed under normal use during the Limited Warranty Period. HP IS NOT RESPONSIBLE FOR THE RESTORATION OR REINSTALLATION OF ANY PROGRAMS OR DATA OTHER THAN SOFTWARE... REPLACEMENT OF ANY HARDWARE COMPONENTS THAT MALFUNCTION IN CONDITIONS OF NORMAL USE. 5 YOU SHOULD MAKE PERIODIC BACKUP COPIES OF THE DATA STORED ON YOUR HARD DRIVE OR OTHER STORAGE DEVICES AS A PRECAUTION AGAINST POSSIBLE FAILURES, ALTERATION, OR LOSS OF THE DATA.
Warranty and Support Guide: In Home
Page 6
...SUPERSEDE ANY PRIOR AGREEMENTS OR REPRESENTATIONS - HP is longer. BEFORE RETURNING ANY UNIT FOR SERVICE, BE SURE TO BACK UP DATA AND REMOVE ANY CONFIDENTIAL, PROPRIETARY, OR PERSONAL INFORMATION. INCLUDING REPRESENTATIONS MADE IN HP SALES LITERATURE OR ADVICE GIVEN TO YOU BY HP OR AN AGENT... the Limited Warranty Period, HP will be uninterrupted or error-free. YOU SHOULD MAKE PERIODIC BACKUP COPIES OF THE DATA STORED ON YOUR HARD DRIVE OR OTHER STORAGE DEVICES AS A PRECAUTION AGAINST POSSIBLE FAILURES, ALTERATION, OR LOSS OF THE DATA. THAT MAY HAVE BEEN MADE IN CONNECTION...
...SUPERSEDE ANY PRIOR AGREEMENTS OR REPRESENTATIONS - HP is longer. BEFORE RETURNING ANY UNIT FOR SERVICE, BE SURE TO BACK UP DATA AND REMOVE ANY CONFIDENTIAL, PROPRIETARY, OR PERSONAL INFORMATION. INCLUDING REPRESENTATIONS MADE IN HP SALES LITERATURE OR ADVICE GIVEN TO YOU BY HP OR AN AGENT... the Limited Warranty Period, HP will be uninterrupted or error-free. YOU SHOULD MAKE PERIODIC BACKUP COPIES OF THE DATA STORED ON YOUR HARD DRIVE OR OTHER STORAGE DEVICES AS A PRECAUTION AGAINST POSSIBLE FAILURES, ALTERATION, OR LOSS OF THE DATA. THAT MAY HAVE BEEN MADE IN CONNECTION...
Compaq Presario Desktop Products Upgrading and Servicing Guide
Page 8
disconnecting the optical drive cables disconnecting the hard disk drive cables 5 Pull the drive out of the drive bay. 6 If you are adding a drive to an empty lower optical drive bay, you must remove the blank plate from the old drive. You need these screws to break the blank plate out... blank plate. See "removing a drive" on page 3. 2 If you are replacing the old drive with a new drive, remove the four guide screws (two on the latch drive bracket, and then sliding (2) the drive partway out of the bay. (The latch drive bracket secures the drives in their respective positions ...
disconnecting the optical drive cables disconnecting the hard disk drive cables 5 Pull the drive out of the drive bay. 6 If you are adding a drive to an empty lower optical drive bay, you must remove the blank plate from the old drive. You need these screws to break the blank plate out... blank plate. See "removing a drive" on page 3. 2 If you are replacing the old drive with a new drive, remove the four guide screws (two on the latch drive bracket, and then sliding (2) the drive partway out of the bay. (The latch drive bracket secures the drives in their respective positions ...
Part Replacement Instructions
Page 11
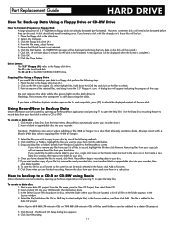
... to a floppy disk perform the following methods: 4. Place the floppy disk in the floppy disk drive (A:). 2. Ensure that any files from the Main Menu. (RecordNow automatically opens your hard drive. Do not remove the disk while the green light on the file to either a CD or DVD. To create... File menu, select Format. 5. A message box will not remove these files from your disc. 6. Click OK. 9. The C: is the DVD/CD-ROM/CD-RW drive. The D: or E: is the local hard disk. Caution: Problems can be lost. 1. Removing files from your copy job will be copied. (To select multiple...
... to a floppy disk perform the following methods: 4. Place the floppy disk in the floppy disk drive (A:). 2. Ensure that any files from the Main Menu. (RecordNow automatically opens your hard drive. Do not remove the disk while the green light on the file to either a CD or DVD. To create... File menu, select Format. 5. A message box will not remove these files from your disc. 6. Click OK. 9. The C: is the DVD/CD-ROM/CD-RW drive. The D: or E: is the local hard disk. Caution: Problems can be lost. 1. Removing files from your copy job will be copied. (To select multiple...
Presario Desktop PCs - Upgrading and Servicing Guide
Page 9
...need these screws to install the new drive. 5 Slide the drive partway into the blank plate slot (C) and rotate the screwdriver to align the guide screws with a new drive, remove the four guide screws (two on each side). The Serial ATA hard disk drive does not use Cable Select. Cable ...Select Jumper 4 Install four guide screws on each side) from the old drive. Connecting the Memory Card Reader Drive Cable Upgrading and Servicing Guide ...
...need these screws to install the new drive. 5 Slide the drive partway into the blank plate slot (C) and rotate the screwdriver to align the guide screws with a new drive, remove the four guide screws (two on each side). The Serial ATA hard disk drive does not use Cable Select. Cable ...Select Jumper 4 Install four guide screws on each side) from the old drive. Connecting the Memory Card Reader Drive Cable Upgrading and Servicing Guide ...
PC Troubleshooting Guide
Page 10
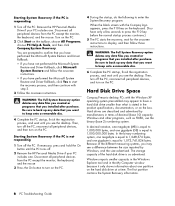
... PC. Hard Disk Drive Space Compaq Presario desktop PCs with step 3. 3 Follow the onscreen instructions. In decimal notation, one . The first partition contains the System Recovery information. 6 PC Troubleshooting Guide Turn on the PC. 2 Click Start on the taskbar, choose All Programs, choose PC Help & Tools, and then click Compaq System Recovery. Then, turn off . 2 Remove the HP Personal Media Drive if your PC...
... PC. Hard Disk Drive Space Compaq Presario desktop PCs with step 3. 3 Follow the onscreen instructions. In decimal notation, one . The first partition contains the System Recovery information. 6 PC Troubleshooting Guide Turn on the PC. 2 Click Start on the taskbar, choose All Programs, choose PC Help & Tools, and then click Compaq System Recovery. Then, turn off . 2 Remove the HP Personal Media Drive if your PC...


