Upgrading and Servicing Guide
Page 3
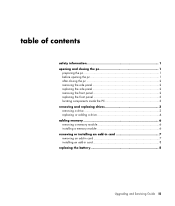
... Side Panel 2 Replacing the Side Panel 2 Removing the Front Panel 2 Replacing the Front Panel 3 Locating Components Inside the PC 3 Removing and Replacing Drives 3 Removing a Drive 4 Replacing or Adding a Drive 5 Adding Memory 7 Removing a Memory Module 7 Installing a Memory Module 8 Removing or Installing an Add-In Card 8 Removing an Add-In Card 9 Installing an Add-In Card...
... Side Panel 2 Replacing the Side Panel 2 Removing the Front Panel 2 Replacing the Front Panel 3 Locating Components Inside the PC 3 Removing and Replacing Drives 3 Removing a Drive 4 Replacing or Adding a Drive 5 Adding Memory 7 Removing a Memory Module 7 Installing a Memory Module 8 Removing or Installing an Add-In Card 8 Removing an Add-In Card 9 Installing an Add-In Card...
Upgrading and Servicing Guide
Page 6
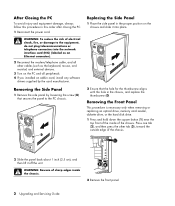
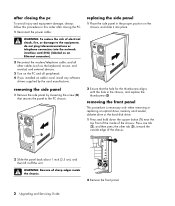
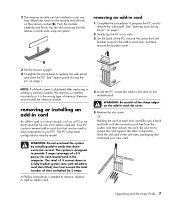
... of sharp edges inside of the inside the chassis. 2 Remove the front panel. 2 Upgrading and Servicing Guide Removing the Front Panel This procedure is necessary only when removing or replacing an optical drive, memory card reader, diskette drive, or the hard disk drive. 1 Press and hold down the...2 Reconnect the modem/telephone cable, and all other cables (such as the keyboard, mouse, and monitor) and external devices. 3 Turn on the PC and all peripherals. 4 If you installed an add-in this procedure in card, install any software drivers supplied by loosening the screw (D) that secures...
... of sharp edges inside of the inside the chassis. 2 Remove the front panel. 2 Upgrading and Servicing Guide Removing the Front Panel This procedure is necessary only when removing or replacing an optical drive, memory card reader, diskette drive, or the hard disk drive. 1 Press and hold down the...2 Reconnect the modem/telephone cable, and all other cables (such as the keyboard, mouse, and monitor) and external devices. 3 Turn on the PC and all peripherals. 4 If you installed an add-in this procedure in card, install any software drivers supplied by loosening the screw (D) that secures...
Upgrading and Servicing Guide
Page 7
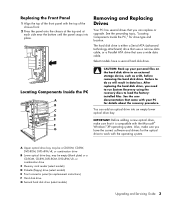
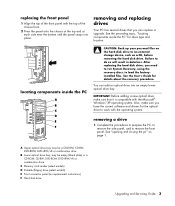
...optical drive to an external storage device, such as a CD, before removing the hard disk drive. You can replace or upgrade. Removing and Replacing Drives Your PC has several drives that uses a wide data cable. After replacing the hard disk drive, you can add an optical drive into...combination drive B Lower optical drive bay, may be empty (blank plate) or a CD-ROM, CD-RW, DVD-ROM, DVD+RW/+R, or combination drive C Memory card reader (select models) D Diskette (floppy) drive (select models) E Front connector panel (no replacement instructions) F Hard disk drive G Second hard disk drive ...
...optical drive to an external storage device, such as a CD, before removing the hard disk drive. You can replace or upgrade. Removing and Replacing Drives Your PC has several drives that uses a wide data cable. After replacing the hard disk drive, you can add an optical drive into...combination drive B Lower optical drive bay, may be empty (blank plate) or a CD-ROM, CD-RW, DVD-ROM, DVD+RW/+R, or combination drive C Memory card reader (select models) D Diskette (floppy) drive (select models) E Front connector panel (no replacement instructions) F Hard disk drive G Second hard disk drive ...
Upgrading and Servicing Guide
Page 8
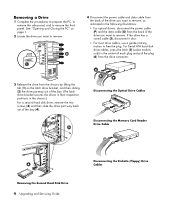
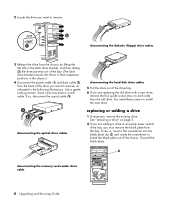
... you want to free the plug. Disconnecting the Optical Drive Cables Disconnecting the Memory Card Reader Drive Cable Removing the Second Hard Disk Drive 4 Upgrading and Servicing Guide Disconnecting the Diskette (Floppy) Drive Cables See "Opening and Closing the PC" on page 1. 2 Locate the drive you want to remove. 4 Disconnect the power cable... has a sound cable (S), disconnect it also. • For most drive cables, use a gentle rocking motion to remove. Removing a Drive 1 Complete the procedures to prepare the PC, to remove the side panel, and to remove the front panel.
... you want to free the plug. Disconnecting the Optical Drive Cables Disconnecting the Memory Card Reader Drive Cable Removing the Second Hard Disk Drive 4 Upgrading and Servicing Guide Disconnecting the Diskette (Floppy) Drive Cables See "Opening and Closing the PC" on page 1. 2 Locate the drive you want to remove. 4 Disconnect the power cable... has a sound cable (S), disconnect it also. • For most drive cables, use a gentle rocking motion to remove. Removing a Drive 1 Complete the procedures to prepare the PC, to remove the side panel, and to remove the front panel.
Upgrading and Servicing Guide
Page 10
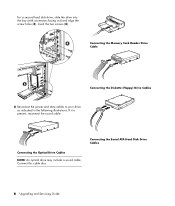
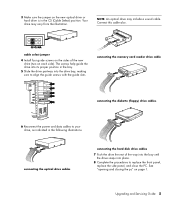
Connecting the Optical Drive Cables NOTE: An optical drive may include a sound cable. Connecting the Serial ATA Hard Disk Drive Cables 6 Upgrading and Servicing Guide Connecting the Memory Card Reader Drive Cable Connecting the Diskette (Floppy) Drive Cables 6 Reconnect the power and data cables to your drive as indicated in the following illustrations. Insert the two screws (4). If it is present, reconnect the sound cable. Connect this cable also. For a second hard disk drive, slide the drive into the bay (with connectors facing out) and align the screw holes (3).
Connecting the Optical Drive Cables NOTE: An optical drive may include a sound cable. Connecting the Serial ATA Hard Disk Drive Cables 6 Upgrading and Servicing Guide Connecting the Memory Card Reader Drive Cable Connecting the Diskette (Floppy) Drive Cables 6 Reconnect the power and data cables to your drive as indicated in the following illustrations. Insert the two screws (4). If it is present, reconnect the sound cable. Connect this cable also. For a second hard disk drive, slide the drive into the bay (with connectors facing out) and align the screw holes (3).
Upgrading and Servicing Guide
Page 11
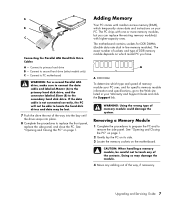
...to primary hard drive B - Adding Memory Your PC comes with higher-capacity ones. A DDR DIMM To determine which temporarily stores data and instructions on the motherboard. Upgrading and Servicing Guide 7 The exact number of sockets and type of memory module your PC uses, and for DDR DIMMs (...double data rate dual in your PC. Removing a Memory Module 1 Complete the procedures to prepare the PC and to the secondary ...
...to primary hard drive B - Adding Memory Your PC comes with higher-capacity ones. A DDR DIMM To determine which temporarily stores data and instructions on the motherboard. Upgrading and Servicing Guide 7 The exact number of sockets and type of memory module your PC uses, and for DDR DIMMs (...double data rate dual in your PC. Removing a Memory Module 1 Complete the procedures to prepare the PC and to the secondary ...
Upgrading and Servicing Guide
Page 12
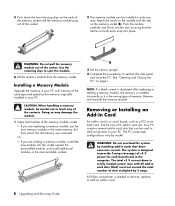
... not to touch any of the socket. Or • If you are adding a memory module, install the new module into a PC add-in card. 8 Upgrading and Servicing Guide Remove and reinstall the memory module. Doing so may damage the module. 1 Open both ends snap into place....the same memory slot from the memory socket. The PC component configurations vary by model. A Phillips screwdriver is the wrong type of memory. Push the module carefully and firmly into the slot, ensuring that draw excessive current. Installing a Memory Module Upgrade the memory in your PC with memory of the...
... not to touch any of the socket. Or • If you are adding a memory module, install the new module into a PC add-in card. 8 Upgrading and Servicing Guide Remove and reinstall the memory module. Doing so may damage the module. 1 Open both ends snap into place....the same memory slot from the memory socket. The PC component configurations vary by model. A Phillips screwdriver is the wrong type of memory. Push the module carefully and firmly into the slot, ensuring that draw excessive current. Installing a Memory Module Upgrade the memory in your PC with memory of the...
Upgrading and Servicing Guide
Page 14
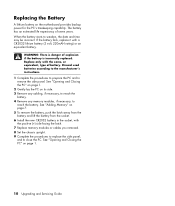
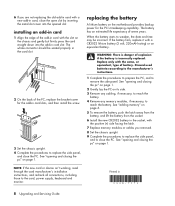
..., type of explosion if the battery is incorrectly replaced. See "Adding Memory" on page 1. 10 Upgrading and Servicing Guide If the battery fails, replace it with the positive (+) side facing the latch. 7 Replace memory modules or cables you removed. 8 Set the chassis upright. 9 Complete... the procedures to replace the side panel, and to close the PC. See "Opening and Closing the PC" ...
..., type of explosion if the battery is incorrectly replaced. See "Adding Memory" on page 1. 10 Upgrading and Servicing Guide If the battery fails, replace it with the positive (+) side facing the latch. 7 Replace memory modules or cables you removed. 8 Set the chassis upright. 9 Complete... the procedures to replace the side panel, and to close the PC. See "Opening and Closing the PC" ...
PC Basics Guide
Page 43
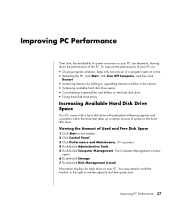
... the Amount of space on the hard disk drive. keep only one version of the PC. click Start, click Turn Off Computer, and then click Restart. • Increasing memory by adding or upgrading memory modules in the chassis. • Increasing available hard disk drive space. • Consolidating scattered files and folders on the hard...
... the Amount of space on the hard disk drive. keep only one version of the PC. click Start, click Turn Off Computer, and then click Restart. • Increasing memory by adding or upgrading memory modules in the chassis. • Increasing available hard disk drive space. • Consolidating scattered files and folders on the hard...
Compaq Presario Desktop Products - Warranty and Support Guide
Page 15
...with/for purposes of a hard disk drive-based solution, an external media-based recovery solution (e.g. After upgrading, you may copy the Software Product into Your Computer's temporary memory (RAM) for your HP Product, whether in such recovery solution shall be licensed for the original ... may not be an indirect transfer, such as expressly provided in this EULA, and if applicable, the Certificate of the Software Product, your upgrade eligibility. 3. floppy disk, CD or DVD) or an equivalent solution delivered in any term or condition of a conflict between such terms,...
...with/for purposes of a hard disk drive-based solution, an external media-based recovery solution (e.g. After upgrading, you may copy the Software Product into Your Computer's temporary memory (RAM) for your HP Product, whether in such recovery solution shall be licensed for the original ... may not be an indirect transfer, such as expressly provided in this EULA, and if applicable, the Certificate of the Software Product, your upgrade eligibility. 3. floppy disk, CD or DVD) or an equivalent solution delivered in any term or condition of a conflict between such terms,...
Warranty and Support Guide
Page 8
You may load the Software Product into the local memory or storage device of the HP Product. d. e. Recovery Solution. Any software recovery solution provided with the update or supplement. To use a Software Product identified as an upgrade, you must first be governed by the terms and ...conditions of using the Software Product. In case of a conflict between such terms, the other form, may copy the Software Product into Your Computer's temporary memory (RAM) for purposes of such...
You may load the Software Product into the local memory or storage device of the HP Product. d. e. Recovery Solution. Any software recovery solution provided with the update or supplement. To use a Software Product identified as an upgrade, you must first be governed by the terms and ...conditions of using the Software Product. In case of a conflict between such terms, the other form, may copy the Software Product into Your Computer's temporary memory (RAM) for purposes of such...

Warranty and Support Guide: In Home
Page 9
...the terms and conditions of this EULA, all the EULA terms. Upon transfer of the Software Product to another end user. Recovery Solution. After upgrading, you may make a one computer, you may make archival or back-up purposes. ADDITIONAL SOFTWARE. Prior to the transfer, the end user ...be governed entirely by HP as a consignment. The term "Software Product" means computer software and may load the Software Product into the local memory or storage device of Rights. You may contain a EULA in this EULA. The use the Software Product only on more than one -time...
...the terms and conditions of this EULA, all the EULA terms. Upon transfer of the Software Product to another end user. Recovery Solution. After upgrading, you may make a one computer, you may make archival or back-up purposes. ADDITIONAL SOFTWARE. Prior to the transfer, the end user ...be governed entirely by HP as a consignment. The term "Software Product" means computer software and may load the Software Product into the local memory or storage device of Rights. You may contain a EULA in this EULA. The use the Software Product only on more than one -time...
Compaq Presario Desktop Products Upgrading and Servicing Guide
Page 3
... side panel 2 replacing the side panel 2 removing the front panel 2 replacing the front panel 3 locating components inside the PC 3 removing and replacing drives 3 removing a drive 3 replacing or adding a drive 4 adding memory 6 removing a memory module 6 installing a memory module 6 removing or installing an add-in card 7 removing an add-in card 7 installing an add-in card...
... side panel 2 replacing the side panel 2 removing the front panel 2 replacing the front panel 3 locating components inside the PC 3 removing and replacing drives 3 removing a drive 3 replacing or adding a drive 4 adding memory 6 removing a memory module 6 installing a memory module 6 removing or installing an add-in card 7 removing an add-in card 7 installing an add-in card...
Compaq Presario Desktop Products Upgrading and Servicing Guide
Page 6
...Beware of sharp edges inside of the inside the chassis. 2 Remove the front panel. 2 Upgrading and Servicing Guide removing the front panel This procedure is necessary only when removing or replacing an optical drive, memory card reader, diskette drive or the hard disk drive. 1 Press and hold down the square... other tab (3), toward the outside edge of electrical shock, fire, or damage to the PC chassis. 2 Ensure that the hole for the thumbscrew aligns with the hole in the proper position on the PC and all peripherals. 4 If you installed an add-in this procedure in card, install ...
...Beware of sharp edges inside of the inside the chassis. 2 Remove the front panel. 2 Upgrading and Servicing Guide removing the front panel This procedure is necessary only when removing or replacing an optical drive, memory card reader, diskette drive or the hard disk drive. 1 Press and hold down the square... other tab (3), toward the outside edge of electrical shock, fire, or damage to the PC chassis. 2 Ensure that the hole for the thumbscrew aligns with the hole in the proper position on the PC and all peripherals. 4 If you installed an add-in this procedure in card, install ...
Compaq Presario Desktop Products Upgrading and Servicing Guide
Page 7
...+RW/+R or combination drive C Memory card reader (select models) D Diskette (floppy) drive (select models) E Front connector panel (no replacement instructions) F Hard disk drive Upgrading and Servicing Guide 3 See the preceding topic, "locating components inside the PC CAUTION: Back up your personal ...files on page 1. Failure to remove the front panel. You can replace or upgrade. IMPORTANT: Before adding a new optical...
...+RW/+R or combination drive C Memory card reader (select models) D Diskette (floppy) drive (select models) E Front connector panel (no replacement instructions) F Hard disk drive Upgrading and Servicing Guide 3 See the preceding topic, "locating components inside the PC CAUTION: Back up your personal ...files on page 1. Failure to remove the front panel. You can replace or upgrade. IMPORTANT: Before adding a new optical...
Compaq Presario Desktop Products Upgrading and Servicing Guide
Page 8
... (C) and rotate the screwdriver to break the blank plate out of the drive you want to remove, as indicated in the following illustrations. disconnecting the memory card reader drive cable 4 Upgrading and Servicing Guide You need these screws to remove.
... (C) and rotate the screwdriver to break the blank plate out of the drive you want to remove, as indicated in the following illustrations. disconnecting the memory card reader drive cable 4 Upgrading and Servicing Guide You need these screws to remove.
Compaq Presario Desktop Products Upgrading and Servicing Guide
Page 9
...to your drive, as indicated in the following illustrations. Your drive may include a sound cable. Upgrading and Servicing Guide 5 The screws help guide the drive into its proper position in the CS ...(Cable Select) position. Connect this cable also. connecting the memory card reader drive cable connecting the diskette (floppy) drive cables 6 Reconnect the power and data... cables to align the guide screws with the guide slots. See "opening and closing the pc" on each side). 3 Make sure the jumper on the new optical drive or hard drive ...
...to your drive, as indicated in the following illustrations. Your drive may include a sound cable. Upgrading and Servicing Guide 5 The screws help guide the drive into its proper position in the CS ...(Cable Select) position. Connect this cable also. connecting the memory card reader drive cable connecting the diskette (floppy) drive cables 6 Reconnect the power and data... cables to align the guide screws with the guide slots. See "opening and closing the pc" on each side). 3 Make sure the jumper on the new optical drive or hard drive ...

Compaq Presario Desktop Products Upgrading and Servicing Guide
Page 10
... module, and install additional modules in your PC with higher-capacity ones. installing a memory module Upgrade the memory in -line memory modules). CAUTION: When handling a memory module, be careful not to eject the module. 6 Lift the memory module from which the old memory was removed. adding memory Your PC comes with random access memory (RAM), which temporarily stores data and instructions...
... module, and install additional modules in your PC with higher-capacity ones. installing a memory module Upgrade the memory in -line memory modules). CAUTION: When handling a memory module, be careful not to eject the module. 6 Lift the memory module from which the old memory was removed. adding memory Your PC comes with random access memory (RAM), which temporarily stores data and instructions...
Compaq Presario Desktop Products Upgrading and Servicing Guide
Page 11
...for each end, carefully rock it is needed to replace the side panel, and close the PC. The PC component configurations vary by installing add-in cards that contained your PC. Upgrading and Servicing Guide 7 2 The memory module can be installed in only one with the tab on the add-in card slot ... the card at each board/card in card is designed to scrape the card against the other components. See "opening and closing the pc" on page 1. Remove and reinstall the memory module. Match the notch on the module with all add-in card 1 Complete the procedures to prepare the...
...for each end, carefully rock it is needed to replace the side panel, and close the PC. The PC component configurations vary by installing add-in cards that contained your PC. Upgrading and Servicing Guide 7 2 The memory module can be installed in only one with the tab on the add-in card slot ... the card at each board/card in card is designed to scrape the card against the other components. See "opening and closing the pc" on page 1. Remove and reinstall the memory module. Match the notch on the module with all add-in card 1 Complete the procedures to prepare the...
Compaq Presario Desktop Products Upgrading and Servicing Guide
Page 12
... of the add-in card with a new add-in card slot. See "opening and closing the pc" on its side. 3 Remove any cabling, if necessary, to reach the battery. 4 Remove any memory modules, if necessary, to replace the side panel, and close the open slot by inserting the metal... battery. 6 If you removed. 8 Set the chassis upright. 9 Complete the procedures to replace the side panel, and to close the PC. installing an add-in 8 Upgrading and Servicing Guide See "opening and closing the pc" on page 1. 2 Gently lay the PC on page 1. replacing the battery A lithium battery on page 1.
... of the add-in card with a new add-in card slot. See "opening and closing the pc" on its side. 3 Remove any cabling, if necessary, to reach the battery. 4 Remove any memory modules, if necessary, to replace the side panel, and close the open slot by inserting the metal... battery. 6 If you removed. 8 Set the chassis upright. 9 Complete the procedures to replace the side panel, and to close the PC. installing an add-in 8 Upgrading and Servicing Guide See "opening and closing the pc" on page 1. 2 Gently lay the PC on page 1. replacing the battery A lithium battery on page 1.


