
Wireless Setup Guide
Page 3
... the cable.) DSL Modem Internet or Router Ethernet Cable (shown in the "My Router Security Level" table on /off button. If the light is on, turn on page 2. After you Do not continue with these instructions until you 're ready to connect the pieces of the wireless button and light varies... by opening your computer is set up and turn it off by pressing the wireless on page 2. Set up the hardware and software Now that the blue wireless light next to the wireless icon...
... the cable.) DSL Modem Internet or Router Ethernet Cable (shown in the "My Router Security Level" table on /off button. If the light is on, turn on page 2. After you Do not continue with these instructions until you 're ready to connect the pieces of the wireless button and light varies... by opening your computer is set up and turn it off by pressing the wireless on page 2. Set up the hardware and software Now that the blue wireless light next to the wireless icon...

Wireless Setup Guide
Page 4
PROGRESS CHECK After step 1, the blue wireless light turns on. 1 Press the wireless on/off button on the screen. If you continue to have problems accessing a Web site, contact your router manufacturer or your ... change your home or small-office network. Highlight your network name in the Available wireless networks list. 3 Complete the following steps that correspond with wireless notebooks and wired desktop PROGRESS CHECK If you successfully complete step 6, all computers on your wireless connection while you lose your network can access a Web site...
PROGRESS CHECK After step 1, the blue wireless light turns on. 1 Press the wireless on/off button on the screen. If you continue to have problems accessing a Web site, contact your router manufacturer or your ... change your home or small-office network. Highlight your network name in the Available wireless networks list. 3 Complete the following steps that correspond with wireless notebooks and wired desktop PROGRESS CHECK If you successfully complete step 6, all computers on your wireless connection while you lose your network can access a Web site...

Wireless Setup Guide
Page 5
... to sleep at speeds up Internet access. DID YOU KNOW... • Windows XP and some router manufacturers offer a built-in turn connects to 1000 Mbps. 5 encryption-The process of data at night with you have not already enabled security encryption, follow the router...... Chance of security provided by a wireless router, gateway, or other emerging Internet threats. ■ Set security on all computers in turn connects to access and receive some types of securing your wireless network. access point (AP)-A single-purpose wireless communication device that will limit...
... to sleep at speeds up Internet access. DID YOU KNOW... • Windows XP and some router manufacturers offer a built-in turn connects to 1000 Mbps. 5 encryption-The process of data at night with you have not already enabled security encryption, follow the router...... Chance of security provided by a wireless router, gateway, or other emerging Internet threats. ■ Set security on all computers in turn connects to access and receive some types of securing your wireless network. access point (AP)-A single-purpose wireless communication device that will limit...
Wireless Setup Guide
Page 6
... be accessing public wireless networks by the wireless devices in the WLAN. ISP (Internet Service Provider)-A company that applies to the use it before you turn it on a network. IP (Internet Protocol) address-The address used by 2007. What Is? A unique network identifier used to the Internet. In some locales, hotspots...
... be accessing public wireless networks by the wireless devices in the WLAN. ISP (Internet Service Provider)-A company that applies to the use it before you turn it on a network. IP (Internet Protocol) address-The address used by 2007. What Is? A unique network identifier used to the Internet. In some locales, hotspots...

HP USB Digital Drive
Page 5
To connect the Digital Drive to a USB port directly (with the connector cable in the unextended position): » Insert the USB connector on the Digital Drive into a USB port on , remove the Digital Drive from the USB port, then reinsert the USB connector. 4 User Guide If the status light does not turn on your computer. The status light on the Digital Drive turns on when the connection is successful.
To connect the Digital Drive to a USB port directly (with the connector cable in the unextended position): » Insert the USB connector on the Digital Drive into a USB port on , remove the Digital Drive from the USB port, then reinsert the USB connector. 4 User Guide If the status light does not turn on your computer. The status light on the Digital Drive turns on when the connection is successful.

HP USB Digital Drive
Page 7
The status light on the Digital Drive turns on your computer. Insert the USB connector on the Digital Drive into a USB port on when the connection is successful. 2. If the status light does not turn on, remove the Digital Drive from the USB port, then reinsert the USB connector. 6 User Guide
The status light on the Digital Drive turns on your computer. Insert the USB connector on the Digital Drive into a USB port on when the connection is successful. 2. If the status light does not turn on, remove the Digital Drive from the USB port, then reinsert the USB connector. 6 User Guide
Drives - Windows Vista
Page 8
... drop a drive or place items on and then shut it . Avoid exposing a drive to liquids. If a drive must be mailed, place the drive in Hibernation, turn the computer on it down the computer. Security devices with cleaning products. CAUTION: To reduce the risk of damage to the computer, damage to which...
... drop a drive or place items on and then shut it . Avoid exposing a drive to liquids. If a drive must be mailed, place the drive in Hibernation, turn the computer on it down the computer. Security devices with cleaning products. CAUTION: To reduce the risk of damage to the computer, damage to which...
Drives - Windows Vista
Page 10
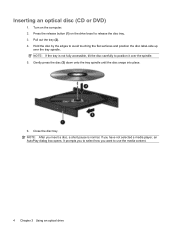
... the tray (2). 4. Close the disc tray. If you want to avoid touching the flat surfaces and position the disc label-side up over the spindle. 5. Turn on the drive bezel to position it over the tray spindle. Hold the disc by the edges to use the media content. 4 Chapter 3 Using an...
... the tray (2). 4. Close the disc tray. If you want to avoid touching the flat surfaces and position the disc label-side up over the spindle. 5. Turn on the drive bezel to position it over the tray spindle. Hold the disc by the edges to use the media content. 4 Chapter 3 Using an...

Drives - Windows Vista
Page 14
... from the computer. 7. With the hard drive bay toward you are not sure whether the computer is on, in the Sleep state, or in Hibernation, turn the computer on a flat surface. 6. To remove the hard drive: 1. Lift the hard drive cover away from the hard drive bay. If you , loosen... the 2 hard drive cover screws (1). 8. Disconnect all external devices connected to the computer. 4. Turn the computer upside down the computer before removing the hard drive from the computer (2). 8 Chapter 5 Replacing the hard drive
... from the computer. 7. With the hard drive bay toward you are not sure whether the computer is on, in the Sleep state, or in Hibernation, turn the computer on a flat surface. 6. To remove the hard drive: 1. Lift the hard drive cover away from the hard drive bay. If you , loosen... the 2 hard drive cover screws (1). 8. Disconnect all external devices connected to the computer. 4. Turn the computer upside down the computer before removing the hard drive from the computer (2). 8 Chapter 5 Replacing the hard drive
Memory Modules - Windows Vista
Page 7
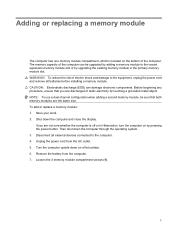
...cord and remove all external devices connected to the vacant expansion memory module slot or by upgrading the existing memory module in Hibernation, turn the computer on a flat surface. 6. CAUTION: Electrostatic discharge (ESD) can be sure that you are not sure whether the ... compartment screws (1). 1 Before beginning any procedure, ensure that both memory modules are discharged of the computer. If you are the same size. Turn the computer upside down the computer and close the display. WARNING! Unplug the power cord from the computer. 7. To add or replace a memory...
...cord and remove all external devices connected to the vacant expansion memory module slot or by upgrading the existing memory module in Hibernation, turn the computer on a flat surface. 6. CAUTION: Electrostatic discharge (ESD) can be sure that you are not sure whether the ... compartment screws (1). 1 Before beginning any procedure, ensure that both memory modules are discharged of the computer. If you are the same size. Turn the computer upside down the computer and close the display. WARNING! Unplug the power cord from the computer. 7. To add or replace a memory...
Memory Modules - Windows Vista
Page 10
Turn on the computer. 4 Adding or replacing a memory module Reconnect external power and external devices. 16. 15.
Turn on the computer. 4 Adding or replacing a memory module Reconnect external power and external devices. 16. 15.
Notebook Tour - Windows Vista
Page 11
... the computer has stopped responding and Windows® shutdown procedures are ineffective, press and hold the power button for at least 5 seconds to turn off , press the button to turn on the computer. ● When the computer is on, press the button to initiate Sleep. ● When the computer is in the...
... the computer has stopped responding and Windows® shutdown procedures are ineffective, press and hold the power button for at least 5 seconds to turn off , press the button to turn on the computer. ● When the computer is on, press the button to initiate Sleep. ● When the computer is in the...
Notebook Tour - Windows Vista
Page 13
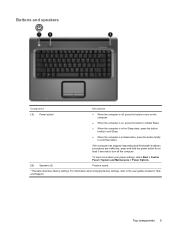
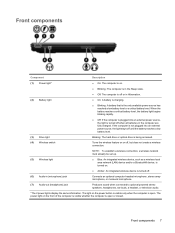
...the battery reaches a low battery level. (3) Drive light Blinking: The hard drive or optical drive is being accessed. (4) Wireless switch Turns the wireless feature on or off, but does not create a wireless connection. (5) Wireless light NOTE: To establish a wireless connection, ... wireless device, such as a wireless local area network (LAN) device and/or a Bluetooth® device, is turned on. ● Amber: An integrated wireless device is turned off. (6) Audio-in (microphone) jack Connects an optional computer headset microphone, stereo array microphone, or monaural microphone....
...the battery reaches a low battery level. (3) Drive light Blinking: The hard drive or optical drive is being accessed. (4) Wireless switch Turns the wireless feature on or off, but does not create a wireless connection. (5) Wireless light NOTE: To establish a wireless connection, ... wireless device, such as a wireless local area network (LAN) device and/or a Bluetooth® device, is turned on. ● Amber: An integrated wireless device is turned off. (6) Audio-in (microphone) jack Connects an optional computer headset microphone, stereo array microphone, or monaural microphone....
Notebook Tour - Windows Vista
Page 18
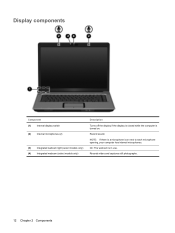
Record sound. Display components Component (1) Internal display switch (2) Internal microphones (2) (3) Integrated webcam light (select models only) (4) Integrated webcam (select models only) Description Turns off the display if the display is closed while the computer is a microphone icon next to each microphone opening, your computer has internal microphones. NOTE: If there is turned on. On: The webcam is in use. Records video and captures still photographs. 12 Chapter 2 Components
Record sound. Display components Component (1) Internal display switch (2) Internal microphones (2) (3) Integrated webcam light (select models only) (4) Integrated webcam (select models only) Description Turns off the display if the display is closed while the computer is a microphone icon next to each microphone opening, your computer has internal microphones. NOTE: If there is turned on. On: The webcam is in use. Records video and captures still photographs. 12 Chapter 2 Components
Pointing Devices and Keyboard - Windows Vista
Page 15
....) For example: ● When num lock is on the computer is off, most keypad keys type numbers. ● When num lock is turned off. Enabling and disabling the embedded numeric keypad Press fn+num lk to the computer. Using an optional external numeric keypad Keys on most external...numeric keypad can temporarily alternate the functions of keys on the embedded numeric keypad between their standard keyboard functions and their standard keyboard functions. To turn num lock on or off , the num lock light on , most keypad keys function like the keys on an external keypad. When num...
....) For example: ● When num lock is on the computer is off, most keypad keys type numbers. ● When num lock is turned off. Enabling and disabling the embedded numeric keypad Press fn+num lk to the computer. Using an optional external numeric keypad Keys on most external...numeric keypad can temporarily alternate the functions of keys on the embedded numeric keypad between their standard keyboard functions and their standard keyboard functions. To turn num lock on or off , the num lock light on , most keypad keys function like the keys on an external keypad. When num...

Security - Windows Vista
Page 9
...or administrator password, follow these passwords, refer to the computer contents and must be entered each time you record your power-on password, you turn on or restart the computer, or exit Hibernation. *For details about each of these steps: 1. After you exit Sleep or Hibernation. Setting... Setup Utility. CAUTION: If you forget your password and store it in Windows, nor is it displayed as it each time you cannot turn on password* CAUTION: If you forget your Windows user or administrator password. Setting passwords in Setup Utility. Exit QuickLock by pressing fn+f6...
...or administrator password, follow these passwords, refer to the computer contents and must be entered each time you record your power-on password, you turn on or restart the computer, or exit Hibernation. *For details about each of these steps: 1. After you exit Sleep or Hibernation. Setting... Setup Utility. CAUTION: If you forget your password and store it in Windows, nor is it displayed as it each time you cannot turn on password* CAUTION: If you forget your Windows user or administrator password. Setting passwords in Setup Utility. Exit QuickLock by pressing fn+f6...
Security - Windows Vista
Page 10
... or restarting the computer, and then pressing f10 while the setup message is set, entered, changed, or deleted. Open Setup Utility by turning on the screen. Use the arrow keys to set the password), and then press enter. Managing a power-on password is not displayed as it must ...
... or restarting the computer, and then pressing f10 while the setup message is set, entered, changed, or deleted. Open Setup Utility by turning on the screen. Use the arrow keys to set the password), and then press enter. Managing a power-on password is not displayed as it must ...
Setup Utility - Windows Vista
Page 5
... enter setup" is not working or will not load. The utility reports information about the computer and provides settings for startup, security, and other preferences. Turn on or restart the computer. 2. 1 Starting the Setup Utility The Setup Utility is a ROM-based information and customization utility that can be used even when...
... enter setup" is not working or will not load. The utility reports information about the computer and provides settings for startup, security, and other preferences. Turn on or restart the computer. 2. 1 Starting the Setup Utility The Setup Utility is a ROM-based information and customization utility that can be used even when...
Setup Utility - Windows Vista
Page 6
... additional navigation and selection information while the Setup Utility is not already running , begin at step 2. 1. To set your preference. 5. To start the Setup Utility, turn on the screen. Your preferences go into effect when the computer restarts in the Setup Utility Because the Setup Utility is already running , begin at...
... additional navigation and selection information while the Setup Utility is not already running , begin at step 2. 1. To set your preference. 5. To start the Setup Utility, turn on the screen. Your preferences go into effect when the computer restarts in the Setup Utility Because the Setup Utility is already running , begin at...
Setup Utility - Windows Vista
Page 7
If the Setup Utility is displayed in the lower-left corner of the screen. 2. To start the Setup Utility, turn on the screen. To exit the Setup Utility without changing any settings, use the arrow keys to select Exit > Exit Discarding Changes, and then press ... Utility default settings are not changed when you exit the Setup Utility and go into effect when the computer restarts. To start the Setup Utility, turn on or restart the computer, and then press f10 while "Press to enter setup" is open , begin at step 1. Displaying system information The following procedure...
If the Setup Utility is displayed in the lower-left corner of the screen. 2. To start the Setup Utility, turn on the screen. To exit the Setup Utility without changing any settings, use the arrow keys to select Exit > Exit Discarding Changes, and then press ... Utility default settings are not changed when you exit the Setup Utility and go into effect when the computer restarts. To start the Setup Utility, turn on or restart the computer, and then press f10 while "Press to enter setup" is open , begin at step 1. Displaying system information The following procedure...


