
Wireless Setup Guide
Page 4
Wireless Router Security Level Disable (no security) WEP WPA-PSK On the Wireless Network Connection screen: 1 Select the check box for Allow me to connect to the selected wireless network, even though it is not secure. 2 Select Connect. 1 Clear ...step 1, the blue wireless light turns on. 1 Press the wireless on/off button on the screen. Highlight your network name in the Available wireless networks list. 3 Complete the following steps that correspond with wireless notebooks and wired desktop PROGRESS CHECK If you successfully complete step 3, a Wireless Network Connection status icon and...
Wireless Router Security Level Disable (no security) WEP WPA-PSK On the Wireless Network Connection screen: 1 Select the check box for Allow me to connect to the selected wireless network, even though it is not secure. 2 Select Connect. 1 Clear ...step 1, the blue wireless light turns on. 1 Press the wireless on/off button on the screen. Highlight your network name in the Available wireless networks list. 3 Complete the following steps that correspond with wireless notebooks and wired desktop PROGRESS CHECK If you successfully complete step 3, a Wireless Network Connection status icon and...

HP USB Digital Drive
Page 9
Select the Digital Drive and wait until the "Safe to remove the Digital Drive when the status light on the Digital Drive is in the extended position, return it on its track for safe storage. 8 User Guide Select the "Safely Remove Hardware" icon on your taskbar. A dialog box displays a list of connected devices. 2. Disconnecting the Digital Drive ✎ Do not attempt to Remove Hardware" message appears on your screen. 3. Gently unplug the Digital Drive from the USB port. ✎ If the USB connector cable is flashing. 1.
Select the Digital Drive and wait until the "Safe to remove the Digital Drive when the status light on the Digital Drive is in the extended position, return it on its track for safe storage. 8 User Guide Select the "Safely Remove Hardware" icon on your taskbar. A dialog box displays a list of connected devices. 2. Disconnecting the Digital Drive ✎ Do not attempt to Remove Hardware" message appears on your screen. 3. Gently unplug the Digital Drive from the USB port. ✎ If the USB connector cable is flashing. 1.
Backup and Recovery - Windows Vista
Page 8
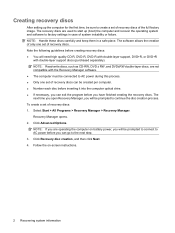
Recovery Manager opens. 2. Click Advanced Options. NOTE: If you are operating the computer on -screen instructions. 2 Recovering system information NOTE: Handle these discs carefully and keep them in case of system instability or failure. NOTE: Read-write discs, such as ...
Recovery Manager opens. 2. Click Advanced Options. NOTE: If you are operating the computer on -screen instructions. 2 Recovering system information NOTE: Handle these discs carefully and keep them in case of system instability or failure. NOTE: Read-write discs, such as ...
Backup and Recovery - Windows Vista
Page 9
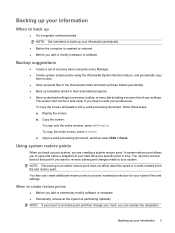
...Before you add or modify hardware or software Backup suggestions ● Create a set of your settings. To copy the entire screen, press fn+prt sc. To copy the screen and paste it into a word-processing document, follow these folders periodically. ● Back up templates stored in their associated... you to save and name a snapshot of your hard drive at a specific point in a window, toolbar, or menu bar by taking a screen shot of recovery discs using Recovery Manager. ● Create system restore points using the Windows® System Restore feature, and periodically copy them to...
...Before you add or modify hardware or software Backup suggestions ● Create a set of your settings. To copy the entire screen, press fn+prt sc. To copy the screen and paste it into a word-processing document, follow these folders periodically. ● Back up templates stored in their associated... you to save and name a snapshot of your hard drive at a specific point in a window, toolbar, or menu bar by taking a screen shot of recovery discs using Recovery Manager. ● Create system restore points using the Windows® System Restore feature, and periodically copy them to...
Backup and Recovery - Windows Vista
Page 10
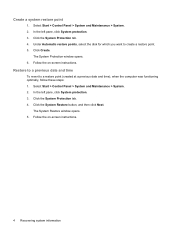
... functioning optimally, follow these steps: 1. The System Protection window opens. 6. Select Start > Control Panel > System and Maintenance > System. 2. Follow the on -screen instructions. 4 Recovering system information Follow the on -screen instructions. Click the System Restore button, and then click Next. Click the System Protection tab. 4. The System Restore window opens. 5. Click the...
... functioning optimally, follow these steps: 1. The System Protection window opens. 6. Select Start > Control Panel > System and Maintenance > System. 2. Follow the on -screen instructions. 4 Recovering system information Follow the on -screen instructions. Click the System Restore button, and then click Next. Click the System Protection tab. 4. The System Restore window opens. 5. Click the...
Backup and Recovery - Windows Vista
Page 11
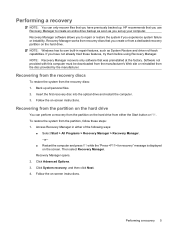
...; Restart the computer and press f11 while the "Press for recovery" message is displayed on the screen. Follow the on -screen instructions. Then select Recovery Manager. Click System recovery, and then click Next. 4. Follow the on -screen instructions. Recovery Manager opens. 2. Performing a recovery NOTE: You can perform a recovery from the partition on the...
...; Restart the computer and press f11 while the "Press for recovery" message is displayed on the screen. Follow the on -screen instructions. Then select Recovery Manager. Click System recovery, and then click Next. 4. Follow the on -screen instructions. Recovery Manager opens. 2. Performing a recovery NOTE: You can perform a recovery from the partition on the...
Drives - Windows Vista
Page 8
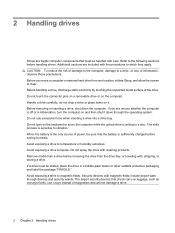
... computer. If you move the computer while the optical drive is sufficiently charged before removing the drive from one location, initiate Sleep, and allow the screen to a disc. 2 Handling drives Drives are fragile computer components that must be mailed, place the drive in Hibernation, turn the computer on and then shut...
... computer. If you move the computer while the optical drive is sufficiently charged before removing the drive from one location, initiate Sleep, and allow the screen to a disc. 2 Handling drives Drives are fragile computer components that must be mailed, place the drive in Hibernation, turn the computer on and then shut...
Drives - Windows Vista
Page 13
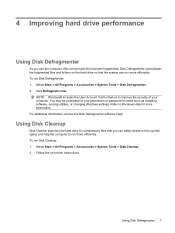
... > Accessories > System Tools > Disk Defragmenter. 2. Disk Defragmenter consolidates the fragmented files and folders on the hard drive so that you use the computer, files on -screen instructions. Click Defragment now. You may be prompted for your computer.
... > Accessories > System Tools > Disk Defragmenter. 2. Disk Defragmenter consolidates the fragmented files and folders on the hard drive so that you use the computer, files on -screen instructions. Click Defragment now. You may be prompted for your computer.
Notebook Tour - Windows Vista
Page 9
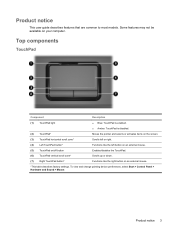
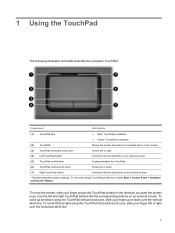
... Component Description (1) TouchPad light ● Blue: TouchPad is enabled. ● Amber: TouchPad is disabled. (2) TouchPad* Moves the pointer and selects or activates items on the screen. (3) TouchPad horizontal scroll zone* Scrolls left or right. (4) Left TouchPad button* Functions like the left button on an external mouse. (5) TouchPad on/off button Enables...
... Component Description (1) TouchPad light ● Blue: TouchPad is enabled. ● Amber: TouchPad is disabled. (2) TouchPad* Moves the pointer and selects or activates items on the screen. (3) TouchPad horizontal scroll zone* Scrolls left or right. (4) Left TouchPad button* Functions like the left button on an external mouse. (5) TouchPad on/off button Enables...
Pointing Devices and Keyboard - Windows Vista
Page 5
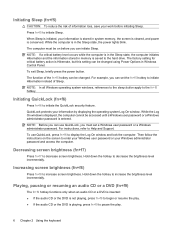
... Support (fn+f1 4 Opening the Print Options window (fn+f2 4 Opening a Web browser (fn+f3 5 Switching the screen image (fn+f4 5 Initiating Sleep (fn+f5) ...6 Initiating QuickLock (fn+f6 6 Decreasing screen brightness (fn+f7 6 Increasing screen brightness (fn+f8 6 Playing, pausing or resuming an audio CD or a DVD (fn+f9 6 Stopping an audio...
... Support (fn+f1 4 Opening the Print Options window (fn+f2 4 Opening a Web browser (fn+f3 5 Switching the screen image (fn+f4 5 Initiating Sleep (fn+f5) ...6 Initiating QuickLock (fn+f6 6 Decreasing screen brightness (fn+f7 6 Increasing screen brightness (fn+f8 6 Playing, pausing or resuming an audio CD or a DVD (fn+f9 6 Stopping an audio...
Pointing Devices and Keyboard - Windows Vista
Page 7
.... Component Description (1) TouchPad light ● Blue: TouchPad is enabled. ● Amber: TouchPad is disabled. (2) TouchPad* Moves the pointer and selects or activates items on the screen. (3) TouchPad horizontal scroll zone* Scrolls left or right. (4) Left TouchPad button* Functions like the left and right TouchPad buttons like the right button on an...
.... Component Description (1) TouchPad light ● Blue: TouchPad is enabled. ● Amber: TouchPad is disabled. (2) TouchPad* Moves the pointer and selects or activates items on the screen. (3) TouchPad horizontal scroll zone* Scrolls left or right. (4) Left TouchPad button* Functions like the left and right TouchPad buttons like the right button on an...
Pointing Devices and Keyboard - Windows Vista
Page 9
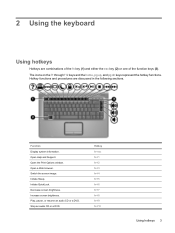
...audio CD or a DVD. 2 Using the keyboard Using hotkeys Hotkeys are discussed in the following sections. Switch the screen image. Hotkey functions and procedures are combinations of the fn key (1) and either the esc key (2) or one of... the function keys (3). Stop an audio CD or a DVD. Open a Web browser. Decrease screen brightness. Hotkey fn+esc fn+f1 fn+f2 fn+f3 fn+f4 fn+f5 fn+f6 fn+f7 fn+...f8 fn+f9 fn+f10 Using hotkeys 3 Increase screen brightness. Function Display system information. The icons on the f1 through f12 keys and the home, pg...
...audio CD or a DVD. 2 Using the keyboard Using hotkeys Hotkeys are discussed in the following sections. Switch the screen image. Hotkey functions and procedures are combinations of the fn key (1) and either the esc key (2) or one of... the function keys (3). Stop an audio CD or a DVD. Open a Web browser. Decrease screen brightness. Hotkey fn+esc fn+f1 fn+f2 fn+f3 fn+f4 fn+f5 fn+f6 fn+f7 fn+...f8 fn+f9 fn+f10 Using hotkeys 3 Increase screen brightness. Function Display system information. The icons on the f1 through f12 keys and the home, pg...
Pointing Devices and Keyboard - Windows Vista
Page 11
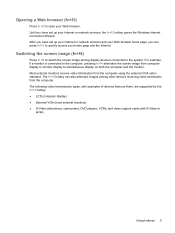
... Press fn+f3 to open your Web browser home page, you can also alternate images among display devices connected to the system. Switching the screen image (fn+f4) Press fn+f4 to simultaneous display on both the computer and the monitor. For example, if a monitor is connected to... the computer, pressing fn+f4 alternates the screen image from computer display to monitor display to switch the screen image among other devices receiving video information from the computer using the external VGA video standard. Most external monitors ...
... Press fn+f3 to open your Web browser home page, you can also alternate images among display devices connected to the system. Switching the screen image (fn+f4) Press fn+f4 to simultaneous display on both the computer and the monitor. For example, if a monitor is connected to... the computer, pressing fn+f4 alternates the screen image from computer display to monitor display to switch the screen image among other devices receiving video information from the computer using the external VGA video standard. Most external monitors ...
Pointing Devices and Keyboard - Windows Vista
Page 12
... a critical battery level occurs while the computer is in the Sleep state, the computer initiates Hibernation and the information stored in system memory, the screen is cleared, and power is saved to pause the play . ● If the audio CD or the DVD is entered. For example, you...to decrease the brightness level incrementally. NOTE: Before you can set a Windows user password or a Windows administrator password. Decreasing screen brightness (fn+f7) Press fn+f7 to increase screen brightness. Playing, pausing or resuming an audio CD or a DVD (fn+f9) The fn+f9 hotkey functions only when ...
... a critical battery level occurs while the computer is in the Sleep state, the computer initiates Hibernation and the information stored in system memory, the screen is cleared, and power is saved to pause the play . ● If the audio CD or the DVD is entered. For example, you...to decrease the brightness level incrementally. NOTE: Before you can set a Windows user password or a Windows administrator password. Decreasing screen brightness (fn+f7) Press fn+f7 to increase screen brightness. Playing, pausing or resuming an audio CD or a DVD (fn+f9) The fn+f9 hotkey functions only when ...

Pointing Devices and Keyboard - Windows Vista
Page 16
... remove dust, lint, and particles that can be used to blow air around on the keyboard surface. A vacuum cleaner can deposit household debris on the screen. WARNING! 4 Cleaning the TouchPad and keyboard Dirt and grease on the TouchPad can cause the pointer to jump around and under the keys to loosen...
... remove dust, lint, and particles that can be used to blow air around on the keyboard surface. A vacuum cleaner can deposit household debris on the screen. WARNING! 4 Cleaning the TouchPad and keyboard Dirt and grease on the TouchPad can cause the pointer to jump around and under the keys to loosen...
Pointing Devices and Keyboard - Windows Vista
Page 17
...6 initiating Sleep 6 muting speaker sound 7 opening Help and Support 4 opening Print Options window 4 opening Web browser 5 switching screen image 5 using 4 K keyboard 3 keyboard hotkeys, identifying 3 keypad, embedded enabling and disabling 9 identifying 8 switching key functions... num lock light, identifying 8 num lock, external keypad 9 P Print Options window hotkey 4 Q QuickLock hotkey 6 S S-Video 5 screen brightness hotkeys 6 screen image, switching 5 scroll zones, TouchPad 1 Sleep hotkey 6 system information hotkey 4 T TouchPad identifying 1 setting preferences 2 TouchPad buttons, ...
...6 initiating Sleep 6 muting speaker sound 7 opening Help and Support 4 opening Print Options window 4 opening Web browser 5 switching screen image 5 using 4 K keyboard 3 keyboard hotkeys, identifying 3 keypad, embedded enabling and disabling 9 identifying 8 switching key functions... num lock light, identifying 8 num lock, external keypad 9 P Print Options window hotkey 4 Q QuickLock hotkey 6 S S-Video 5 screen brightness hotkeys 6 screen image, switching 5 scroll zones, TouchPad 1 Sleep hotkey 6 system information hotkey 4 T TouchPad identifying 1 setting preferences 2 TouchPad buttons, ...
Security - Windows Vista
Page 8
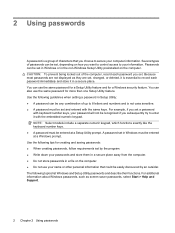
... a file on the computer. Use the following topics list Windows and Setup Utility passwords and describe their functions. Because most passwords are not displayed as screen-saver passwords, select Start > Help and Support. 2 Chapter 2 Using passwords You can be entered at a Setup Utility prompt.
... a file on the computer. Use the following topics list Windows and Setup Utility passwords and describe their functions. Because most passwords are not displayed as screen-saver passwords, select Start > Help and Support. 2 Chapter 2 Using passwords You can be entered at a Setup Utility prompt.
Security - Windows Vista
Page 10
.... ● To delete a power-on password, type your preferences and exit Setup Utility, press f10, and then follow the instructions on the screen. 4 Chapter 2 Using passwords A power-on password, type your password in the Enter New Password and Confirm New Password fields, and then press...Password, and then press enter. ● To set , entered, changed, or deleted. Managing a power-on password prevents unauthorized use of the screen. 2. Open Setup Utility by turning on or restarting the computer, and then pressing f10 while the setup message is set an administrator password, ...
.... ● To delete a power-on password, type your preferences and exit Setup Utility, press f10, and then follow the instructions on the screen. 4 Chapter 2 Using passwords A power-on password, type your password in the Enter New Password and Confirm New Password fields, and then press...Password, and then press enter. ● To set , entered, changed, or deleted. Managing a power-on password prevents unauthorized use of the screen. 2. Open Setup Utility by turning on or restarting the computer, and then pressing f10 while the setup message is set an administrator password, ...
Security - Windows Vista
Page 18
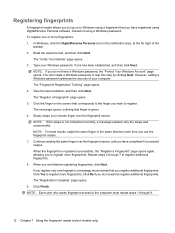
... "Registration Complete" page opens. 9. NOTE: Each user who wants fingerprint access to register more fingerprints. Registering fingerprints A fingerprint reader allows you to log on the screen that you have registered using DigitalPersona Personal software, instead of your Windows password, if one has been established, and then click Next.
... "Registration Complete" page opens. 9. NOTE: Each user who wants fingerprint access to register more fingerprints. Registering fingerprints A fingerprint reader allows you to log on the screen that you have registered using DigitalPersona Personal software, instead of your Windows password, if one has been established, and then click Next.
Setup Utility - Windows Vista
Page 5
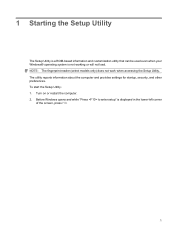
...-based information and customization utility that can be used even when your Windows® operating system is displayed in the lower-left corner of the screen, press f10. 1 NOTE: The fingerprint reader (select models only) does not work when accessing the Setup Utility.
...-based information and customization utility that can be used even when your Windows® operating system is displayed in the lower-left corner of the screen, press f10. 1 NOTE: The fingerprint reader (select models only) does not work when accessing the Setup Utility.


