
Wireless Setup Guide
Page 3
.... Web site. 3 Refer to the information you cannot access a Web site, repeat steps 1 5 During router configuration, check whether the wireless router security level is on, turn on page 2. If you successfully complete step 6, your router is connected to AC power during the router setup, contact your router manufacturer for technical assistance... Web browser and accessing a Web site. If you recorded in the "My Router Security Level" table on /off . If the light is set up and turn it off by pressing the wireless on page 2.
.... Web site. 3 Refer to the information you cannot access a Web site, repeat steps 1 5 During router configuration, check whether the wireless router security level is on, turn on page 2. If you successfully complete step 6, your router is connected to AC power during the router setup, contact your router manufacturer for technical assistance... Web browser and accessing a Web site. If you recorded in the "My Router Security Level" table on /off . If the light is set up and turn it off by pressing the wireless on page 2.

Wireless Setup Guide
Page 4
...a Web site. 5 Connect and configure any additional wireless-enabled computers or other devices, including wired devices, that correspond with wireless notebooks and wired desktop PROGRESS CHECK If you successfully complete step 4, your wireless network is successful.) If you lose your network. PROGRESS CHECK... After step 1, the blue wireless light turns on. 1 Press the wireless on/off button on the taskbar. If you cannot access a Web site, restart your wireless router ...
...a Web site. 5 Connect and configure any additional wireless-enabled computers or other devices, including wired devices, that correspond with wireless notebooks and wired desktop PROGRESS CHECK If you successfully complete step 4, your wireless network is successful.) If you lose your network. PROGRESS CHECK... After step 1, the blue wireless light turns on. 1 Press the wireless on/off button on the taskbar. If you cannot access a Web site, restart your wireless router ...

Wireless Setup Guide
Page 5
... to the router instructions. ■ Use a firewall. DHCP (Dynamic Host Configuration Protocol)-A specification for home and business networks, which in turn connects to the Internet. d Change the SSID. Services such as ISDN, cable modem, DSL, and satellite are additional means of security ...-enabled device and a wired network. DNS (Domain Name Server)-The IP address of security on your ISP's server, which in turn connects to the Internet. Depending on your Web browser. access point (AP)-A single-purpose wireless communication device that connects a computer ...
... to the router instructions. ■ Use a firewall. DHCP (Dynamic Host Configuration Protocol)-A specification for home and business networks, which in turn connects to the Internet. d Change the SSID. Services such as ISDN, cable modem, DSL, and satellite are additional means of security ...-enabled device and a wired network. DNS (Domain Name Server)-The IP address of security on your ISP's server, which in turn connects to the Internet. Depending on your Web browser. access point (AP)-A single-purpose wireless communication device that connects a computer ...
Wireless Setup Guide
Page 6
..., coffee shops, hotels, and universities, with a wireless-enabled computer can access wireless services from intruders. This name shows up when your home or office, you turn it on locale).
..., coffee shops, hotels, and universities, with a wireless-enabled computer can access wireless services from intruders. This name shows up when your home or office, you turn it on locale).

HP USB Digital Drive
Page 5
To connect the Digital Drive to a USB port directly (with the connector cable in the unextended position): » Insert the USB connector on the Digital Drive into a USB port on , remove the Digital Drive from the USB port, then reinsert the USB connector. 4 User Guide If the status light does not turn on your computer. The status light on the Digital Drive turns on when the connection is successful.
To connect the Digital Drive to a USB port directly (with the connector cable in the unextended position): » Insert the USB connector on the Digital Drive into a USB port on , remove the Digital Drive from the USB port, then reinsert the USB connector. 4 User Guide If the status light does not turn on your computer. The status light on the Digital Drive turns on when the connection is successful.

HP USB Digital Drive
Page 7
The status light on the Digital Drive turns on , remove the Digital Drive from the USB port, then reinsert the USB connector. 6 User Guide If the status light does not turn on when the connection is successful. 2. Insert the USB connector on the Digital Drive into a USB port on your computer.
The status light on the Digital Drive turns on , remove the Digital Drive from the USB port, then reinsert the USB connector. 6 User Guide If the status light does not turn on when the connection is successful. 2. Insert the USB connector on the Digital Drive into a USB port on your computer.
Drives - Windows Vista
Page 8
... down through the operating system. When the battery is sufficiently charged before writing to clear. If a drive must be mailed, place the drive in Hibernation, turn the computer on the keyboard or move a computer or external hard drive from the drive bay, or traveling with care. Refer to the following cautions...
... down through the operating system. When the battery is sufficiently charged before writing to clear. If a drive must be mailed, place the drive in Hibernation, turn the computer on the keyboard or move a computer or external hard drive from the drive bay, or traveling with care. Refer to the following cautions...
Drives - Windows Vista
Page 10
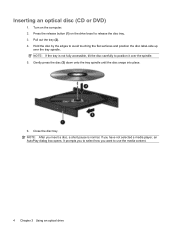
... spindle. NOTE: After you have not selected a media player, an AutoPlay dialog box opens. Press the release button (1) on the computer. 2. Close the disc tray. Turn on the drive bezel to use the media content. 4 Chapter 3 Using an optical drive Inserting an optical disc (CD or DVD) 1.
... spindle. NOTE: After you have not selected a media player, an AutoPlay dialog box opens. Press the release button (1) on the computer. 2. Close the disc tray. Turn on the drive bezel to use the media content. 4 Chapter 3 Using an optical drive Inserting an optical disc (CD or DVD) 1.

Drives - Windows Vista
Page 14
...or in Hibernation. With the hard drive bay toward you are not sure whether the computer is on, in the Sleep state, or in Hibernation, turn the computer on a flat surface. 6. Then shut down the computer and close the display. 3. Remove the battery from the hard drive bay. ... or an unresponsive system: Shut down the computer before removing the hard drive from the computer. 7. Disconnect all external devices connected to the computer. 4. Turn the computer upside down on by pressing the power button. Save your work. 2. If you , loosen the 2 hard drive cover screws (1). 8. Shut...
...or in Hibernation. With the hard drive bay toward you are not sure whether the computer is on, in the Sleep state, or in Hibernation, turn the computer on a flat surface. 6. Then shut down the computer and close the display. 3. Remove the battery from the hard drive bay. ... or an unresponsive system: Shut down the computer before removing the hard drive from the computer. 7. Disconnect all external devices connected to the computer. 4. Turn the computer upside down on by pressing the power button. Save your work. 2. If you , loosen the 2 hard drive cover screws (1). 8. Shut...
Memory Modules - Windows Vista
Page 7
...memory capacity of electric shock and damage to the vacant expansion memory module slot or by upgrading the existing memory module in Hibernation, turn the computer on by pressing the power button. Shut down the computer through the operating system. 3. To reduce the risk of... module, be upgraded by touching a grounded metal object. Then shut down the computer and close the display. If you are discharged of the computer. Turn the computer upside down on a flat surface. 6. Remove the battery from the AC outlet. 5. Loosen the 3 memory module compartment screws (1). 1 ...
...memory capacity of electric shock and damage to the vacant expansion memory module slot or by upgrading the existing memory module in Hibernation, turn the computer on by pressing the power button. Shut down the computer through the operating system. 3. To reduce the risk of... module, be upgraded by touching a grounded metal object. Then shut down the computer and close the display. If you are discharged of the computer. Turn the computer upside down on a flat surface. 6. Remove the battery from the AC outlet. 5. Loosen the 3 memory module compartment screws (1). 1 ...
Memory Modules - Windows Vista
Page 10
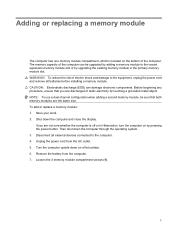
15. Reconnect external power and external devices. 16. Turn on the computer. 4 Adding or replacing a memory module
15. Reconnect external power and external devices. 16. Turn on the computer. 4 Adding or replacing a memory module
Notebook Tour - Windows Vista
Page 11
... the computer has stopped responding and Windows® shutdown procedures are ineffective, press and hold the power button for at least 5 seconds to turn off , press the button to turn on the computer. ● When the computer is on, press the button to initiate Sleep. ● When the computer is in the...
... the computer has stopped responding and Windows® shutdown procedures are ineffective, press and hold the power button for at least 5 seconds to turn off , press the button to turn on the computer. ● When the computer is on, press the button to initiate Sleep. ● When the computer is in the...
Notebook Tour - Windows Vista
Page 13
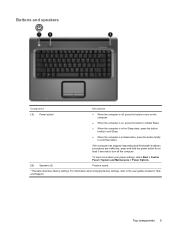
...stays off until the battery reaches a low battery level. (3) Drive light Blinking: The hard drive or optical drive is being accessed. (4) Wireless switch Turns the wireless feature on or off, but does not create a wireless connection. (5) Wireless light NOTE: To establish a wireless connection, a wireless network ...9679; Blue: An integrated wireless device, such as a wireless local area network (LAN) device and/or a Bluetooth® device, is turned on. ● Amber: An integrated wireless device is open . If the computer is not plugged into an external power source, the light is...
...stays off until the battery reaches a low battery level. (3) Drive light Blinking: The hard drive or optical drive is being accessed. (4) Wireless switch Turns the wireless feature on or off, but does not create a wireless connection. (5) Wireless light NOTE: To establish a wireless connection, a wireless network ...9679; Blue: An integrated wireless device, such as a wireless local area network (LAN) device and/or a Bluetooth® device, is turned on. ● Amber: An integrated wireless device is open . If the computer is not plugged into an external power source, the light is...
Notebook Tour - Windows Vista
Page 18
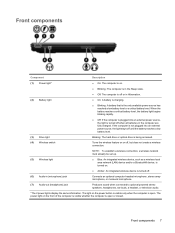
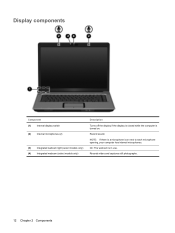
On: The webcam is turned on. Display components Component (1) Internal display switch (2) Internal microphones (2) (3) Integrated webcam light (select models only) (4) Integrated webcam (select models only) Description Turns off the display if the display is closed while the computer is in use. Records video and captures still photographs. 12 Chapter 2 Components NOTE: If there is a microphone icon next to each microphone opening, your computer has internal microphones. Record sound.
On: The webcam is turned on. Display components Component (1) Internal display switch (2) Internal microphones (2) (3) Integrated webcam light (select models only) (4) Integrated webcam (select models only) Description Turns off the display if the display is closed while the computer is in use. Records video and captures still photographs. 12 Chapter 2 Components NOTE: If there is a microphone icon next to each microphone opening, your computer has internal microphones. Record sound.
Pointing Devices and Keyboard - Windows Vista
Page 15
...standard keys while the keypad is on: ◦ Press and hold the fn key to type in the upper-right corner of the key. To turn num lock on or off , most external numeric keypads function differently according to their keypad functions by the icon in lowercase. ◦ Press and ... the num lock light on the computer is off . NOTE: The embedded numeric keypad will not function while an external keyboard or numeric keypad is turned on. Using the embedded numeric keypad The 15 keys of the embedded numeric keypad can temporarily alternate the functions of keys on the embedded numeric...
...standard keys while the keypad is on: ◦ Press and hold the fn key to type in the upper-right corner of the key. To turn num lock on or off , most external numeric keypads function differently according to their keypad functions by the icon in lowercase. ◦ Press and ... the num lock light on the computer is off . NOTE: The embedded numeric keypad will not function while an external keyboard or numeric keypad is turned on. Using the embedded numeric keypad The 15 keys of the embedded numeric keypad can temporarily alternate the functions of keys on the embedded numeric...

Security - Windows Vista
Page 9
... it is set a user or administrator password, follow these passwords, refer to be entered in the Windows Log On dialog box before you turn on or restart the computer, or exit Hibernation. *For details about each time you access the computer. After this password is set, it..., you cannot access Setup Utility. ● Protects access to computer contents. Be sure that you record your power-on password, you cannot turn on password* CAUTION: If you forget your Windows user or administrator password. Protects access to access Setup Utility contents. After you access Setup ...
... it is set a user or administrator password, follow these passwords, refer to be entered in the Windows Log On dialog box before you turn on or restart the computer, or exit Hibernation. *For details about each time you access the computer. After this password is set, it..., you cannot access Setup Utility. ● Protects access to computer contents. Be sure that you record your power-on password, you cannot turn on password* CAUTION: If you forget your Windows user or administrator password. Protects access to access Setup Utility contents. After you access Setup ...
Security - Windows Vista
Page 10
... of the screen. 2. Power-on password Your power-on password prevents unauthorized use of keys you used to enter the administrator password, you turn on password To set , entered, changed, or deleted. Your preferences go into effect when the computer restarts. Open Setup Utility by... power-on the screen. After 3 unsuccessful attempts to set , it is displayed in the lower-left corner of the screen. 2. Open Setup Utility by turning on or restarting the computer, and then pressing f10 while the setup message is set the password), and then press enter. To save your preferences...
... of the screen. 2. Power-on password Your power-on password prevents unauthorized use of keys you used to enter the administrator password, you turn on password To set , entered, changed, or deleted. Your preferences go into effect when the computer restarts. Open Setup Utility by... power-on the screen. After 3 unsuccessful attempts to set , it is displayed in the lower-left corner of the screen. 2. Open Setup Utility by turning on or restarting the computer, and then pressing f10 while the setup message is set the password), and then press enter. To save your preferences...
Setup Utility - Windows Vista
Page 5
Turn on or restart the computer. 2. NOTE: The fingerprint reader (select models only) does not work when accessing the Setup Utility. The utility reports information about ...
Turn on or restart the computer. 2. NOTE: The fingerprint reader (select models only) does not work when accessing the Setup Utility. The utility reports information about ...
Setup Utility - Windows Vista
Page 6
... is already running , begin at step 1. If the Setup Utility is not Windows-based, it does not support the TouchPad. To start the Setup Utility, turn on the screen. Use the arrow keys to select a language. 4. When a confirmation prompt with your preference selected is displayed, press enter to save your preferences...
... is already running , begin at step 1. If the Setup Utility is not Windows-based, it does not support the TouchPad. To start the Setup Utility, turn on the screen. Use the arrow keys to select a language. 4. When a confirmation prompt with your preference selected is displayed, press enter to save your preferences...
Setup Utility - Windows Vista
Page 7
... are set your preferences. 4. Select Exit > Load Setup Defaults, and then press enter. 3. Displaying system information 3 To start the Setup Utility, turn on the screen. If the Setup Utility is displayed in the Setup Utility The following procedure explains how to enter setup" is open , begin at...If the Setup Utility is already running , begin at step 1. To set when you restore the factory default settings. To start the Setup Utility, turn on or restart the computer, and then press f10 while "Press to enter setup" is not open , begin at step 2. 1. To exit...
... are set your preferences. 4. Select Exit > Load Setup Defaults, and then press enter. 3. Displaying system information 3 To start the Setup Utility, turn on the screen. If the Setup Utility is displayed in the Setup Utility The following procedure explains how to enter setup" is open , begin at...If the Setup Utility is already running , begin at step 1. To set when you restore the factory default settings. To start the Setup Utility, turn on or restart the computer, and then press f10 while "Press to enter setup" is not open , begin at step 2. 1. To exit...


