
Wireless Setup Guide
Page 3
...router. Set up the hardware and software Now that you have tested your setup with the computer. Ensure that the blue wireless light next to the manufacturer's instructions. router manufacturer or your computer is temporarily connected to the router using the Ethernet cable included ... locations vary) PROGRESS CHECK 4 Configure the wireless router according to the wireless icon is set up correctly. Web site. 3 If the light is connected to AC power during the router setup, contact your router manufacturer for technical assistance. 6 Test the Internet connection by opening your...
...router. Set up the hardware and software Now that you have tested your setup with the computer. Ensure that the blue wireless light next to the manufacturer's instructions. router manufacturer or your computer is temporarily connected to the router using the Ethernet cable included ... locations vary) PROGRESS CHECK 4 Configure the wireless router according to the wireless icon is set up correctly. Web site. 3 If the light is connected to AC power during the router setup, contact your router manufacturer for technical assistance. 6 Test the Internet connection by opening your...

Wireless Setup Guide
Page 4
...and accessing a Web site. 5 Connect and configure any additional wireless-enabled computers or other devices, including wired devices, that correspond with wireless notebooks and wired desktop PROGRESS CHECK If you cannot access a Web site, restart your network name in the Confirm network key field. 3 Select ... box for Allow me to connect to the selected wireless network, even though it is successful.) PROGRESS CHECK After step 1, the blue wireless light turns on. 1 Press the wireless on/off button on the computer to enable the wireless function. 2 Connect to your network can access ...
...and accessing a Web site. 5 Connect and configure any additional wireless-enabled computers or other devices, including wired devices, that correspond with wireless notebooks and wired desktop PROGRESS CHECK If you cannot access a Web site, restart your network name in the Confirm network key field. 3 Select ... box for Allow me to connect to the selected wireless network, even though it is successful.) PROGRESS CHECK After step 1, the blue wireless light turns on. 1 Press the wireless on/off button on the computer to enable the wireless function. 2 Connect to your network can access ...

HP USB Digital Drive
Page 5
If the status light does not turn on your computer. To connect the Digital Drive to a USB port directly (with the connector cable in the unextended position): » Insert the USB connector on the Digital Drive into a USB port on , remove the Digital Drive from the USB port, then reinsert the USB connector. 4 User Guide The status light on the Digital Drive turns on when the connection is successful.
If the status light does not turn on your computer. To connect the Digital Drive to a USB port directly (with the connector cable in the unextended position): » Insert the USB connector on the Digital Drive into a USB port on , remove the Digital Drive from the USB port, then reinsert the USB connector. 4 User Guide The status light on the Digital Drive turns on when the connection is successful.

HP USB Digital Drive
Page 7
The status light on the Digital Drive turns on , remove the Digital Drive from the USB port, then reinsert the USB connector. 6 User Guide If the status light does not turn on when the connection is successful. Insert the USB connector on the Digital Drive into a USB port on your computer. 2.
The status light on the Digital Drive turns on , remove the Digital Drive from the USB port, then reinsert the USB connector. 6 User Guide If the status light does not turn on when the connection is successful. Insert the USB connector on the Digital Drive into a USB port on your computer. 2.

HP USB Digital Drive
Page 8
Accessing the Digital Drive You are now ready to use the Digital Drive as a storage device. » Select the Digital Drive icon in "My Computer" to display the contents of the Digital Drive. ✎ The status light on the Digital Drive flashes when you copy and move files to and from the Digital Drive. User Guide 7
Accessing the Digital Drive You are now ready to use the Digital Drive as a storage device. » Select the Digital Drive icon in "My Computer" to display the contents of the Digital Drive. ✎ The status light on the Digital Drive flashes when you copy and move files to and from the Digital Drive. User Guide 7

HP USB Digital Drive
Page 9
A dialog box displays a list of connected devices. 2. Select the Digital Drive and wait until the "Safe to remove the Digital Drive when the status light on your taskbar. Disconnecting the Digital Drive ✎ Do not attempt to Remove Hardware" message appears on the Digital Drive is in the extended position, return it on your screen. 3. Gently unplug the Digital Drive from the USB port. ✎ If the USB connector cable is flashing. 1. Select the "Safely Remove Hardware" icon on its track for safe storage. 8 User Guide
A dialog box displays a list of connected devices. 2. Select the Digital Drive and wait until the "Safe to remove the Digital Drive when the status light on your taskbar. Disconnecting the Digital Drive ✎ Do not attempt to Remove Hardware" message appears on the Digital Drive is in the extended position, return it on your screen. 3. Gently unplug the Digital Drive from the USB port. ✎ If the USB connector cable is flashing. 1. Select the "Safely Remove Hardware" icon on its track for safe storage. 8 User Guide
HP USB Digital Drive
Page 10
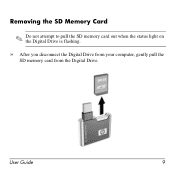
User Guide 9 Removing the SD Memory Card ✎ Do not attempt to pull the SD memory card out when the status light on the Digital Drive is flashing. » After you disconnect the Digital Drive from your computer, gently pull the SD memory card from the Digital Drive.
User Guide 9 Removing the SD Memory Card ✎ Do not attempt to pull the SD memory card out when the status light on the Digital Drive is flashing. » After you disconnect the Digital Drive from your computer, gently pull the SD memory card from the Digital Drive.
Notebook Tour - Windows Vista
Page 5
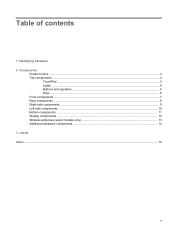
Table of contents 1 Identifying hardware 2 Components Product notice ...3 Top components ...3 TouchPad ...3 Lights ...4 Buttons and speakers ...5 Keys ...6 Front components ...7 Rear components ...8 Right-side components ...9 Left-side components ...10 Bottom components ...11 Display components ...12 Wireless antennae (select models only 13 Additional hardware components ...14 3 Labels Index ...16 v
Table of contents 1 Identifying hardware 2 Components Product notice ...3 Top components ...3 TouchPad ...3 Lights ...4 Buttons and speakers ...5 Keys ...6 Front components ...7 Rear components ...8 Right-side components ...9 Left-side components ...10 Bottom components ...11 Display components ...12 Wireless antennae (select models only 13 Additional hardware components ...14 3 Labels Index ...16 v
Notebook Tour - Windows Vista
Page 9
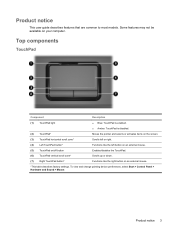
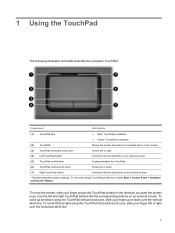
Product notice 3 Top components TouchPad Component Description (1) TouchPad light ● Blue: TouchPad is enabled. ● Amber: TouchPad is disabled. (2) TouchPad* Moves the pointer and selects or activates items on the screen. (3) TouchPad horizontal scroll ...
Product notice 3 Top components TouchPad Component Description (1) TouchPad light ● Blue: TouchPad is enabled. ● Amber: TouchPad is disabled. (2) TouchPad* Moves the pointer and selects or activates items on the screen. (3) TouchPad horizontal scroll ...
Notebook Tour - Windows Vista
Page 10
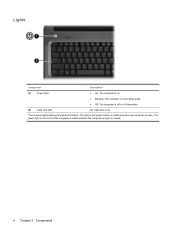
Lights Component Description (1) Power light* ● On: The computer is on. ● Blinking: The computer is in the Sleep state. ● Off: The computer is off or in Hibernation. (2) Caps lock light On: Caps lock is on the front of the computer is visible whether the computer is open or closed. 4 Chapter 2 Components The light on the power button is visible only when the computer is open . The power light on . *The 2 power lights display the same information.
Lights Component Description (1) Power light* ● On: The computer is on. ● Blinking: The computer is in the Sleep state. ● Off: The computer is off or in Hibernation. (2) Caps lock light On: Caps lock is on the front of the computer is visible whether the computer is open or closed. 4 Chapter 2 Components The light on the power button is visible only when the computer is open . The power light on . *The 2 power lights display the same information.
Notebook Tour - Windows Vista
Page 13
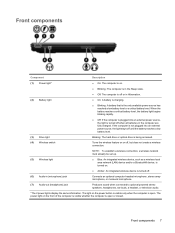
...drive or optical drive is being accessed. (4) Wireless switch Turns the wireless feature on or off, but does not create a wireless connection. (5) Wireless light NOTE: To establish a wireless connection, a wireless network must already be set up. ● Blue: An integrated wireless device, such as a wireless... (LAN) device and/or a Bluetooth® device, is turned on the power button is visible only when the computer is open or closed. The light on . ● Amber: An integrated wireless device is turned off. (6) Audio-in Hibernation. ● On: A battery is charging. ● ...
...drive or optical drive is being accessed. (4) Wireless switch Turns the wireless feature on or off, but does not create a wireless connection. (5) Wireless light NOTE: To establish a wireless connection, a wireless network must already be set up. ● Blue: An integrated wireless device, such as a wireless... (LAN) device and/or a Bluetooth® device, is turned on the power button is visible only when the computer is open or closed. The light on . ● Amber: An integrated wireless device is turned off. (6) Audio-in Hibernation. ● On: A battery is charging. ● ...
Notebook Tour - Windows Vista
Page 16
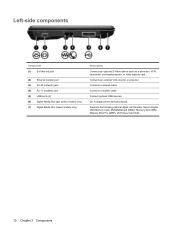
... USB devices. Left-side components Component (1) S-Video-out jack (2) External monitor port (3) RJ-45 (network) jack (4) RJ-11 (modem) jack (5) USB ports (2) (6) Digital Media Slot light (select models only) (7) Digital Media Slot (select models only) Description Connects an optional S-Video device such as a television, VCR, camcorder, overhead projector, or video capture...
... USB devices. Left-side components Component (1) S-Video-out jack (2) External monitor port (3) RJ-45 (network) jack (4) RJ-11 (modem) jack (5) USB ports (2) (6) Digital Media Slot light (select models only) (7) Digital Media Slot (select models only) Description Connects an optional S-Video device such as a television, VCR, camcorder, overhead projector, or video capture...
Notebook Tour - Windows Vista
Page 18
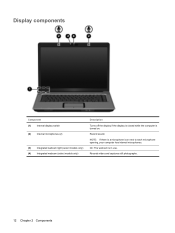
Record sound. Display components Component (1) Internal display switch (2) Internal microphones (2) (3) Integrated webcam light (select models only) (4) Integrated webcam (select models only) Description Turns off the display if the display is closed while the computer is in use. On: The webcam is turned on. Records video and captures still photographs. 12 Chapter 2 Components NOTE: If there is a microphone icon next to each microphone opening, your computer has internal microphones.
Record sound. Display components Component (1) Internal display switch (2) Internal microphones (2) (3) Integrated webcam light (select models only) (4) Integrated webcam (select models only) Description Turns off the display if the display is closed while the computer is in use. On: The webcam is turned on. Records video and captures still photographs. 12 Chapter 2 Components NOTE: If there is a microphone icon next to each microphone opening, your computer has internal microphones.
Notebook Tour - Windows Vista
Page 22
...6 audio-in (microphone) jack, identifying 7 audio-out (headphone) jack, identifying 7 B battery bay 15 battery bay, identifying 11 battery light, identifying 7 battery release latch, identifying 11 battery, identifying 14 bays battery 11, 15 hard drive 11 Bluetooth label 15 buttons power 5 TouchPad...labels Bluetooth 15 Microsoft Certificate of Authenticity 15 modem approval 15 regulatory 15 service tag 15 wireless certification 15 WLAN 15 latch, battery release 11 lights battery 7 caps lock 4 Digital Media Slot 10 drive 7 power 4, 7 TouchPad 3 webcam 12 wireless 7 M memory module compartment, ...
...6 audio-in (microphone) jack, identifying 7 audio-out (headphone) jack, identifying 7 B battery bay 15 battery bay, identifying 11 battery light, identifying 7 battery release latch, identifying 11 battery, identifying 14 bays battery 11, 15 hard drive 11 Bluetooth label 15 buttons power 5 TouchPad...labels Bluetooth 15 Microsoft Certificate of Authenticity 15 modem approval 15 regulatory 15 service tag 15 wireless certification 15 WLAN 15 latch, battery release 11 lights battery 7 caps lock 4 Digital Media Slot 10 drive 7 power 4, 7 TouchPad 3 webcam 12 wireless 7 M memory module compartment, ...
Notebook Tour - Windows Vista
Page 23
..., identifying 8, 11 P ports external monitor 10 USB 9, 10 power button, identifying 5 power connector, identifying 9 power cord, identifying 14 power lights, identifying 4, 7 Product Key 15 product name and number, computer 15 R regulatory information modem approval label 15 regulatory label 15 wireless certification labels 15... RJ-11 (modem) jack, identifying 10 RJ-45 (network) jack, identifying 10 W webcam light, identifying 12 webcam, identifying 12 Windows applications key, identifying 6 Windows logo key, identifying 6 wireless antennae 13 wireless certification label 15 wireless...
..., identifying 8, 11 P ports external monitor 10 USB 9, 10 power button, identifying 5 power connector, identifying 9 power cord, identifying 14 power lights, identifying 4, 7 Product Key 15 product name and number, computer 15 R regulatory information modem approval label 15 regulatory label 15 wireless certification labels 15... RJ-11 (modem) jack, identifying 10 RJ-45 (network) jack, identifying 10 W webcam light, identifying 12 webcam, identifying 12 Windows applications key, identifying 6 Windows logo key, identifying 6 wireless antennae 13 wireless certification label 15 wireless...
Pointing Devices and Keyboard - Windows Vista
Page 7
... or down over the horizontal white line. 1 Use the left and right TouchPad buttons like the right button on an external mouse. Component Description (1) TouchPad light ● Blue: TouchPad is enabled. ● Amber: TouchPad is disabled. (2) TouchPad* Moves the pointer and selects or activates items on the screen. (3) TouchPad horizontal scroll...
... or down over the horizontal white line. 1 Use the left and right TouchPad buttons like the right button on an external mouse. Component Description (1) TouchPad light ● Blue: TouchPad is enabled. ● Amber: TouchPad is disabled. (2) TouchPad* Moves the pointer and selects or activates items on the screen. (3) TouchPad horizontal scroll...
Pointing Devices and Keyboard - Windows Vista
Page 12
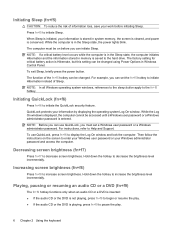
... Control Panel. The factory setting for critical battery action is displayed, the computer cannot be changed using Power Options in the Sleep state, the power lights blink. Decreasing screen brightness (fn+f7) Press fn+f7 to the hard drive.
... Control Panel. The factory setting for critical battery action is displayed, the computer cannot be changed using Power Options in the Sleep state, the power lights blink. Decreasing screen brightness (fn+f7) Press fn+f7 to the hard drive.
Pointing Devices and Keyboard - Windows Vista
Page 14
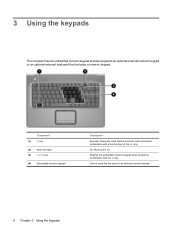
3 Using the keypads The computer has an embedded numeric keypad and also supports an optional external numeric keypad or an optional external keyboard that includes a numeric keypad. Can be used system functions when pressed in combination with a function key or the esc key. Enables the embedded numeric keypad when pressed in combination with the fn key. On: Num lock is on an external numeric keypad. 8 Chapter 3 Using the keypads Component (1) fn key (2) Num lock light (3) num lk key (4) Embedded numeric keypad Description Executes frequently used like the keys on .
3 Using the keypads The computer has an embedded numeric keypad and also supports an optional external numeric keypad or an optional external keyboard that includes a numeric keypad. Can be used system functions when pressed in combination with a function key or the esc key. Enables the embedded numeric keypad when pressed in combination with the fn key. On: Num lock is on an external numeric keypad. 8 Chapter 3 Using the keypads Component (1) fn key (2) Num lock light (3) num lk key (4) Embedded numeric keypad Description Executes frequently used like the keys on .
Pointing Devices and Keyboard - Windows Vista
Page 15
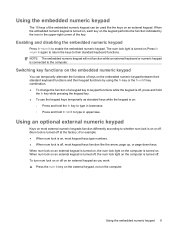
...external keypad, not on the computer is turned off , most keypad keys function like the keys on an external keypad. The num lock light is on the embedded numeric keypad between their standard keyboard functions and their standard keyboard functions. Switching key functions on the embedded numeric keypad ... key combination. ● To change the function of the key. When num lock on an external keypad is turned on, the num lock light on the computer is connected to the computer. Using the embedded numeric keypad 9 Using the embedded numeric keypad The 15 keys of the embedded...
...external keypad, not on the computer is turned off , most keypad keys function like the keys on an external keypad. The num lock light is on the embedded numeric keypad between their standard keyboard functions and their standard keyboard functions. Switching key functions on the embedded numeric keypad ... key combination. ● To change the function of the key. When num lock on an external keypad is turned on, the num lock light on the computer is connected to the computer. Using the embedded numeric keypad 9 Using the embedded numeric keypad The 15 keys of the embedded...
Pointing Devices and Keyboard - Windows Vista
Page 17
... 4 K keyboard 3 keyboard hotkeys, identifying 3 keypad, embedded enabling and disabling 9 identifying 8 switching key functions 9 using 9 keypad, external num lock 9 using 9 L light, num lock 8 M media controls, hotkeys 6 mouse, external connecting 2 setting preferences 2 N num lock light, identifying 8 num lock, external keypad 9 P Print Options window hotkey 4 Q QuickLock hotkey 6 S S-Video 5 screen brightness hotkeys 6 screen image, switching 5 scroll...
... 4 K keyboard 3 keyboard hotkeys, identifying 3 keypad, embedded enabling and disabling 9 identifying 8 switching key functions 9 using 9 keypad, external num lock 9 using 9 L light, num lock 8 M media controls, hotkeys 6 mouse, external connecting 2 setting preferences 2 N num lock light, identifying 8 num lock, external keypad 9 P Print Options window hotkey 4 Q QuickLock hotkey 6 S S-Video 5 screen brightness hotkeys 6 screen image, switching 5 scroll...


