
Wireless Setup Guide
Page 4
...Connection. (The Wireless Network Connection status icon and message are displayed on page 2.) 2 Retype the pass phrase in the Available wireless networks list. 3 Complete the following steps that correspond with wireless notebooks and wired desktop PROGRESS CHECK If you successfully complete step ...wireless router security level (encryption): PROGRESS CHECK If you successfully complete step 3, a Wireless Network Connection status icon and message are displayed on the computer to enable the wireless function. 2 Connect to the wireless network by opening your Web browser and accessing a...
...Connection. (The Wireless Network Connection status icon and message are displayed on page 2.) 2 Retype the pass phrase in the Available wireless networks list. 3 Complete the following steps that correspond with wireless notebooks and wired desktop PROGRESS CHECK If you successfully complete step ...wireless router security level (encryption): PROGRESS CHECK If you successfully complete step 3, a Wireless Network Connection status icon and message are displayed on the computer to enable the wireless function. 2 Connect to the wireless network by opening your Web browser and accessing a...

Wireless Setup Guide
Page 5
..., or spam over the Web or through the Internet: 1 in 20 ■ Enable MAC address filtering on , fast Internet connection. Chance of information. A firewall is displayed.) c Select the Wireless Networks tab. DID YOU KNOW... What Is? Secure your network You don't go to sleep at speeds up Internet access.
..., or spam over the Web or through the Internet: 1 in 20 ■ Enable MAC address filtering on , fast Internet connection. Chance of information. A firewall is displayed.) c Select the Wireless Networks tab. DID YOU KNOW... What Is? Secure your network You don't go to sleep at speeds up Internet access.
Wireless Setup Guide
Page 6
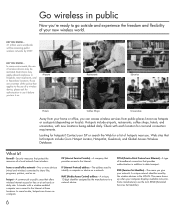
... offers wireless Internet access for a list of a local network from public places known as coolspots. A unique network identifier used to data transport. Contact your computer displays available networks. IP (Internet Protocol) address-The address used by the manufacturer to the Internet. This name shows up when your ISP or search the...
... offers wireless Internet access for a list of a local network from public places known as coolspots. A unique network identifier used to data transport. Contact your computer displays available networks. IP (Internet Protocol) address-The address used by the manufacturer to the Internet. This name shows up when your ISP or search the...

HP USB Digital Drive
Page 8
Accessing the Digital Drive You are now ready to use the Digital Drive as a storage device. » Select the Digital Drive icon in "My Computer" to display the contents of the Digital Drive. ✎ The status light on the Digital Drive flashes when you copy and move files to and from the Digital Drive. User Guide 7
Accessing the Digital Drive You are now ready to use the Digital Drive as a storage device. » Select the Digital Drive icon in "My Computer" to display the contents of the Digital Drive. ✎ The status light on the Digital Drive flashes when you copy and move files to and from the Digital Drive. User Guide 7

HP USB Digital Drive
Page 9
Gently unplug the Digital Drive from the USB port. ✎ If the USB connector cable is flashing. 1. Select the "Safely Remove Hardware" icon on your screen. 3. Select the Digital Drive and wait until the "Safe to remove the Digital Drive when the status light on the Digital Drive is in the extended position, return it on its track for safe storage. 8 User Guide A dialog box displays a list of connected devices. 2. Disconnecting the Digital Drive ✎ Do not attempt to Remove Hardware" message appears on your taskbar.
Gently unplug the Digital Drive from the USB port. ✎ If the USB connector cable is flashing. 1. Select the "Safely Remove Hardware" icon on your screen. 3. Select the Digital Drive and wait until the "Safe to remove the Digital Drive when the status light on the Digital Drive is in the extended position, return it on its track for safe storage. 8 User Guide A dialog box displays a list of connected devices. 2. Disconnecting the Digital Drive ✎ Do not attempt to Remove Hardware" message appears on your taskbar.

Backup and Recovery - Windows Vista
Page 9
...; Save customized settings in a window, toolbar, or menu bar by taking a screen shot of your preferences. Open a word-processing document, and then select Edit > Paste. Display the screen. c. Copy the screen: To copy only the active window, press alt+fn+prt sc. Backup suggestions 5 b. Backup suggestions ● Create a set of recovery...
...; Save customized settings in a window, toolbar, or menu bar by taking a screen shot of your preferences. Open a word-processing document, and then select Edit > Paste. Display the screen. c. Copy the screen: To copy only the active window, press alt+fn+prt sc. Backup suggestions 5 b. Backup suggestions ● Create a set of recovery...
Backup and Recovery - Windows Vista
Page 12
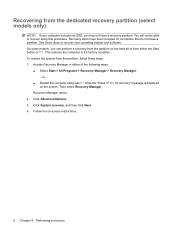
Recovery discs have been included for recovery" message is displayed on the screen. On some models, you may not have a partition. Access Recovery Manager in either the Start button or f11. Click Advanced Options. 3. Follow ...
Recovery discs have been included for recovery" message is displayed on the screen. On some models, you may not have a partition. Access Recovery Manager in either the Start button or f11. Click Advanced Options. 3. Follow ...

Drives - Windows Vista
Page 10
... DVD/CD-ROM drives. 4. NOTE: Windows includes the User Account Control feature to improve the security of your selections. Observing the copyright warning It is displayed on the DVD Region tab. Changing DVD region settings Most DVDs that the Use AutoPlay for tasks such as installing software, running utilities, or changing...
... DVD/CD-ROM drives. 4. NOTE: Windows includes the User Account Control feature to improve the security of your selections. Observing the copyright warning It is displayed on the DVD Region tab. Changing DVD region settings Most DVDs that the Use AutoPlay for tasks such as installing software, running utilities, or changing...
Drives - Windows Vista
Page 14
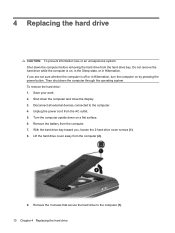
... drive from the computer. 7. Remove the 3 screws that secure the hard drive to the computer. 4. Turn the computer upside down the computer and close the display. 3. Shut down on a flat surface. 6. Remove the battery from the hard drive bay. Do not remove the hard drive while the computer is off or...
... drive from the computer. 7. Remove the 3 screws that secure the hard drive to the computer. 4. Turn the computer upside down the computer and close the display. 3. Shut down on a flat surface. 6. Remove the battery from the hard drive bay. Do not remove the hard drive while the computer is off or...

Drives - Windows Vista
Page 19
Wipe from the center of the computer desktop and select Personalize > Display Settings. 2. or - ◦ The playback window in your work and close . Disconnecting these Plug and Play devices frees up valuable system resources and results in ... or a DVD. ● Log off printers and scanners, and unplug cameras and portable handheld devices. Set Colors to Medium (16 bit) if this message is displayed, click No. If this setting is clean. In rare cases, you may behave in better playback performance. ◦ Change desktop color properties. If necessary, clean...
Wipe from the center of the computer desktop and select Personalize > Display Settings. 2. or - ◦ The playback window in your work and close . Disconnecting these Plug and Play devices frees up valuable system resources and results in ... or a DVD. ● Log off printers and scanners, and unplug cameras and portable handheld devices. Set Colors to Medium (16 bit) if this message is displayed, click No. If this setting is clean. In rare cases, you may behave in better playback performance. ◦ Change desktop color properties. If necessary, clean...
Drives - Windows Vista
Page 21
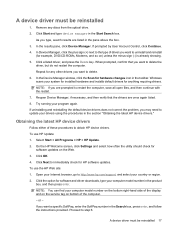
... box, press enter, and follow the instructions provided. In the results pane, click Device Manager. Obtaining the latest HP device drivers Follow either of the display and on the service tag on ) unless the minus sign (-) is already showing. 5. On the HP Welcome screen, click Settings and select how often the...
... box, press enter, and follow the instructions provided. In the results pane, click Device Manager. Obtaining the latest HP device drivers Follow either of the display and on the service tag on ) unless the minus sign (-) is already showing. 5. On the HP Welcome screen, click Settings and select how often the...
Drives - Windows Vista
Page 22
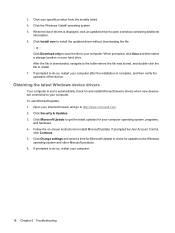
... drive. Click Download only to save the file to your specific product from the models listed. 4. Obtaining the latest Windows device drivers Your computer is displayed, click an updated driver to the Windows operating system and other Microsoft products. 6. Click your computer. or -
... drive. Click Download only to save the file to your specific product from the models listed. 4. Obtaining the latest Windows device drivers Your computer is displayed, click an updated driver to the Windows operating system and other Microsoft products. 6. Click your computer. or -

External Devices - Windows Vista
Page 8
... the far right of the taskbar. CAUTION: To prevent damage to a USB connector, do not pull on the cable to the USB port. NOTE: To display the Safely Remove Hardware icon, click the Show Hidden Icons icon (< or To stop a USB device before removing it. Connecting a USB device CAUTION: To prevent... USB cable for the device to remove the USB device. NOTE: The first time you connect a USB device, the "Installing device driver software" message is displayed in the notification area, at the far right of the taskbar.
... the far right of the taskbar. CAUTION: To prevent damage to a USB connector, do not pull on the cable to the USB port. NOTE: To display the Safely Remove Hardware icon, click the Show Hidden Icons icon (< or To stop a USB device before removing it. Connecting a USB device CAUTION: To prevent... USB cable for the device to remove the USB device. NOTE: The first time you connect a USB device, the "Installing device driver software" message is displayed in the notification area, at the far right of the taskbar.

External Media Cards - Windows Vista
Page 6
... firmly seated. Inserting a digital card CAUTION: To avoid damaging the digital card or the computer, do not insert any type of available options may be displayed. 2 Using Digital Media Slot cards (select models only) Insert the card into the Digital Media Slot. Hold the digital card label-side up, with the...
... firmly seated. Inserting a digital card CAUTION: To avoid damaging the digital card or the computer, do not insert any type of available options may be displayed. 2 Using Digital Media Slot cards (select models only) Insert the card into the Digital Media Slot. Hold the digital card label-side up, with the...

External Media Cards - Windows Vista
Page 7
Stop the digital card: a. NOTE: To display the Safely Remove Hardware icon, click the Show Hidden Icons icon (< or Double-click the Safely Remove Hardware icon in the notification area, at the far right of data or an unresponsive system, stop a data transfer, click Cancel in the operating system Copying window. 2. Stopping and removing a digital card CAUTION: To prevent loss of the taskbar. NOTE: To stop a digital card before removing it. 1. Save your information and close all programs associated with the digital card.
Stop the digital card: a. NOTE: To display the Safely Remove Hardware icon, click the Show Hidden Icons icon (< or Double-click the Safely Remove Hardware icon in the notification area, at the far right of data or an unresponsive system, stop a data transfer, click Cancel in the operating system Copying window. 2. Stopping and removing a digital card CAUTION: To prevent loss of the taskbar. NOTE: To stop a digital card before removing it. 1. Save your information and close all programs associated with the digital card.
Memory Modules - Windows Vista and Windows 7
Page 7
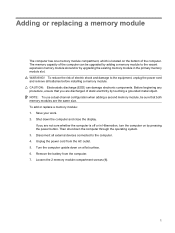
... pressing the power button. The memory capacity of the computer. Unplug the power cord from the computer. 7. Then shut down the computer and close the display. Loosen the 2 memory module compartment screws (1). 1 CAUTION: Electrostatic discharge (ESD) can be sure that you are the same size. Before beginning any procedure, ensure that...
... pressing the power button. The memory capacity of the computer. Unplug the power cord from the computer. 7. Then shut down the computer and close the display. Loosen the 2 memory module compartment screws (1). 1 CAUTION: Electrostatic discharge (ESD) can be sure that you are the same size. Before beginning any procedure, ensure that...
Modem and Local Area Network - Windows Vista
Page 10
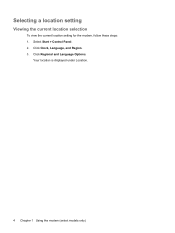
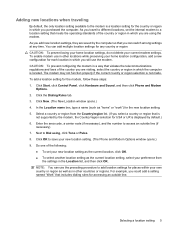
Select Start > Control Panel. 2. Click Regional and Language Options. Your location is displayed under Location. 4 Chapter 1 Using the modem (select models only) Selecting a location setting Viewing the current location selection To view the current location setting for the modem, follow these steps: 1. Click Clock, Language, and Region. 3.
Select Start > Control Panel. 2. Click Regional and Language Options. Your location is displayed under Location. 4 Chapter 1 Using the modem (select models only) Selecting a location setting Viewing the current location selection To view the current location setting for the modem, follow these steps: 1. Click Clock, Language, and Region. 3.
Modem and Local Area Network - Windows Vista
Page 11
... standards of the country you select a country or region that is not supported by the modem, the Country/region selection for USA or UK is displayed by the computer so that includes dialing rules for accessing an outside line (if necessary). 7. For example, you are saved by default.) 6. You can use...
... standards of the country you select a country or region that is not supported by the modem, the Country/region selection for USA or UK is displayed by the computer so that includes dialing rules for accessing an outside line (if necessary). 7. For example, you are saved by default.) 6. You can use...
Modem and Local Area Network - Windows Vista
Page 12
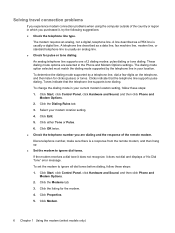
.... 2. To change the dialing mode in your modem location setting. 4. Click OK twice. ● Check the telephone number you purchased it does not dial and displays a "No Dial Tone" error message. Click the listing for pulse or tone dialing. Click Properties. 5. The modem requires an analog, not a digital, telephone line. A telephone...
.... 2. To change the dialing mode in your modem location setting. 4. Click OK twice. ● Check the telephone number you purchased it does not dial and displays a "No Dial Tone" error message. Click the listing for pulse or tone dialing. Click Properties. 5. The modem requires an analog, not a digital, telephone line. A telephone...

Notebook Tour - Windows Vista
Page 5
Table of contents 1 Identifying hardware 2 Components Top components ...2 TouchPad ...2 Keys ...3 Buttons and speakers ...4 Front components ...5 Rear components ...6 Right-side components ...7 Left-side components ...8 Bottom components ...9 Display components ...10 Lights ...11 Cleaning the display ...12 Wireless antennae (select models only 13 Additional hardware components ...14 3 Labels Index ...16 v
Table of contents 1 Identifying hardware 2 Components Top components ...2 TouchPad ...2 Keys ...3 Buttons and speakers ...4 Front components ...5 Rear components ...6 Right-side components ...7 Left-side components ...8 Bottom components ...9 Display components ...10 Lights ...11 Cleaning the display ...12 Wireless antennae (select models only 13 Additional hardware components ...14 3 Labels Index ...16 v


