End User License Agreement
Page 1
...suppliers reserve all terms and conditions of download. You do not have Software Product into Your Computer's AGREE TO ALL TERMS AND temporary memory (RAM) for use the Software Product on more than one computer, you may make archival or back-up purposes. d. Storage. ... Computer"). The term "Software Product" means computer software and may load the Software ON THE CONDITION THAT YOU Product into the local memory or storage device of the Freeware by third parties ("Freeware"), is not otherwise subject to distribute the Software PRODUCT ARE OFFERED ONLY Product...
...suppliers reserve all terms and conditions of download. You do not have Software Product into Your Computer's AGREE TO ALL TERMS AND temporary memory (RAM) for use the Software Product on more than one computer, you may make archival or back-up purposes. d. Storage. ... Computer"). The term "Software Product" means computer software and may load the Software ON THE CONDITION THAT YOU Product into the local memory or storage device of the Freeware by third parties ("Freeware"), is not otherwise subject to distribute the Software PRODUCT ARE OFFERED ONLY Product...
Upgrading and Servicing Guide
Page 5
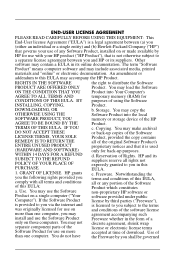
Remove items such as memory cards, USB drives, etc. 4 Grasp the handle on the side cover and pull towards the back of the computer. Removing and Replacing the Front Bezel 3 Removing the Front Bezel 1 Press the Power button to the computer. 570984-001 - Slide the cover about 2.4 cm (1 inch) to remove it. 5 Remove the side panel by lifting it away from the computer. 3 Remove the side cover by loosening the screw that connects the cover to turn off the computer. 2 Disconnect all cables and remove all items from the computer: Disconnect cables for power, keyboard, mouse, monitor, etc.
Remove items such as memory cards, USB drives, etc. 4 Grasp the handle on the side cover and pull towards the back of the computer. Removing and Replacing the Front Bezel 3 Removing the Front Bezel 1 Press the Power button to the computer. 570984-001 - Slide the cover about 2.4 cm (1 inch) to remove it. 5 Remove the side panel by lifting it away from the computer. 3 Remove the side cover by loosening the screw that connects the cover to turn off the computer. 2 Disconnect all cables and remove all items from the computer: Disconnect cables for power, keyboard, mouse, monitor, etc.
Upgrading and Servicing Guide
Page 11
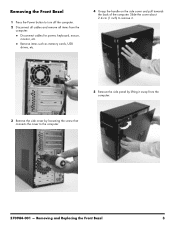
Removing and Replacing an Optical Disc Drive 3 Slide the cover about 2.4 cm (1 inch) to turn off the computer. 2 Disconnect all cables and remove all items from the computer: Disconnect cables for power, keyboard, mouse, monitor, etc. Removing an Optical Disc Drive 1 Press the Power button to remove it. 537491-001 - Remove items such as memory cards, USB drives, etc. 4 Remove the side cover by loosening the screw that connects the cover to the computer. 3 Remove any discs in the drive. 5 Grasp the handle on the side cover and pull towards the back of the computer.
Removing and Replacing an Optical Disc Drive 3 Slide the cover about 2.4 cm (1 inch) to turn off the computer. 2 Disconnect all cables and remove all items from the computer: Disconnect cables for power, keyboard, mouse, monitor, etc. Removing an Optical Disc Drive 1 Press the Power button to remove it. 537491-001 - Remove items such as memory cards, USB drives, etc. 4 Remove the side cover by loosening the screw that connects the cover to the computer. 3 Remove any discs in the drive. 5 Grasp the handle on the side cover and pull towards the back of the computer.
Upgrading and Servicing Guide
Page 19
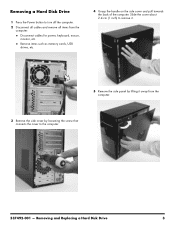
..., keyboard, mouse, monitor, etc. Removing and Replacing a Hard Disk Drive 3 Slide the cover about 2.4 cm (1 inch) to the computer. 537492-001 - Remove items such as memory cards, USB drives, etc. 4 Grasp the handle on the side cover and pull towards the back of the computer.
..., keyboard, mouse, monitor, etc. Removing and Replacing a Hard Disk Drive 3 Slide the cover about 2.4 cm (1 inch) to the computer. 537492-001 - Remove items such as memory cards, USB drives, etc. 4 Grasp the handle on the side cover and pull towards the back of the computer.

Upgrading and Servicing Guide
Page 27
Removing and Replacing an Add-In Card 3 Slide the cover about 2.4 cm (1 inch) to the computer. 537493-001 - Removing an Add-In Card 1 Press the Power button to turn off the computer. 2 Disconnect all cables and remove all items from the computer. 3 Remove the side cover by loosening the screw that connects the cover to remove it. 5 Remove the side panel by lifting it away from the computer: Disconnect cables for power, keyboard, mouse, monitor, etc. Remove items such as memory cards, USB drives, etc. 4 Grasp the handle on the side cover and pull towards the back of the computer.
Removing and Replacing an Add-In Card 3 Slide the cover about 2.4 cm (1 inch) to the computer. 537493-001 - Removing an Add-In Card 1 Press the Power button to turn off the computer. 2 Disconnect all cables and remove all items from the computer. 3 Remove the side cover by loosening the screw that connects the cover to remove it. 5 Remove the side panel by lifting it away from the computer: Disconnect cables for power, keyboard, mouse, monitor, etc. Remove items such as memory cards, USB drives, etc. 4 Grasp the handle on the side cover and pull towards the back of the computer.

Upgrading and Servicing Guide
Page 35
..., keyboard, mouse, monitor, etc. Removing and Replacing a Power Supply 3 Removing a Power Supply 1 Press the power button to the computer. 573607-001 - Remove items such as memory cards, USB drives, etc. 4 Grasp the handle on the side cover and pull towards the back of the computer.
..., keyboard, mouse, monitor, etc. Removing and Replacing a Power Supply 3 Removing a Power Supply 1 Press the power button to the computer. 573607-001 - Remove items such as memory cards, USB drives, etc. 4 Grasp the handle on the side cover and pull towards the back of the computer.

Upgrading and Servicing Guide
Page 41
Removing and Replacing Memory
Removing and Replacing Memory

Upgrading and Servicing Guide
Page 42
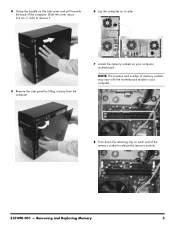
...Needed: Flathead screwdriver Phillips screwdriver Flathead screwdrivers A flathead screwdriver can damage the electronic components inside the computer. Remove items such as memory cards, USB drives, etc. You may vary by model. 3 Remove the side cover by touching the metal cage of ...Static electricity can be injured from the computer: Disconnect cables for power, keyboard, mouse, monitor, etc. Removing and Replacing Memory Discharge static electricity by loosening the screw that connects the cover to cool before touching any internal parts or electronic components. ...
...Needed: Flathead screwdriver Phillips screwdriver Flathead screwdrivers A flathead screwdriver can damage the electronic components inside the computer. Remove items such as memory cards, USB drives, etc. You may vary by model. 3 Remove the side cover by touching the metal cage of ...Static electricity can be injured from the computer: Disconnect cables for power, keyboard, mouse, monitor, etc. Removing and Replacing Memory Discharge static electricity by loosening the screw that connects the cover to cool before touching any internal parts or electronic components. ...
Upgrading and Servicing Guide
Page 43
Slide the cover about 2.4 cm (1 inch) to remove it. 6 Lay the computer on its side. 5 Remove the side panel by lifting it away from the computer. 7 Locate the memory sockets on each end of the memory socket to release the memory module. 537490-001 - NOTE: The location and number of the computer. Removing and Replacing Memory 3 4 Grasp the handle on the side cover and pull towards the back of memory sockets may vary with the motherboard model in your computer. 8 Push down the retaining clip on your computer motherboard.
Slide the cover about 2.4 cm (1 inch) to remove it. 6 Lay the computer on its side. 5 Remove the side panel by lifting it away from the computer. 7 Locate the memory sockets on each end of the memory socket to release the memory module. 537490-001 - NOTE: The location and number of the computer. Removing and Replacing Memory 3 4 Grasp the handle on the side cover and pull towards the back of memory sockets may vary with the motherboard model in your computer. 8 Push down the retaining clip on your computer motherboard.

Upgrading and Servicing Guide
Page 44
...may not look exactly the same as the original part, due to different manufacturers or models. Incompatible memory modules cannot be installed in the memory socket. 2 Look at the memory module socket for the tab that meet or exceed your original computer specifications. 1 Touching only the ...top edge of the memory module, locate the notch at the bottom edge. Removing and Replacing Memory 9 Touching only the memory module, lift it out of memory has a different notch position. Hewlett-Packard always provides quality parts that ...
...may not look exactly the same as the original part, due to different manufacturers or models. Incompatible memory modules cannot be installed in the memory socket. 2 Look at the memory module socket for the tab that meet or exceed your original computer specifications. 1 Touching only the ...top edge of the memory module, locate the notch at the bottom edge. Removing and Replacing Memory 9 Touching only the memory module, lift it out of memory has a different notch position. Hewlett-Packard always provides quality parts that ...

Upgrading and Servicing Guide
Page 45
3 Position the memory module over the socket, aligning the notch with the tab in the socket, and then firmly press the module down into the socket. 5 The side panel has several tabs on its top, bottom, and leading edges. ...until the retaining clips at the ends of the socket lock the module into place. 6 The tabs fit into slots and over the front lip of the computer. 4 Set the computer upright. 537490-001 - Removing and Replacing Memory 5
3 Position the memory module over the socket, aligning the notch with the tab in the socket, and then firmly press the module down into the socket. 5 The side panel has several tabs on its top, bottom, and leading edges. ...until the retaining clips at the ends of the socket lock the module into place. 6 The tabs fit into slots and over the front lip of the computer. 4 Set the computer upright. 537490-001 - Removing and Replacing Memory 5

Upgrading and Servicing Guide
Page 46
The information contained herein is subject to change without notice. Version: 2.0 Slide the side cover forward. 8 Reattach the screw at the back of the computer. 9 Connect the cables, such as the monitor. 12 Verify that the replacement memory works properly. © Copyright 2009 Hewlett-Packard Development Company, L.P. 7 To reattach the panel, align the tabs on the panel over the corresponding slots on the computer and all peripherals, such as the keyboard, mouse, Ethernet, and monitor cables. 10 Reconnect the power cord. 11 Turn on the computer.
The information contained herein is subject to change without notice. Version: 2.0 Slide the side cover forward. 8 Reattach the screw at the back of the computer. 9 Connect the cables, such as the monitor. 12 Verify that the replacement memory works properly. © Copyright 2009 Hewlett-Packard Development Company, L.P. 7 To reattach the panel, align the tabs on the panel over the corresponding slots on the computer and all peripherals, such as the keyboard, mouse, Ethernet, and monitor cables. 10 Reconnect the power cord. 11 Turn on the computer.

Upgrading and Servicing Guide
Page 30
Version: 1.0 Printed in Memory Modules 13 Speichermodule Modules mémoire Módulos de memoria Geheugenmodules Módulos de memória Moduli di memoria Hukommelsesmoduler 15 Minnemoduler Minnesmoduler Muistimoduulit ...;y pamięci Pamět'ové moduly Módulos da memória Pamät'ové moduly 17 Bellek modülleri Modul memori 14 16 18 Terdaftar di Deperindag provinsi DKI Jakarta No. 0251/1.824.51/09.04 © Copyright 2009 Hewlett-Packard Development Company, L.P. The information contained...
Version: 1.0 Printed in Memory Modules 13 Speichermodule Modules mémoire Módulos de memoria Geheugenmodules Módulos de memória Moduli di memoria Hukommelsesmoduler 15 Minnemoduler Minnesmoduler Muistimoduulit ...;y pamięci Pamět'ové moduly Módulos da memória Pamät'ové moduly 17 Bellek modülleri Modul memori 14 16 18 Terdaftar di Deperindag provinsi DKI Jakarta No. 0251/1.824.51/09.04 © Copyright 2009 Hewlett-Packard Development Company, L.P. The information contained...
Limited Warranty and Support Guide - Refurbished
Page 15
... displays the full 4GB of system resource requirements. The BIOS menu displays. HP Planet Partners HP is not an HP product; we take back all memory above 3GB is subject to recycle: http://www.hp.com/recycle The information contained herein is used for system resources. Confirm the Total Installed..., to make it is to change without notice. © Copyright 2004-2009 Hewlett-Packard Development Company, L.P. 15 This limitation is not limited to HP and Compaq systems. The memory above 3GB may not be available because of installed memory. 1 Turn on the PC. 2 Press the F10 key.
... displays the full 4GB of system resource requirements. The BIOS menu displays. HP Planet Partners HP is not an HP product; we take back all memory above 3GB is subject to recycle: http://www.hp.com/recycle The information contained herein is used for system resources. Confirm the Total Installed..., to make it is to change without notice. © Copyright 2004-2009 Hewlett-Packard Development Company, L.P. 15 This limitation is not limited to HP and Compaq systems. The memory above 3GB may not be available because of installed memory. 1 Turn on the PC. 2 Press the F10 key.
Getting Started Guide
Page 8
... you might be sold separately). ◦ For a modem, connect to a telephone line (DSL) or cable line and to your computer ENWW Check the operating system, memory, and other requirements listed before purchasing new software or hardware for installing software and hardware devices After you complete the initial computer setup, you have...
... you might be sold separately). ◦ For a modem, connect to a telephone line (DSL) or cable line and to your computer ENWW Check the operating system, memory, and other requirements listed before purchasing new software or hardware for installing software and hardware devices After you complete the initial computer setup, you have...

Getting Started Guide
Page 9
... another computer to the new computer. If the display (monitor) is blank, the monitor might encounter while installing, starting up, or using CDs or DVDs, memory sticks, and external hard drives. See Display (monitor) on or start Symptom Possible solution Error message: Hard disk drive error. To transfer your new computer...
... another computer to the new computer. If the display (monitor) is blank, the monitor might encounter while installing, starting up, or using CDs or DVDs, memory sticks, and external hard drives. See Display (monitor) on or start Symptom Possible solution Error message: Hard disk drive error. To transfer your new computer...

Warranty and Support Guide
Page 14
... may appear to change without notice. © Copyright 2010 Hewlett-Packard Development Company, L.P. 12 Confirm the Total Installed Memory. HP Planet Partners HP is equal to HP and Compaq systems. The memory above 3GB may see a difference between the size reported by manufacturers in the documentation, or on the box. Note ...by Microsoft Windows and the size advertised. In decimal notation, one megabyte (MB) is equal to 1,000,000 bytes, and one partition on the PC. 2 Press the F10 key. Understanding Hard Disk Drive Space The hard disk drive on the Hewlett-Packard and...
... may appear to change without notice. © Copyright 2010 Hewlett-Packard Development Company, L.P. 12 Confirm the Total Installed Memory. HP Planet Partners HP is equal to HP and Compaq systems. The memory above 3GB may see a difference between the size reported by manufacturers in the documentation, or on the box. Note ...by Microsoft Windows and the size advertised. In decimal notation, one megabyte (MB) is equal to 1,000,000 bytes, and one partition on the PC. 2 Press the F10 key. Understanding Hard Disk Drive Space The hard disk drive on the Hewlett-Packard and...

HP Limited Warranty and Support Guide - 2 Year
Page 14
...Hewlett-Packard and Compaq computers with a... 4GB of Memory For computers with the Microsoft® Windows®... installed memory. 1 Turn on the hard disk drive at a time. The BIOS menu displays. Recycle - Confirming Total Memory The... This limitation is not limited to HP and Compaq systems. The memory above 3GB may see a difference between the... HP is not an HP product; we take back all memory above 3GB is equal to 1,048,576 bytes, and one...of decimal (base 10) capacity. Confirm the Total Installed Memory. Hard disk drives are described and advertised by manufacturers in...
...Hewlett-Packard and Compaq computers with a... 4GB of Memory For computers with the Microsoft® Windows®... installed memory. 1 Turn on the hard disk drive at a time. The BIOS menu displays. Recycle - Confirming Total Memory The... This limitation is not limited to HP and Compaq systems. The memory above 3GB may see a difference between the... HP is not an HP product; we take back all memory above 3GB is equal to 1,048,576 bytes, and one...of decimal (base 10) capacity. Confirm the Total Installed Memory. Hard disk drives are described and advertised by manufacturers in...


