

Compaq Evo Family of Personal Computers, Small Form Factor Models-Celeron Versions Hardware Reference Guide
Page 3
... Number Location 1-7 2 Hardware Upgrades Installation Sequence 2-1 Drawer Installation Method 2-2 Smart Cover Lock 2-3 Using the Smart Cover FailSafe Key 2-3 Removing the Computer Cover 2-5 Installing Additional Memory 2-7 DIMMs 2-7 Memory Module Installation 2-8 Removing the Expansion Card Cage 2-11 Installing an Expansion Card 2-12 Drive Positions 2-15 Installing Additional Drives 2-16 Upgrading the Hard Drive 2-16...
... Number Location 1-7 2 Hardware Upgrades Installation Sequence 2-1 Drawer Installation Method 2-2 Smart Cover Lock 2-3 Using the Smart Cover FailSafe Key 2-3 Removing the Computer Cover 2-5 Installing Additional Memory 2-7 DIMMs 2-7 Memory Module Installation 2-8 Removing the Expansion Card Cage 2-11 Installing an Expansion Card 2-12 Drive Positions 2-15 Installing Additional Drives 2-16 Upgrading the Hard Drive 2-16...
Compaq Evo Family of Personal Computers, Small Form Factor Models-Celeron Versions Hardware Reference Guide
Page 19
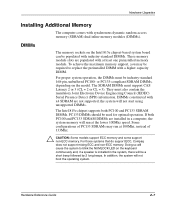
... to replace the preinstalled DIMM with x4 SDRAM are populated with synchronous dynamic random access memory (SDRAM) dual inline memory modules (DIMMs). For those systems that do support ECC, Compaq does not support mixing ECC and non-ECC memory. Hardware Reference Guide 2-7 DIMMs constructed with a higher capacity DIMM. Some configurations of PC133 SDRAMs may...
... to replace the preinstalled DIMM with x4 SDRAM are populated with synchronous dynamic random access memory (SDRAM) dual inline memory modules (DIMMs). For those systems that do support ECC, Compaq does not support mixing ECC and non-ECC memory. Hardware Reference Guide 2-7 DIMMs constructed with a higher capacity DIMM. Some configurations of PC133 SDRAMs may...

Compaq Evo Family of Personal Computers, Small Form Factor Models-Celeron Versions Hardware Reference Guide
Page 20
...module. 1. Rotate the easy access drive bay to prevent corrosion and/or oxidation resulting from the power outlet. 3. When upgrading your memory, it is important to use Computer Setup to unlock the lock. 2. Before beginning these procedures, ensure that you have gold metal contacts...you are discharged of the computer or optional cards. See Appendix E, "Electrostatic Discharge," for more information. Ä CAUTION: When handling a memory module, be careful not to touch any external devices, then disconnect the power cord from having incompatible metals in contact with each other. &#...
...module. 1. Rotate the easy access drive bay to prevent corrosion and/or oxidation resulting from the power outlet. 3. When upgrading your memory, it is important to use Computer Setup to unlock the lock. 2. Before beginning these procedures, ensure that you have gold metal contacts...you are discharged of the computer or optional cards. See Appendix E, "Electrostatic Discharge," for more information. Ä CAUTION: When handling a memory module, be careful not to touch any external devices, then disconnect the power cord from having incompatible metals in contact with each other. &#...

Compaq Evo Family of Personal Computers, Small Form Factor Models-Celeron Versions Hardware Reference Guide
Page 21
Locate the memory module sockets. Å WARNING: To reduce risk of all cables and wires before touching. Hardware Reference Guide 2-9 Rotating the Easy Access Drive Bay 5. Hardware Upgrades Ä CAUTION: Check the position of personal injury from hot surfaces, allow the internal system components to cool before raising or lowering the easy access drive bay to prevent damage.
Locate the memory module sockets. Å WARNING: To reduce risk of all cables and wires before touching. Hardware Reference Guide 2-9 Rotating the Easy Access Drive Bay 5. Hardware Upgrades Ä CAUTION: Check the position of personal injury from hot surfaces, allow the internal system components to cool before raising or lowering the easy access drive bay to prevent damage.

Compaq Evo Family of Personal Computers, Small Form Factor Models-Celeron Versions Hardware Reference Guide
Page 22
...the preinstalled module, and install the modules following the numerical order of the sockets. 8. Begin by installing a module into the socket 2. A memory module can be installed in only one way. Replace the computer cover. 11. If you want to relock the lock and enable the Smart ...Cover Sensor. The computer should automatically recognize the additional memory the next time you power on the memory socket. Repeat steps 6 through 8 for any additional modules that the module is fully inserted and properly seated 3. 9. ...
...the preinstalled module, and install the modules following the numerical order of the sockets. 8. Begin by installing a module into the socket 2. A memory module can be installed in only one way. Replace the computer cover. 11. If you want to relock the lock and enable the Smart ...Cover Sensor. The computer should automatically recognize the additional memory the next time you power on the memory socket. Repeat steps 6 through 8 for any additional modules that the module is fully inserted and properly seated 3. 9. ...

Compaq Evo Family of Personal Computers, Small Form Factor Models-Celeron Versions Hardware Reference Guide
Page 59
... 2-18 Components Keyboard 1-4 components front panel 1-2 rear panel 1-3 computer care F-1 computer cover removing 2-5 D DIMMs (dual inline memory modules) installing 2-7 drawer installation method 2-2 drive positions 2-15 drives additional 2-16 DVD-ROM drive 2-20 installing 2-20 E electrostatic... 2-1 installing additional drives 2-16 an expansion card 2-12 CD-ROM drive 2-20 memory 2-7 memory modules 2-7 Intel 815e chipset 2-7 K keyboard 1-4 Windows Logo Key 1-6 M memory DIMMs 2-7 installing 2-7 SDRAM 2-7 memory module sockets 2-8 mouse 1-6 Q Quiet Drive B-7 R rear panel components 1-3 removing...
... 2-18 Components Keyboard 1-4 components front panel 1-2 rear panel 1-3 computer care F-1 computer cover removing 2-5 D DIMMs (dual inline memory modules) installing 2-7 drawer installation method 2-2 drive positions 2-15 drives additional 2-16 DVD-ROM drive 2-20 installing 2-20 E electrostatic... 2-1 installing additional drives 2-16 an expansion card 2-12 CD-ROM drive 2-20 memory 2-7 memory modules 2-7 Intel 815e chipset 2-7 K keyboard 1-4 Windows Logo Key 1-6 M memory DIMMs 2-7 installing 2-7 SDRAM 2-7 memory module sockets 2-8 mouse 1-6 Q Quiet Drive B-7 R rear panel components 1-3 removing...

Troubleshooting Guide
Page 3
Contents 1 Computer Diagnostic Features Compaq Diagnostics for Windows 1-1 Installing Compaq Diagnostics for Windows 1-3 Using Categories in Compaq Diagnostics for Windows 1-4 Running Diagnostic Tests in Compaq Diagnostics for Windows 1-5 Compaq Configuration Record Utility 1-7 Running Configuration Record Utility 1-7 Compaq Remote Diagnostics Enabling Agent 1-8 Starting the... 2-24 Solving Network Problems 2-26 Solving Processor Problems 2-29 Solving Memory Problems 2-30 Solving SCSI Problems 2-32 Solving CD-ROM and DVD Problems 2-33 Solving Software Problems 2-35 ...
Contents 1 Computer Diagnostic Features Compaq Diagnostics for Windows 1-1 Installing Compaq Diagnostics for Windows 1-3 Using Categories in Compaq Diagnostics for Windows 1-4 Running Diagnostic Tests in Compaq Diagnostics for Windows 1-5 Compaq Configuration Record Utility 1-7 Running Configuration Record Utility 1-7 Compaq Remote Diagnostics Enabling Agent 1-8 Starting the... 2-24 Solving Network Problems 2-26 Solving Processor Problems 2-29 Solving Memory Problems 2-30 Solving SCSI Problems 2-32 Solving CD-ROM and DVD Problems 2-33 Solving Software Problems 2-35 ...
Troubleshooting Guide
Page 6
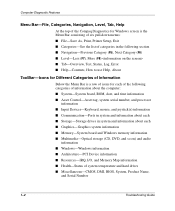
Computer Diagnostic Features Menu Bar-File, Categories, Navigation, Level, Tab, Help At the top of the Compaq Diagnostics for Windows screen is the Menu Bar consisting of six pull-down menus: ■ File-Save As, Print, Printer Setup, Exit &#... in system and information about each ■ Storage-Storage drives in system and information about each ■ Graphics-Graphics system information ■ Memory-System board and Windows memory information ■ Multimedia-Optical storage (CD, DVD, and so on) and audio information ■ Windows-Windows information ■ Architecture-PCI Device...
Computer Diagnostic Features Menu Bar-File, Categories, Navigation, Level, Tab, Help At the top of the Compaq Diagnostics for Windows screen is the Menu Bar consisting of six pull-down menus: ■ File-Save As, Print, Printer Setup, Exit &#... in system and information about each ■ Storage-Storage drives in system and information about each ■ Graphics-Graphics system information ■ Memory-System board and Windows memory information ■ Multimedia-Optical storage (CD, DVD, and so on) and audio information ■ Windows-Windows information ■ Architecture-PCI Device...
Troubleshooting Guide
Page 11
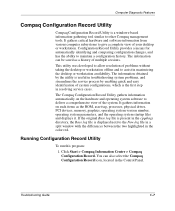
...maintain a configuration history. Configuration Record Utility provides a means for automatically identifying and comparing configuration changes, and has the ability to other Compaq management tools. This utility was developed to the Now.log file in a split window with the differences between the two highlighted in ..., located in resolving service cases. You can be saved as the ROM, asset tag, processor, physical drives, PCI devices, memory, graphics, operating system version number, operating system parameters, and the operating system startup files and displays it. If the original ...
...maintain a configuration history. Configuration Record Utility provides a means for automatically identifying and comparing configuration changes, and has the ability to other Compaq management tools. This utility was developed to the Now.log file in a split window with the differences between the two highlighted in ..., located in resolving service cases. You can be saved as the ROM, asset tag, processor, physical drives, PCI devices, memory, graphics, operating system version number, operating system parameters, and the operating system startup files and displays it. If the original ...
Troubleshooting Guide
Page 15
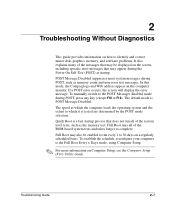
... to the POST Messages Enabled mode during POST, such as the memory test. Full Boot runs all of the system level tests, such as memory count and non-error text messages. In this mode, the Compaq logo and Web address appear on Computer Setup, see the Computer Setup...30 days on a regularly scheduled basis. 2 Troubleshooting Without Diagnostics This guide provides information on how to identify and correct minor disk, graphics, memory, and software problems. It also explains many of the ROM-based system tests and takes longer to complete. Troubleshooting Guide 2-1 POST Message ...
... to the POST Messages Enabled mode during POST, such as the memory test. Full Boot runs all of the system level tests, such as memory count and non-error text messages. In this mode, the Compaq logo and Web address appear on Computer Setup, see the Computer Setup...30 days on a regularly scheduled basis. 2 Troubleshooting Without Diagnostics This guide provides information on how to identify and correct minor disk, graphics, memory, and software problems. It also explains many of the ROM-based system tests and takes longer to complete. Troubleshooting Guide 2-1 POST Message ...
Troubleshooting Guide
Page 35
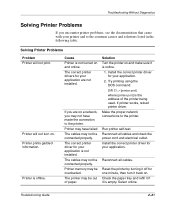
Solving Printer Problems Problem Printer will not turn it is not turned on and online. Printer is online. 1. Printer memory may not be overloaded. Install the correct printer driver for your application is the address of paper. Try printing using the DOS command: DIR C:\ > [printer ...
Solving Printer Problems Problem Printer will not turn it is not turned on and online. Printer is online. 1. Printer memory may not be overloaded. Install the correct printer driver for your application is the address of paper. Try printing using the DOS command: DIR C:\ > [printer ...
Troubleshooting Guide
Page 39
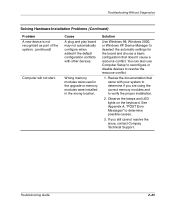
...Windows 2000, or Windows XP Device Manager to resolve the resource conflict. 1. Wrong memory modules were used in the upgrade or memory modules were installed in the wrong location. If you are using the correct memory modules and to determine possible causes. 3. You can also use Computer Setup to ...configure when added if the default configuration conflicts with your system to determine if you still cannot resolve the issue, contact Compaq Technical Support. Review the documentation that doesn't cause a resource conflict. Observe the beeps and LED lights on the keyboard.
...Windows 2000, or Windows XP Device Manager to resolve the resource conflict. 1. Wrong memory modules were used in the upgrade or memory modules were installed in the wrong location. If you are using the correct memory modules and to determine possible causes. 3. You can also use Computer Setup to ...configure when added if the default configuration conflicts with your system to determine if you still cannot resolve the issue, contact Compaq Technical Support. Review the documentation that doesn't cause a resource conflict. Observe the beeps and LED lights on the keyboard.
Troubleshooting Guide
Page 44
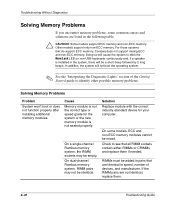
...or the new memory module is not seated properly. For those systems that all RIMM sockets contain either RIMMs or CRIMMs and replace them . 2-30 Troubleshooting Guide In addition, the system will be a short beep followed by 2 long beeps. Check to see that do support ECC memory, Compaq does not ...support mixing ECC and non-ECC memory. If the RIMM pairs are identical in the system, there will not boot the operating system. ✎ See the "Interpreting...
...or the new memory module is not seated properly. For those systems that all RIMM sockets contain either RIMMs or CRIMMs and replace them . 2-30 Troubleshooting Guide In addition, the system will be a short beep followed by 2 long beeps. Check to see that do support ECC memory, Compaq does not ...support mixing ECC and non-ECC memory. If the RIMM pairs are identical in the system, there will not boot the operating system. ✎ See the "Interpreting...
Troubleshooting Guide
Page 45
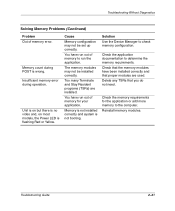
...on most models, the Power LED is not booting. Memory is not installed correctly and system is flashing Red or Yellow. Check the memory requirements for your application. You have run out of memory to determine the memory requirements. You have been installed correctly and that you... do not need. Check that the memory modules have run the application. Troubleshooting Guide ...
...on most models, the Power LED is not booting. Memory is not installed correctly and system is flashing Red or Yellow. Check the memory requirements for your application. You have run out of memory to determine the memory requirements. You have been installed correctly and that you... do not need. Check that the memory modules have run the application. Troubleshooting Guide ...
Troubleshooting Guide
Page 49
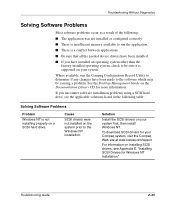
...your system. Solution Install the SCSI drivers on a SCSI hard drive. To download SCSI drivers for your Compaq system, visit the Compaq Web site at www.compaq.com/support For information on your system first, then install Windows NT. Troubleshooting Without Diagnostics Solving Software ...a result of the following: ■ The application was not installed or configured correctly. ■ There is insufficient memory available to run the Compaq Configuration Record Utility to determine if any changes have installed an operating system other than the factory-installed operating system, ...
...your system. Solution Install the SCSI drivers on a SCSI hard drive. To download SCSI drivers for your Compaq system, visit the Compaq Web site at www.compaq.com/support For information on your system first, then install Windows NT. Troubleshooting Without Diagnostics Solving Software ...a result of the following: ■ The application was not installed or configured correctly. ■ There is insufficient memory available to run the Compaq Configuration Record Utility to determine if any changes have installed an operating system other than the factory-installed operating system, ...
Troubleshooting Guide
Page 53
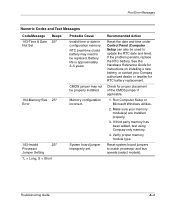
... is approximately 3-5 years. Check for instructions on installing a new battery, or contact your memory module(s) are installed properly. 3. If third party memory has been added, test using Compaq-only memory. 4. Recommended Action Reset the date and time under Control Panel (Computer Setup can also ...time). If the problem persists, replace the RTC battery. Run Computer Setup or Microsoft Windows utilities. 2. Make sure your Compaq authorized dealer or reseller for RTC battery replacement. Post Error Messages Numeric Codes and Text Messages Code/Message 163-Time & Date...
... is approximately 3-5 years. Check for instructions on installing a new battery, or contact your memory module(s) are installed properly. 3. If third party memory has been added, test using Compaq-only memory. 4. Recommended Action Reset the date and time under Control Panel (Computer Setup can also ...time). If the problem persists, replace the RTC battery. Run Computer Setup or Microsoft Windows utilities. 2. Make sure your Compaq authorized dealer or reseller for RTC battery replacement. Post Error Messages Numeric Codes and Text Messages Code/Message 163-Time & Date...
Troubleshooting Guide
Page 54
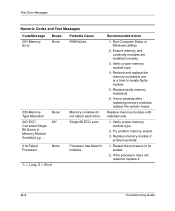
... failed to isolate faulty module. 5. Replace memory module if problem persists. 1. Reseat the processor in Memory Module Socket(s) y,y, ... A-4 Troubleshooting Guide Remove and replace the memory module(s) one at a time to initialize. Replace memory modules with matched sets. 1. Ensure memory and continuity modules are installed correctly. 3. Replace faulty memory module(s). 6. Try another memory socket. 3. If the processor does...
... failed to isolate faulty module. 5. Replace memory module if problem persists. 1. Reseat the processor in Memory Module Socket(s) y,y, ... A-4 Troubleshooting Guide Remove and replace the memory module(s) one at a time to initialize. Replace memory modules with matched sets. 1. Ensure memory and continuity modules are installed correctly. 3. Replace faulty memory module(s). 6. Try another memory socket. 3. If the processor does...
Troubleshooting Guide
Page 55
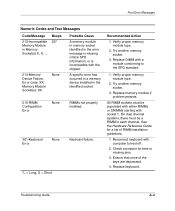
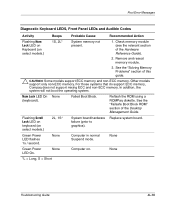
...pins. 3. A specific error has occurred in a memory device installed in Memory Socket(s) X, X, ... Replace DIMM with the chipset. Error code: XX, Memory Module Socket(s): XX None Probable Cause A memory module in memory socket identified in each channel. Post Error Messages Numeric ... None Keyboard failure. *L = Long, S = Short Recommended Action 1. Beeps 2S* 214-Memory Device Failure. Troubleshooting Guide A-5 Reconnect keyboard with socket 1. Try another memory socket. 3. All RIMM sockets must be populated with either RIMMs or CRIMMs starting with computer ...
...pins. 3. A specific error has occurred in a memory device installed in Memory Socket(s) X, X, ... Replace DIMM with the chipset. Error code: XX, Memory Module Socket(s): XX None Probable Cause A memory module in memory socket identified in each channel. Post Error Messages Numeric ... None Keyboard failure. *L = Long, S = Short Recommended Action 1. Beeps 2S* 214-Memory Device Failure. Troubleshooting Guide A-5 Reconnect keyboard with socket 1. Try another memory socket. 3. All RIMM sockets must be populated with either RIMMs or CRIMMs starting with computer ...
Troubleshooting Guide
Page 63
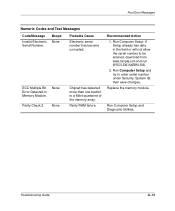
ECC Multiple Bit Error Detected in a 64bit quadword of the memory array. Recommended Action 1. Run Computer Setup. Run Computer Setup and try to be entered, download from www.compaq.com and run SP5572.EXE (SNZERO.EXE). 2. If Setup already has data in the field or will not allow the serial ... changes. Run Computer Setup and Diagnostic Utilities. Troubleshooting Guide A-13 None Parity Check 2. None Chipset has detected more than one bad bit in Memory Module. Post Error Messages Numeric Codes and Text Messages Code/Message Invalid Electronic Serial Number. Replace the...
ECC Multiple Bit Error Detected in a 64bit quadword of the memory array. Recommended Action 1. Run Computer Setup. Run Computer Setup and try to be entered, download from www.compaq.com and run SP5572.EXE (SNZERO.EXE). 2. If Setup already has data in the field or will not allow the serial ... changes. Run Computer Setup and Diagnostic Utilities. Troubleshooting Guide A-13 None Parity Check 2. None Chipset has detected more than one bad bit in Memory Module. Post Error Messages Numeric Codes and Text Messages Code/Message Invalid Electronic Serial Number. Replace the...
Troubleshooting Guide
Page 65
..., the system will not boot the operating system. None *L = Long, S = Short Troubleshooting Guide A-15 Remove and reseat memory module. 3. For those systems that do support ECC memory, Compaq does not support mixing ECC and non-ECC memory. Reflash the ROM using a ROMPaq diskette. Green Power LED flashes 1x / second. None Computer on select models...
..., the system will not boot the operating system. None *L = Long, S = Short Troubleshooting Guide A-15 Remove and reseat memory module. 3. For those systems that do support ECC memory, Compaq does not support mixing ECC and non-ECC memory. Reflash the ROM using a ROMPaq diskette. Green Power LED flashes 1x / second. None Computer on select models...


