Backup and Recovery - Windows Vista
Page 7
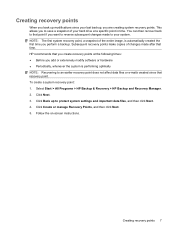
... you select Create factory software recovery CDs or DVDs to recover the system (Highly recommended), you have finished creating the recovery discs. Follow the on-screen instructions. 1 To create a set of recovery discs of the full factory image. 1 Creating recovery discs After setting up (boot) the computer and recover the operating...
... you select Create factory software recovery CDs or DVDs to recover the system (Highly recommended), you have finished creating the recovery discs. Follow the on-screen instructions. 1 To create a set of recovery discs of the full factory image. 1 Creating recovery discs After setting up (boot) the computer and recover the operating...
Backup and Recovery - Windows Vista
Page 10
...only the active window, press alt+fn+prt sc. The screen shot can be a time saver if you have to a DVD using HP Backup and Recovery Manager, and periodically copy them to external power. To copy the entire screen, press fn+prt sc. NOTE: Drivers, utilities, and ...applications installed by taking a screen shot of recovery discs using HP Backup and Recovery Manager. ● Create system recovery points using HP...
...only the active window, press alt+fn+prt sc. The screen shot can be a time saver if you have to a DVD using HP Backup and Recovery Manager, and periodically copy them to external power. To copy the entire screen, press fn+prt sc. NOTE: Drivers, utilities, and ...applications installed by taking a screen shot of recovery discs using HP Backup and Recovery Manager. ● Create system recovery points using HP...
Backup and Recovery - Windows Vista
Page 11
... and important data files, and then click Next. 4. Click Next. 3. Backing up specific files or folders: 1. NOTE: This process will take several minutes, depending on -screen instructions. To back up specific files or folders 5 Click Back up individual files and folders, and then click Next. 5.
... and important data files, and then click Next. 4. Click Next. 3. Backing up specific files or folders: 1. NOTE: This process will take several minutes, depending on -screen instructions. To back up specific files or folders 5 Click Back up individual files and folders, and then click Next. 5.
Backup and Recovery - Windows Vista
Page 12
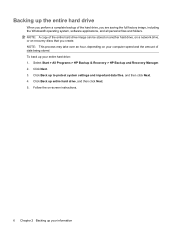
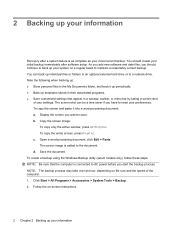
... on your entire hard drive: 1. NOTE: A copy of the entire hard drive image can be stored on another hard drive, on a network drive, or on -screen instructions. 6 Chapter 2 Backing up your information Click Back up entire hard drive, and then click Next. 5. Follow the on recovery discs that you are saving...
... on your entire hard drive: 1. NOTE: A copy of the entire hard drive image can be stored on another hard drive, on a network drive, or on -screen instructions. 6 Chapter 2 Backing up your information Click Back up entire hard drive, and then click Next. 5. Follow the on recovery discs that you are saving...
Backup and Recovery - Windows Vista
Page 13
... recovery points at a specific point in time. Creating recovery points 7 Select Start > All Programs > HP Backup & Recovery > HP Backup and Recovery Manager. 2. Follow the on-screen instructions. Click Create or manage Recovery Points, and then click Next. 5. Creating recovery points When you back up to protect system settings and important data...
... recovery points at a specific point in time. Creating recovery points 7 Select Start > All Programs > HP Backup & Recovery > HP Backup and Recovery Manager. 2. Follow the on-screen instructions. Click Create or manage Recovery Points, and then click Next. 5. Creating recovery points When you back up to protect system settings and important data...

Backup and Recovery - Windows Vista
Page 14
Scheduling backups Use HP Backup Scheduler to an optional docking station (select models only). Select Start > All Programs > HP Backup & Recovery > HP Backup Scheduler. 2. To schedule backups: 1. Follow the on-screen instructions. 8 Chapter 2 Backing up your information With this tool, you can schedule backups at specific intervals (daily, weekly, or monthly) or at specific events, such as at system restart or when you dock to schedule backups for the entire system, for recovery points, or for specific files and folders.
Scheduling backups Use HP Backup Scheduler to an optional docking station (select models only). Select Start > All Programs > HP Backup & Recovery > HP Backup Scheduler. 2. To schedule backups: 1. Follow the on-screen instructions. 8 Chapter 2 Backing up your information With this tool, you can schedule backups at specific intervals (daily, weekly, or monthly) or at specific events, such as at system restart or when you dock to schedule backups for the entire system, for recovery points, or for specific files and folders.

Backup and Recovery - Windows Vista
Page 16
Follow the on-screen instructions. 10 Chapter 3 Performing a recovery Back up all personal files. 2. Performing a recovery from the recovery discs To perform a recovery from the recovery discs, follow these steps: 1. Insert the first recovery disc into the optical drive and restart the computer. 3.
Follow the on-screen instructions. 10 Chapter 3 Performing a recovery Back up all personal files. 2. Performing a recovery from the recovery discs To perform a recovery from the recovery discs, follow these steps: 1. Insert the first recovery disc into the optical drive and restart the computer. 3.

Backup and Recovery - Windows Vista
Page 18
Click Next. 4. Click Recover important files or the entire system, and then click Next. 5. Back up all personal files. 2. Follow the on-screen instructions. 12 Chapter 3 Performing a recovery Initiating a recovery in Windows To initiate a recovery in Windows, follow these steps: 1. Select Start > All Programs > HP Backup & Recovery > HP Backup and Recovery Manager. 3.
Click Next. 4. Click Recover important files or the entire system, and then click Next. 5. Back up all personal files. 2. Follow the on-screen instructions. 12 Chapter 3 Performing a recovery Initiating a recovery in Windows To initiate a recovery in Windows, follow these steps: 1. Select Start > All Programs > HP Backup & Recovery > HP Backup and Recovery Manager. 3.

Backup and Recovery - Windows Vista
Page 19
Click a recovery option, and then click Next. 4. Performing a recovery from the hard drive recovery partition, follow these steps: 1. Follow the on-screen instructions. Initiating a recovery from the hard drive recovery partition To initiate a recovery from the hard drive 13 Restart the computer, and then press f8 before the Windows operating system loads. 3. Back up all personal files. 2.
Click a recovery option, and then click Next. 4. Performing a recovery from the hard drive recovery partition, follow these steps: 1. Follow the on-screen instructions. Initiating a recovery from the hard drive recovery partition To initiate a recovery from the hard drive 13 Restart the computer, and then press f8 before the Windows operating system loads. 3. Back up all personal files. 2.
Backup and Recovery - Windows XP
Page 6
...word-processing document, click Edit > Paste. d. As you add new software and data files, you want to reset your preferences. Display the screen you should create your initial backup immediately after a system failure is as complete as your most current backup. To create a backup using the Windows... to back up individual files or folders to an optional external hard drive or to maintain a reasonably current backup. To copy the screen and paste it up periodically. ● Back up templates stored in their associated programs. ● Save customized settings that the computer...
...word-processing document, click Edit > Paste. d. As you add new software and data files, you want to reset your preferences. Display the screen you should create your initial backup immediately after a system failure is as complete as your most current backup. To create a backup using the Windows... to back up individual files or folders to an optional external hard drive or to maintain a reasonably current backup. To copy the screen and paste it up periodically. ● Back up templates stored in their associated programs. ● Save customized settings that the computer...

Backup and Recovery - Windows XP
Page 7
... possible, back up all personal files. 2. The Backup or Restore Wizard opens. 3. Click Start > All Programs > Accessories > System Tools > Backup. NOTE: For additional information on -screen instructions. Recovering your information To recover information you have previously backed up. ● Operating System and Driver Recovery discs (included with your computer): You can...
... possible, back up all personal files. 2. The Backup or Restore Wizard opens. 3. Click Start > All Programs > Accessories > System Tools > Backup. NOTE: For additional information on -screen instructions. Recovering your information To recover information you have previously backed up. ● Operating System and Driver Recovery discs (included with your computer): You can...

Backup and Recovery - Windows XP
Page 8
..., follow these steps: 1. The recovery process reinstalls the original operating system, software, and drivers. Insert the Operating System disc into the optical drive. 3. Turn on -screen instructions to install the drivers and programs. 4 Chapter 3 Performing a recovery Follow the on the computer are permanently removed. All files you have created and any...
..., follow these steps: 1. The recovery process reinstalls the original operating system, software, and drivers. Insert the Operating System disc into the optical drive. 3. Turn on -screen instructions to install the drivers and programs. 4 Chapter 3 Performing a recovery Follow the on the computer are permanently removed. All files you have created and any...
Software Update - Windows XP
Page 5
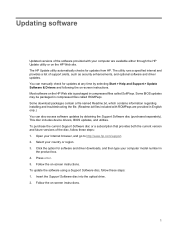
...may be packaged in compressed files called SoftPaqs. Select your Internet browser, and go to http://www.hp.com/support. 2. Follow the on -screen instructions. 1 To update the software using a Support Software disc, follow these steps: 1. Most software on the HP Web site. Some ...current version and future versions of support alerts, such as security enhancements, and optional software and driver updates. Follow the on -screen instructions. Click the option for software and driver downloads, and then type your computer are provided in English only.) You can manually...
...may be packaged in compressed files called SoftPaqs. Select your Internet browser, and go to http://www.hp.com/support. 2. Follow the on -screen instructions. 1 To update the software using a Support Software disc, follow these steps: 1. Most software on the HP Web site. Some ...current version and future versions of support alerts, such as security enhancements, and optional software and driver updates. Follow the on -screen instructions. Click the option for software and driver downloads, and then type your computer are provided in English only.) You can manually...
Software Update - Windows XP
Page 6
... the BIOS version" section. Open your computer is stored on the computer. Identify your computer model, product category, and series or family. Follow the on-screen instructions. 2 Updating software To update the software using the HP Web site, follow these steps: 1.
... the BIOS version" section. Open your computer is stored on the computer. Identify your computer model, product category, and series or family. Follow the on-screen instructions. 2 Updating software To update the software using the HP Web site, follow these steps: 1.

Software Update - Windows XP
Page 7
... System BIOS) can be displayed by using Computer Setup. To use Computer Setup for Startup Menu" message is displayed at the bottom of the screen, and follow the on or restart the computer, and then press esc while the "Press the ESC key for displaying BIOS information, follow these... steps: 1. Press f10 to select File > Ignore changes and exit, and then press enter. Updating the BIOS 3 Turn on -screen instructions. - Click Exit in Windows®) or by pressing fn+esc (if you currently have, and then download and install the new BIOS. Use the...
... System BIOS) can be displayed by using Computer Setup. To use Computer Setup for Startup Menu" message is displayed at the bottom of the screen, and follow the on or restart the computer, and then press esc while the "Press the ESC key for displaying BIOS information, follow these... steps: 1. Press f10 to select File > Ignore changes and exit, and then press enter. Updating the BIOS 3 Turn on -screen instructions. - Click Exit in Windows®) or by pressing fn+esc (if you currently have, and then download and install the new BIOS. Use the...
Software Update - Windows XP
Page 8
...are displayed, follow these instructions: Do not disconnect power from the computer by selecting Start > My Computer. 2. Follow the instructions on the screen to download your selection to http://www.hp.com/support, and then select your computer. Follow any instructions that is complete. If no ... to download. You will be available for your hard drive that has an .exe extension (for BIOS updates. 1. Follow the on-screen instructions to access the BIOS update you are posted as needed. Using the hard drive path you check the HP Web site periodically for...
...are displayed, follow these instructions: Do not disconnect power from the computer by selecting Start > My Computer. 2. Follow the instructions on the screen to download your selection to http://www.hp.com/support, and then select your computer. Follow any instructions that is complete. If no ... to download. You will be available for your hard drive that has an .exe extension (for BIOS updates. 1. Follow the on-screen instructions to access the BIOS update you are posted as needed. Using the hard drive path you check the HP Web site periodically for...

Software Update - Windows XP
Page 9
Complete the installation by following the instructions on the screen reports a successful installation, you may delete the downloaded file from your hard drive. Updating the BIOS 5 NOTE: After a message on the screen. The BIOS installation begins. 5.
Complete the installation by following the instructions on the screen reports a successful installation, you may delete the downloaded file from your hard drive. Updating the BIOS 5 NOTE: After a message on the screen. The BIOS installation begins. 5.
Software Update - Windows XP
Page 10
... folder where the file was stored, and double-click the file to install the updated software without downloading the file. - When the list of the screen. Proceed to open a window containing additional information. 6. If you want a specific SoftPaq, type the SoftPaq number in the product box, and then press enter. - or...
... folder where the file was stored, and double-click the file to install the updated software without downloading the file. - When the list of the screen. Proceed to open a window containing additional information. 6. If you want a specific SoftPaq, type the SoftPaq number in the product box, and then press enter. - or...
MultiBoot - Windows Vista and Windows XP
Page 7
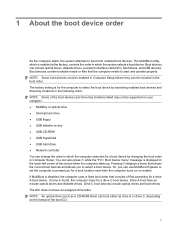
... that consists of first searching for a boot device by searching enabled boot devices and drive bay locations in the following order: NOTE: Some of the screen when the computer starts up. If none is found, the computer looks for a boot location each time the computer turns on key ● USB CD...
... that consists of first searching for a boot device by searching enabled boot devices and drive bay locations in the following order: NOTE: Some of the screen when the computer starts up. If none is found, the computer looks for a boot location each time the computer turns on key ● USB CD...
MultiBoot - Windows Vista and Windows XP
Page 9
... to a USB device or a NIC device only if the device has first been enabled in the lower-left corner of the screen (select models only). 3 Open Computer Setup by turning on the screen. Then follow these steps: 1. NOTE: The USB Port option must be enabled in the lower-right corner of the... screen. 2. or - Your preferences go into an optional docking device (select models only), use USB legacy support. To enable a USB device or a NIC device as a boot ...
... to a USB device or a NIC device only if the device has first been enabled in the lower-left corner of the screen (select models only). 3 Open Computer Setup by turning on the screen. Then follow these steps: 1. NOTE: The USB Port option must be enabled in the lower-right corner of the... screen. 2. or - Your preferences go into an optional docking device (select models only), use USB legacy support. To enable a USB device or a NIC device as a boot ...


