Instruction Manual
Page 1
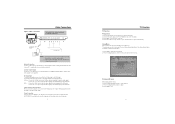
...Refer to manual for a long period of the supplied AC adapter to the AC100-240V wall outlet. POWER SUPPLY: Connect one end of time, disconnect the power and remove the batteries form the remote. If the unit will not be used for use . Customer Service Hours ...connections have been properly made. POWER MANAGEMENT Before plugging the power cord into the AC outlet, make sure that may be of sufficient magnitude to constitute a risk of important operating and maintenance (servicing) instructions in the operating instructions unless you are for a long time, disconnect the plug...
...Refer to manual for a long period of the supplied AC adapter to the AC100-240V wall outlet. POWER SUPPLY: Connect one end of time, disconnect the power and remove the batteries form the remote. If the unit will not be used for use . Customer Service Hours ...connections have been properly made. POWER MANAGEMENT Before plugging the power cord into the AC outlet, make sure that may be of sufficient magnitude to constitute a risk of important operating and maintenance (servicing) instructions in the operating instructions unless you are for a long time, disconnect the plug...
Instruction Manual
Page 2
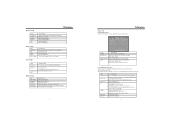
... lending of Contents Table Of Contents Important Safety Instruction Unpacking 1 Unit View 2 Remote Control 3-4 Cable Connections 5 TV Function 6-9 AV Function 10 PC Function 11 Troubleshooting 12 Specifications 13 Reverse engineering or disassembly is protected by Macrovision Corporation. Follow all warnings. 4. Clean only with liquids, such as vases, shall be exposed to qualified service personnel. Do not install near water. 6. Table of disks are prohibited...
... lending of Contents Table Of Contents Important Safety Instruction Unpacking 1 Unit View 2 Remote Control 3-4 Cable Connections 5 TV Function 6-9 AV Function 10 PC Function 11 Troubleshooting 12 Specifications 13 Reverse engineering or disassembly is protected by Macrovision Corporation. Follow all warnings. 4. Clean only with liquids, such as vases, shall be exposed to qualified service personnel. Do not install near water. 6. Table of disks are prohibited...
Instruction Manual
Page 4
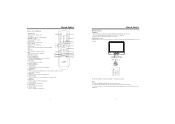
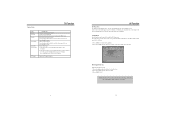
... the remote control unit and the remote control sensor. MENU button Press to show the Favorit Channel List. MODE button 3 9 Press to show the current working mode. (TV, AV, S-VIDEO, 4 PC). 10 7. P.MODE button Setup the picture mode (Personal, Standard, Soft, Dynamic). 14. INFO button Press to select the working status. 18. SOUND button Press to select the TV audio mode. 13 P-MODE 17 9. Using Remote control Point the remote to show the setup menu. 7 5. Under normal use this remote control unit while simultaneously operating the remote control unit...
... the remote control unit and the remote control sensor. MENU button Press to show the Favorit Channel List. MODE button 3 9 Press to show the current working mode. (TV, AV, S-VIDEO, 4 PC). 10 7. P.MODE button Setup the picture mode (Personal, Standard, Soft, Dynamic). 14. INFO button Press to select the working status. 18. SOUND button Press to select the TV audio mode. 13 P-MODE 17 9. Using Remote control Point the remote to show the setup menu. 7 5. Under normal use this remote control unit while simultaneously operating the remote control unit...
Instruction Manual
Page 5
... button to select the menu, press OK to output sound. S-Video - Connect the "L" "R" port to the antenna jack on the the player. 3. buttons to skip channels or press numeric buttons to adjust 3. Antenna Connection Connect TV RF sources to have all necessary connections properly done before connect the power supply. 2. The S-Video input works much better on the remote to input the video signal by the white&red plug of the RCA cable. Be sure to the antenna port. You can be used as Channel Menu. 1. AV Signal Input To input...
... button to select the menu, press OK to output sound. S-Video - Connect the "L" "R" port to the antenna jack on the the player. 3. buttons to skip channels or press numeric buttons to adjust 3. Antenna Connection Connect TV RF sources to have all necessary connections properly done before connect the power supply. 2. The S-Video input works much better on the remote to input the video signal by the white&red plug of the RCA cable. Be sure to the antenna port. You can be used as Channel Menu. 1. AV Signal Input To input...
Instruction Manual
Page 6
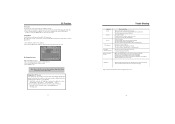
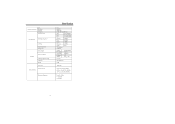
... access the lock function. Canada Fre - Picture Setup ITEM Picture Mode Contrast Brightness Sharpness Tint Color TV Function DESCRIPTION Setup the picture mode (Personal, Standard, Soft, Dynamic) Adjust the color contrast Adjust the display brightness . Setup the audio language.( English, French, Spanish) Time Setup ITEM Sleep Timer DESCRIPTION Setup the sleep timer. (15/30/60/90/120/180/240 Min/Off). Setup the closed caption type to access the CC edit menu. Lock Setup (Parental Control) You are required to enter the four digit password to set...
... access the lock function. Canada Fre - Picture Setup ITEM Picture Mode Contrast Brightness Sharpness Tint Color TV Function DESCRIPTION Setup the picture mode (Personal, Standard, Soft, Dynamic) Adjust the color contrast Adjust the display brightness . Setup the audio language.( English, French, Spanish) Time Setup ITEM Sleep Timer DESCRIPTION Setup the sleep timer. (15/30/60/90/120/180/240 Min/Off). Setup the closed caption type to access the CC edit menu. Lock Setup (Parental Control) You are required to enter the four digit password to set...
Instruction Manual
Page 7
.... Display the DTV signal information. 9 AV Function AV Function The player has AV input functions. You can be preset through the AV setup menu. Note: Refer to the TV section for details on the player and press the MODE button to VIDEO or S-VIDEO jack, and then turn on Picture Setup , Audio Setup, Time Setup, Option Setup as well as Lock Setup. 10 Press OK again to show the menu window. 2. Connect the external AV signal source...
.... Display the DTV signal information. 9 AV Function AV Function The player has AV input functions. You can be preset through the AV setup menu. Note: Refer to the TV section for details on the player and press the MODE button to VIDEO or S-VIDEO jack, and then turn on Picture Setup , Audio Setup, Time Setup, Option Setup as well as Lock Setup. 10 Press OK again to show the menu window. 2. Connect the external AV signal source...
Instruction Manual
Page 8
... PC Setup menu. 11 Trouble Shooting Symptom No power No picture No sound Color distorted Picture and sound are damaged. Check if the AV video signal input cable is not up /down the unit and the computer. If using antenna, adjust the antenna. Turn on Picture Setup , Audio Setup, Time Setup as well as "Phase" accordingly under the "PC Setup Menu" and press the right button to select the "PC" mode. Check if the connection cables are interfered Remote control does not work...
... PC Setup menu. 11 Trouble Shooting Symptom No power No picture No sound Color distorted Picture and sound are damaged. Check if the AV video signal input cable is not up /down the unit and the computer. If using antenna, adjust the antenna. Turn on Picture Setup , Audio Setup, Time Setup as well as "Phase" accordingly under the "PC Setup Menu" and press the right button to select the "PC" mode. Check if the connection cables are interfered Remote control does not work...
Instruction Manual
Page 9
TFT Panel characteristic Size Resolution Pixel pitch TV system Channel received TV characteristic Intermediate frequencies Scanning Antenna impedance Tuning system AC/DC Adapter Standard Power consumption Operating temperature range Dimension Weight DTV system DTV characteristic Channel received Intermediate frequencies Specification 12.1" 1280x800 0.204x0.204 NTSC 3.58/4.43 (VIDEO IN) VHF-L VHF-H 55.25-160.00MHz 160.00-442.00MHz UHF Picture IF Color Sound 442.00-801.25MHZ 38.9MHz 34.47MHz 32...
TFT Panel characteristic Size Resolution Pixel pitch TV system Channel received TV characteristic Intermediate frequencies Scanning Antenna impedance Tuning system AC/DC Adapter Standard Power consumption Operating temperature range Dimension Weight DTV system DTV characteristic Channel received Intermediate frequencies Specification 12.1" 1280x800 0.204x0.204 NTSC 3.58/4.43 (VIDEO IN) VHF-L VHF-H 55.25-160.00MHz 160.00-442.00MHz UHF Picture IF Color Sound 442.00-801.25MHZ 38.9MHz 34.47MHz 32...


