
Quick Setup Guide
Page 2
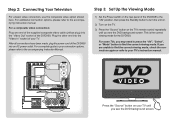
...Press the "Source" button on the TV's remote control repeatedly until you see the DVD background screen. This is the correct viewing mode for the DVD938. For some TVs, you may need to press the "AV", "Select", or "Mode" button to find the correct viewing mode, check the connections... Instruction Manual. Plug the other end into the "Video In" socket of the DVD938 to the "ON" position, then press the Standby button to the accompanying instruction manual. Step 3: Set Up the Viewing Mode 1) Set the Power switch on the rear panel of your connection options, please refer to ...
...Press the "Source" button on the TV's remote control repeatedly until you see the DVD background screen. This is the correct viewing mode for the DVD938. For some TVs, you may need to press the "AV", "Select", or "Mode" button to find the correct viewing mode, check the connections... Instruction Manual. Plug the other end into the "Video In" socket of the DVD938 to the "ON" position, then press the Standby button to the accompanying instruction manual. Step 3: Set Up the Viewing Mode 1) Set the Power switch on the rear panel of your connection options, please refer to ...
User Manual
Page 8
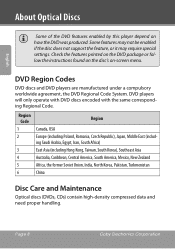
... the same corresponding Regional Code. DVD Region Codes DVD discs and DVD players are manufactured under a compulsory worldwide agreement, the DVD Regional Code System. Page 8 Coby Electronics Corporation Check the features printed on the DVD package or follow the instructions found on the disc's on how the DVD was produced. Region... compressed data and need proper handling. Some features may not be enabled if the disc does not support the feature, or it may require special settings.
... the same corresponding Regional Code. DVD Region Codes DVD discs and DVD players are manufactured under a compulsory worldwide agreement, the DVD Regional Code System. Page 8 Coby Electronics Corporation Check the features printed on the DVD package or follow the instructions found on the disc's on how the DVD was produced. Region... compressed data and need proper handling. Some features may not be enabled if the disc does not support the feature, or it may require special settings.
User Manual
Page 10
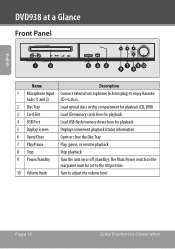
English DVD938 at a Glance Front Panel 1 Name Description 1 Microphone Input Connect external microphones (6.3mm plug) to enjoy Karaoke Jacks (1 and 2) CD+G discs. 2 Disc Tray Load optical discs ... close the Disc Tray 7 Play/Pause Play, pause, or resume playback 8 Stop Stop playback 9 Power/Standby Turn the unit on the rear panel must be set to the ON position. 10 Volume Knob Turn to adjust the volume level Page 10 Coby Electronics Corporation The Main Power switch on or off (standby).
English DVD938 at a Glance Front Panel 1 Name Description 1 Microphone Input Connect external microphones (6.3mm plug) to enjoy Karaoke Jacks (1 and 2) CD+G discs. 2 Disc Tray Load optical discs ... close the Disc Tray 7 Play/Pause Play, pause, or resume playback 8 Stop Stop playback 9 Power/Standby Turn the unit on the rear panel must be set to the ON position. 10 Volume Knob Turn to adjust the volume level Page 10 Coby Electronics Corporation The Main Power switch on or off (standby).
User Manual
Page 14
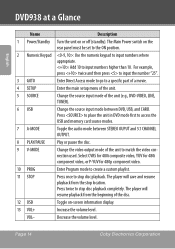
The player will resume playback from the stop location. VOL- Page 14 Coby Electronics Corporation Decrease the volume level. Select CVBS for 480i composite video, YUV...of the disc. 12 OSD Toggle on or off (standby). The Main Power switch on the rear panel must be set to the ON position. 2 Numeric Keypad : Use the numeric keypad to input numbers where appropriate. : Add 10 ... playback from the beginning of the unit to match the video connection used. English DVD938 at a Glance Name Description 1 Power/Standby Turn the unit on -screen information display. 13 VOL+ Increase the ...
The player will resume playback from the stop location. VOL- Page 14 Coby Electronics Corporation Decrease the volume level. Select CVBS for 480i composite video, YUV...of the disc. 12 OSD Toggle on or off (standby). The Main Power switch on the rear panel must be set to the ON position. 2 Numeric Keypad : Use the numeric keypad to input numbers where appropriate. : Add 10 ... playback from the beginning of the unit to match the video connection used. English DVD938 at a Glance Name Description 1 Power/Standby Turn the unit on -screen information display. 13 VOL+ Increase the ...
User Manual
Page 17
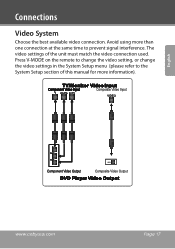
Connections Video System Choose the best available video connection. Press V-MODE on the remote to change the video setting, or change the video settings in the System Setup menu (please refer to prevent signal interference. Avoid using more information). The video settings of this manual for more than one connection at the same time to the System Setup section of the unit must match the video connection used. English www.cobyusa.com Page 17
Connections Video System Choose the best available video connection. Press V-MODE on the remote to change the video setting, or change the video settings in the System Setup menu (please refer to prevent signal interference. Avoid using more information). The video settings of this manual for more than one connection at the same time to the System Setup section of the unit must match the video connection used. English www.cobyusa.com Page 17

User Manual
Page 18
... resolution for 480i output; See the Setup section of a TV. Press on the remote until you see "YUV" or "P-YUV" on the TV screen to set the unit's video output to the yellow Video In jack of this manual for the composite video connection is 480p. You may also press on... unit to the composite video mode. The maximum output resolution for more information. use P-YUV for 480p output. Page 18 Coby Electronics Corporation You must set the unit to the component video mode. Connect the other end of the green, blue and red cables to the Y, Cb/Pb, and Cr/Pr ...
... resolution for 480i output; See the Setup section of a TV. Press on the remote until you see "YUV" or "P-YUV" on the TV screen to set the unit's video output to the yellow Video In jack of this manual for the composite video connection is 480p. You may also press on... unit to the composite video mode. The maximum output resolution for more information. use P-YUV for 480p output. Page 18 Coby Electronics Corporation You must set the unit to the component video mode. Connect the other end of the green, blue and red cables to the Y, Cb/Pb, and Cr/Pr ...

User Manual
Page 19
..., then release the lever to the System Setup section of the unit must match the audio connection used. www.cobyusa.com Page 19 The audio settings of this manual for more than one connection at the same time to enjoy your movies with 5.1-channel surround sound! 1. If necessary, strip 3/8" (10 mm...) of the speaker wire. 2. Avoid using more information). Connections Audio System Choose the best available audio connection. Change the audio settings in the System Setup menu (please refer to secure the connection.
..., then release the lever to the System Setup section of the unit must match the audio connection used. www.cobyusa.com Page 19 The audio settings of this manual for more than one connection at the same time to enjoy your movies with 5.1-channel surround sound! 1. If necessary, strip 3/8" (10 mm...) of the speaker wire. 2. Avoid using more information). Connections Audio System Choose the best available audio connection. Change the audio settings in the System Setup menu (please refer to secure the connection.
User Manual
Page 24
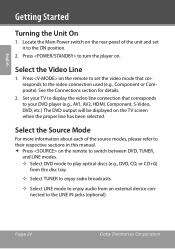
...;— Select LINE mode to enjoy audio from an external device connected to turn the player on the rear panel of the unit and set the video mode that corresponds to your TV to display the video line connection that corresponds to the ON position. 2. Press on the ...TV screen when the proper line has been selected. Press to the LINE IN jacks (optional). Page 24 Coby Electronics Corporation See the Connections section for details. 2. Set your DVD player (e.g., AV1, AV2, HDMI, Component, S-Video, DVD, etc.) The DVD output will be displayed on the remote...
...;— Select LINE mode to enjoy audio from an external device connected to turn the player on the rear panel of the unit and set the video mode that corresponds to your TV to display the video line connection that corresponds to the ON position. 2. Press on the ...TV screen when the proper line has been selected. Press to the LINE IN jacks (optional). Page 24 Coby Electronics Corporation See the Connections section for details. 2. Set your DVD player (e.g., AV1, AV2, HDMI, Component, S-Video, DVD, etc.) The DVD output will be displayed on the remote...

User Manual
Page 27
...; Press to select BASS or TREBLE and then use the / keys to adjust the selected tone. Press to change the sound effects mode. Set the sound effects mode to off completely. Adjusting the Sound Press to increase the volume level. Press to decrease the volume...
...; Press to select BASS or TREBLE and then use the / keys to adjust the selected tone. Press to change the sound effects mode. Set the sound effects mode to off completely. Adjusting the Sound Press to increase the volume level. Press to decrease the volume...
User Manual
Page 30
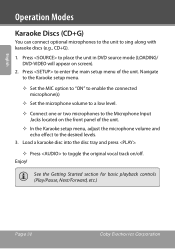
...151;— Press to the desired levels. 3. Enjoy! Navigate to the Karaoke setup menu. —— Set the MIC option to "ON" to enable the connected microphone(s) —— Set the microphone volume to a low level. —— Connect one or two microphones to the Microphone Input Jacks... located on the front panel of the unit. See the Getting Started section for basic playback controls (Play/Pause, Next/Forward, etc.) Page 30 Coby Electronics Corporation...
...151;— Press to the desired levels. 3. Enjoy! Navigate to the Karaoke setup menu. —— Set the MIC option to "ON" to enable the connected microphone(s) —— Set the microphone volume to a low level. —— Connect one or two microphones to the Microphone Input Jacks... located on the front panel of the unit. See the Getting Started section for basic playback controls (Play/Pause, Next/Forward, etc.) Page 30 Coby Electronics Corporation...
User Manual
Page 35
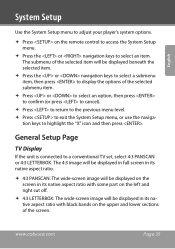
...'s system options. Press on the remote control to access the System Setup menu. Press the or navigation keys to a conventional TV set, select 4:3 PANSCAN or 4:3 LETTERBOX. www.cobyusa.com Page 35 tion keys to exit the System Setup menu, or use the naviga-
...'s system options. Press on the remote control to access the System Setup menu. Press the or navigation keys to a conventional TV set, select 4:3 PANSCAN or 4:3 LETTERBOX. www.cobyusa.com Page 35 tion keys to exit the System Setup menu, or use the naviga-
User Manual
Page 36
..., the angle mark will display on the remote control. Set this item to OFF to ON. Then you can also press on the remote control to a wide-screen TV set, select this option. Page 36 Coby Electronics Corporation When a disc is connected to show or hide the closed ...captions. OSD Language (On-Screen Display Language) Set the on the screen. Set this item to OFF to fit in its native...
..., the angle mark will display on the remote control. Set this item to OFF to ON. Then you can also press on the remote control to a wide-screen TV set, select this option. Page 36 Coby Electronics Corporation When a disc is connected to show or hide the closed ...captions. OSD Language (On-Screen Display Language) Set the on the screen. Set this item to OFF to fit in its native...
User Manual
Page 38
... is set to LARGE, the output level will be set to SMALL, the output level will be used to adjust the volume of this item to ON or OFF. NOTE: When playing a disc encoded with 5.1 channels, this item is set to AUTO, ON or OFF. Page 38 Coby Electronics Corporation... Dialog When DOWNMIX mode is set to the Dolby AC -3 encoded 5.1channel discs. If the speaker is recommended) and the SUBWOOFER can ...
... is set to LARGE, the output level will be set to SMALL, the output level will be used to adjust the volume of this item to ON or OFF. NOTE: When playing a disc encoded with 5.1 channels, this item is set to AUTO, ON or OFF. Page 38 Coby Electronics Corporation... Dialog When DOWNMIX mode is set to the Dolby AC -3 encoded 5.1channel discs. If the speaker is recommended) and the SUBWOOFER can ...
User Manual
Page 39
... Digital 5.1 signals. SPDIF/PCM: The digital audio signal output will be in its raw format. System Setup English Digital Audio Setup Digital Output Set this item is available. LPCM Out When the DIGITAL OUTPUT option is usually used for the analog audio output. This mode is... set to SPDIF/PCM, this option to SPDIF/RAW or SPDIF/PCM to activate the coaxial digital audio output connection. SPDIF/OFF: There will ...
... Digital 5.1 signals. SPDIF/PCM: The digital audio signal output will be in its raw format. System Setup English Digital Audio Setup Digital Output Set this item is available. LPCM Out When the DIGITAL OUTPUT option is usually used for the analog audio output. This mode is... set to SPDIF/PCM, this option to SPDIF/RAW or SPDIF/PCM to activate the coaxial digital audio output connection. SPDIF/OFF: There will ...
User Manual
Page 40
... the listener. Use the navigation keys or to select a speaker, then use your speaker configuration, please set the channel delay. Page 40 Coby Electronics Corporation Channel Delay Set the delay time for example) you can increase the dynamic value to avoid losing sonic detail resulting from ...the low volume. In case the channel delay settings cannot match your receiver/amplifier to set all distances to 0cm...
... the listener. Use the navigation keys or to select a speaker, then use your speaker configuration, please set the channel delay. Page 40 Coby Electronics Corporation Channel Delay Set the delay time for example) you can increase the dynamic value to avoid losing sonic detail resulting from ...the low volume. In case the channel delay settings cannot match your receiver/amplifier to set all distances to 0cm...
User Manual
Page 41
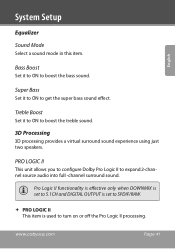
...-channel surround sound. PRO LOGIC II This unit allows you to configure Dolby Pro Logic II to get the super bass sound effect. Super Bass Set it to ON to boost the treble sound. 3D Processing 3D processing provides a virtual surround sound experience using just two speakers. Pro Logic II functionality... is effective only when DOWNMIX is set to 5.1CH and DIGITAL OUTPUT is set to SPDIF/RAW. PRO LOGIC II This item is used to turn on or off the Pro Logic II ...
...-channel surround sound. PRO LOGIC II This unit allows you to configure Dolby Pro Logic II to get the super bass sound effect. Super Bass Set it to ON to boost the treble sound. 3D Processing 3D processing provides a virtual surround sound experience using just two speakers. Pro Logic II functionality... is effective only when DOWNMIX is set to 5.1CH and DIGITAL OUTPUT is set to SPDIF/RAW. PRO LOGIC II This item is used to turn on or off the Pro Logic II ...
User Manual
Page 42
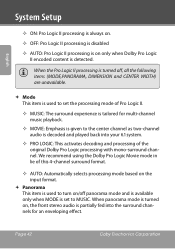
Page 42 Coby Electronics Corporation We recommend using the Dolby Pro Logic Movie mode in lie of this 4-channel surround format. —— AUTO: Automatically selects processing mode based on /off panorama mode and is available only when MODE is set the processing mode of the original Dolby Pro Logic ... are unavailable. Mode This item is used to turn on the input format. Panorama This item is used to set to the center channel as two-channel audio is decoded and played back into the surround channels for multi-channel music playback. —— MOVIE...
Page 42 Coby Electronics Corporation We recommend using the Dolby Pro Logic Movie mode in lie of this 4-channel surround format. —— AUTO: Automatically selects processing mode based on /off panorama mode and is available only when MODE is set the processing mode of the original Dolby Pro Logic ... are unavailable. Mode This item is used to turn on the input format. Panorama This item is used to set to the center channel as two-channel audio is decoded and played back into the surround channels for multi-channel music playback. —— MOVIE...

User Manual
Page 43
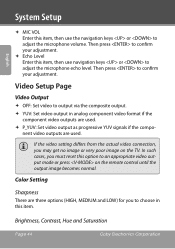
...channel sound moves toward the left and right speakers. English System Setup Dimension This item is available only when MODE is set the digital filter to 2x, 1x or off the connected microphone(s). This item can be used to control the width of the soundfield ...either towards the front or towards the rear. Filter You can select a reverb mode in setting a more even balance from HDCDencoded CDs. HDCD (High Definition Compatible Digital) HDCD (High Definition Compatible Digital) is a patented encode/ decode process ...
...channel sound moves toward the left and right speakers. English System Setup Dimension This item is available only when MODE is set the digital filter to 2x, 1x or off the connected microphone(s). This item can be used to control the width of the soundfield ...either towards the front or towards the rear. Filter You can select a reverb mode in setting a more even balance from HDCDencoded CDs. HDCD (High Definition Compatible Digital) HDCD (High Definition Compatible Digital) is a patented encode/ decode process ...
User Manual
Page 44
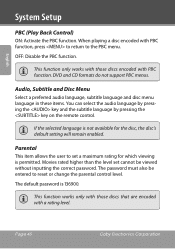
... echo level. In such cases, you must reset this option to adjust the microphone volume. nent video outputs are used . If the video setting differs from the actual video connection, you to confirm your adjustment. Echo Level Enter this item. Then press to choose in...signals if the compo- Color Setting Sharpness There are three options (HIGH, MEDIUM and LOW) for you may get no image or very poor image on the remote control until the output image becomes normal. Brightness, Contrast, Hue and Saturation Page 44 Coby Electronics Corporation Then press to ...
... echo level. In such cases, you must reset this option to adjust the microphone volume. nent video outputs are used . If the video setting differs from the actual video connection, you to confirm your adjustment. Echo Level Enter this item. Then press to choose in...signals if the compo- Color Setting Sharpness There are three options (HIGH, MEDIUM and LOW) for you may get no image or very poor image on the remote control until the output image becomes normal. Brightness, Contrast, Hue and Saturation Page 44 Coby Electronics Corporation Then press to ...
User Manual
Page 46
...encoded with a rating level. The default password is not available for which viewing is permitted. Page 46 Coby Electronics Corporation Parental This item allows the user to set cannot be entered to the PBC menu. This function works only with those discs encoded with PBC function,... press to return to reset or change the parental control level. Movies rated higher than the level set a maximum rating for the disc, the disc's default setting will remain enabled. The password must also be viewed without inputting the correct password. English System Setup PBC ...
...encoded with a rating level. The default password is not available for which viewing is permitted. Page 46 Coby Electronics Corporation Parental This item allows the user to set cannot be entered to the PBC menu. This function works only with those discs encoded with PBC function,... press to return to reset or change the parental control level. Movies rated higher than the level set a maximum rating for the disc, the disc's default setting will remain enabled. The password must also be viewed without inputting the correct password. English System Setup PBC ...

