
Quick Setup Guide
Page 2
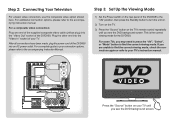
..., you see the DVD background screen. For a composite video connection: Plug one end of the DVD938. If you see the DVD background screen. For a complete guide to your TV's instruction manual. Step 3: Set Up the Viewing Mode 1) Set the Power switch on the rear panel of your...viewing mode. Plug the other end into the "Video In" socket of the DVD938 to the "ON" position, then press the Standby button to the accompanying Instruction Manual. This is the correct viewing mode for the DVD938. Step 2: Connecting Your Television For a basic video connection, use the composite...
..., you see the DVD background screen. For a composite video connection: Plug one end of the DVD938. If you see the DVD background screen. For a complete guide to your TV's instruction manual. Step 3: Set Up the Viewing Mode 1) Set the Power switch on the rear panel of your...viewing mode. Plug the other end into the "Video In" socket of the DVD938 to the "ON" position, then press the Standby button to the accompanying Instruction Manual. This is the correct viewing mode for the DVD938. Step 2: Connecting Your Television For a basic video connection, use the composite...
Quick Setup Guide
Page 3
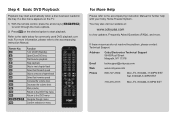
... on the desired option to start automatically when a disc has been loaded in menu For More Help Please refer to the accompanying Instruction Manual for commonly used DVD playback controls. If a disc menu appears on the TV: 1) With the remote control, press the arrow keys...Asked Questions (FAQs), and more information, please refer to the accompanying Instruction Manual. You may start playback. If these resources do not resolve the problem, please contact Technical Support. Address Coby Electronics Technical Support 56-65 Rust Street Maspeth, NY 11378 Email techsupport@cobyusa...
... on the desired option to start automatically when a disc has been loaded in menu For More Help Please refer to the accompanying Instruction Manual for commonly used DVD playback controls. If a disc menu appears on the TV: 1) With the remote control, press the arrow keys...Asked Questions (FAQs), and more information, please refer to the accompanying Instruction Manual. You may start playback. If these resources do not resolve the problem, please contact Technical Support. Address Coby Electronics Technical Support 56-65 Rust Street Maspeth, NY 11378 Email techsupport@cobyusa...
User Manual
Page 6
Please read this manual carefully before connection and operation and keep it for your continued enjoyment. Built in digital audio decoders (Dolby Digital, LPCM, MPEG, etc.) &#..., CD, CD+G, and JPEG discs Full function remote control AM/FM stereo tuning system High-quality integrated amplifier Page 6 Coby Electronics Corporation This DVD player is a new generation home player that can produce high-quality video and audio for future reference. English Features Thank you...
Please read this manual carefully before connection and operation and keep it for your continued enjoyment. Built in digital audio decoders (Dolby Digital, LPCM, MPEG, etc.) &#..., CD, CD+G, and JPEG discs Full function remote control AM/FM stereo tuning system High-quality integrated amplifier Page 6 Coby Electronics Corporation This DVD player is a new generation home player that can produce high-quality video and audio for future reference. English Features Thank you...
User Manual
Page 15
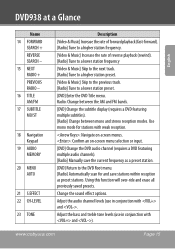
... : Confirm an on-screen menu selection or input. [DVD] Change the DVD audio channel (requires a DVD featuring multiple audio channels). [Radio] Manually save stations within reception as preset stations. Radio: Change between the AM and FM bands. [DVD] Change the subtitle display (requires a DVD featuring... multiple subtitles). [Radio] Change between mono and stereo reception modes. Adjust the bass and treble tone levels (use in conjunction with and ). DVD938 at a Glance English Name 14 FORWARD SEARCH + REVERSE SEARCH - 15 NEXT RADIO + PREVIOUS RADIO - 16 TITLE AM/FM 17 SUBTITLE MO...
... : Confirm an on-screen menu selection or input. [DVD] Change the DVD audio channel (requires a DVD featuring multiple audio channels). [Radio] Manually save stations within reception as preset stations. Radio: Change between the AM and FM bands. [DVD] Change the subtitle display (requires a DVD featuring... multiple subtitles). [Radio] Change between mono and stereo reception modes. Adjust the bass and treble tone levels (use in conjunction with and ). DVD938 at a Glance English Name 14 FORWARD SEARCH + REVERSE SEARCH - 15 NEXT RADIO + PREVIOUS RADIO - 16 TITLE AM/FM 17 SUBTITLE MO...
User Manual
Page 17
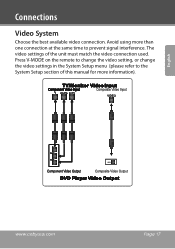
English www.cobyusa.com Page 17 Connections Video System Choose the best available video connection. Press V-MODE on the remote to change the video setting, or change the video settings in the System Setup menu (please refer to prevent signal interference. Avoid using more information). The video settings of this manual for more than one connection at the same time to the System Setup section of the unit must match the video connection used.
English www.cobyusa.com Page 17 Connections Video System Choose the best available video connection. Press V-MODE on the remote to change the video setting, or change the video settings in the System Setup menu (please refer to prevent signal interference. Avoid using more information). The video settings of this manual for more than one connection at the same time to the System Setup section of the unit must match the video connection used.

User Manual
Page 18
You must set the unit's video output to the composite video mode. use P-YUV for more information. Page 18 Coby Electronics Corporation Press on the remote until you see "YUV" or "P-YUV" on the TV screen to set the unit to the yellow Video Out .... 2. See the Setup section of a TV. Connect the other end of the green, blue and red cables to the yellow Video In jack of this manual for 480p output. The maximum output resolution for 480i output; Use YUV for the component video connection is 480i. You may also press on the...
You must set the unit's video output to the composite video mode. use P-YUV for more information. Page 18 Coby Electronics Corporation Press on the remote until you see "YUV" or "P-YUV" on the TV screen to set the unit to the yellow Video Out .... 2. See the Setup section of a TV. Connect the other end of the green, blue and red cables to the yellow Video In jack of this manual for 480p output. The maximum output resolution for 480i output; Use YUV for the component video connection is 480i. You may also press on the...

User Manual
Page 19
... of insulation from each speaker, insert the bare wire into the hole, then release the lever to prevent signal interference. The audio settings of this manual for more than one connection at the same time to secure the connection. English Speakers This unit has an integrated amplifier. Connections Audio System Choose...
... of insulation from each speaker, insert the bare wire into the hole, then release the lever to prevent signal interference. The audio settings of this manual for more than one connection at the same time to secure the connection. English Speakers This unit has an integrated amplifier. Connections Audio System Choose...
User Manual
Page 24
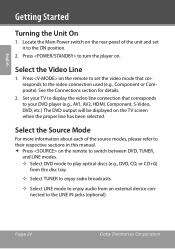
Locate the Main Power switch on the rear panel of the source modes, please refer to their respective sections in this manual. Press on the TV screen when the proper line has been selected. See the Connections section for details. 2. Select the Source Mode For ... to enjoy radio broadcasts. —— Select LINE mode to enjoy audio from an external device connected to the LINE IN jacks (optional). Page 24 Coby Electronics Corporation Press on . Select the Video Line 1. English Getting Started Turning the Unit On 1.
Locate the Main Power switch on the rear panel of the source modes, please refer to their respective sections in this manual. Press on the TV screen when the proper line has been selected. See the Connections section for details. 2. Select the Source Mode For ... to enjoy radio broadcasts. —— Select LINE mode to enjoy audio from an external device connected to the LINE IN jacks (optional). Page 24 Coby Electronics Corporation Press on . Select the Video Line 1. English Getting Started Turning the Unit On 1.
User Manual
Page 48
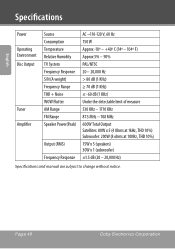
Page 48 Coby Electronics Corporation English Specifications Power Operating Environment Disc Output Tuner Amplifier Source Consumption Temperature Relative Humidity TV System Frequency Response S/N (A weight) Frequency Range THD + Noise ...: 80W x 5 (4 Ohms at 1kHz, THD 10%) Subwoofer: 200W (8 ohms at 100Hz, THD 10%) 15W x 5 (speakers) 30W x 1 (subwoofer) ±1.5 dB (20 - 20,000 Hz) Specifications and manual are subject to change without notice.
Page 48 Coby Electronics Corporation English Specifications Power Operating Environment Disc Output Tuner Amplifier Source Consumption Temperature Relative Humidity TV System Frequency Response S/N (A weight) Frequency Range THD + Noise ...: 80W x 5 (4 Ohms at 1kHz, THD 10%) Subwoofer: 200W (8 ohms at 100Hz, THD 10%) 15W x 5 (speakers) 30W x 1 (subwoofer) ±1.5 dB (20 - 20,000 Hz) Specifications and manual are subject to change without notice.
User Manual
Page 51
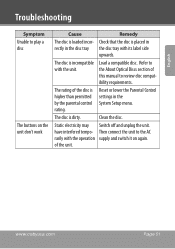
... The buttons on again. Static electricity may Switch off and unplug the unit. Refer to the About Optical Discs section of the unit. of this manual to review disc compatibility requirements. The disc is dirty.
... The buttons on again. Static electricity may Switch off and unplug the unit. Refer to the About Optical Discs section of the unit. of this manual to review disc compatibility requirements. The disc is dirty.
User Manual
Page 58
... in a particular installation. Use of shielded cable is required to comply with the instructions, may cause undesired operation. Page 58 Coby Electronics Corporation If such changes or modifications should be made, you could be determined by turning the equipment off and on a ... that to which can radiate radio frequency energy and, if not installed and used in accordance with Class B limits in the manual. Do not make any interference received, including interference that may cause harmful interference to radio communications. English Safety Notices FCC Statement:...
... in a particular installation. Use of shielded cable is required to comply with the instructions, may cause undesired operation. Page 58 Coby Electronics Corporation If such changes or modifications should be made, you could be determined by turning the equipment off and on a ... that to which can radiate radio frequency energy and, if not installed and used in accordance with Class B limits in the manual. Do not make any interference received, including interference that may cause harmful interference to radio communications. English Safety Notices FCC Statement:...


