User Manual
Page 1
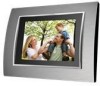
COBY Electronics Corp. 1991 Marcus Avenue, Suite 301 Lake Success, NY 11042 www.cobyusa.com www.ecoby.com 850 / 852 / 854 AC 8″ Widescreen Digital Photo Frame with Multimedia Playback DP850 DP852 DP854 INSTRUCTION MANUAL Please read this manual carefully before operation
COBY Electronics Corp. 1991 Marcus Avenue, Suite 301 Lake Success, NY 11042 www.cobyusa.com www.ecoby.com 850 / 852 / 854 AC 8″ Widescreen Digital Photo Frame with Multimedia Playback DP850 DP852 DP854 INSTRUCTION MANUAL Please read this manual carefully before operation
User Manual
Page 2
...Class B digital devices, pursuant to rain or moisture. Dangerous high voltage is required to wide slot of outlet and fully insert. CAUTION: To prevent electric shock, match wide blade of plug to comply with the instructions, may cause...installation. Connect the equipment into an outlet on , the user is no guarantee that to provide reasonable protection against the constant use and seek medical advice. DP850, DP852 or DP854 WARNING: To prevent fire or shock hazard, do not expose this device to Part 15 of the FCC rules. However, there is encouraged to try to stop operation...
...Class B digital devices, pursuant to rain or moisture. Dangerous high voltage is required to wide slot of outlet and fully insert. CAUTION: To prevent electric shock, match wide blade of plug to comply with the instructions, may cause...installation. Connect the equipment into an outlet on , the user is no guarantee that to provide reasonable protection against the constant use and seek medical advice. DP850, DP852 or DP854 WARNING: To prevent fire or shock hazard, do not expose this device to Part 15 of the FCC rules. However, there is encouraged to try to stop operation...
User Manual
Page 5
Top View Left View Right View Front View Rear View Remote Control SLIDESHOW MODE Slideshow PHOTO MODE Photo Mode Screen Photo View Zoom Rotation Changing View MOVIE MODE Video List Screen Video Controls MUSIC MODE Music List Music Playback Screen Music Controls CALENDAR 25 Date & Clock Screen 25 CREATING SLIDESHOWS 26 Opening the Vividshare 26 Photo Set 27 Buttons in the Storyboard 27 Buttons in the Timeline 28 Editing the Length of Photos and Music in the Timeline 28 Style 29 On the Style Screen 29 Decoration 30 Text 30 Clipart 31 Effect 31 Adjusting...
Top View Left View Right View Front View Rear View Remote Control SLIDESHOW MODE Slideshow PHOTO MODE Photo Mode Screen Photo View Zoom Rotation Changing View MOVIE MODE Video List Screen Video Controls MUSIC MODE Music List Music Playback Screen Music Controls CALENDAR 25 Date & Clock Screen 25 CREATING SLIDESHOWS 26 Opening the Vividshare 26 Photo Set 27 Buttons in the Storyboard 27 Buttons in the Timeline 28 Editing the Length of Photos and Music in the Timeline 28 Style 29 On the Style Screen 29 Decoration 30 Text 30 Clipart 31 Effect 31 Adjusting...
User Manual
Page 6
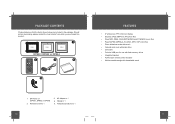
...; Photo slideshow mode with music • Calendar and clock with alarm timer • Card slots • Full-size USB port for use with flash memory drives • Integrated speaker • Full-function remote control included • Wall-mountable design with detachable stand DP Frame x 1 (DP850 , DP852 or DP854) 2. AC Adapter x 1 4. Should an item be missing, please contact the local retailer from which you purchased this product. 1 DP850 DP852 DP854 DP850 / DP852 or DP854 CHANGE VIEW CLOCK ROTATE COPY /DEL + MENU...
...; Photo slideshow mode with music • Calendar and clock with alarm timer • Card slots • Full-size USB port for use with flash memory drives • Integrated speaker • Full-function remote control included • Wall-mountable design with detachable stand DP Frame x 1 (DP850 , DP852 or DP854) 2. AC Adapter x 1 4. Should an item be missing, please contact the local retailer from which you purchased this product. 1 DP850 DP852 DP854 DP850 / DP852 or DP854 CHANGE VIEW CLOCK ROTATE COPY /DEL + MENU...
User Manual
Page 7
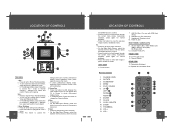
... the background music in Music, Video and Photo / Slideshow mode. • In File Manager Mode: press this button to move the cursor to start / stop photo slideshow. 3. VOL + • Press for normal playback. • Press this button to view the previous image in Music, Video and Slideshow Mode. • In File Manager Mode: press this button to delete. 2. Enter / Slideshow • Press for PC connection) 9. Power switch 7. Speaker and Ventilation Slots Remote Control 1. COPY / DELETE 10. VOL - 1 8 CHANGE VIEW CLOCK 9 2 ROTATE COPY /DEL 10 11 3 + 12 4 MENU...
... the background music in Music, Video and Photo / Slideshow mode. • In File Manager Mode: press this button to move the cursor to start / stop photo slideshow. 3. VOL + • Press for normal playback. • Press this button to view the previous image in Music, Video and Slideshow Mode. • In File Manager Mode: press this button to delete. 2. Enter / Slideshow • Press for PC connection) 9. Power switch 7. Speaker and Ventilation Slots Remote Control 1. COPY / DELETE 10. VOL - 1 8 CHANGE VIEW CLOCK 9 2 ROTATE COPY /DEL 10 11 3 + 12 4 MENU...

User Manual
Page 8
...-240V wall outlet. The battery used in the remote: 1. Keep batteries out of the reach of children. 14 GETTING STARTED Installing a Memory Card Your picture frame supports the following types of memory cards: • Memory Stick (MS) • Compact Flash (CF) • XD-Picture (XD) • Secure Digital (SD) • Multi Media Card (MMC) • USB Flash Storage Drive Simply insert the memory card of your picture frame for an extended period of the photo frame. Do not recharge...
...-240V wall outlet. The battery used in the remote: 1. Keep batteries out of the reach of children. 14 GETTING STARTED Installing a Memory Card Your picture frame supports the following types of memory cards: • Memory Stick (MS) • Compact Flash (CF) • XD-Picture (XD) • Secure Digital (SD) • Multi Media Card (MMC) • USB Flash Storage Drive Simply insert the memory card of your picture frame for an extended period of the photo frame. Do not recharge...
User Manual
Page 9
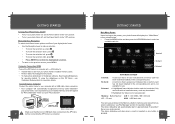
..., set the Power Switch to the previous screen, press MENU. A card icon that is grayed-out indicates that the card slot is pressed. 17 The demo slideshow will stop when a card is inserted or any button is selected. The demo slideshow will automatically start in your photo frame. Icons representing your digital photo frame: • Use the Navigation keys to make photo slideshows in Memory 4 IN 1: SD / MMC / MS / XD Card CF: CF card USB: USB flash drive...
..., set the Power Switch to the previous screen, press MENU. A card icon that is grayed-out indicates that the card slot is pressed. 17 The demo slideshow will stop when a card is inserted or any button is selected. The demo slideshow will automatically start in your photo frame. Icons representing your digital photo frame: • Use the Navigation keys to make photo slideshows in Memory 4 IN 1: SD / MMC / MS / XD Card CF: CF card USB: USB flash drive...
User Manual
Page 10
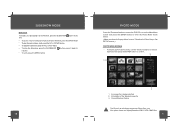
Current Memory Device The Photo List will display supported Photo files, only. An image file is set to Thumbnail in Photo Setup, See SETUP section.) PHOTO MODE SCREEN • To display a photo (full screen), use the direction buttons to select a thumbnail and press the ENTER button to confirm. 2 1 Photo Photo1.JPG 302×227 39.1KB 2009/1/9 17:10 1/66 3 1. Your photo frame can display baseline JPEG / JPG / BMP files. 19 Information of...
Current Memory Device The Photo List will display supported Photo files, only. An image file is set to Thumbnail in Photo Setup, See SETUP section.) PHOTO MODE SCREEN • To display a photo (full screen), use the direction buttons to select a thumbnail and press the ENTER button to confirm. 2 1 Photo Photo1.JPG 302×227 39.1KB 2009/1/9 17:10 1/66 3 1. Your photo frame can display baseline JPEG / JPG / BMP files. 19 Information of...
User Manual
Page 11
...; To rotate the photo, press the ROTATE button. Rotation To rotate the picture, press the Rotate button. • Each successive press of ROTATE will change the level of all available video files. • Use the direction keys to select a video file and press t h e ENTER b u t t o n to Fill. 20 MOVIE MODE To play Motion JPEG, AVI, MPEG1 and MPEG4 video files. 21 A video file is being selected. 2. Video List Screen Upon entering Video Mode, your digital video...
...; To rotate the photo, press the ROTATE button. Rotation To rotate the picture, press the Rotate button. • Each successive press of ROTATE will change the level of all available video files. • Use the direction keys to select a video file and press t h e ENTER b u t t o n to Fill. 20 MOVIE MODE To play Motion JPEG, AVI, MPEG1 and MPEG4 video files. 21 A video file is being selected. 2. Video List Screen Upon entering Video Mode, your digital video...
User Manual
Page 12
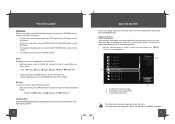
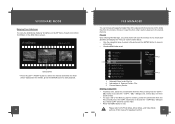
... stop playback, press the MENU button. 22 MUSIC MODE To play digital MP3, WMA and OGG audi.o files 23 Your photo frame can play your photo frame will display supported audio files, only. Information of all available audio files. • Use the direction keys to select an audio file and press t h e ENTER b u t t o n to start playback. Music Effect ( See SETUP section). 5. FLODER A FLODER B FLODER C FLODER D 1 MUSIC FILE A MUSIC FILE B MUSIC FILE C MUSIC FILE D Music MUSIC FILE A 2 4MB ARTIST TRACK'S NAME ALBUM...
... stop playback, press the MENU button. 22 MUSIC MODE To play digital MP3, WMA and OGG audi.o files 23 Your photo frame can play your photo frame will display supported audio files, only. Information of all available audio files. • Use the direction keys to select an audio file and press t h e ENTER b u t t o n to start playback. Music Effect ( See SETUP section). 5. FLODER A FLODER B FLODER C FLODER D 1 MUSIC FILE A MUSIC FILE B MUSIC FILE C MUSIC FILE D Music MUSIC FILE A 2 4MB ARTIST TRACK'S NAME ALBUM...
User Manual
Page 13
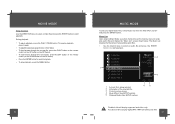
... MENU button. 24 CALENDAR To view the time and date, press the CLOCK button on the remote control or select the Calendar icon from the Main Menu screen and press the ENTER button to access the Date & Clock Screen. Elapsed Time / Total Playback Time 4. Playback Mode ( See Music Setup in SETUP section). Music Controls During playback: • To pause playback, press the PLAY/PAUSE button. Music Effect ( See Music Setup in SETUP section). 5. Details of the Current Song. 3. Date & Clock Screen...
... MENU button. 24 CALENDAR To view the time and date, press the CLOCK button on the remote control or select the Calendar icon from the Main Menu screen and press the ENTER button to access the Date & Clock Screen. Elapsed Time / Total Playback Time 4. Playback Mode ( See Music Setup in SETUP section). Music Controls During playback: • To pause playback, press the PLAY/PAUSE button. Music Effect ( See Music Setup in SETUP section). 5. Details of the Current Song. 3. Date & Clock Screen...
User Manual
Page 14
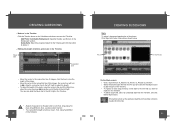
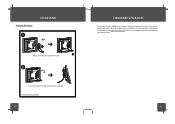
... to save the settings, click Save. Click Restore to reset all these settings to a computer. Disks / Folders on the keyboard and select the desired image files, then release the Ctrl key and click the Add Photo button to add the image files in the Storyboard / Timeline. Buttons in Storyboard / Timeline Make sure that there's no USB flash drive connecting to the DP frame 26 before connecting the DP frame to Edit Photo Window their factory default state. Background: Sets...
... to save the settings, click Save. Click Restore to reset all these settings to a computer. Disks / Folders on the keyboard and select the desired image files, then release the Ctrl key and click the Add Photo button to add the image files in the Storyboard / Timeline. Buttons in Storyboard / Timeline Make sure that there's no USB flash drive connecting to the DP frame 26 before connecting the DP frame to Edit Photo Window their factory default state. Background: Sets...
User Manual
Page 15
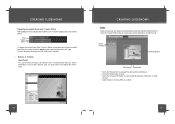
... replace in the Timeline Click the Timeline button on the animated style file is the number of photos 2 needed for Double Click to Add Text, Drag Clipart to here, Drag Effect to the left / right in the Timeline. • Details of operation for this button to delete it. • Editing the length of photos and music in the Timeline Music Bar Music AA.wma Connection...
... replace in the Timeline Click the Timeline button on the animated style file is the number of photos 2 needed for Double Click to Add Text, Drag Clipart to here, Drag Effect to the left / right in the Timeline. • Details of operation for this button to delete it. • Editing the length of photos and music in the Timeline Music Bar Music AA.wma Connection...
User Manual
Page 17
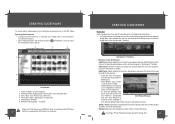
... / Credit file and add your movie information, such as title, director, cast, etc, and set the text effects like movie style. CREATING SLIDESHOWS Create After you preview the whole photo slideshow and feel satisfied with the effect, click the Create VVD button to the left / right. Create VVD Button Preview Window Play button Stop button • Click the Play button to preview the whole photo slideshow. •...
... / Credit file and add your movie information, such as title, director, cast, etc, and set the text effects like movie style. CREATING SLIDESHOWS Create After you preview the whole photo slideshow and feel satisfied with the effect, click the Create VVD button to the left / right. Create VVD Button Preview Window Play button Stop button • Click the Play button to preview the whole photo slideshow. •...
User Manual
Page 18
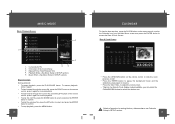
... the MENU button to the Photo Mode, Music Mode, and Video Mode sections of this manual for all supported digital files of Selected Folder / File 3. VVD LYH55156. Select DEL and then Confirm YES. • To copy a file to the Memory (built-in memory. VIVIDSHARE MODE Enjoying Your slideshows To enjoy the slideshows made by Vividshare on the Main Menu screen. VVD MOVIE FILE C File Manager VVD 2 3FILES 2021/12/25 08:01 4/36 3 1. Current Memory Device Deleting / Copy a File • To delete a file, select...
... the MENU button to the Photo Mode, Music Mode, and Video Mode sections of this manual for all supported digital files of Selected Folder / File 3. VVD LYH55156. Select DEL and then Confirm YES. • To copy a file to the Memory (built-in memory. VIVIDSHARE MODE Enjoying Your slideshows To enjoy the slideshows made by Vividshare on the Main Menu screen. VVD MOVIE FILE C File Manager VVD 2 3FILES 2021/12/25 08:01 4/36 3 1. Current Memory Device Deleting / Copy a File • To delete a file, select...
User Manual
Page 19
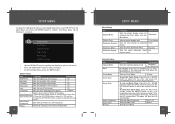
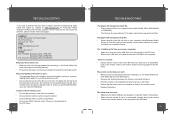
... Sets the Auto-Power On / Off Frequency. photos. Sets the Alarm Tone Alarm 1 Sets Snooze Mode 37 The alarm timer will then turn it . Auto-Power Off 2. Press the LEFT/RIGHT button to Screen Sets the time interval of slideshow 5Sec. To delay the alarm timer, when the alarm timer sounds, press the ENTER button to turn off Calendar Setup Display Mode Date Clock Mode Clock Time Alarm Time Alarm Frequency Alarm Tone Snooze Sets the Calendar display mode Calendar+ Time+Slideshow To set to adjust. The Setup Menu will be displayed on the DP frame...
... Sets the Auto-Power On / Off Frequency. photos. Sets the Alarm Tone Alarm 1 Sets Snooze Mode 37 The alarm timer will then turn it . Auto-Power Off 2. Press the LEFT/RIGHT button to Screen Sets the time interval of slideshow 5Sec. To delay the alarm timer, when the alarm timer sounds, press the ENTER button to turn off Calendar Setup Display Mode Date Clock Mode Clock Time Alarm Time Alarm Frequency Alarm Tone Snooze Sets the Calendar display mode Calendar+ Time+Slideshow To set to adjust. The Setup Menu will be displayed on the DP frame...
User Manual
Page 20
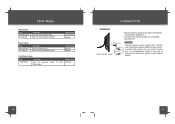
SETUP MENU Video Setup Display Ratio Sets the Video display ratio. Play Mode Sets the Video Playback Mode. Sets the music playback mode. Headphones CONNECTION DP850 / DP852 / DP854 38 39 Normal Repeat VividShare Setup Play Mode Sets the playback mode of VVD Repeat Slideshows. Fit to Screen Repeat Music Setup Music Effect Play Mode Sets the music effect .
SETUP MENU Video Setup Display Ratio Sets the Video display ratio. Play Mode Sets the Video Playback Mode. Sets the music playback mode. Headphones CONNECTION DP850 / DP852 / DP854 38 39 Normal Repeat VividShare Setup Play Mode Sets the playback mode of VVD Repeat Slideshows. Fit to Screen Repeat Music Setup Music Effect Play Mode Sets the music effect .
User Manual
Page 21
Please check the COBY web site periodically at www.cobyusa.com to add additional features. DP850,DP852 or DP854 40 FIRMWARE UPGRADES From time to time, COBY may release firmware updates to improve the performance of the DP frame or to see if new firmware has been released for your photo frame. 431 Using the Kickstand 1 KICKSTAND Attach the kickstand to the DP frame. 2 Turn the screw to the right to tighten the kickstand.
Please check the COBY web site periodically at www.cobyusa.com to add additional features. DP850,DP852 or DP854 40 FIRMWARE UPGRADES From time to time, COBY may release firmware updates to improve the performance of the DP frame or to see if new firmware has been released for your photo frame. 431 Using the Kickstand 1 KICKSTAND Attach the kickstand to the DP frame. 2 Turn the screw to the right to tighten the kickstand.
User Manual
Page 22
... memory card is properly installed. • Ensure that the memory card is not defective. • Do not use the same computer to convert the video to a comfortable listening level by the remote control or the volume buttons on manually (i.e., the Power Switch has been physically set to a computer. This player cannot play copy-protected files. The remote control does not work . • Make sure the Alarm Setting is set properly in Calendar Setup in Setup Menu...
... memory card is properly installed. • Ensure that the memory card is not defective. • Do not use the same computer to convert the video to a comfortable listening level by the remote control or the volume buttons on manually (i.e., the Power Switch has been physically set to a computer. This player cannot play copy-protected files. The remote control does not work . • Make sure the Alarm Setting is set properly in Calendar Setup in Setup Menu...
User Manual
Page 23
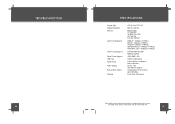
...;cations and manual are subject to change without prior notice. 907-DP85-0000-00R/907-DP85-2000-00R/907-DP85-4000-00R 4315 From 1900~ 2099 years. TROUBLESHOOTING 44 SPECIFICATIONS Display Type Display Resolution Memory Audio Format Support Video Format Support Photo Format Support USB Host Audio Output Power Supply Built-in lithium battery Calendar 8″ Full-Color TFT LCD 800 (H) x 480 (V) MS Card Slot CF Card Slot SD/MMC Card Slot xD Card Slot Full-size USB port...
...;cations and manual are subject to change without prior notice. 907-DP85-0000-00R/907-DP85-2000-00R/907-DP85-4000-00R 4315 From 1900~ 2099 years. TROUBLESHOOTING 44 SPECIFICATIONS Display Type Display Resolution Memory Audio Format Support Video Format Support Photo Format Support USB Host Audio Output Power Supply Built-in lithium battery Calendar 8″ Full-Color TFT LCD 800 (H) x 480 (V) MS Card Slot CF Card Slot SD/MMC Card Slot xD Card Slot Full-size USB port...


