Instruction Manual
Page 1
DP-562 5.6" Color TFT LCD Digital Photo Frame with Video and Music Playback Instruction Manual Please read this manual carefully before operation
DP-562 5.6" Color TFT LCD Digital Photo Frame with Video and Music Playback Instruction Manual Please read this manual carefully before operation

Instruction Manual
Page 8
... View...12 Front View...12 Right View...12 Remote Control 13 GETTING STARTED 14 Using the Remote Control 14 Installing a Memory Card 15 Powering your Digital Picture Frame 15 Turning Your Photo Frame On/Off 16 Menu Interface Navigation 16 Select Card Screen 17 Select Mode Screen 18 Overview of Icons 19...
... View...12 Front View...12 Right View...12 Remote Control 13 GETTING STARTED 14 Using the Remote Control 14 Installing a Memory Card 15 Powering your Digital Picture Frame 15 Turning Your Photo Frame On/Off 16 Menu Interface Navigation 16 Select Card Screen 17 Select Mode Screen 18 Overview of Icons 19...
Instruction Manual
Page 10
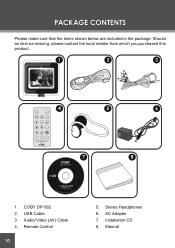
COBY DP-562 2. PACKAGE CONTENTS Please make sure that the items shown below are included in the package. USB Cable 3. Audio/Video (AV) Cable 4. Stereo Headphones 6. AC Adapter 7. Manual Installation CD 8. Should an item be missing, please contact the local retailer from which you purchased this product. 1 2 3 MENU MUTE ZOOM ENTER SETUP VOL- VOL+ ANGLE DIGITAL PHOTO FRAME DP562 4 7 5 8 6 1. Remote Control 10 5.
COBY DP-562 2. PACKAGE CONTENTS Please make sure that the items shown below are included in the package. USB Cable 3. Audio/Video (AV) Cable 4. Stereo Headphones 6. AC Adapter 7. Manual Installation CD 8. Should an item be missing, please contact the local retailer from which you purchased this product. 1 2 3 MENU MUTE ZOOM ENTER SETUP VOL- VOL+ ANGLE DIGITAL PHOTO FRAME DP562 4 7 5 8 6 1. Remote Control 10 5.

Instruction Manual
Page 15
... (CF) • Secure Digital cards (SD) • MultiMedia Card (MMC) • xD-Picture card (xD) Simply insert the memory card of your choice into its corresponding card slot located on the label as this may result in the proper direction. Getting photos and files onto your picture frame for viewing couldn't be...Do not connect the power plug to orient the card in the risk of the adapter into an AC 100-240V wall outlet. Powering your photo frame's Power In Jack and plug the other than that which is indicated here or on the left panel of the type specified here. Take ...
... (CF) • Secure Digital cards (SD) • MultiMedia Card (MMC) • xD-Picture card (xD) Simply insert the memory card of your choice into its corresponding card slot located on the label as this may result in the proper direction. Getting photos and files onto your picture frame for viewing couldn't be...Do not connect the power plug to orient the card in the risk of the adapter into an AC 100-240V wall outlet. Powering your photo frame's Power In Jack and plug the other than that which is indicated here or on the left panel of the type specified here. Take ...
Instruction Manual
Page 16
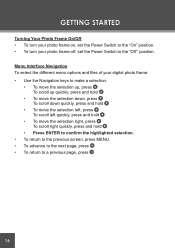
..., set the Power Switch to a previous page, press 16 GETTING STARTED Turning Your Photo Frame On/Off • To turn your photo frame on, set the Power Switch to the "On" position. • To turn your digital photo frame: • Use the Navigation keys to make a selection. • To move the selection up, press To scroll up...
..., set the Power Switch to a previous page, press 16 GETTING STARTED Turning Your Photo Frame On/Off • To turn your photo frame on, set the Power Switch to the "On" position. • To turn your digital photo frame: • Use the Navigation keys to make a selection. • To move the selection up, press To scroll up...

Instruction Manual
Page 23
... and WMA audio files. 23 The Music List displays the filenames of Pages 4. Music List Upon entering Music Mode, your digital audio files, select Music Mode from the "Select Mode" screen and press ENTER. "Playback" icon indicates the file that is being played 2. Track ...of all available audio files. • Use the navigation keys to select an audio file and press ENTER to start playback. 1. Your photo frame can play your photo frame will display supported audio files, only. Filename The Music List will scan the memory card for available audio files and display the "Music...
... and WMA audio files. 23 The Music List displays the filenames of Pages 4. Music List Upon entering Music Mode, your digital audio files, select Music Mode from the "Select Mode" screen and press ENTER. "Playback" icon indicates the file that is being played 2. Track ...of all available audio files. • Use the navigation keys to select an audio file and press ENTER to start playback. 1. Your photo frame can play your photo frame will display supported audio files, only. Filename The Music List will scan the memory card for available audio files and display the "Music...

Instruction Manual
Page 25
... navigation keys to select a video file and press ENTER to start play digital AVI and MP4 video files from the "Select Mode" screen and press ENTER. VIDEO MODE To play your photo frame will display supported Video files, only. back. 1. Filename 2. Your photo frame can play - Selected file (highlight bar) 3. File size The Video List...
... navigation keys to select a video file and press ENTER to start play digital AVI and MP4 video files from the "Select Mode" screen and press ENTER. VIDEO MODE To play your photo frame will display supported Video files, only. back. 1. Filename 2. Your photo frame can play - Selected file (highlight bar) 3. File size The Video List...
Instruction Manual
Page 27
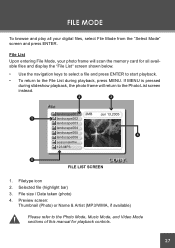
...Mode, your photo frame will return to the Photo Mode, Music Mode, and Video Mode sections of this manual for playback controls. 27 Selected file (highlight bar) 3. File size / Date taken (photo) 4. Filetype icon 2. If MENU is pressed during playback, press MENU. FILE LIST SCREEN 1. Preview screen: Thumbnail (Photo) or Name ... keys to select a file and press ENTER to start playback. • To return to the File List during slideshow playback, the photo frame will scan the memory card for all your digital files, select File Mode from the "Select Mode" screen and press ENTER.
...Mode, your photo frame will return to the Photo Mode, Music Mode, and Video Mode sections of this manual for playback controls. 27 Selected file (highlight bar) 3. File size / Date taken (photo) 4. Filetype icon 2. If MENU is pressed during playback, press MENU. FILE LIST SCREEN 1. Preview screen: Thumbnail (Photo) or Name ... keys to select a file and press ENTER to start playback. • To return to the File List during slideshow playback, the photo frame will scan the memory card for all your digital files, select File Mode from the "Select Mode" screen and press ENTER.
Instruction Manual
Page 28
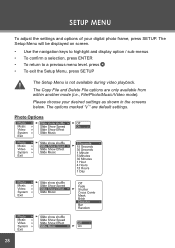
.... The Copy File and Delete File options are default settings. The options marked ' " are only available from within another mode (i.e., File/Photo/Music/Video mode). Please choose your digital photo frame, press SETUP. Photo Options 28 SETUP MENU To adjust the settings and options of your desired settings as shown in the screens below. press...
.... The Copy File and Delete File options are default settings. The options marked ' " are only available from within another mode (i.e., File/Photo/Music/Video mode). Please choose your digital photo frame, press SETUP. Photo Options 28 SETUP MENU To adjust the settings and options of your desired settings as shown in the screens below. press...
Instruction Manual
Page 36
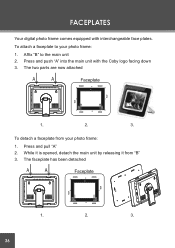
Affix "B" to your photo frame: 1. Press and pull "A" 2. The faceplate has been detached 36 FACEPLATES Your digital photo frame comes equipped with the Coby logo facing down 3. Press and push "A" into the main unit with interchangeable face plates. While it is opened, detach the main unit by releasing it from your photo frame: 1. To attach a faceplate to the main unit 2. The two parts are now attached To detach a faceplate from "B" 3.
Affix "B" to your photo frame: 1. Press and pull "A" 2. The faceplate has been detached 36 FACEPLATES Your digital photo frame comes equipped with the Coby logo facing down 3. Press and push "A" into the main unit with interchangeable face plates. While it is opened, detach the main unit by releasing it from your photo frame: 1. To attach a faceplate to the main unit 2. The two parts are now attached To detach a faceplate from "B" 3.


