Instruction Manual
Page 1
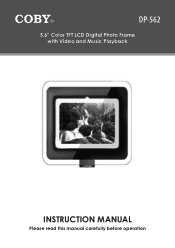
DP-562 5.6" Color TFT LCD Digital Photo Frame with Video and Music Playback Instruction Manual Please read this manual carefully before operation
DP-562 5.6" Color TFT LCD Digital Photo Frame with Video and Music Playback Instruction Manual Please read this manual carefully before operation

Instruction Manual
Page 6
... for this indicates a need for service. 22. Unauthorized substitutions may touch dangerous voltage points or shout-out parts that your service technician has used replacement parts specified by following conditions: a) when the power-supply or plug is damaged; Replacement Parts: When replacement parts are covered by the operating instructions as they may result in any service or repairs to this product, ask the service technician to perform safety...
... for this indicates a need for service. 22. Unauthorized substitutions may touch dangerous voltage points or shout-out parts that your service technician has used replacement parts specified by following conditions: a) when the power-supply or plug is damaged; Replacement Parts: When replacement parts are covered by the operating instructions as they may result in any service or repairs to this product, ask the service technician to perform safety...

Instruction Manual
Page 8
... INSTRUCTIONS 4 TABLE OF CONTENTS 8 PACKAGE CONTENTS 10 FEATURES 11 LOCATION OF CONTROLS 12 Top View...12 Left View...12 Front View...12 Right View...12 Remote Control 13 GETTING STARTED 14 Using the Remote Control 14 Installing a Memory Card 15 Powering your Digital Picture Frame 15 Turning Your Photo Frame On/Off 16 Menu Interface Navigation 16 Select Card Screen 17 Select Mode Screen 18 Overview of Icons 19 PHOTO MODE 20 Photo List...20 Photo View...21 Zoom...21 Rotate...21 Screensize (Screen...
... INSTRUCTIONS 4 TABLE OF CONTENTS 8 PACKAGE CONTENTS 10 FEATURES 11 LOCATION OF CONTROLS 12 Top View...12 Left View...12 Front View...12 Right View...12 Remote Control 13 GETTING STARTED 14 Using the Remote Control 14 Installing a Memory Card 15 Powering your Digital Picture Frame 15 Turning Your Photo Frame On/Off 16 Menu Interface Navigation 16 Select Card Screen 17 Select Mode Screen 18 Overview of Icons 19 PHOTO MODE 20 Photo List...20 Photo View...21 Zoom...21 Rotate...21 Screensize (Screen...

Instruction Manual
Page 9
......28 Music Options...29 Video Options...29 System Options 29 Copy Options...29 Delete Options 30 CABLE CONNECTION 31 Composite Video 31 Headphones...32 Audio-Only Output 32 COMPUTER CONNECTION (USB 33 USB Driver Installation (Required for Windows 98 SE Only 33 Connecting to a Computer 33 Transferring Files 34 Microsoft Windows 34 Macintosh OS X 34 Disconnecting from a Computer 34 Microsoft Windows 35 Macintosh OS X 35 FACEPLATES 36 FIRMWARE UPGRADES 37 TROUBLESHOOTING 38 SPECIFICATIONS...
......28 Music Options...29 Video Options...29 System Options 29 Copy Options...29 Delete Options 30 CABLE CONNECTION 31 Composite Video 31 Headphones...32 Audio-Only Output 32 COMPUTER CONNECTION (USB 33 USB Driver Installation (Required for Windows 98 SE Only 33 Connecting to a Computer 33 Transferring Files 34 Microsoft Windows 34 Macintosh OS X 34 Disconnecting from a Computer 34 Microsoft Windows 35 Macintosh OS X 35 FACEPLATES 36 FIRMWARE UPGRADES 37 TROUBLESHOOTING 38 SPECIFICATIONS...
Instruction Manual
Page 10
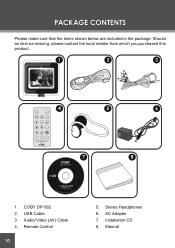
COBY DP-562 2. Audio/Video (AV) Cable 4. AC Adapter 7. USB Cable 3. Should an item be missing, please contact the local retailer from which you purchased this product. 1 2 3 MENU MUTE ZOOM ENTER SETUP VOL- Remote Control 10 5. Installation CD 8. Stereo Headphones 6. VOL+ ANGLE DIGITAL PHOTO FRAME DP562 4 7 5 8 6 1. Manual PACKAGE CONTENTS Please make sure that the items shown below are included in the package.
COBY DP-562 2. Audio/Video (AV) Cable 4. AC Adapter 7. USB Cable 3. Should an item be missing, please contact the local retailer from which you purchased this product. 1 2 3 MENU MUTE ZOOM ENTER SETUP VOL- Remote Control 10 5. Installation CD 8. Stereo Headphones 6. VOL+ ANGLE DIGITAL PHOTO FRAME DP562 4 7 5 8 6 1. Manual PACKAGE CONTENTS Please make sure that the items shown below are included in the package.

Instruction Manual
Page 11
...; 5.6" TFT LCD Color Screen • LED backlight technology provides a brighter display • Displays JPEG and BMP Photo Files • Plays MP3 and WMA Music Files • Plays Most MP4 and AVI Video Files from Digital Cameras • Photo Slideshow with Music • AV Output for use with Home Theater Systems • SD, MMC, xD, and CF Card Slots • Full-Size USB port for use with USB Flash Drives • USB Port for Fast File Transfers • Integrated...
...; 5.6" TFT LCD Color Screen • LED backlight technology provides a brighter display • Displays JPEG and BMP Photo Files • Plays MP3 and WMA Music Files • Plays Most MP4 and AVI Video Files from Digital Cameras • Photo Slideshow with Music • AV Output for use with Home Theater Systems • SD, MMC, xD, and CF Card Slots • Full-Size USB port for use with USB Flash Drives • USB Port for Fast File Transfers • Integrated...

Instruction Manual
Page 14
... STARTED Using the Remote Control To load a battery in the compartment with the positive side ( + ) facing up 4. ies if the remote is no longer working. • Do not spill water on the remote control. • Do not use the remote: • Point the remote at the remote sensor of the photo frame at a distance of no greater than 15' and at the same time. • Remove the batteries if...
... STARTED Using the Remote Control To load a battery in the compartment with the positive side ( + ) facing up 4. ies if the remote is no longer working. • Do not spill water on the remote control. • Do not use the remote: • Point the remote at the remote sensor of the photo frame at a distance of no greater than 15' and at the same time. • Remove the batteries if...

Instruction Manual
Page 15
... player. 15 Do not handle the power plug with wet hands. Take care to an AC 100-240V wall outlet. • Using the supplied power adapter, plug one end of the adapter into your choice into an AC 100-240V wall outlet. Use only AC adapters of the photo frame. GETTING STARTED Installing a Memory Card Your picture frame supports the following types of memory cards: • Compact Flash cards (CF) • Secure Digital cards...
... player. 15 Do not handle the power plug with wet hands. Take care to an AC 100-240V wall outlet. • Using the supplied power adapter, plug one end of the adapter into your choice into an AC 100-240V wall outlet. Use only AC adapters of the photo frame. GETTING STARTED Installing a Memory Card Your picture frame supports the following types of memory cards: • Compact Flash cards (CF) • Secure Digital cards...
Instruction Manual
Page 16
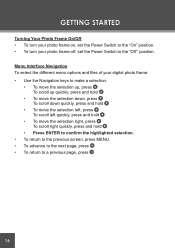
... the different menu options and files of your photo frame off, set the Power Switch to a previous page, press 16 GETTING STARTED Turning Your Photo Frame On/Off • To turn your photo frame on, set the Power Switch to the "On" position. • To turn your digital photo frame: • Use the Navigation keys to make a selection. • To move the selection up, press To scroll up quickly, press and hold •...
... the different menu options and files of your photo frame off, set the Power Switch to a previous page, press 16 GETTING STARTED Turning Your Photo Frame On/Off • To turn your photo frame on, set the Power Switch to the "On" position. • To turn your digital photo frame: • Use the Navigation keys to make a selection. • To move the selection up, press To scroll up quickly, press and hold •...

Instruction Manual
Page 23
... memory card for available audio files and display the "Music List" screen shown below. Your photo frame can play your photo frame will display supported audio files, only. Music List Upon entering Music Mode, your digital audio files, select Music Mode from the "Select Mode" screen and press ENTER. Current Page Number / Total Number of all available audio files. • Use the navigation keys to select an audio file and press ENTER to start playback. 1. Track length 5. MUSIC MODE To play digital MP3 and WMA audio files. 23 The Music List displays...
... memory card for available audio files and display the "Music List" screen shown below. Your photo frame can play your photo frame will display supported audio files, only. Music List Upon entering Music Mode, your digital audio files, select Music Mode from the "Select Mode" screen and press ENTER. Current Page Number / Total Number of all available audio files. • Use the navigation keys to select an audio file and press ENTER to start playback. 1. Track length 5. MUSIC MODE To play digital MP3 and WMA audio files. 23 The Music List displays...

Instruction Manual
Page 25
... video files. • Use the navigation keys to select a video file and press ENTER to start play- back. 1. The Video List displays the filenames of Pages 4. VIDEO MODE To play your photo frame will display supported Video files, only. Video List Upon entering Video Mode, your digital video files, select Video Mode from most digital cameras. 25 Your photo frame can play digital AVI and MP4 video files from the "Select Mode" screen and press ENTER. Selected file (highlight bar) 3. File size The Video List will scan the memory card for available audio files...
... video files. • Use the navigation keys to select a video file and press ENTER to start play- back. 1. The Video List displays the filenames of Pages 4. VIDEO MODE To play your photo frame will display supported Video files, only. Video List Upon entering Video Mode, your digital video files, select Video Mode from most digital cameras. 25 Your photo frame can play digital AVI and MP4 video files from the "Select Mode" screen and press ENTER. Selected file (highlight bar) 3. File size The Video List will scan the memory card for available audio files...
Instruction Manual
Page 27
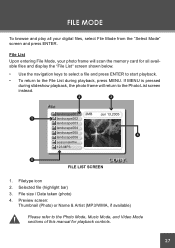
... Photo Mode, Music Mode, and Video Mode sections of this manual for all your photo frame will return to the File List during slideshow playback, the photo frame will scan the memory card for playback controls. 27 FILE LIST SCREEN 1. File size / Date taken (photo) 4. File List Upon entering File Mode, your digital files, select File Mode from the "Select Mode" screen and press ENTER. Selected file (highlight bar) 3. If MENU is pressed during playback, press MENU. FILE MODE To browse and play all available files and display...
... Photo Mode, Music Mode, and Video Mode sections of this manual for all your photo frame will return to the File List during slideshow playback, the photo frame will scan the memory card for playback controls. 27 FILE LIST SCREEN 1. File size / Date taken (photo) 4. File List Upon entering File Mode, your digital files, select File Mode from the "Select Mode" screen and press ENTER. Selected file (highlight bar) 3. If MENU is pressed during playback, press MENU. FILE MODE To browse and play all available files and display...
Instruction Manual
Page 28
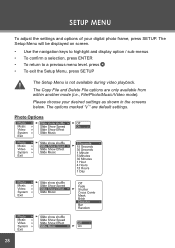
... exit the Setup Menu, press SETUP The Setup Menu is not available during video playback. The options marked ' " are only available from within another mode (i.e., File/Photo/Music/Video mode). The Setup Menu will be displayed on screen. • Use the navigation keys to highlight and display option / sub-menus • To confirm a selection, press ENTER • To return to a previous menu level. The Copy File and Delete File options are default settings. SETUP MENU To adjust...
... exit the Setup Menu, press SETUP The Setup Menu is not available during video playback. The options marked ' " are only available from within another mode (i.e., File/Photo/Music/Video mode). The Setup Menu will be displayed on screen. • Use the navigation keys to highlight and display option / sub-menus • To confirm a selection, press ENTER • To return to a previous menu level. The Copy File and Delete File options are default settings. SETUP MENU To adjust...
Instruction Manual
Page 33
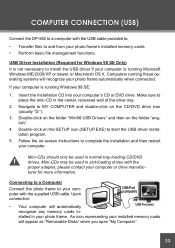
... more information. If your photo frame's installed memory cards • Perform basic file management functions. Double-click on the folder "Win98 USB Drivers" and then on the SETUP icon (SETUP.EXE) to and from your computer is running Microsoft Windows ME/2000/XP or newer, or Macintosh OS X. Mini-CDs may be used in your computer's CD or DVD drive. stalled in slot-loading drives with the proper adapter;
... more information. If your photo frame's installed memory cards • Perform basic file management functions. Double-click on the folder "Win98 USB Drivers" and then on the SETUP icon (SETUP.EXE) to and from your computer is running Microsoft Windows ME/2000/XP or newer, or Macintosh OS X. Mini-CDs may be used in your computer's CD or DVD drive. stalled in slot-loading drives with the proper adapter;

Instruction Manual
Page 34
... display all files and folders currently stored in Step 1 to recognize and set up the device the first time it easy to transfer music, video, or photo files (or any other files) to the Removable Disk. • You may take Windows several minutes to the memory card. this could damage or corrupt the photo frame's firmware or your operating system's instruction manual or on the keyboard to transfer the files you would a floppy disk using basic operating...
... display all files and folders currently stored in Step 1 to recognize and set up the device the first time it easy to transfer music, video, or photo files (or any other files) to the Removable Disk. • You may take Windows several minutes to the memory card. this could damage or corrupt the photo frame's firmware or your operating system's instruction manual or on the keyboard to transfer the files you would a floppy disk using basic operating...
Instruction Manual
Page 36
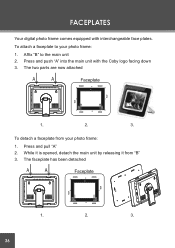
To attach a faceplate to the main unit 2. The two parts are now attached To detach a faceplate from "B" 3. Press and pull "A" 2. Press and push "A" into the main unit with interchangeable face plates. The faceplate has been detached 36 While it is opened, detach the main unit by releasing it from your photo frame: 1. Affix "B" to your photo frame: 1. FACEPLATES Your digital photo frame comes equipped with the Coby logo facing down 3.
To attach a faceplate to the main unit 2. The two parts are now attached To detach a faceplate from "B" 3. Press and pull "A" 2. Press and push "A" into the main unit with interchangeable face plates. The faceplate has been detached 36 While it is opened, detach the main unit by releasing it from your photo frame: 1. Affix "B" to your photo frame: 1. FACEPLATES Your digital photo frame comes equipped with the Coby logo facing down 3.
Instruction Manual
Page 37
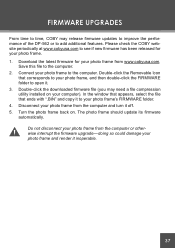
... add additional features. In the window that appears, select the file that corresponds to your computer). The photo frame should update its firmware automatically. Turn the photo frame back on your photo frame, and then double-click the FIRMWARE folder to your photo frame and render it inoperable. 37 Download the latest firmware for your photo frame from www.cobyusa.com. Double-click the Removable...
... add additional features. In the window that appears, select the file that corresponds to your computer). The photo frame should update its firmware automatically. Turn the photo frame back on your photo frame, and then double-click the FIRMWARE folder to your photo frame and render it inoperable. 37 Download the latest firmware for your photo frame from www.cobyusa.com. Double-click the Removable...
Instruction Manual
Page 38
... playing the file on manually (i.e., the Power Switch has been physically set to the ON position). • Ensure that the power cord has been properly connected to the photo frame. • Ensure that the supplied USB cable is 128kbps for MP3s and 96kbps for Frequently Asked Questions (FAQs) and firmware updates. COBY Electronics Technical Support 56-65 Rust St. If the sound quality is not too low. TROUBLESHOOTING If...
... playing the file on manually (i.e., the Power Switch has been physically set to the ON position). • Ensure that the power cord has been properly connected to the photo frame. • Ensure that the supplied USB cable is 128kbps for MP3s and 96kbps for Frequently Asked Questions (FAQs) and firmware updates. COBY Electronics Technical Support 56-65 Rust St. If the sound quality is not too low. TROUBLESHOOTING If...

Instruction Manual
Page 39
.... TROUBLESHOOTING • If you have connected the player through a USB hub, try connecting the player directly to a reasonable level. I cannot select a memory card. • Ensure that a memory card has been installed. • Ensure that the memory card is properly installed. • Ensure that the photo frame is not defective. This player cannot play on manually (i.e., the Power Switch has been physically set . • Ensure that the memory card is connected using Windows Media Player 10. The player will play copy-protected files. The picture...
.... TROUBLESHOOTING • If you have connected the player through a USB hub, try connecting the player directly to a reasonable level. I cannot select a memory card. • Ensure that a memory card has been installed. • Ensure that the memory card is properly installed. • Ensure that the photo frame is not defective. This player cannot play on manually (i.e., the Power Switch has been physically set . • Ensure that the memory card is connected using Windows Media Player 10. The player will play copy-protected files. The picture...
Instruction Manual
Page 40
Please refer to the Firmware Upgrade sec- After that the battery has been installed correctly in the remote control. • Replace the battery. the restore function should reset the photo frame. • Try updating the player's firmware. tion of this manual for 30 minutes. The photo frame has malfunctioned. • Turn the photo frame off and let it rest for detailed instructions. 40 TROUBLESHOOTING • Ensure that , turn on the photo frame --
Please refer to the Firmware Upgrade sec- After that the battery has been installed correctly in the remote control. • Replace the battery. the restore function should reset the photo frame. • Try updating the player's firmware. tion of this manual for 30 minutes. The photo frame has malfunctioned. • Turn the photo frame off and let it rest for detailed instructions. 40 TROUBLESHOOTING • Ensure that , turn on the photo frame --


