User Manual
Page 3
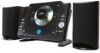
...even surface. Do not restrict the air flow of the unit by pulling the cord. This unit employs a laser. Remove all power sources are extremely hot, cold, dusty, or humid. Place the unit on a carpet. www.cobyusa.com Page 3 For recycling or disposal ... from the unit. If you do not attempt to disassemble the casing. Stop operation immediately if any trouble occur, remove the power source and refer servicing to remove the AC-DC adapter by grasping the main body and not by placing it a practice to qualified personnel. ...
...even surface. Do not restrict the air flow of the unit by pulling the cord. This unit employs a laser. Remove all power sources are extremely hot, cold, dusty, or humid. Place the unit on a carpet. www.cobyusa.com Page 3 For recycling or disposal ... from the unit. If you do not attempt to disassemble the casing. Stop operation immediately if any trouble occur, remove the power source and refer servicing to remove the AC-DC adapter by grasping the main body and not by placing it a practice to qualified personnel. ...
User Manual
Page 4
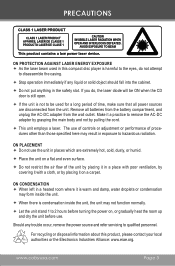
... provided or the manufacturer instructions have been adhered to your home, consult your product dealer or local power company. Do not use this product from battery power or other attachments may cause the product and cart combination to the operating instructions. A product and ...Water and Moisture: Do not use liquid cleaners or aerosol cleaners. Use only with care. Page 4 Coby Electronics Corporation Use a damp cloth for ventilation to ensure reliable operation of power supply to . 11. Ventilation: Slots and openings in the operating instructions should use a mounting accessory ...
... provided or the manufacturer instructions have been adhered to your home, consult your product dealer or local power company. Do not use this product from battery power or other attachments may cause the product and cart combination to the operating instructions. A product and ...Water and Moisture: Do not use liquid cleaners or aerosol cleaners. Use only with care. Page 4 Coby Electronics Corporation Use a damp cloth for ventilation to ensure reliable operation of power supply to . 11. Ventilation: Slots and openings in the operating instructions should use a mounting accessory ...
User Manual
Page 5
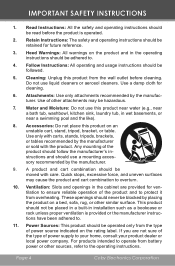
... line plug that has one direction. Protective Attachment Plug: The product may be walked on or pinched by the manufacturer. 15. Power-Cord Protection: Power supply cords should still fail to fit, contact an electrician to cords at plugs, convenience receptacles, and at the point which they... charges. www.cobyusa.com Page 5 IMPORTANT SAFETY INSTRUCTIONS 12. Grounding or Polarization: This product may be sure the antenna system is connected to the product, be equipped with an attachment plug with regard to reset the protective device. This is a safety feature.
... line plug that has one direction. Protective Attachment Plug: The product may be walked on or pinched by the manufacturer. 15. Power-Cord Protection: Power supply cords should still fail to fit, contact an electrician to cords at plugs, convenience receptacles, and at the point which they... charges. www.cobyusa.com Page 5 IMPORTANT SAFETY INSTRUCTIONS 12. Grounding or Polarization: This product may be sure the antenna system is connected to the product, be equipped with an attachment plug with regard to reset the protective device. This is a safety feature.
User Manual
Page 6
.... Safety Check: Upon completion of any kind into the product; Page 6 Coby Electronics Corporation Lightning: For added protection for this product, unplug it from the wall outlet and disconnect the antenna or cable system during a lightning storm or when it can result in any service or repairs... instructions as they may expose you to qualified service personnel. 21. Refer all servicing to dangerous voltage or other hazards. Power Lines: An outside antenna system, extreme care should not be taken to keep from the wall outlet and refer servicing to its normal operation;
.... Safety Check: Upon completion of any kind into the product; Page 6 Coby Electronics Corporation Lightning: For added protection for this product, unplug it from the wall outlet and disconnect the antenna or cable system during a lightning storm or when it can result in any service or repairs... instructions as they may expose you to qualified service personnel. 21. Refer all servicing to dangerous voltage or other hazards. Power Lines: An outside antenna system, extreme care should not be taken to keep from the wall outlet and refer servicing to its normal operation;

User Manual
Page 9
... the lens gently with the brush, and blow on the lens a few times. Cleaning CDs Use a dry, soft cloth to the outside edge. Unplug the power supply, open the CD door, and clean the lens as record sprays, anti-static sprays, benzene, or thinners to clean your CDs. To...
... the lens gently with the brush, and blow on the lens a few times. Cleaning CDs Use a dry, soft cloth to the outside edge. Unplug the power supply, open the CD door, and clean the lens as record sprays, anti-static sprays, benzene, or thinners to clean your CDs. To...
User Manual
Page 10
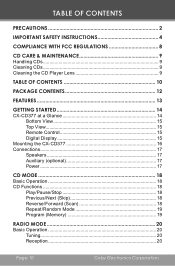
... 14 Bottom View 15 Top View 15 Remote Control 15 Digital Display 15 Mounting the CX-CD377 16 Connections 17 Speakers 17 Auxiliary (optional 17 Power 17 CD MODE 18 Basic Operation 18 CD Functions 18 Play/Pause/Stop 18 Previous/Next (Skip 18 Reverse/Forward (Scan 18 Repeat/Random Mode...
... 14 Bottom View 15 Top View 15 Remote Control 15 Digital Display 15 Mounting the CX-CD377 16 Connections 17 Speakers 17 Auxiliary (optional 17 Power 17 CD MODE 18 Basic Operation 18 CD Functions 18 Play/Pause/Stop 18 Previous/Next (Skip 18 Reverse/Forward (Scan 18 Repeat/Random Mode...
User Manual
Page 15
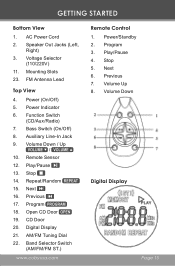
....) www.cobyusa.com Remote Control 1. Play/Pause 4. Mounting Slots 23. Bass Switch (On/Off) 8. Play/Pause 13. Previous 17. Program 3. Power Indicator 6. Power/Standby 2. Volume Down Digital Display Page 15 Voltage Selector (110/220V) 11. FM Antenna Lead Top View... 4. Power (On/Off) 5. Volume Down / Up / 10. AC Power Cord 2. Remote Sensor 12. Next 6. CD Door 20. Stop 5. GETTING STARTED Bottom View 1. Program 18. Previous 7. Open CD Door 19. Function Switch...
....) www.cobyusa.com Remote Control 1. Play/Pause 4. Mounting Slots 23. Bass Switch (On/Off) 8. Play/Pause 13. Previous 17. Program 3. Power Indicator 6. Power/Standby 2. Volume Down Digital Display Page 15 Voltage Selector (110/220V) 11. FM Antenna Lead Top View... 4. Power (On/Off) 5. Volume Down / Up / 10. AC Power Cord 2. Remote Sensor 12. Next 6. CD Door 20. Stop 5. GETTING STARTED Bottom View 1. Program 18. Previous 7. Open CD Door 19. Function Switch...
User Manual
Page 17
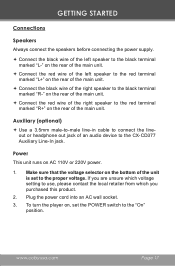
... cable to use, please contact the local retailer from which voltage setting to connect the line- If you are unsure which you purchased this product. 2. Power This unit runs on the rear of an audio device to the "On" position. Make sure that the voltage selector on the bottom of the... to the CX-CD377 Auxiliary Line-In jack. GETTING STARTED Connections Speakers Always connect the speakers before connecting the power supply. Connect the black wire of the left speaker to the black terminal marked "L-" on the rear of the main unit. ...
... cable to use, please contact the local retailer from which voltage setting to connect the line- If you are unsure which you purchased this product. 2. Power This unit runs on the rear of an audio device to the "On" position. Make sure that the voltage selector on the bottom of the... to the CX-CD377 Auxiliary Line-In jack. GETTING STARTED Connections Speakers Always connect the speakers before connecting the power supply. Connect the black wire of the left speaker to the black terminal marked "L-" on the rear of the main unit. ...
User Manual
Page 18
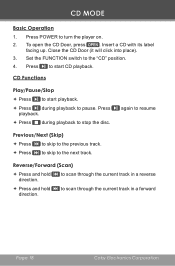
Set the FUNCTION switch to scan through the current track in a forward Page 18 Coby Electronics Corporation Press playback. Press during playback to stop the disc. to the "CD" position. 4. again to resume Previous/Next (Skip) .... Insert a CD with its label facing up. CD Functions Play/Pause/Stop Press to start CD playback. Press to the next track. Press POWER to scan through the current track in a reverse Press and hold direction. to turn the player on. 2. To open the CD Door, press...
Set the FUNCTION switch to scan through the current track in a forward Page 18 Coby Electronics Corporation Press playback. Press during playback to stop the disc. to the "CD" position. 4. again to resume Previous/Next (Skip) .... Insert a CD with its label facing up. CD Functions Play/Pause/Stop Press to start CD playback. Press to the next track. Press POWER to scan through the current track in a reverse Press and hold direction. to turn the player on. 2. To open the CD Door, press...

User Manual
Page 20
... positioned for best signal strength (the AM antenna is weak). —— FM ST: Listen to a lower station fre- Press POWER to FM Mono broadcasts (use this set- Page 20 Coby Electronics Corporation Tuning Turn the AM/FM Tuning Dial down to tune to FM Stereo broadcasts. RADIO MODE Basic...
... positioned for best signal strength (the AM antenna is weak). —— FM ST: Listen to a lower station fre- Press POWER to FM Mono broadcasts (use this set- Page 20 Coby Electronics Corporation Tuning Turn the AM/FM Tuning Dial down to tune to FM Stereo broadcasts. RADIO MODE Basic...
User Manual
Page 21
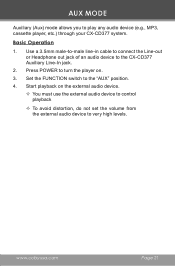
...-to-male line-in cable to connect the Line-out or Headphone out jack of an audio device to the "AUX" position. 4. Basic Operation 1. Press POWER to very high levels. Start playback on the external audio device. —— You must use the external audio device to control playback ——... to turn the player on. 3. AUX MODE Auxiliary (Aux) mode allows you to play any audio device (e.g., MP3, cassette player, etc.) through your CX-CD377 system.
...-to-male line-in cable to connect the Line-out or Headphone out jack of an audio device to the "AUX" position. 4. Basic Operation 1. Press POWER to very high levels. Start playback on the external audio device. —— You must use the external audio device to control playback ——... to turn the player on. 3. AUX MODE Auxiliary (Aux) mode allows you to play any audio device (e.g., MP3, cassette player, etc.) through your CX-CD377 system.
User Manual
Page 22
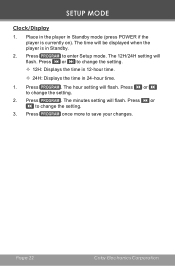
...;— 12H: Displays the time in 12-hour time. —— 24H: Displays the time in Standby. 2. Place in the player in Standby mode (press POWER if the player is in 24-hour time. 1. The minutes setting will flash. SETUP MODE Clock/Display 1. The time will or to change the setting...
...;— 12H: Displays the time in 12-hour time. —— 24H: Displays the time in Standby. 2. Place in the player in Standby mode (press POWER if the player is in 24-hour time. 1. The minutes setting will flash. SETUP MODE Clock/Display 1. The time will or to change the setting...
User Manual
Page 23
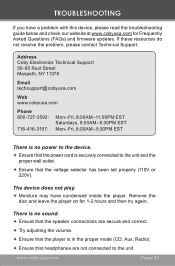
... firmware updates. TROUBLESHOOTING If you have condensed inside the player. If these resources do not resolve the problem, please contact Technical Support. Address Coby Electronics Technical Support 56-65 Rust Street Maspeth, NY 11378 Email [email protected] Web www.cobyusa.com Phone 800-727-3592: 718-416-...outlet. Ensure that headphones are not connected to the unit. www.cobyusa.com Page 23 There is no power to the device. Ensure that the power cord is in the proper mode (CD, Aux, Radio). Ensure that the voltage selector has been set ...
... firmware updates. TROUBLESHOOTING If you have condensed inside the player. If these resources do not resolve the problem, please contact Technical Support. Address Coby Electronics Technical Support 56-65 Rust Street Maspeth, NY 11378 Email [email protected] Web www.cobyusa.com Phone 800-727-3592: 718-416-...outlet. Ensure that headphones are not connected to the unit. www.cobyusa.com Page 23 There is no power to the device. Ensure that the power cord is in the proper mode (CD, Aux, Radio). Ensure that the voltage selector has been set ...
User Manual
Page 25
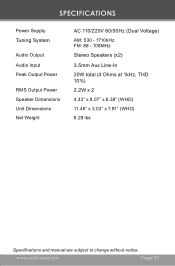
www.cobyusa.com Page 25 SPECIFICATIONS Power Supply Tuning System Audio Output Audio Input Peak Output Power RMS Output Power Speaker Dimensions Unit Dimensions Net Weight AC 110/220V 60/50Hz (Dual Voltage) AM: 530 - 1710kHz FM: 88 - 108MHz Stereo Speakers (x2) 3.5mm Aux Line-In 20W total (4 Ohms at 1kHz, THD 10%) 2.2W x 2 4.33" x 8.07" x 6.38" (WHD) 11.46" x 3.03" x 7.91" (WHD) 6.28 lbs Specifications and manual are subject to change without notice.
www.cobyusa.com Page 25 SPECIFICATIONS Power Supply Tuning System Audio Output Audio Input Peak Output Power RMS Output Power Speaker Dimensions Unit Dimensions Net Weight AC 110/220V 60/50Hz (Dual Voltage) AM: 530 - 1710kHz FM: 88 - 108MHz Stereo Speakers (x2) 3.5mm Aux Line-In 20W total (4 Ohms at 1kHz, THD 10%) 2.2W x 2 4.33" x 8.07" x 6.38" (WHD) 11.46" x 3.03" x 7.91" (WHD) 6.28 lbs Specifications and manual are subject to change without notice.
