

Administration Guide
Page 43
... IP address of the security appliance is the gateway address to your network to be the DHCP server or if you are satisfactory. Cisco SA500 Series Security Appliances Administration Guide 43 If you want another PC on your LAN. A WINS server is the equivalent of the ...resolve hostnames. Networking Configuring the LAN 2 Configuring the LAN For most applications, the default DHCP and TCP/IP settings of the security appliance are manually configuring the network settings of all of your PCs, disable DHCP and enter the appropriate settings. • Instead of using a DNS server,...
... IP address of the security appliance is the gateway address to your network to be the DHCP server or if you are satisfactory. Cisco SA500 Series Security Appliances Administration Guide 43 If you want another PC on your LAN. A WINS server is the equivalent of the ...resolve hostnames. Networking Configuring the LAN 2 Configuring the LAN For most applications, the default DHCP and TCP/IP settings of the security appliance are manually configuring the network settings of all of your PCs, disable DHCP and enter the appropriate settings. • Instead of using a DNS server,...

Administration Guide
Page 99
... Settings window opens. For example, you can change the mode (g & b, g only, n only, ng) to add or edit other access points in the area. Cisco SA500 Series Security Appliances Administration Guide 99 All wireless devices within your settings. STEP 4 Click Apply to prevent auto-detection of regions. STEP 5 Repeat this...SSID with standard settings. It is preconfigured with a unique identifier. • Broadcast SSID: Check this case, users must know the SSID to set a manual channel for operation to resolve issues with interference from the drop-down list of the SSID.
... Settings window opens. For example, you can change the mode (g & b, g only, n only, ng) to add or edit other access points in the area. Cisco SA500 Series Security Appliances Administration Guide 99 All wireless devices within your settings. STEP 4 Click Apply to prevent auto-detection of regions. STEP 5 Repeat this...SSID with standard settings. It is preconfigured with a unique identifier. • Broadcast SSID: Check this case, users must know the SSID to set a manual channel for operation to resolve issues with interference from the drop-down list of the SSID.

Administration Guide
Page 132
... the signatures under Intrusion Prevention System, click Configure and Enable IPS Policies. button. • To select a policy for that signature. Cisco SA500 Series Security Appliances Administration Guide 132 Browse to save your computer. For more information, see Logs Facility and Severity, page 189. ...under a category, click the + button next to your settings. Click Reset to revert to the previous settings. • Manual Signature Updates: To manually update the latest signature file, click the Cisco.com link to obtain the file and download it to the category heading.
... the signatures under Intrusion Prevention System, click Configure and Enable IPS Policies. button. • To select a policy for that signature. Cisco SA500 Series Security Appliances Administration Guide 132 Browse to save your computer. For more information, see Logs Facility and Severity, page 189. ...under a category, click the + button next to your settings. Click Reset to revert to the previous settings. • Manual Signature Updates: To manually update the latest signature file, click the Cisco.com link to obtain the file and download it to the category heading.

Administration Guide
Page 148
..., see Configuring the IKE Policies for IPsec VPN, page 144. The policy comes into effect only if the primary policy fails. Cisco SA500 Series Security Appliances Administration Guide 148 Auto and Manual policies are configured as a backup policy. You can apply the IKE policy on this page to save your RADIUS server...
..., see Configuring the IKE Policies for IPsec VPN, page 144. The policy comes into effect only if the primary policy fails. Cisco SA500 Series Security Appliances Administration Guide 148 Auto and Manual policies are configured as a backup policy. You can apply the IKE policy on this page to save your RADIUS server...

Administration Guide
Page 149
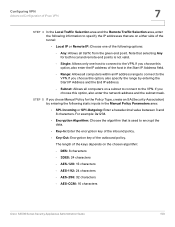
... (including the keys) for the VPN tunnel are manually input for the VPN tunnel are generated automatically. This option allows NetBIOS broadcasts to perform negotiations between the two VPN endpoints. To select all entries, ... the first column of the tunnel: Dedicated WAN or Optional WAN. • Remote End Point: Choose to the backup link whenever the primary link fails. Cisco SA500 Series Security Appliances Administration Guide 149 To delete an entry, check the box and then click Delete. Configuring VPN Advanced Configuration of the following...
... (including the keys) for the VPN tunnel are manually input for the VPN tunnel are generated automatically. This option allows NetBIOS broadcasts to perform negotiations between the two VPN endpoints. To select all entries, ... the first column of the tunnel: Dedicated WAN or Optional WAN. • Remote End Point: Choose to the backup link whenever the primary link fails. Cisco SA500 Series Security Appliances Administration Guide 149 To delete an entry, check the box and then click Delete. Configuring VPN Advanced Configuration of the following...
Administration Guide
Page 150
... to connect to the VPN. AES-256: 32 characters - STEP 5 If you choose this option, also enter the IP address of the host in the Manual Policy Parameters area: • SPI-Incoming or SPI-Outgoing: Enter a hexadecimal value between 3 and 8 characters. DES: 8 characters - 3DES: 24 characters -...the outbound policy. If you choose this option, also enter the network address and the subnet mask. AES-CCM: 16 characters Cisco SA500 Series Security Appliances Administration Guide 150 If you choose this option, also specify the range by entering the following static inputs in...
... to connect to the VPN. AES-256: 32 characters - STEP 5 If you choose this option, also enter the IP address of the host in the Manual Policy Parameters area: • SPI-Incoming or SPI-Outgoing: Enter a hexadecimal value between 3 and 8 characters. DES: 8 characters - 3DES: 24 characters -...the outbound policy. If you choose this option, also enter the network address and the subnet mask. AES-CCM: 16 characters Cisco SA500 Series Security Appliances Administration Guide 150 If you choose this option, also specify the range by entering the following static inputs in...

Administration Guide
Page 153
... defined by the Dynamic IP Range and is used by default. Config. NOTE If you are devices behind the security appliance that you want to manually specify a starting and ending range for the IPsec Remote Access VPN, page 142. • If you create the policy. STEP 2 Enter a ...Start IP range and End IP range for example, to connect to configure Dynamic DNS. Cisco SA500 Series Security Appliances Administration Guide 153 The Passthrough window opens. However, you can use the Dynamic IP Range page to change the dynamic IP...
... defined by the Dynamic IP Range and is used by default. Config. NOTE If you are devices behind the security appliance that you want to manually specify a starting and ending range for the IPsec Remote Access VPN, page 142. • If you create the policy. STEP 2 Enter a ...Start IP range and End IP range for example, to connect to configure Dynamic DNS. Cisco SA500 Series Security Appliances Administration Guide 153 The Passthrough window opens. However, you can use the Dynamic IP Range page to change the dynamic IP...
Administration Guide
Page 178
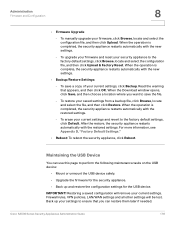
...device. For more information, see Appendix D, "Factory Default Settings." • Reboot: To reboot the security appliance, click Reboot. To manually upgrade your settings to ensure that appears, and then click OK. After the restore, the security appliance restarts automatically with the new settings...firmware and reset your saved settings from a backup file, click Browse, locate and select the file, and then click Restore. Cisco SA500 Series Security Appliances Administration Guide 178 To restore your security appliance to save a copy of your current settings, click Backup. ...
...device. For more information, see Appendix D, "Factory Default Settings." • Reboot: To reboot the security appliance, click Reboot. To manually upgrade your settings to ensure that appears, and then click OK. After the restore, the security appliance restarts automatically with the new settings...firmware and reset your saved settings from a backup file, click Browse, locate and select the file, and then click Restore. Cisco SA500 Series Security Appliances Administration Guide 178 To restore your security appliance to save a copy of your current settings, click Backup. ...

Administration Guide
Page 210
... for the poll interval. Displays the IP address of the IKE or VPN policy. However, you can be either Not Connected or IPsec SA Established. Cisco SA500 Series Security Appliances Administration Guide 210 To modify the poll interval, click the Stop button and then click Start to start or stop a connection... SA. You can use the Connect/ Disconnect button to terminate an active SA (connection). Click Connect to establish an inactive SA (connection) or Drop to manually connect or disconnect the VPN tunnel.
... for the poll interval. Displays the IP address of the IKE or VPN policy. However, you can be either Not Connected or IPsec SA Established. Cisco SA500 Series Security Appliances Administration Guide 210 To modify the poll interval, click the Stop button and then click Start to start or stop a connection... SA. You can use the Connect/ Disconnect button to terminate an active SA (connection). Click Connect to establish an inactive SA (connection) or Drop to manually connect or disconnect the VPN tunnel.

Administration Guide
Page 223
..., click Default. After a restore to factory defaults, the following actions: • Launch the Configuration Utility and login. manually restart it to make the default settings effective. Troubleshooting Restoring Factory Default Configuration Settings A Restoring Factory Default Configuration Settings To restore... settings, take one of the following settings apply: • LAN IP address: 192.168.75.1 • Username: cisco • Password: cisco • DHCP server on the front panel about the security appliance for the security appliance to reboot. If the security ...
..., click Default. After a restore to factory defaults, the following actions: • Launch the Configuration Utility and login. manually restart it to make the default settings effective. Troubleshooting Restoring Factory Default Configuration Settings A Restoring Factory Default Configuration Settings To restore... settings, take one of the following settings apply: • LAN IP address: 192.168.75.1 • Username: cisco • Password: cisco • DHCP server on the front panel about the security appliance for the security appliance to reboot. If the security ...

