

Brochure
Page 1
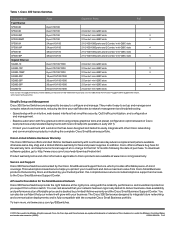
... for the new generation of Cisco® Small Business managed switches: the Cisco 300 Series. Easy to set up and use, the Cisco 300 Series provides the ideal combination of affordability, performance, and capabilities in use. These switches improve the availability of your critical...run silently and unobtrusively, even as they need to make every dollar count. Cisco 300 Series Switches Powerful Features and Performance at the Right Price Cisco 300 Series Switches offer enhanced switch features that support advanced technologies, including quality of service (QoS) intelligence and...
... for the new generation of Cisco® Small Business managed switches: the Cisco 300 Series. Easy to set up and use, the Cisco 300 Series provides the ideal combination of affordability, performance, and capabilities in use. These switches improve the availability of your critical...run silently and unobtrusively, even as they need to make every dollar count. Cisco 300 Series Switches Powerful Features and Performance at the Right Price Cisco 300 Series Switches offer enhanced switch features that support advanced technologies, including quality of service (QoS) intelligence and...
Brochure
Page 2
... has been rigorously tested to configure and manage. Delivered by Cisco and backed by your business. All rights reserved. Cisco, the Cisco logo, and Cisco Systems are designed to be confident that your investment and derive maximum value from a Cisco switch. Cisco Limited Lifetime Hardware Warranty The Cisco 300 Series offers a limited lifetime hardware warranty with other countries...
... has been rigorously tested to configure and manage. Delivered by Cisco and backed by your business. All rights reserved. Cisco, the Cisco logo, and Cisco Systems are designed to be confident that your investment and derive maximum value from a Cisco switch. Cisco Limited Lifetime Hardware Warranty The Cisco 300 Series offers a limited lifetime hardware warranty with other countries...
User Manual
Page 2
... forward packets between connecting devices after power up. For additional information, see www.cisco.com/smb. 1 Mounting the Cisco Switch There are three ways to prevent overheating. 2 300 Series Managed Switches Do not deploy the device in a location where any of the following conditions... the switch: • Set the switch on a flat surface. • Mount the switch on a wall (8-port devices only). • Mount the switch in a standard rack (1 rack unit high). In the default configuration, it will familiarize you for choosing the Cisco 300 Series Managed Switch, a Cisco Small ...
... forward packets between connecting devices after power up. For additional information, see www.cisco.com/smb. 1 Mounting the Cisco Switch There are three ways to prevent overheating. 2 300 Series Managed Switches Do not deploy the device in a location where any of the following conditions... the switch: • Set the switch on a flat surface. • Mount the switch on a wall (8-port devices only). • Mount the switch in a standard rack (1 rack unit high). In the default configuration, it will familiarize you for choosing the Cisco 300 Series Managed Switch, a Cisco Small ...
User Manual
Page 3
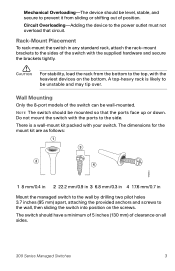
... and secure the brackets tightly. Do not mount the switch with the heaviest devices on all sides. 300 Series Managed Switches 3 NOTE The switch should be mounted so that circuit. The switch should have a minimum of 5 inches (130 mm) of the switch can be wall-mounted. There is likely to the ... mm/0.7 in any standard rack, attach the rack-mount brackets to the sides of position. Rack-Mount Placement To rack-mount the switch in Mount the managed switch to the wall by drilling two pilot holes 3.7 inches (95 mm) apart, attaching the provided anchors and screws to be unstable and...
... and secure the brackets tightly. Do not mount the switch with the heaviest devices on all sides. 300 Series Managed Switches 3 NOTE The switch should be mounted so that circuit. The switch should have a minimum of 5 inches (130 mm) of the switch can be wall-mounted. There is likely to the ... mm/0.7 in any standard rack, attach the rack-mount brackets to the sides of position. Rack-Mount Placement To rack-mount the switch in Mount the managed switch to the wall by drilling two pilot holes 3.7 inches (95 mm) apart, attaching the provided anchors and screws to be unstable and...
User Manual
Page 4
... (Power Sourcing Equipment) device, the switch can take up to one of the Cisco Small Business Managed Switch, page 9 for damages incurred by insecure wallmounting. 2 Connecting Network Devices To connect the managed switch to the network: STEP 1 Connect the Ethernet cable to a PD (Powered Device). 4 300 Series Managed Switches Cisco is normal behavior. It can deliver...
... (Power Sourcing Equipment) device, the switch can take up to one of the Cisco Small Business Managed Switch, page 9 for damages incurred by insecure wallmounting. 2 Connecting Network Devices To connect the managed switch to the network: STEP 1 Connect the Ethernet cable to a PD (Powered Device). 4 300 Series Managed Switches Cisco is normal behavior. It can deliver...
User Manual
Page 5
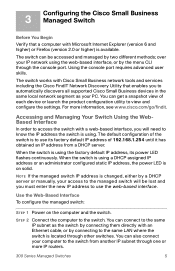
... connecting them directly with a web-based interface, you must enter the new IP address to the switch. The switch works with Cisco Small Business network tools and services including the Cisco FindIT Network Discovery Utility that a computer with Microsoft Internet Explorer (version 6 and higher) or Firefox (version 2.0 ...the settings. You can get a snapshot view of the switch is located through one or more information, see www.cisco.com/go/findit. over your PC. Using the console port requires advanced user skills. The switch can connect to the same IP subnet as your IP ...
... connecting them directly with a web-based interface, you must enter the new IP address to the switch. The switch works with Cisco Small Business network tools and services including the Cisco FindIT Network Discovery Utility that a computer with Microsoft Internet Explorer (version 6 and higher) or Firefox (version 2.0 ...the settings. You can get a snapshot view of the switch is located through one or more information, see www.cisco.com/go/findit. over your PC. Using the console port requires advanced user skills. The switch can connect to the same IP subnet as your IP ...
User Manual
Page 6
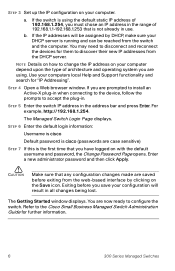
... username and password, the Change Password Page opens. STEP 4 Open a Web browser window. The Managed Switch Login Page displays. You are now ready to the Cisco Small Business Managed Switch Administration Guide for "IP Addressing". NOTE Details on how to discover their new IP addresses from the... switch and the computer. b. STEP 3 Set up the IP configuration on your computer depend upon the type...
... username and password, the Change Password Page opens. STEP 4 Open a Web browser window. The Managed Switch Login Page displays. You are now ready to the Cisco Small Business Managed Switch Administration Guide for "IP Addressing". NOTE Details on how to discover their new IP addresses from the... switch and the computer. b. STEP 3 Set up the IP configuration on your computer depend upon the type...
User Manual
Page 7
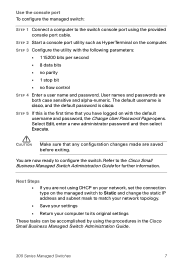
...Save your settings • Return your computer to configure the switch. STEP 5 If this is cisco. Use the console port To configure the managed switch: STEP 1 Connect a computer to the Cisco Small Business Managed Switch Administration Guide for further information. STEP 3 Configure the utility with.... CAUTION Make sure that you are saved before exiting. Refer to the switch console port using the procedures in the Cisco Small Business Managed Switch Administration Guide. 300 Series Managed Switches 7 Next Steps • If you have logged on with the following parameters...
...Save your settings • Return your computer to configure the switch. STEP 5 If this is cisco. Use the console port To configure the managed switch: STEP 1 Connect a computer to the Cisco Small Business Managed Switch Administration Guide for further information. STEP 3 Configure the utility with.... CAUTION Make sure that you are saved before exiting. Refer to the switch console port using the procedures in the Cisco Small Business Managed Switch Administration Guide. 300 Series Managed Switches 7 Next Steps • If you have logged on with the following parameters...
User Manual
Page 8
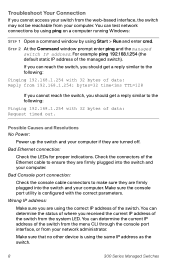
...similar to the following: Pinging 192.168.1.254 with 32 bytes of the managed switch). For example ping 192.168.1.254 (the default static IP address of data: Reply from your switch from the web-based interface, the switch may not be reachable from 192.168.1.254: bytes=32 time You can ...reach the switch, you cannot access your computer. If you can test network connections by using ping...
...similar to the following: Pinging 192.168.1.254 with 32 bytes of the managed switch). For example ping 192.168.1.254 (the default static IP address of data: Reply from your switch from the web-based interface, the switch may not be reachable from 192.168.1.254: bytes=32 time You can ...reach the switch, you cannot access your computer. If you can test network connections by using ping...
User Manual
Page 9
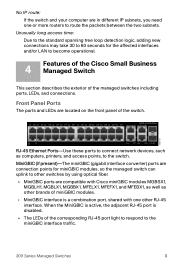
... is a combination port, shared with one or more routers to become operational. 4 Features of the Cisco Small Business Managed Switch This section describes the exterior of the switch. MiniGBIC (if present)-The miniGBIC (gigabit interface converter) ports are connection points for the affected interfaces and..., adding new connections may take 30 to 60 seconds for miniGBIC modules, so the managed switch can uplink to other switches by using optical fiber. • MiniGBIC ports are compatible with Cisco miniGBIC modules MGBSX1, MGBLH1, MGBLX1, MGBBX1, MFELX1, MFEFX1, and MFEBX1, as well as...
... is a combination port, shared with one or more routers to become operational. 4 Features of the Cisco Small Business Managed Switch This section describes the exterior of the switch. MiniGBIC (if present)-The miniGBIC (gigabit interface converter) ports are connection points for the affected interfaces and..., adding new connections may take 30 to 60 seconds for miniGBIC modules, so the managed switch can uplink to other switches by using optical fiber. • MiniGBIC ports are compatible with Cisco miniGBIC modules MGBSX1, MGBLH1, MGBLX1, MGBBX1, MFELX1, MFEFX1, and MFEBX1, as well as...
User Manual
Page 10
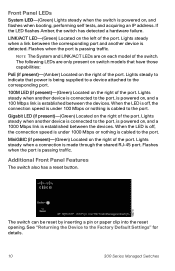
...right of the port. Lights steady when a connection is passing traffic. Flashes when the port is made through the shared RJ-45 port. The switch can be reset by inserting a pin or paper clip into the reset opening. See "Returning the Device to the Factory Default Settings" for details.... 10 300 Series Managed Switches Lights steady to indicate that have those capabilities: PoE (if present)-(Amber) Located on the right of the port. Lights steady when a link ...
...right of the port. Lights steady when a connection is passing traffic. Flashes when the port is made through the shared RJ-45 port. The switch can be reset by inserting a pin or paper clip into the reset opening. See "Returning the Device to the Factory Default Settings" for details.... 10 300 Series Managed Switches Lights steady to indicate that have those capabilities: PoE (if present)-(Amber) Located on the right of the port. Lights steady when a link ...

User Manual
Page 11
... Settings To use the Reset button to reboot or reset the managed switch, do the following: • To reboot the managed switch, press the Reset button for more than 10 seconds. • To restore the managed switch configuration to power. With the power on your network. 2. Power-...The Power port is where you will connect the switch to the factory default settings: 1. Disconnect the managed switch from the network or disable all DHCP servers on ,...
... Settings To use the Reset button to reboot or reset the managed switch, do the following: • To reboot the managed switch, press the Reset button for more than 10 seconds. • To restore the managed switch configuration to power. With the power on your network. 2. Power-...The Power port is where you will connect the switch to the factory default settings: 1. Disconnect the managed switch from the network or disable all DHCP servers on ,...


