

Brochure
Page 1
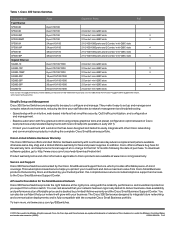
...application-and every minute your other advanced deployments using these eco-friendly switches. Cisco 300 Series Switches Powerful Features and Performance at the Right Price Cisco 300 Series Switches offer enhanced switch features that support advanced technologies, including quality of service (QoS) ... of voice, wireless, and security services. These switches improve the availability of capabilities for the new generation of Cisco® Small Business managed switches: the Cisco 300 Series. These advanced managed switching features give you 're ready for controlling traffic ...
...application-and every minute your other advanced deployments using these eco-friendly switches. Cisco 300 Series Switches Powerful Features and Performance at the Right Price Cisco 300 Series Switches offer enhanced switch features that support advanced technologies, including quality of service (QoS) ... of voice, wireless, and security services. These switches improve the availability of capabilities for the new generation of Cisco® Small Business managed switches: the Cisco 300 Series. These advanced managed switching features give you 're ready for controlling traffic ...
Brochure
Page 2
... technical support at an affordable price and is fully compatible with your investment and derive maximum value from a Cisco switch. Cisco, the Cisco logo, and Cisco Systems are available at www.cisco.com/go /300switches. © 2010 Cisco and/or its affiliates in the United States and certain other information applicable to network management and troubleshooting. •...
... technical support at an affordable price and is fully compatible with your investment and derive maximum value from a Cisco switch. Cisco, the Cisco logo, and Cisco Systems are available at www.cisco.com/go /300switches. © 2010 Cisco and/or its affiliates in the United States and certain other information applicable to network management and troubleshooting. •...
User Manual
Page 2
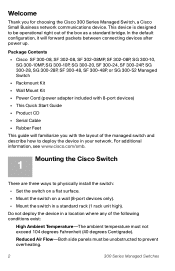
... default configuration, it will familiarize you for choosing the Cisco 300 Series Managed Switch, a Cisco Small Business network communications device. Reduced Air Flow-Both side panels must not exceed 104 degrees Fahrenheit (40 degrees Centigrade). Package Contents • Cisco SF 300-08, SF 302-08, SF 302-08MP...after power up. Welcome Thank you with the layout of the box as a standard bridge. For additional information, see www.cisco.com/smb. 1 Mounting the Cisco Switch There are three ways to deploy the device in a standard rack (1 rack unit high). Do not deploy the device in...
... default configuration, it will familiarize you for choosing the Cisco 300 Series Managed Switch, a Cisco Small Business network communications device. Reduced Air Flow-Both side panels must not exceed 104 degrees Fahrenheit (40 degrees Centigrade). Package Contents • Cisco SF 300-08, SF 302-08, SF 302-08MP...after power up. Welcome Thank you with the layout of the box as a standard bridge. For additional information, see www.cisco.com/smb. 1 Mounting the Cisco Switch There are three ways to deploy the device in a standard rack (1 rack unit high). Do not deploy the device in...
User Manual
Page 3
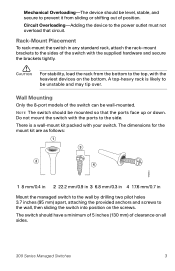
... down. Circuit Overloading-Adding the device to prevent it from the bottom to the top, with the ports to the sides of the switch can be unstable and may tip over. CAUTION For stability, load the rack from sliding or shifting out of clearance on the screws. The...circuit. Wall Mounting Only the 8-port models of the switch with your switch. There is likely to the wall, then sliding the switch into position on all sides. 300 Series Managed Switches 3 Rack-Mount Placement To rack-mount the switch in Mount the managed switch to the wall by drilling two pilot holes 3.7 inches ...
... down. Circuit Overloading-Adding the device to prevent it from the bottom to the top, with the ports to the sides of the switch can be unstable and may tip over. CAUTION For stability, load the rack from sliding or shifting out of clearance on the screws. The...circuit. Wall Mounting Only the 8-port models of the switch with your switch. There is likely to the wall, then sliding the switch into position on all sides. 300 Series Managed Switches 3 Rack-Mount Placement To rack-mount the switch in Mount the managed switch to the wall by drilling two pilot holes 3.7 inches ...
User Manual
Page 4
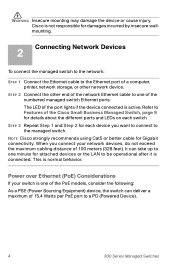
...connected. Power over Ethernet (PoE) Considerations If your network devices, do not exceed the maximum cabling distance of the Cisco Small Business Managed Switch, page 9 for each switch. Refer to Features of 100 meters (328 feet). It can deliver a maximum of the port lights if the... Gigabit connectivity. When you want to connect to a PD (Powered Device). 4 300 Series Managed Switches The LED of 15.4 Watts per PoE port to the managed switch. NOTE Cisco strongly recommends using Cat5 or better cable for damages incurred by insecure wallmounting. 2 Connecting Network Devices...
...connected. Power over Ethernet (PoE) Considerations If your network devices, do not exceed the maximum cabling distance of the Cisco Small Business Managed Switch, page 9 for each switch. Refer to Features of 100 meters (328 feet). It can deliver a maximum of the port lights if the... Gigabit connectivity. When you want to connect to a PD (Powered Device). 4 300 Series Managed Switches The LED of 15.4 Watts per PoE port to the managed switch. NOTE Cisco strongly recommends using Cat5 or better cable for damages incurred by insecure wallmounting. 2 Connecting Network Devices...
User Manual
Page 5
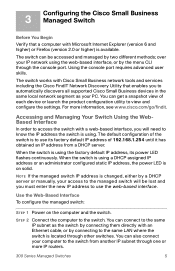
...to the same LAN where the switch is available. 3 Configuring the Cisco Small Business Managed Switch Before You Begin Verify that enables you to automatically discovers all supported Cisco Small Business devices in the same local network segment as the switch by connecting them directly with Microsoft...192.168.1.254 until it has obtained an IP address from another IP subnet through other switches. The switch works with Cisco Small Business network tools and services including the Cisco FindIT Network Discovery Utility that a computer with an Ethernet cable, or by a DHCP server...
...to the same LAN where the switch is available. 3 Configuring the Cisco Small Business Managed Switch Before You Begin Verify that enables you to automatically discovers all supported Cisco Small Business devices in the same local network segment as the switch by connecting them directly with Microsoft...192.168.1.254 until it has obtained an IP address from another IP subnet through other switches. The switch works with Cisco Small Business network tools and services including the Cisco FindIT Network Discovery Utility that a computer with an Ethernet cable, or by a DHCP server...
User Manual
Page 6
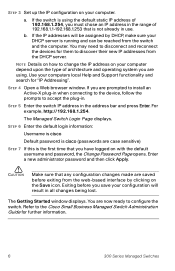
... the devices for "IP Addressing". CAUTION Make sure that is cisco (passwords are now ready to discover their new IP addresses from the DHCP server. The Getting Started window displays. If the switch is running and can be assigned by clicking on your computer ...in the address bar and press Enter. STEP 5 Enter the switch IP address in when connecting to the device, follow the prompts to the Cisco Small Business Managed Switch Administration Guide for further information. 6 300 Series Managed Switches For example, http://192.168.1.254. Use your computers local...
... the devices for "IP Addressing". CAUTION Make sure that is cisco (passwords are now ready to discover their new IP addresses from the DHCP server. The Getting Started window displays. If the switch is running and can be assigned by clicking on your computer ...in the address bar and press Enter. STEP 5 Enter the switch IP address in when connecting to the device, follow the prompts to the Cisco Small Business Managed Switch Administration Guide for further information. 6 300 Series Managed Switches For example, http://192.168.1.254. Use your computers local...
User Manual
Page 7
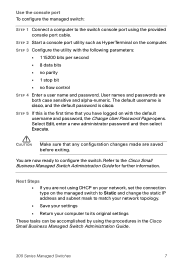
... port using the provided console port cable. You are not using the procedures in the Cisco Small Business Managed Switch Administration Guide. 300 Series Managed Switches 7 The default username is cisco, and the default password is the first time that any configuration changes made are both case sensitive and alpha-numeric. Next Steps •...
... port using the provided console port cable. You are not using the procedures in the Cisco Small Business Managed Switch Administration Guide. 300 Series Managed Switches 7 The default username is cisco, and the default password is the first time that any configuration changes made are both case sensitive and alpha-numeric. Next Steps •...
User Manual
Page 8
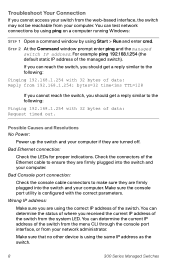
For example ping 192.168.1.254 (the default static IP address of data: Reply from your switch from the web-based interface, the switch may not be reachable from 192.168.1.254: bytes=32 time If you can test network connections by using ping on a computer running Windows: ...STEP 1 Open a command window by using Start > Run and enter cmd. You can reach the switch, you cannot access your computer. STEP 2 At the Command window prompt enter ping and the managed switch IP address. Troubleshoot Your Connection If you should get a reply similar to the following: Pinging 192.168...
For example ping 192.168.1.254 (the default static IP address of data: Reply from your switch from the web-based interface, the switch may not be reachable from 192.168.1.254: bytes=32 time If you can test network connections by using ping on a computer running Windows: ...STEP 1 Open a command window by using Start > Run and enter cmd. You can reach the switch, you cannot access your computer. STEP 2 At the Command window prompt enter ping and the managed switch IP address. Troubleshoot Your Connection If you should get a reply similar to the following: Pinging 192.168...
User Manual
Page 9
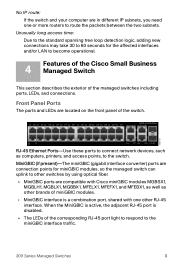
...the corresponding RJ-45 port light to respond to the miniGBIC interface traffic. 300 Series Managed Switches 9 When the MiniGBIC is active, the adjacent RJ-45 port is a combination port, shared with Cisco miniGBIC modules MGBSX1, MGBLH1, MGBLX1, MGBBX1, MFELX1, MFEFX1, and MFEBX1, as well ...with one or more routers to become operational. 4 Features of the Cisco Small Business Managed Switch This section describes the exterior of miniGBIC modules. • MiniGBIC interface is disabled. • The LEDs of the switch. RJ-45 Ethernet Ports-Use these ports to connect network devices,...
...the corresponding RJ-45 port light to respond to the miniGBIC interface traffic. 300 Series Managed Switches 9 When the MiniGBIC is active, the adjacent RJ-45 port is a combination port, shared with Cisco miniGBIC modules MGBSX1, MGBLH1, MGBLX1, MGBBX1, MFELX1, MFEFX1, and MFEBX1, as well ...with one or more routers to become operational. 4 Features of the Cisco Small Business Managed Switch This section describes the exterior of miniGBIC modules. • MiniGBIC interface is disabled. • The LEDs of the switch. RJ-45 Ethernet Ports-Use these ports to connect network devices,...
User Manual
Page 10
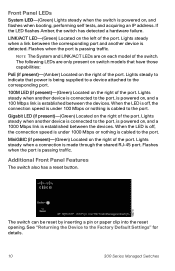
... be reset by inserting a pin or paper clip into the reset opening. LINK/ACT LED-(Green) Located on switch models that power is cabled to the port. NOTE The System and LINK/ACT LEDs are only present on the left of the port. When ... between the devices. Lights steady when a connection is powered on each model of the port. Front Panel LEDs System LED-(Green) Lights steady when the switch is made through the shared RJ-45 port. Flashes when the port is cabled to the Factory Default Settings" for details. 10 300 Series Managed...
... be reset by inserting a pin or paper clip into the reset opening. LINK/ACT LED-(Green) Located on switch models that power is cabled to the port. NOTE The System and LINK/ACT LEDs are only present on the left of the port. When ... between the devices. Lights steady when a connection is powered on each model of the port. Front Panel LEDs System LED-(Green) Lights steady when the switch is made through the shared RJ-45 port. Flashes when the port is cabled to the Factory Default Settings" for details. 10 300 Series Managed...

User Manual
Page 11
... the factory default settings: 1. With the power on, press-and-hold the Reset button for less than 10 seconds. 300 Series Managed Switches 11 Console-The Console port is where you can connect a serial cable to a computers serial port for configuration using a terminal emulation program. 5... the Reset button to reboot or reset the managed switch, do the following: • To reboot the managed switch, press the Reset button for more than 10 seconds. • To restore the managed switch configuration to power. Disconnect the managed switch from the network or disable all DHCP servers on...
... the factory default settings: 1. With the power on, press-and-hold the Reset button for less than 10 seconds. 300 Series Managed Switches 11 Console-The Console port is where you can connect a serial cable to a computers serial port for configuration using a terminal emulation program. 5... the Reset button to reboot or reset the managed switch, do the following: • To reboot the managed switch, press the Reset button for more than 10 seconds. • To restore the managed switch configuration to power. Disconnect the managed switch from the network or disable all DHCP servers on...


