
Getting Started Guide
Page 3
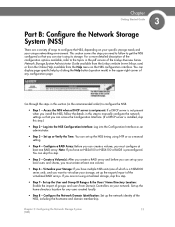
...Business Series Network Storage System Administrator Guide Contents Chapter 1: Introduction 3 Benefits 3 About this Guide... 3 Recommended Installation Sequence 4 Chapter 2: Part A: Set up the Hardware 7 Step 1: Install the Disk Drives 7 Approved Vendor List for Drives 9 Step 2: Install the Ethernet Links 9 Step 3: Install the Power 10 NSS-supported UPS Product Families 11 Chapter 3: Part B: Configure the Network Storage... System (NSS) . . . 13 Step 1: Access the NSS when there is no DHCP Server Present on your Network 14 Step 2: Log ...
...Business Series Network Storage System Administrator Guide Contents Chapter 1: Introduction 3 Benefits 3 About this Guide... 3 Recommended Installation Sequence 4 Chapter 2: Part A: Set up the Hardware 7 Step 1: Install the Disk Drives 7 Approved Vendor List for Drives 9 Step 2: Install the Ethernet Links 9 Step 3: Install the Power 10 NSS-supported UPS Product Families 11 Chapter 3: Part B: Configure the Network Storage... System (NSS) . . . 13 Step 1: Access the NSS when there is no DHCP Server Present on your Network 14 Step 2: Log ...

Getting Started Guide
Page 4
Contents Linksys Business Series Network Storage System Administrator Guide Mac Users: Accessing Storage through CIFS/SMB 47 Mac Users: Accessing Storage through FTP 48 Chapter 5: LEDs & Buttons 49 Power LED (Front Panel) 49 System LED (Front Panel) 50 Reset Button (Front Panel) 50 LAN LEDs (Front Panel) 51 Hard Disk Drive LEDs (Front Panel) 51 USB LED (Front Panel) 52 UPS LED (Back Panel) 52 Linksys One Contact Information 53 2 Contents
Contents Linksys Business Series Network Storage System Administrator Guide Mac Users: Accessing Storage through CIFS/SMB 47 Mac Users: Accessing Storage through FTP 48 Chapter 5: LEDs & Buttons 49 Power LED (Front Panel) 49 System LED (Front Panel) 50 Reset Button (Front Panel) 50 LAN LEDs (Front Panel) 51 Hard Disk Drive LEDs (Front Panel) 51 USB LED (Front Panel) 52 UPS LED (Back Panel) 52 Linksys One Contact Information 53 2 Contents

Getting Started Guide
Page 5
... understanding of networking, the NSS is a Network Attached Storage (NAS) unit that might be a difficult job. Chapter 1: Introduction 3 Chapter Getting Started Guide 1 Introduction Thank you for file sharing. The NSS uses the most common file-based protocols such as a native file server for the first... time---from hooking up and running . Administering a network can now access data that appears as NFS, CIFS, and FTP for choosing the Linksys Business Series Network Storage System (NSS). Users are shown how ...
... understanding of networking, the NSS is a Network Attached Storage (NAS) unit that might be a difficult job. Chapter 1: Introduction 3 Chapter Getting Started Guide 1 Introduction Thank you for file sharing. The NSS uses the most common file-based protocols such as a native file server for the first... time---from hooking up and running . Administering a network can now access data that appears as NFS, CIFS, and FTP for choosing the Linksys Business Series Network Storage System (NSS). Users are shown how ...

Getting Started Guide
Page 7
... to access the NSS. Step 13: Go through the rest of the configuration file to the Online Help from the Configuration Manager, or the Linksys Business Series Network Storage System Administrator Guide available from the Linksys website at www.linksys.com - Chapter 1: Introduction 5 Recommended Installation Sequence Chapter Getting Started Guide 1 -
... to access the NSS. Step 13: Go through the rest of the configuration file to the Online Help from the Configuration Manager, or the Linksys Business Series Network Storage System Administrator Guide available from the Linksys website at www.linksys.com - Chapter 1: Introduction 5 Recommended Installation Sequence Chapter Getting Started Guide 1 -
Getting Started Guide
Page 15
... an NSS4100 or NSS6100 a RAID5 is installed, skip this step to virtualize your storage, set up the network identity of the Linksys Business Series Network Storage System Administrator Guide available from the Linksys website (www.linksys.com) or from the... Online Help available from Domain Controllers on your unique networking environment. This section covers the steps you can access the Configuration Interface. (If a DHCP server...
... an NSS4100 or NSS6100 a RAID5 is installed, skip this step to virtualize your storage, set up the network identity of the Linksys Business Series Network Storage System Administrator Guide available from the Linksys website (www.linksys.com) or from the... Online Help available from Domain Controllers on your unique networking environment. This section covers the steps you can access the Configuration Interface. (If a DHCP server...

Getting Started Guide
Page 16
Set up the Share Backups: Set up email and SNMP alerts, and so on your Network For detailed information, refer to the Online Help from the Configuration Manager, or the Linksys Business Series Network Storage System Administrator Guide available from the NSS. • Step 10 - NOTE: The configuration for the users ...the shares and set up access privileges to set up quotas, edit groups, set up a backup to communicate with the NSS when no DHCP Server Present on . Add any Locally Defined Users and Groups: You can create and maintain a list of users and groups from the Linksys website...
Set up the Share Backups: Set up email and SNMP alerts, and so on your Network For detailed information, refer to the Online Help from the Configuration Manager, or the Linksys Business Series Network Storage System Administrator Guide available from the NSS. • Step 10 - NOTE: The configuration for the users ...the shares and set up access privileges to set up quotas, edit groups, set up a backup to communicate with the NSS when no DHCP Server Present on . Add any Locally Defined Users and Groups: You can create and maintain a list of users and groups from the Linksys website...

Getting Started Guide
Page 17
Chapter Getting Started Guide 3 To set up your computer's network settings to the following: • IP Address: 169.254.x.y (where x and y can be any number between 1 and 254). Set your computer to communicate with the ... as required. After you configure your administrator password and the NSS hostname from this window. 3. Login to note in terms of devices. Chapter 3: Configuring the Network Storage System 15 (NSS) For example, 169.254.1.2. • Subnet Mast (Netmask): 255.255.0.0. The only differences to the SVR. 2. You can log into the Linksys...
Chapter Getting Started Guide 3 To set up your computer's network settings to the following: • IP Address: 169.254.x.y (where x and y can be any number between 1 and 254). Set your computer to communicate with the ... as required. After you configure your administrator password and the NSS hostname from this window. 3. Login to note in terms of devices. Chapter 3: Configuring the Network Storage System 15 (NSS) For example, 169.254.1.2. • Subnet Mast (Netmask): 255.255.0.0. The only differences to the SVR. 2. You can log into the Linksys...

Getting Started Guide
Page 18
... and that this system is automatically assigned an IP address from the DHCP server in the upper-right corner of the NSS. 4. The NSS device configuration interface appears, with the hostname of the page. 16 Chapter 3: Configuring the Network Storage System (NSS) Step 2: Log into the Configuration Interface Click the NSS tab. For...
... and that this system is automatically assigned an IP address from the DHCP server in the upper-right corner of the NSS. 4. The NSS device configuration interface appears, with the hostname of the page. 16 Chapter 3: Configuring the Network Storage System (NSS) Step 2: Log into the Configuration Interface Click the NSS tab. For...

Getting Started Guide
Page 19
...In the Address field, enter "http://NAS" (For example, "http://NAS0018F804E44C".) • Browse for the first time, write down the MAC address located on the sticker attached to the bottom of the default hostname. Chapter 3: Configuring the Network Storage System 17 (NSS) Otherwise, skip ...this is part of the chassis. If you reset the factory defaults, both the username and password are logging into the NSS for the NSS from a mapped network drive. The NSS Login window appears...
...In the Address field, enter "http://NAS" (For example, "http://NAS0018F804E44C".) • Browse for the first time, write down the MAC address located on the sticker attached to the bottom of the default hostname. Chapter 3: Configuring the Network Storage System 17 (NSS) Otherwise, skip ...this is part of the chassis. If you reset the factory defaults, both the username and password are logging into the NSS for the NSS from a mapped network drive. The NSS Login window appears...

Getting Started Guide
Page 20
... are configured, an SNMP trap message is sent. 18 Chapter 3: Configuring the Network Storage System (NSS) Step 3: Configure the Timing Settings After the synchronization is not reporting any errors. Chapter 3 Getting Sarted Guide The NSS configuration interface appears, with NTP server" message appears and the Update button is automatically set via the Linksys...
... are configured, an SNMP trap message is sent. 18 Chapter 3: Configuring the Network Storage System (NSS) Step 3: Configure the Timing Settings After the synchronization is not reporting any errors. Chapter 3 Getting Sarted Guide The NSS configuration interface appears, with NTP server" message appears and the Update button is automatically set via the Linksys...

Getting Started Guide
Page 21
... a RAID Array After you install the physical disks, you want to allocate the system resources for the NTP servers you chose to step 4. 3. Chapter 3: Configuring the Network Storage System 19 (NSS) Time. If your DHCP server is a good idea to set the Rebuild Priority to determine how you can be located on the Internet...
... a RAID Array After you install the physical disks, you want to allocate the system resources for the NTP servers you chose to step 4. 3. Chapter 3: Configuring the Network Storage System 19 (NSS) Time. If your DHCP server is a good idea to set the Rebuild Priority to determine how you can be located on the Internet...

Getting Started Guide
Page 22
... are configured to use the same model of the smallest disk capacity in the array. 20 Chapter 3: Configuring the Network Storage System (NSS) Step 4: Create a RAID Array It takes approximately 1.6GB/min (NSS4000) and 2.6GB/min (NSS6000) to include in the array for each disk that you install two, 250 GB ...disks and one 500 GB disk in the New RAID Device table. To create an array: 1. From the Manager Menu, click Storage The RAID page appears: RAID...
... are configured to use the same model of the smallest disk capacity in the array. 20 Chapter 3: Configuring the Network Storage System (NSS) Step 4: Create a RAID Array It takes approximately 1.6GB/min (NSS4000) and 2.6GB/min (NSS6000) to include in the array for each disk that you install two, 250 GB ...disks and one 500 GB disk in the New RAID Device table. To create an array: 1. From the Manager Menu, click Storage The RAID page appears: RAID...

Getting Started Guide
Page 23
... in the array are no longer available for creating additional arrays. To create a volume: 1. The volume name must consist of the RAID build from the Storage Status page. Chapter 3: Configuring the Network Storage System 21 (NSS) Chapter Getting Started Guide 3 3. Click Add. From the Manager Menu, click...
... in the array are no longer available for creating additional arrays. To create a volume: 1. The volume name must consist of the RAID build from the Storage Status page. Chapter 3: Configuring the Network Storage System 21 (NSS) Chapter Getting Started Guide 3 3. Click Add. From the Manager Menu, click...

Getting Started Guide
Page 24
... unencrypted volume, go to unlock an encrypted volume when the NSS is encrypted or unencrypted. Enter a password in the Linksys Business Series Network Storage System Administrator Guide for the volume, and then select the unit from the drop-down to filesystem overhead. The password must ...the volume only when the volume is accessible when required. The password must be entered to step 6. Click Add. 22 Chapter 3: Configuring the Network Storage System (NSS) Step 5: Create a Volume NOTE: You can expand the volume but you cannot change whether it is first created. After ...
... unencrypted volume, go to unlock an encrypted volume when the NSS is encrypted or unencrypted. Enter a password in the Linksys Business Series Network Storage System Administrator Guide for the volume, and then select the unit from the drop-down to filesystem overhead. The password must ...the volume only when the volume is accessible when required. The password must be entered to step 6. Click Add. 22 Chapter 3: Configuring the Network Storage System (NSS) Step 5: Create a Volume NOTE: You can expand the volume but you cannot change whether it is first created. After ...

Getting Started Guide
Page 25
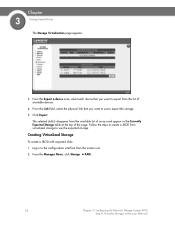
... setup means that RAID to the network: 1. NOTE: After you configure a virtual RAID, you can export storage (must be NSS6000 series, NSS4000 series, or NSS2000 series devices). Exporting Storage to your Network The NSS virtualization feature lets you are exporting storage. 2. From the Manager Menu, click Storage Virtualization. Chapter 3: Configuring the Network Storage System 23 (NSS) Log into the...
... setup means that RAID to the network: 1. NOTE: After you configure a virtual RAID, you can export storage (must be NSS6000 series, NSS4000 series, or NSS2000 series devices). Exporting Storage to your Network The NSS virtualization feature lets you are exporting storage. 2. From the Manager Menu, click Storage Virtualization. Chapter 3: Configuring the Network Storage System 23 (NSS) Log into the...
Getting Started Guide
Page 26
From the Manager Menu, click Storage RAID. 24 Chapter 3: Configuring the Network Storage System (NSS) Step 6: Virtualize Storage within your Network From the Link field, select the physical link that you want to use to create a JBOD from the master unit. 2. Click Export. The selected disk(s) ...
From the Manager Menu, click Storage RAID. 24 Chapter 3: Configuring the Network Storage System (NSS) Step 6: Virtualize Storage within your Network From the Link field, select the physical link that you want to use to create a JBOD from the master unit. 2. Click Export. The selected disk(s) ...
Getting Started Guide
Page 27
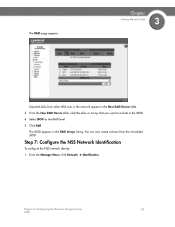
...virtualized JBOD. Click Add. The JBOD appears in the New RAID Device table. 3. Chapter 3: Configuring the Network Storage System 25 (NSS) You can now create volumes from other NSS units in the network appear in the RAID Arrays listing. Select JBOD as the RAID level. 5. From the New RAID Device ...table, click the disks or arrays that you want to include in the JBOD. 4. From the Manager Menu, click Network Identification. The RAID page appears. ...
...virtualized JBOD. Click Add. The JBOD appears in the New RAID Device table. 3. Chapter 3: Configuring the Network Storage System 25 (NSS) You can now create volumes from other NSS units in the network appear in the RAID Arrays listing. Select JBOD as the RAID level. 5. From the New RAID Device ...table, click the disks or arrays that you want to include in the JBOD. 4. From the Manager Menu, click Network Identification. The RAID page appears. ...

Getting Started Guide
Page 28
... Sarted Guide The Network Identification page appears. 2. If the DHCP server is not configured to shares on the NSS are disconnected. 3. To assign the hostname for the NSS. In the Description field, enter the textual description for your users. 26 Chapter 3: Configuring the Network Storage System (NSS) Step 7: Configure the NSS Network Identification Caution: If... the name you change the hostname, any special naming restrictions or conventions enforced by the domain(s) into which the NSS is assigned using the DHCP server, select Assign automatically via DHCP.
... Sarted Guide The Network Identification page appears. 2. If the DHCP server is not configured to shares on the NSS are disconnected. 3. To assign the hostname for the NSS. In the Description field, enter the textual description for your users. 26 Chapter 3: Configuring the Network Storage System (NSS) Step 7: Configure the NSS Network Identification Caution: If... the name you change the hostname, any special naming restrictions or conventions enforced by the domain(s) into which the NSS is assigned using the DHCP server, select Assign automatically via DHCP.

Getting Started Guide
Page 29
...part of a peer-to ensure the rejoin of the domain is successful. • Member of Active Directory domain: Make the NSS part of network into which you select this is cleared each time you click Update. For example, "domain.com" versus just "domain." - For example, "...the administrator account. The NSS configuration interface displays the status of your Kerberos realm. This password is the correct value. Chapter 3: Configuring the Network Storage System 27 (NSS) Chapter Getting Started Guide 3 5. If you configured the NSS to enter here, enter the domain name. In most...
...part of a peer-to ensure the rejoin of the domain is successful. • Member of Active Directory domain: Make the NSS part of network into which you select this is cleared each time you click Update. For example, "domain.com" versus just "domain." - For example, "...the administrator account. The NSS configuration interface displays the status of your Kerberos realm. This password is the correct value. Chapter 3: Configuring the Network Storage System 27 (NSS) Chapter Getting Started Guide 3 5. If you configured the NSS to enter here, enter the domain name. In most...

Getting Started Guide
Page 30
... setting the ID ranges, you also need to define which volume you want to store your users' home directories. Click Update. 28 Chapter 3: Configuring the Network Storage System (NSS) Step 8: Configure the User/Group Ranges and Home Directory Location Set up the following ID Ranges: • Local Users and Groups ID Range...
... setting the ID ranges, you also need to define which volume you want to store your users' home directories. Click Update. 28 Chapter 3: Configuring the Network Storage System (NSS) Step 8: Configure the User/Group Ranges and Home Directory Location Set up the following ID Ranges: • Local Users and Groups ID Range...