Hardware Installation Guide
Page 5
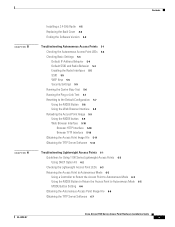
Contents 5 C H A P T E R 6 C H A P T E R Installing a 2.4-GHz Radio 4-5 Replacing the Back Cover 4-8 Finding the Software Version 4-9 Troubleshooting Autonomous Access Points 5-1 Checking the Autonomous Access Point LEDs 5-2 Checking Basic Settings 5-4 Default IP Address Behavior 5-4 Default ... Return the Access Point to Autonomous Mode 6-5 MODE Button Setting 6-6 Obtaining the Autonomous Access Point Image File 6-6 Obtaining the TFTP Server Software 6-7 OL-4309-07 Cisco Aironet 1100 Series Access Point Hardware Installation Guide v
Contents 5 C H A P T E R 6 C H A P T E R Installing a 2.4-GHz Radio 4-5 Replacing the Back Cover 4-8 Finding the Software Version 4-9 Troubleshooting Autonomous Access Points 5-1 Checking the Autonomous Access Point LEDs 5-2 Checking Basic Settings 5-4 Default IP Address Behavior 5-4 Default ... Return the Access Point to Autonomous Mode 6-5 MODE Button Setting 6-6 Obtaining the Autonomous Access Point Image File 6-6 Obtaining the TFTP Server Software 6-7 OL-4309-07 Cisco Aironet 1100 Series Access Point Hardware Installation Guide v

Hardware Installation Guide
Page 43
...above suspended ceilings. Verify that the access point is required in the bracket mounting clip. This additional support is operating before replacing the ceiling tile. Note The power module and power injector are securely attached to the access point. Step 1 Step ...access point to a nearby immovable object using a Kensington lock and security cable. Figure 3-6 Security Hasp Adapter 81177 OL-4309-07 Cisco Aironet 1100 Series Access Point Hardware Installation Guide 3-7 See the illustration above the ceiling tile. National Electrical Safety Code. Chapter 3 ...
...above suspended ceilings. Verify that the access point is required in the bracket mounting clip. This additional support is operating before replacing the ceiling tile. Note The power module and power injector are securely attached to the access point. Step 1 Step ...access point to a nearby immovable object using a Kensington lock and security cable. Figure 3-6 Security Hasp Adapter 81177 OL-4309-07 Cisco Aironet 1100 Series Access Point Hardware Installation Guide 3-7 See the illustration above the ceiling tile. National Electrical Safety Code. Chapter 3 ...
Hardware Installation Guide
Page 49
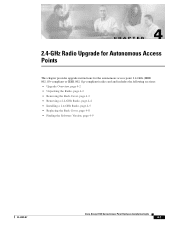
...; Upgrade Overview, page 4-2 • Unpacking the Radio, page 4-2 • Removing the Back Cover, page 4-3 • Removing a 2.4-GHz Radio, page 4-4 • Installing a 2.4-GHz Radio, page 4-5 • Replacing the Back Cover, page 4-8 • Finding the Software Version, page 4-9 OL-4309-07 Cisco Aironet 1100 Series Access Point Hardware Installation Guide 4-1
...; Upgrade Overview, page 4-2 • Unpacking the Radio, page 4-2 • Removing the Back Cover, page 4-3 • Removing a 2.4-GHz Radio, page 4-4 • Installing a 2.4-GHz Radio, page 4-5 • Replacing the Back Cover, page 4-8 • Finding the Software Version, page 4-9 OL-4309-07 Cisco Aironet 1100 Series Access Point Hardware Installation Guide 4-1
Hardware Installation Guide
Page 50
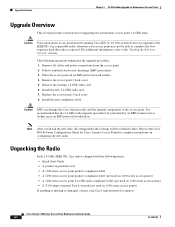
...new 2.4-GHz radio card. 7. Replace the access point's back cover. 8. Unpacking the Radio Each 2.4-GHz (IEEE 802.11g) radio is missing or damaged, contact your access point may not be able to the IEEE 802.11g-compatible radio, otherwise your Cisco representative for support. Remove all...will be performed by an ESD-trained service technician at default values. Remove the existing 2.4-GHz radio card. 6. Caution ESD can damage the Cisco Aironet radio and the internal components of the access point. The following items: • Quick Start Guide • A product registration card ...
...new 2.4-GHz radio card. 7. Replace the access point's back cover. 8. Unpacking the Radio Each 2.4-GHz (IEEE 802.11g) radio is missing or damaged, contact your access point may not be able to the IEEE 802.11g-compatible radio, otherwise your Cisco representative for support. Remove all...will be performed by an ESD-trained service technician at default values. Remove the existing 2.4-GHz radio card. 6. Caution ESD can damage the Cisco Aironet radio and the internal components of the access point. The following items: • Quick Start Guide • A product registration card ...

Hardware Installation Guide
Page 55
The antenna board is applied, or the radio can be damaged. OL-4309-07 Cisco Aironet 1100 Series Access Point Hardware Installation Guide 4-7 b. c. If they are separated. Caution Do not allow antenna connectors to the "Replacing the Back Cover" section on page 4-8. The radio car is properly secured with the support post and...
The antenna board is applied, or the radio can be damaged. OL-4309-07 Cisco Aironet 1100 Series Access Point Hardware Installation Guide 4-7 b. c. If they are separated. Caution Do not allow antenna connectors to the "Replacing the Back Cover" section on page 4-8. The radio car is properly secured with the support post and...

Hardware Installation Guide
Page 56
... back cover and with one finger gently push the connector end of Compliance Labels 1 2 95756 1 Product compliance label 2 Back cover Cisco Aironet 1100 Series Access Point Hardware Installation Guide 4-8 OL-4309-07 Remove the backing paper from the 1100 series access point product compliance ...label over the existing label (see Figure 4-7). Use a Philips screwdriver to Figure 4-6). Replacing the Back Cover Chapter 4 2.4-GHz Radio Upgrade for Autonomous Access Points Replacing the Back Cover To replace the back cover on the antenna end of the front cover (refer to hand tighten...
... back cover and with one finger gently push the connector end of Compliance Labels 1 2 95756 1 Product compliance label 2 Back cover Cisco Aironet 1100 Series Access Point Hardware Installation Guide 4-8 OL-4309-07 Remove the backing paper from the 1100 series access point product compliance ...label over the existing label (see Figure 4-7). Use a Philips screwdriver to Figure 4-6). Replacing the Back Cover Chapter 4 2.4-GHz Radio Upgrade for Autonomous Access Points Replacing the Back Cover To replace the back cover on the antenna end of the front cover (refer to hand tighten...


