User Manual
Page 3
... Zooming an Image ...13 Momentarily Cutting Off the Input Source Image 14 Freezing an Image...14 Displaying a Pointer in the Projected Image 15 Changing the aspect ratio of the projected image 16 Adjusting the Volume Level 17 To adjust the volume level 17 To mute the audio...17 Eco Mode (Power...
... Zooming an Image ...13 Momentarily Cutting Off the Input Source Image 14 Freezing an Image...14 Displaying a Pointer in the Projected Image 15 Changing the aspect ratio of the projected image 16 Adjusting the Volume Level 17 To adjust the volume level 17 To mute the audio...17 Eco Mode (Power...
User Manual
Page 5
... Computer to the Projector 45 Remote Controller Signal Range 46 Projection Distance and Screen Size 47 Aspect Ratio Setting and Projection Image 48 Supported Signals 52 Using Wired LAN to Control the Projector (XJ-M145, XJ-M155, XJ-M245, XJ-M255 55 Supported External Devices 55 Controlling the Projector from a Computer 55 Projector RS-232C...
... Computer to the Projector 45 Remote Controller Signal Range 46 Projection Distance and Screen Size 47 Aspect Ratio Setting and Projection Image 48 Supported Signals 52 Using Wired LAN to Control the Projector (XJ-M145, XJ-M155, XJ-M245, XJ-M255 55 Supported External Devices 55 Controlling the Projector from a Computer 55 Projector RS-232C...
User Manual
Page 8
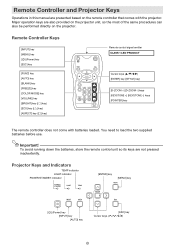
... [MENU] key [P] (Power) key [ESC] key [FUNC] key [AUTO] key [BLANK] key [FREEZE] key [COLOR MODE] key [VOLUME] key [BRIGHT] key ([O] key) [ECO] key ([f] key) [ASPECT] key ([Z] key) Remote control signal emitter CLASS 1 LED PRODUCT Cursor keys (S/T/W/X) [ENTER] key ([STYLE] key) [D-ZOOM +] [D-ZOOM -] keys [KEYSTONE +] [KEYSTONE -] keys [POINTER] key The remote...
... [MENU] key [P] (Power) key [ESC] key [FUNC] key [AUTO] key [BLANK] key [FREEZE] key [COLOR MODE] key [VOLUME] key [BRIGHT] key ([O] key) [ECO] key ([f] key) [ASPECT] key ([Z] key) Remote control signal emitter CLASS 1 LED PRODUCT Cursor keys (S/T/W/X) [ENTER] key ([STYLE] key) [D-ZOOM +] [D-ZOOM -] keys [KEYSTONE +] [KEYSTONE -] keys [POINTER] key The remote...

User Manual
Page 12
... z Momentary cut off of the input source image and projection of a black or blue screen, or a logo z Image freeze z Pointer display in the projected image z Aspect ratio switching Adjusting Image Brightness Note (for USB port model users) Use the setup menu (page 20) to adjust image brightness when the input source...
... z Momentary cut off of the input source image and projection of a black or blue screen, or a logo z Image freeze z Pointer display in the projected image z Aspect ratio switching Adjusting Image Brightness Note (for USB port model users) Use the setup menu (page 20) to adjust image brightness when the input source...
User Manual
Page 16
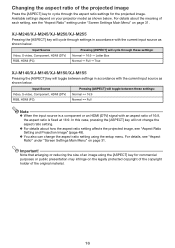
... presentation may infringe on the legally protected copyright of the copyright holder of the original material. 16 XJ-M240/XJ-M245/XJ-M250/XJ-M255 Pressing the [ASPECT] key will not change the aspect ratio setting using the [ASPECT] key for the projected image. For details, see the "Aspect Ratio" setting under "Screen Settings Main Menu" on page 31.
... presentation may infringe on the legally protected copyright of the copyright holder of the original material. 16 XJ-M240/XJ-M245/XJ-M250/XJ-M255 Pressing the [ASPECT] key will not change the aspect ratio setting using the [ASPECT] key for the projected image. For details, see the "Aspect Ratio" setting under "Screen Settings Main Menu" on page 31.

User Manual
Page 19
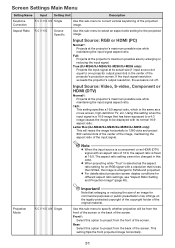
... (f key) described on page 18. z Adjust image brightness Highlight "Brightness" and then press the [ENTER] key. J This performs the same operation as pressing the [ASPECT] key (Z key) described on page 12. z (for USB port model users) Use the setup menu (page 20) to select the Eco Mode when the input..., use this menu to perform the operations described below . z Turn the Eco Mode on the bundled CD-ROM. 19 z Select the aspect ratio of the projected image Highlight "Aspect Ratio" and then press the [ENTER] key. Note z While "Off" is selected for the Eco Mode setting, you also can use...
... (f key) described on page 18. z Adjust image brightness Highlight "Brightness" and then press the [ENTER] key. J This performs the same operation as pressing the [ASPECT] key (Z key) described on page 12. z (for USB port model users) Use the setup menu (page 20) to select the Eco Mode when the input..., use this menu to perform the operations described below . z Turn the Eco Mode on the bundled CD-ROM. 19 z Select the aspect ratio of the projected image Highlight "Aspect Ratio" and then press the [ENTER] key. Note z While "Off" is selected for the Eco Mode setting, you also can use...
User Manual
Page 31
...of the screen. Letter Box (XJ-M240/XJ-M245/XJ-M250/XJ-M255 only): This will be displayed with its actual size (1 input source dot equal to one projector output pixel dot) in this setting when the input signal is the same as the aspect ratio setting for the projected image.... option to project from the front of the screen. True (XJ-M240/XJ-M245/XJ-M250/XJ-M255 only): Projects the input signal at the projector's maximum possible size while maintaining the input signal aspect ratio. 16:9 : This setting specifies a 16:9 aspect ratio, which is a 16:9 image that is less than SVGA...
...of the screen. Letter Box (XJ-M240/XJ-M245/XJ-M250/XJ-M255 only): This will be displayed with its actual size (1 input source dot equal to one projector output pixel dot) in this setting when the input signal is the same as the aspect ratio setting for the projected image.... option to project from the front of the screen. True (XJ-M240/XJ-M245/XJ-M250/XJ-M255 only): Projects the input signal at the projector's maximum possible size while maintaining the input signal aspect ratio. 16:9 : This setting specifies a 16:9 aspect ratio, which is a 16:9 image that is less than SVGA...

User Manual
Page 48
XJ-M240/XJ-M245/XJ-M250/XJ-M255 Input source: RGB or HDMI (PC) Input Signal Normal Full SVGA (800 × 600) True XGA (1024 × 768) WXGA (1280 × 800) SXGA (1280 × 1024) * * The blue boundary indicates the projection area. 48 Aspect Ratio Setting and Projection Image The following shows how images are projected in accordance with the type of the input signal and the aspect ratio setting of the projector.
XJ-M240/XJ-M245/XJ-M250/XJ-M255 Input source: RGB or HDMI (PC) Input Signal Normal Full SVGA (800 × 600) True XGA (1024 × 768) WXGA (1280 × 800) SXGA (1280 × 1024) * * The blue boundary indicates the projection area. 48 Aspect Ratio Setting and Projection Image The following shows how images are projected in accordance with the type of the input signal and the aspect ratio setting of the projector.

User Manual
Page 49
Input source: Video, S-video, component or HDMI (DTV) Input Signal Normal 16:9 4:3 Aspect Image Letter Box * Squeezed Image * Letter Box Image * * The blue boundary indicates the projection area. 49
Input source: Video, S-video, component or HDMI (DTV) Input Signal Normal 16:9 4:3 Aspect Image Letter Box * Squeezed Image * Letter Box Image * * The blue boundary indicates the projection area. 49
User Manual
Page 58
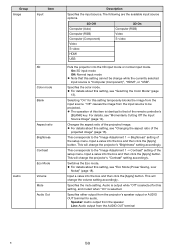
... OUT terminal B 58 Selecting "On" for this setting, see "Selecting the Color Mode" (page 13). Changes the aspect ratio of the projected image" (page 16). Group Image Item Input 3D Color mode Blank Audio Aspect ratio Brightness Contrast Eco Mode Volume Mute Audio Out Description Specifies the input source. This corresponds to... HDMI USB 3D On Computer (RGB) Video S-video Puts the projector into the box and then click the [Apply] button. For details, see "Changing the aspect ratio of the projected image.
... OUT terminal B 58 Selecting "On" for this setting, see "Selecting the Color Mode" (page 13). Changes the aspect ratio of the projected image" (page 16). Group Image Item Input 3D Color mode Blank Audio Aspect ratio Brightness Contrast Eco Mode Volume Mute Audio Out Description Specifies the input source. This corresponds to... HDMI USB 3D On Computer (RGB) Video S-video Puts the projector into the box and then click the [Apply] button. For details, see "Changing the aspect ratio of the projected image.
User Manual
Page 61
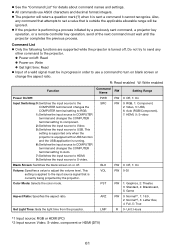
... sent command, a projector key operation, or a remote controller key operation, send of a valid signal must wait until the projector completes the previous process. Aspect Ratio: Specifies the aspect ratio. Also, any other command to set a value that attempts to the projector. Do not try to send any command that is outside the... : Write z Get light time: Read z Input of the next command must be ignored. z All commands use a command to turn on blank screen or change the aspect ratio.
... sent command, a projector key operation, or a remote controller key operation, send of a valid signal must wait until the projector completes the previous process. Aspect Ratio: Specifies the aspect ratio. Also, any other command to set a value that attempts to the projector. Do not try to send any command that is outside the... : Write z Get light time: Read z Input of the next command must be ignored. z All commands use a command to turn on blank screen or change the aspect ratio.