
User Guide
Page 3
Contents About this manual 5 Projector Overview 6 Projector Features and Main Functions 6 Remote Controller and Projector Keys 8 Back Terminals 9 Loading Remote Controller Batteries 9 Setting Up the Projector 10 Setup Precautions 10 Connecting to an Image Output Device 11 Connecting the Analog RGB Output of a Computer to ...
Contents About this manual 5 Projector Overview 6 Projector Features and Main Functions 6 Remote Controller and Projector Keys 8 Back Terminals 9 Loading Remote Controller Batteries 9 Setting Up the Projector 10 Setup Precautions 10 Connecting to an Image Output Device 11 Connecting the Analog RGB Output of a Computer to ...
User Guide
Page 5
Projector Troubleshooting 47 Appendix 49 Remote Controller Signal Range 49 Projection Distance and Screen Size 50 Aspect Ratio Setting and Projection Image 51 Supported Signals 53 Specifications 55 About this manual are explained using the remote controller that comes with the projector. 5 All of the operations in this manual...
Projector Troubleshooting 47 Appendix 49 Remote Controller Signal Range 49 Projection Distance and Screen Size 50 Aspect Ratio Setting and Projection Image 51 Supported Signals 53 Specifications 55 About this manual are explained using the remote controller that comes with the projector. 5 All of the operations in this manual...
User Guide
Page 6
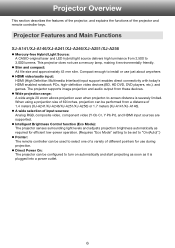
Projector Features and Main Functions XJ-A141/XJ-A146/XJ-A241/XJ-A246/XJ-A251/XJ-A256 z Mercury-free Hybrid Light Source: A CASIO-original laser and LED hybrid light source delivers high luminance from these devices. z HDMI video/audio input: HDMI (High ...projector does not use just about anywhere. Compact enough to select one of a variety of 1.4 meters (XJ-A241/XJ-A246/XJ-A251/XJ-A256) or 1.7 meters (XJ-A141/XJ-A146). z A wide selection of the projector and remote controller keys. z Direct Power On: The projector can be performed from a distance of different pointers for...
Projector Features and Main Functions XJ-A141/XJ-A146/XJ-A241/XJ-A246/XJ-A251/XJ-A256 z Mercury-free Hybrid Light Source: A CASIO-original laser and LED hybrid light source delivers high luminance from these devices. z HDMI video/audio input: HDMI (High ...projector does not use just about anywhere. Compact enough to select one of a variety of 1.4 meters (XJ-A241/XJ-A246/XJ-A251/XJ-A256) or 1.7 meters (XJ-A141/XJ-A146). z A wide selection of the projector and remote controller keys. z Direct Power On: The projector can be performed from a distance of different pointers for...
User Guide
Page 8
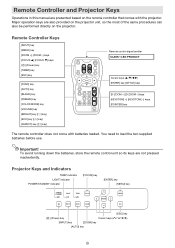
... indicator [FOCUS] key [ENTER] key [MENU] key [ESC] key [P] (Power) key Cursor keys (q/w/U/I) [INPUT] key [ZOOM] key [AUTO] key 8 Remote Controller and Projector Keys Operations in this manual are presented based on the projector. To avoid running down the batteries, store the... that comes with batteries loaded. You need to load the two supplied batteries before use. Major operation keys are not pressed inadvertently. Remote Controller Keys [INPUT] key [MENU] key [ZOOM +] [ZOOM -] keys [FOCUS S] [FOCUS T] keys [P] (Power) key [TIMER] key [ESC] key [FUNC] key [AUTO] ...
... indicator [FOCUS] key [ENTER] key [MENU] key [ESC] key [P] (Power) key Cursor keys (q/w/U/I) [INPUT] key [ZOOM] key [AUTO] key 8 Remote Controller and Projector Keys Operations in this manual are presented based on the projector. To avoid running down the batteries, store the... that comes with batteries loaded. You need to load the two supplied batteries before use. Major operation keys are not pressed inadvertently. Remote Controller Keys [INPUT] key [MENU] key [ZOOM +] [ZOOM -] keys [FOCUS S] [FOCUS T] keys [P] (Power) key [TIMER] key [ESC] key [FUNC] key [AUTO] ...

User Guide
Page 9
... the case, making sure that their positive (+) and negative (-) ends are facing correctly. 3. Back Terminals COMPUTER terminal AV terminal Remote control signal receiver Serial port* Speaker HDMI port USB port (XJ-A146/XJ-A246/XJ-A256 only) Anti-theft lock hole Intake vents Power connector * This serial port is for connecting a separately available special...
... the case, making sure that their positive (+) and negative (-) ends are facing correctly. 3. Back Terminals COMPUTER terminal AV terminal Remote control signal receiver Serial port* Speaker HDMI port USB port (XJ-A146/XJ-A246/XJ-A256 only) Anti-theft lock hole Intake vents Power connector * This serial port is for connecting a separately available special...
User Guide
Page 20
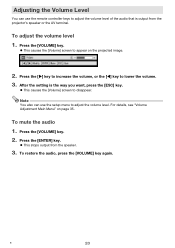
... of the audio that is the way you want, press the [ESC] key. Press the [ENTER] key. Adjusting the Volume Level You can use the remote controller keys to lower the volume. 3. B 20 z This causes the [Volume] screen to adjust the volume level. To restore the audio, press the [VOLUME] key...
... of the audio that is the way you want, press the [ESC] key. Press the [ENTER] key. Adjusting the Volume Level You can use the remote controller keys to lower the volume. 3. B 20 z This causes the [Volume] screen to adjust the volume level. To restore the audio, press the [VOLUME] key...
User Guide
Page 28
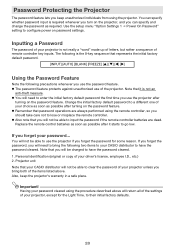
...] [S] [T] [W] [X] Using the Password Feature Note the following two items to your CASIO distributor will be able to clear the password of the items listed above will need to lose or misplace the remote controller. Use the setup menu "Option Settings 1 J Power On Password" setting to... have the password cleared. 1. z Remember that your CASIO distributor to configure power on the password feature. Personal identification...
...] [S] [T] [W] [X] Using the Password Feature Note the following two items to your CASIO distributor will be able to clear the password of the items listed above will need to lose or misplace the remote controller. Use the setup menu "Option Settings 1 J Power On Password" setting to... have the password cleared. 1. z Remember that your CASIO distributor to configure power on the password feature. Personal identification...

User Guide
Page 48
... and Warning Messages" (page 44). not light. Contact your retailer or authorized CASIO service center. 48 Press the remote controller [VOLUME] key and then use "Image Adjustment 1 J Color Balance" to normal operation. 1. On the remote controller, use the [FOCUS S] and [FOCUS T] keys to a Video Device...an automatic adjustment operation. z If the input source is connected to your original dealer or authorized CASIO service center for at least 10 minutes. 2. z The remote controller may be too low or muted. indicator is no problem with the input source device. Change...
... and Warning Messages" (page 44). not light. Contact your retailer or authorized CASIO service center. 48 Press the remote controller [VOLUME] key and then use "Image Adjustment 1 J Color Balance" to normal operation. 1. On the remote controller, use the [FOCUS S] and [FOCUS T] keys to a Video Device...an automatic adjustment operation. z If the input source is connected to your original dealer or authorized CASIO service center for at least 10 minutes. 2. z The remote controller may be too low or muted. indicator is no problem with the input source device. Change...

User Guide
Page 49
.../or shorter than that shown on the right (Back) when there is a sharp angle between the remote controller and the remote control signal receiver. Important! z The allowable distance between the remote controller and the projector is less when there is a special AV cable plugged into the AV terminal ...on the back or front of the projector. To avoid running down the batteries, store the remote control unit so its keys are not pressed inadvertently. 49 Front ±30 degrees max. 5 meters (16.4 feet) max. ±30 degrees max...
.../or shorter than that shown on the right (Back) when there is a sharp angle between the remote controller and the remote control signal receiver. Important! z The allowable distance between the remote controller and the projector is less when there is a special AV cable plugged into the AV terminal ...on the back or front of the projector. To avoid running down the batteries, store the remote control unit so its keys are not pressed inadvertently. 49 Front ±30 degrees max. 5 meters (16.4 feet) max. ±30 degrees max...