
Owners Manual
Page 1
... Modes 24 Exposure Adjustment 25 Changing the Aperture Setting 26 Record Mode Displays 27 Using the Self-Timer 30 Playing Back Images 31 Displaying Images on the Camera's LCD 31 Displaying Images on a TV Screen 32 Page Status Indicators 33 Producing a Multi-Page Display 34 Using the Zoom Function 36 3 Using Auto Play 38 Protecting Memory Pages 41 Unprotecting Memory Pages 43 Hiding Protected Memory Pages 45 Deleting Memory Pages 46 Deleting Images From Memory 46 Resolution Conversion 50 Connecting to carefully read this manual. • CASIO COMPUTER CO., LTD. The QV-100...
... Modes 24 Exposure Adjustment 25 Changing the Aperture Setting 26 Record Mode Displays 27 Using the Self-Timer 30 Playing Back Images 31 Displaying Images on the Camera's LCD 31 Displaying Images on a TV Screen 32 Page Status Indicators 33 Producing a Multi-Page Display 34 Using the Zoom Function 36 3 Using Auto Play 38 Protecting Memory Pages 41 Unprotecting Memory Pages 43 Hiding Protected Memory Pages 45 Deleting Memory Pages 46 Deleting Images From Memory 46 Resolution Conversion 50 Connecting to carefully read this manual. • CASIO COMPUTER CO., LTD. The QV-100...
Owners Manual
Page 2
... leave the battery compartment cover open the battery compartment cover, disconnect the AC adaptor from the power outlet, and contact your nearest CASIO service provider. 5 Liquid Crystal Digital Camera • Never use or keep the camera in a particular installation. However, there is encouraged to try to direct sunlight - Properly shielded cables with Part 15 of the FCC Rules. Always leave maintenance and repair work up to...
... leave the battery compartment cover open the battery compartment cover, disconnect the AC adaptor from the power outlet, and contact your nearest CASIO service provider. 5 Liquid Crystal Digital Camera • Never use or keep the camera in a particular installation. However, there is encouraged to try to direct sunlight - Properly shielded cables with Part 15 of the FCC Rules. Always leave maintenance and repair work up to...
Owners Manual
Page 3
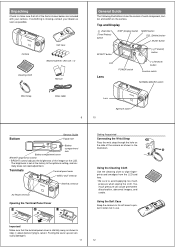
Top and Display /PROTECT (Timer/Protect) button DISP (Display) button MODE button DEL (Delete) button Shutter button EFFECT button [+] (Forward) button LCD POWER switch Lens [-] (Reverse) button Function switch NORMAL/MACRO switch Wrist Strap Video cable Lens 9 10 Aperture switch Bottom General Guide Tripod hole Battery compartment lock Battery compartment cover BRIGHT (brightness) control • BRIGHT control adjusts the brightness of the items shown below are included with your dealer as soon as possible. Using the Soft Case Keep the camera in its soft case to pro- ...
Top and Display /PROTECT (Timer/Protect) button DISP (Display) button MODE button DEL (Delete) button Shutter button EFFECT button [+] (Forward) button LCD POWER switch Lens [-] (Reverse) button Function switch NORMAL/MACRO switch Wrist Strap Video cable Lens 9 10 Aperture switch Bottom General Guide Tripod hole Battery compartment lock Battery compartment cover BRIGHT (brightness) control • BRIGHT control adjusts the brightness of the items shown below are included with your dealer as soon as possible. Using the Soft Case Keep the camera in its soft case to pro- ...

Owners Manual
Page 4
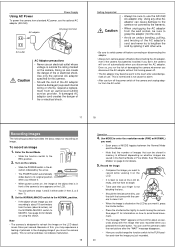
... batteries Approximately 150 minutes continuous operation Recording for about 96 images (one image per minute) FR6 AA-size lithium batteries Approximately 240 minutes continuous operation Recording for more minutes (alkaline batteries) of batteries when the camera is turned off whenever loading or replacing batteries. 1. Getting Acquainted Flash Memory The camera features flash memory for a period of the camera in the Record Mode or after about 10 more than two weeks. • Never recharge batteries, never allow direct connection...
... batteries Approximately 150 minutes continuous operation Recording for about 96 images (one image per minute) FR6 AA-size lithium batteries Approximately 240 minutes continuous operation Recording for more minutes (alkaline batteries) of batteries when the camera is turned off whenever loading or replacing batteries. 1. Getting Acquainted Flash Memory The camera features flash memory for a period of the camera in the Record Mode or after about 10 more than two weeks. • Never recharge batteries, never allow direct connection...
Owners Manual
Page 5
... recording is about seven times per second. See page 24 for alarm. • After use turn off . • The AC adaptor may experience a feeling of the AC adaptor become warm to its original position when you release it on the LCD DIGITAL CAMERA QV-100 LCD. • It is best to look at the LCD directly, and not from an authorized CASIO service provider. Use MODE...
... recording is about seven times per second. See page 24 for alarm. • After use turn off . • The AC adaptor may experience a feeling of the AC adaptor become warm to its original position when you release it on the LCD DIGITAL CAMERA QV-100 LCD. • It is best to look at the LCD directly, and not from an authorized CASIO service provider. Use MODE...
Owners Manual
Page 6
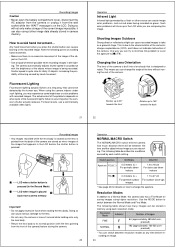
... the shutter button can change the aperture. For best results, use a commercially available video lights. Changing the Lens Orientation The lens of the problems depends on the LCD. • Use a tripod whenever possible when recording images in the Record Mode) B ....... PROTECT EFFECT DISP MODE DEL ON/OFPFOWER REC PLAY A A ....... Resolution Modes In addition to a Normal Mode, this problem is built into a lens body that cannot be between the Normal Mode and Fine Mode. The camera automatically adjusts shutter speed in memory using...
... the shutter button can change the aperture. For best results, use a commercially available video lights. Changing the Lens Orientation The lens of the problems depends on the LCD. • Use a tripod whenever possible when recording images in the Record Mode) B ....... PROTECT EFFECT DISP MODE DEL ON/OFPFOWER REC PLAY A A ....... Resolution Modes In addition to a Normal Mode, this problem is built into a lens body that cannot be between the Normal Mode and Fine Mode. The camera automatically adjusts shutter speed in memory using...
Owners Manual
Page 7
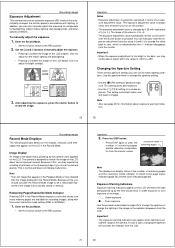
Recording Images Exposure Adjustment This camera features an automatic exposure (AE) function that appear on the LCD about exposure warning indicators. 26 Recording Images Record Mode Displays The following provides details on the images, indicators and messages that automatically changes the shutter speed in accordance with lighting. After adjusting the exposure, press the shutter button to record the image. 25 Operation Notes • Exposure adjustment is generally expressed in terms of the object that is changed by using [+] and [-] to change the value back to...
Recording Images Exposure Adjustment This camera features an automatic exposure (AE) function that appear on the LCD about exposure warning indicators. 26 Recording Images Record Mode Displays The following provides details on the images, indicators and messages that automatically changes the shutter speed in accordance with lighting. After adjusting the exposure, press the shutter button to record the image. 25 Operation Notes • Exposure adjustment is generally expressed in terms of the object that is changed by using [+] and [-] to change the value back to...
Owners Manual
Page 8
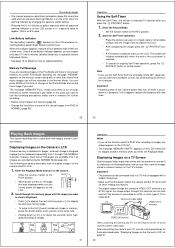
... PLAY after you can then view the images stored in any mode. After connecting the camera and TV, use the Self-Timer with the camera to connect it to adjust exposure while an exposure warning indicator is assigned to appear. exposure value to page that image appears on the LCD first. • The message "MEMORY EMPTY" appears on the LCD. 2. Once the low battery indicator appears, you press the /PROTECT button. 1. In this indicator appears, replace all images...
... PLAY after you can then view the images stored in any mode. After connecting the camera and TV, use the Self-Timer with the camera to connect it to adjust exposure while an exposure warning indicator is assigned to appear. exposure value to page that image appears on the LCD first. • The message "MEMORY EMPTY" appears on the LCD. 2. Once the low battery indicator appears, you press the /PROTECT button. 1. In this indicator appears, replace all images...
Owners Manual
Page 9
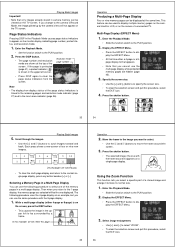
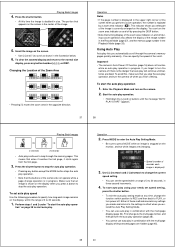
... Playback Mode. • Slide the function switch to display the EFFECT Menu. 3. Press the shutter button. 33 34 5. Selecting a Memory Page in a Multi-Page Display You can use the multi-page display while protected memory pages are colored gray. • To clear the multi-page display and return to twice its normal size. 1. Enter the Playback Mode. • Set the function switch to the zoom area indicator (page 36). Move the frame to the image...
... Playback Mode. • Slide the function switch to display the EFFECT Menu. 3. Press the shutter button. 33 34 5. Selecting a Memory Page in a Multi-Page Display You can use the multi-page display while protected memory pages are colored gray. • To clear the multi-page display and return to twice its normal size. 1. Enter the Playback Mode. • Set the function switch to the zoom area indicator (page 36). Move the frame to the image...
Owners Manual
Page 10
... shutter button to the normal size display, press any time, change operation is stopped on the camera. 2. To set auto play . Operation 2. To clear the zoomed display and return to stop the auto play will continue until the message "AUTO PLAY START" appears. 37 38 Playing Back Images 3 seconds 3 seconds • Auto play lets you perform a zoom operation, the number is displayed in combination with the multi-page display (page 34). Important! • The camera's Auto Power Off function (page 16) does not function while an auto play setting mode...
... shutter button to the normal size display, press any time, change operation is stopped on the camera. 2. To set auto play . Operation 2. To clear the zoomed display and return to stop the auto play will continue until the message "AUTO PLAY START" appears. 37 38 Playing Back Images 3 seconds 3 seconds • Auto play lets you perform a zoom operation, the number is displayed in combination with the multi-page display (page 34). Important! • The camera's Auto Power Off function (page 16) does not function while an auto play setting mode...

Owners Manual
Page 11
... the Playback Mode and turn on power. • Slide the function switch to indicate it is displayed. 6. Select "ALL". • Use [+] and [-] to select "ALL" and then press the shutter button. • When you select "ALL", the message "PROTECT ALL?" Playing Back Images Unprotecting Memory Pages You can protect specific memory pages to ensure that they are hidden (page 45). Press the shutter button. • This causes the "PROTECT PAGE" menu to indicate the image...
... the Playback Mode and turn on power. • Slide the function switch to indicate it is displayed. 6. Select "ALL". • Use [+] and [-] to select "ALL" and then press the shutter button. • When you select "ALL", the message "PROTECT ALL?" Playing Back Images Unprotecting Memory Pages You can protect specific memory pages to ensure that they are hidden (page 45). Press the shutter button. • This causes the "PROTECT PAGE" menu to indicate the image...

Owners Manual
Page 12
... the shutter button. 7. appears on the moni- Press the shutter button. 5. You can delete individual pages, or all the pages currently stored in this operation. 6. See page 43 for you are using the all pages currently in this procedure, select the EXIT icon. 4. Use [+] and [-] to display the image you are deleting. Select the Playback Mode and turn on the camera. Playing Back Images Hiding Protected Memory Pages This function makes it...
... the shutter button. 7. appears on the moni- Press the shutter button. 5. You can delete individual pages, or all the pages currently stored in this operation. 6. See page 43 for you are using the all pages currently in this procedure, select the EXIT icon. 4. Use [+] and [-] to display the image you are deleting. Select the Playback Mode and turn on the camera. Playing Back Images Hiding Protected Memory Pages This function makes it...

Owners Manual
Page 13
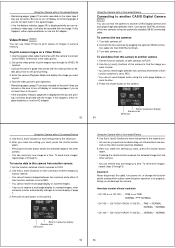
... changes pages automatically at a preset speed. 52 Enter the Playback Mode. • Slide the function switch to select "ALL" and press the shutter button. 4. In each type of all images in the direction indicated by the arrow. 2. Display the FINEˠNORMAL Menu. • Press the MODE button to . DIGITAL terminal DIGITAL terminal* DEL ON/OFPFOWER DEL ON/OFPFOWER Connecting cable* NOMAL NOMAL MACRO MACRO * The type of connecting cable you should use auto play when recording camera images...
... changes pages automatically at a preset speed. 52 Enter the Playback Mode. • Slide the function switch to select "ALL" and press the shutter button. 4. In each type of all images in the direction indicated by the arrow. 2. Display the FINEˠNORMAL Menu. • Press the MODE button to . DIGITAL terminal DIGITAL terminal* DEL ON/OFPFOWER DEL ON/OFPFOWER Connecting cable* NOMAL NOMAL MACRO MACRO * The type of connecting cable you should use auto play when recording camera images...
Owners Manual
Page 14
... 1. 3. Set the function switches of remaining pages if you want , press the shutter button again. • Pressing the shutter button receives the selected image from the other camera become disabled. 5. Doing so can receive only one image at a time. How data transfer affects resolution • QV-100 QV-100 ...... Be sure to previous display Receive icon Send icon 54 Using the Camera with a Connected Device 4. Video Printer VIDEO You can send only one image at a time. Use the special video cable that...
... 1. 3. Set the function switches of remaining pages if you want , press the shutter button again. • Pressing the shutter button receives the selected image from the other camera become disabled. 5. Doing so can receive only one image at a time. How data transfer affects resolution • QV-100 QV-100 ...... Be sure to previous display Receive icon Send icon 54 Using the Camera with a Connected Device 4. Video Printer VIDEO You can send only one image at a time. Use the special video cable that...
Owners Manual
Page 15
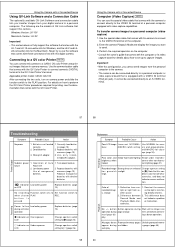
...Shoot under incandes- Strong direct or reflected sunlight Change aperture setting to w h e n s h u t t e r PLAY. Important! • With this camera. Batteries not loaded 1. Color of the computer. 2. Reflection from sunlight or light from your digital camera to the VIDEO IN terminal of recorded image is not shining directly into lens. 2. No recording Function switch sets to Set function switch to [˔]. auto play. 60 Recording Using the Camera with a Connected Device Using QV-Link Software and a Connection Cable The optionally available QV-Link Software and connection cable...
...Shoot under incandes- Strong direct or reflected sunlight Change aperture setting to w h e n s h u t t e r PLAY. Important! • With this camera. Batteries not loaded 1. Color of the computer. 2. Reflection from sunlight or light from your digital camera to the VIDEO IN terminal of recorded image is not shining directly into lens. 2. No recording Function switch sets to Set function switch to [˔]. auto play. 60 Recording Using the Camera with a Connected Device Using QV-Link Software and a Connection Cable The optionally available QV-Link Software and connection cable...
Owners Manual
Page 16
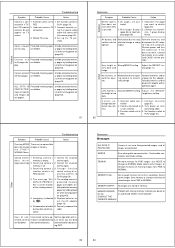
... in switch setting of re- dark. Action Cannot transfer 1. keeps occurring) 2. REC position. The message "ALL 4. Replace batteries or by press- data communications. ing EXIT. Check cable connections and mode settings. the camera (page 32). 3. Set up to PLAY (page 31). 62 Other Troubleshooting Sympton Probable Cause Pressing MODE There are stored in memory. ry pages by holding down [-] while turning power on TV cable that comes with internal memory. are protected. 2. All...
... in switch setting of re- dark. Action Cannot transfer 1. keeps occurring) 2. REC position. The message "ALL 4. Replace batteries or by press- data communications. ing EXIT. Check cable connections and mode settings. the camera (page 32). 3. Set up to PLAY (page 31). 62 Other Troubleshooting Sympton Probable Cause Pressing MODE There are stored in memory. ry pages by holding down [-] while turning power on TV cable that comes with internal memory. are protected. 2. All...

Owners Manual
Page 17
... flash memory Number of Pixels: 360,000) Lens Fixed focus with page protect feature) Imaging Device .......... 1/4-inch CCD (Total Number of Memory Pages FINE(VGA 64 (approximately 480-kbit compressed) NORMAL(Q-VGA) .... 192 (approximately 160-kbit compressed) Delete Functions ........ EV +5 to 18 Exposure Adjustment ..... -2EV to 27cm (from lens protection filter) Light Metering TTL center point by photographic element Exposure Metering ..... LR6 (AM3) AA-size alkaline batteries Approximately 150 minutes continuous operation Recording...
... flash memory Number of Pixels: 360,000) Lens Fixed focus with page protect feature) Imaging Device .......... 1/4-inch CCD (Total Number of Memory Pages FINE(VGA 64 (approximately 480-kbit compressed) NORMAL(Q-VGA) .... 192 (approximately 160-kbit compressed) Delete Functions ........ EV +5 to 18 Exposure Adjustment ..... -2EV to 27cm (from lens protection filter) Light Metering TTL center point by photographic element Exposure Metering ..... LR6 (AM3) AA-size alkaline batteries Approximately 150 minutes continuous operation Recording...


