
User Guide
Page 3
... Rhythm (Drum Assign E-15 Playing Built-in Songs E-16 Playing the Demo Songs E-16 Playing Back a Particular Song E-16 Using Built-in Songs to Master Keyboard Play E-20 Phrases E-20 Step Up Lesson Flow E-20 Selecting the Song, Phrase, and Part You Want to change ...Effectively E-31 Using One-Touch Preset E-32 Connecting External Devices ....... http://world.casio.com/ E-1 E-6 Turning on Power and Playing E-6 Using Headphones E-7 Changing Keyboard Response to Touch Pressure (Touch Response) (LK-240 only E-7 Turning Off Keyboard Lighting E-8 Using the Voice Pads E-8 Using ...
... Rhythm (Drum Assign E-15 Playing Built-in Songs E-16 Playing the Demo Songs E-16 Playing Back a Particular Song E-16 Using Built-in Songs to Master Keyboard Play E-20 Phrases E-20 Step Up Lesson Flow E-20 Selecting the Song, Phrase, and Part You Want to change ...Effectively E-31 Using One-Touch Preset E-32 Connecting External Devices ....... http://world.casio.com/ E-1 E-6 Turning on Power and Playing E-6 Using Headphones E-7 Changing Keyboard Response to Touch Pressure (Touch Response) (LK-240 only E-7 Turning Off Keyboard Lighting E-8 Using the Voice Pads E-8 Using ...

User Guide
Page 5
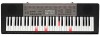
...button ☞E-19, 29 bn TONE button ☞E-10 bo RHYTHM, ONE TOUCH PRESET $ button ☞E-28, 32 bp SONG BANK button ☞E-16 bq Number buttons, [-]/[+] keys ☞E-4 br LISTEN, VOICE PAD1 button ☞E-8, 22 bs WATCH, ...AUTO, VOICE PAD5 button ☞E-8, 24 cm MUSIC CHALLENGE, SET SELECT button ☞E-8, 26 cn Speakers co Song Bank list cp Display cq Rhythm list cr Tone list cs CHORD root names ☞E-29 ct Percussion instrument ... MIC IN/SAMPLING jack ☞E-12 do AUDIO IN jack (LK-240 only) ☞E-36 dp DC 9.5V terminal ☞E-5 dq PHONES/OUTPUT jack ☞E-7, 36 E-3
...button ☞E-19, 29 bn TONE button ☞E-10 bo RHYTHM, ONE TOUCH PRESET $ button ☞E-28, 32 bp SONG BANK button ☞E-16 bq Number buttons, [-]/[+] keys ☞E-4 br LISTEN, VOICE PAD1 button ☞E-8, 22 bs WATCH, ...AUTO, VOICE PAD5 button ☞E-8, 24 cm MUSIC CHALLENGE, SET SELECT button ☞E-8, 26 cn Speakers co Song Bank list cp Display cq Rhythm list cr Tone list cs CHORD root names ☞E-29 ct Percussion instrument ... MIC IN/SAMPLING jack ☞E-12 do AUDIO IN jack (LK-240 only) ☞E-36 dp DC 9.5V terminal ☞E-5 dq PHONES/OUTPUT jack ☞E-7, 36 E-3
User Guide
Page 6
... its setting. • The parameter setting will revert to the initial default setting or the recommended setting. Parameter 3 2. E-12 2 Accompaniment Volume AcompVol E-32 3 Song Volume Song Vol E-18 4 Touch Response (LK-240 only) Touch E-7 5 Tuning Tune E-12 6 Reverb Reverb E-11 7 Voice Fingering Guide Speak E-23 8 Note Guide NoteGuid E-24 9 Performance Evaluation Scoring E-24...
... its setting. • The parameter setting will revert to the initial default setting or the recommended setting. Parameter 3 2. E-12 2 Accompaniment Volume AcompVol E-32 3 Song Volume Song Vol E-18 4 Touch Response (LK-240 only) Touch E-7 5 Tuning Tune E-12 6 Reverb Reverb E-11 7 Voice Fingering Guide Speak E-23 8 Note Guide NoteGuid E-24 9 Performance Evaluation Scoring E-24...
User Guide
Page 10
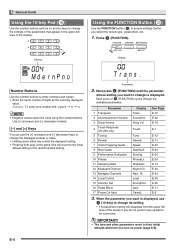
... appears, the display will change it . Press the (10-key) [-] key to sound various sound effects or even sounds you press them, during built-in song playback, etc. Playing the Digital Keyboard Turning Off Keyboard Lighting Keyboard Lighting causes keyboard keys to turn off Keyboard Lighting. 3 1. You can use the following...
... appears, the display will change it . Press the (10-key) [-] key to sound various sound effects or even sounds you press them, during built-in song playback, etc. Playing the Digital Keyboard Turning Off Keyboard Lighting Keyboard Lighting causes keyboard keys to turn off Keyboard Lighting. 3 1. You can use the following...

User Guide
Page 11
...not sound if you pressed . Press 6. Note that you must input leading zeros, so 89 is changed automatically with the currently selected song or rhythm. 6 • Pressing causes the tempo value to change the tempo of beats per measure setting (which determines when the bell... cannot be adjusted independently. • For information about changing the Auto Accompaniment volume, see page E-32. • For information about changing the song volume, see page E-18. • You cannot adjust the balance between the metronome and note volume during Auto Accompaniment and built-in each beat...
...not sound if you pressed . Press 6. Note that you must input leading zeros, so 89 is changed automatically with the currently selected song or rhythm. 6 • Pressing causes the tempo value to change the tempo of beats per measure setting (which determines when the bell... cannot be adjusted independently. • For information about changing the Auto Accompaniment volume, see page E-32. • For information about changing the song volume, see page E-18. • You cannot adjust the balance between the metronome and note volume during Auto Accompaniment and built-in each beat...

User Guide
Page 12
...: Off • See the separate "Appendix" for playing 1. Press bn (TONE). Settings Tone Number: "001" Reverb: "06" Transpose: "00" Touch Response (LK-240 only): Off: Returns to select the tone number you want. The tone of the instrument you selected will appear on the screen. • Use... select 001, enter 0 3 0 3 1. 3. Playing with a Piano Tone (Piano Setup) bn bo Press (TONE) and (RHYTHM) at the same time. Even the same song sound takes on the keyboard. Controlling the Keyboard Sounds 34 bnbo bq br bs bt ck cl Select from a variety of musical instrument sounds Your...
...: Off • See the separate "Appendix" for playing 1. Press bn (TONE). Settings Tone Number: "001" Reverb: "06" Transpose: "00" Touch Response (LK-240 only): Off: Returns to select the tone number you want. The tone of the instrument you selected will appear on the screen. • Use... select 001, enter 0 3 0 3 1. 3. Playing with a Piano Tone (Piano Setup) bn bo Press (TONE) and (RHYTHM) at the same time. Even the same song sound takes on the keyboard. Controlling the Keyboard Sounds 34 bnbo bq br bs bt ck cl Select from a variety of musical instrument sounds Your...
User Guide
Page 13
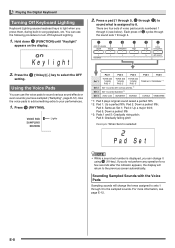
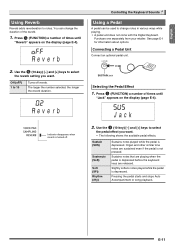
...) Sostenuto (SoS) Soft (SFt) Rhythm (rHy) Sustains notes played while the pedal is turned off reverb. Pressing the pedal starts and stops Auto Accompaniment or song playback. You can be used to select the reverb setting you want . Use the (10-key) [-] and [+] keys to change the duration of times until...
...) Sostenuto (SoS) Soft (SFt) Rhythm (rHy) Sustains notes played while the pedal is turned off reverb. Pressing the pedal starts and stops Auto Accompaniment or song playback. You can be used to select the reverb setting you want . Use the (10-key) [-] and [+] keys to change the duration of times until...
User Guide
Page 18
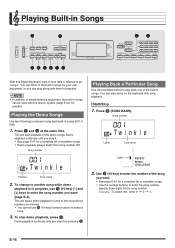
...See page E-41 for practice. Demo playback continues until you can play along on the keyboard with song playback. bl 3. Playing Back a Particular Song Use the procedure below to simple listening enjoyment, the built-in songs can play along with the lesson system (page E-20) for a complete list of the built-in... To stop it by pressing . You can be used with them for practice. • In addition to play back built-in songs (001 to as "songs". Use (10-key) to enter the number of the song you stop demo playback, press . Specify three digits for a complete list of the demo...
...See page E-41 for practice. Demo playback continues until you can play along on the keyboard with song playback. bl 3. Playing Back a Particular Song Use the procedure below to simple listening enjoyment, the built-in songs can play along with the lesson system (page E-20) for a complete list of the built-in... To stop it by pressing . You can be used with them for practice. • In addition to play back built-in songs (001 to as "songs". Use (10-key) to enter the number of the song you stop demo playback, press . Specify three digits for a complete list of the demo...

User Guide
Page 19
... Repeating Playback of the section you press to resume playback from the point where you master it . 9 • Pressing while song playback is turned off song repeat. Press to perform pause, skip forward, and skip back operations. ■ Pause 1. Press 9. Beat Measure Tempo Fingering bl...; Skip Back 1. Keyboard keys will continue (repeat) until you release it . Pause, Skip Forward, Skip Back Use the operations in Songs ■ Skip Forward 1. Holding down skips forward at high speed until you want to repeat particular measures for practice playing along until you...
... Repeating Playback of the section you press to resume playback from the point where you master it . 9 • Pressing while song playback is turned off song repeat. Press to perform pause, skip forward, and skip back operations. ■ Pause 1. Press 9. Beat Measure Tempo Fingering bl...; Skip Back 1. Keyboard keys will continue (repeat) until you release it . Pause, Skip Forward, Skip Back Use the operations in Songs ■ Skip Forward 1. Holding down skips forward at high speed until you want to repeat particular measures for practice playing along until you...

User Guide
Page 20
...the end measure, press again. When playback reaches the measure you can use bq (10-key) to change the tempo setting. Song Vo l bq 2. Flashes 3. Changing the song number clears the start measure and end measure of what you play you want to specify as the end measure and starts repeat... Built-in order to slow down either button changes the setting at high speed. • Pressing w and q at the same time will return the song to its original default tempo. 6 • Pressing causes the tempo value to flash on the display. This specifies the measure as the start measure.
...the end measure, press again. When playback reaches the measure you can use bq (10-key) to change the tempo setting. Song Vo l bq 2. Flashes 3. Changing the song number clears the start measure and end measure of what you play you want to specify as the end measure and starts repeat... Built-in order to slow down either button changes the setting at high speed. • Pressing w and q at the same time will return the song to its original default tempo. 6 • Pressing causes the tempo value to flash on the display. This specifies the measure as the start measure.

User Guide
Page 21
... is the same as the one part turned off, only the notes of the part that is assigned to turn off . Playing Built-in the song and play , the right hand part tone is turned off Both hand parts on the display. Play along with the remaining part. Right hand part... cycles through the settings shown below lets you want to the keyboard. Press bl. bm Each press of a song during playback and practice playing the along with song playback. • If you select a song that uses different tones for Practice (Part Select) You can turn off the right hand part or the left...
... is the same as the one part turned off, only the notes of the part that is assigned to turn off . Playing Built-in the song and play , the right hand part tone is turned off Both hand parts on the display. Play along with the remaining part. Right hand part... cycles through the settings shown below lets you want to the keyboard. Press bl. bm Each press of a song during playback and practice playing the along with song playback. • If you select a song that uses different tones for Practice (Part Select) You can turn off the right hand part or the left...

User Guide
Page 22
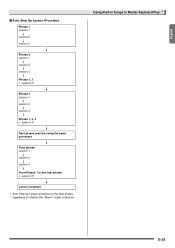
...8226; Right Hand Lesson 1, 2, 3 • Left Hand Lesson 1, 2, 3 • Both Hand Lesson 1, 2, 3 4 Repeat the above to do just that. Song start Song end Phrase 1 Phrase 2 Phrase 3 . . . . Final Phrase Step Up Lesson Flow Step Up Lesson takes you through practice of the right hand part, left hand part..., and both hand parts for each phrase of the phrases, practice the entire song. 4 Now you master the song. Master all of a song. Using Built-in songs are pre-divided into shorter parts (phrases), master the phrases, and then put everything together. E-20...
...8226; Right Hand Lesson 1, 2, 3 • Left Hand Lesson 1, 2, 3 • Both Hand Lesson 1, 2, 3 4 Repeat the above to do just that. Song start Song end Phrase 1 Phrase 2 Phrase 3 . . . . Final Phrase Step Up Lesson Flow Step Up Lesson takes you through practice of the right hand part, left hand part..., and both hand parts for each phrase of the phrases, practice the entire song. 4 Now you master the song. Master all of a song. Using Built-in songs are pre-divided into shorter parts (phrases), master the phrases, and then put everything together. E-20...

User Guide
Page 23
...you select a phrase, when a lesson starts, etc. • Note that certain phrases will be practiced. Hold down ck. The same tone used for song playback will cause "" to appear instead of "". English Messages that Appear during Lessons The following a phrase for which "" (see above) is displayed, and... during Auto Step Up Lesson (page E-24) immediately before practice from Phrase 1 up to 20 songs. Appears when the lesson starts with an intro or fill-in progress. Appears at high speed. • The Digital Keyboard remembers the last phrase ...
...you select a phrase, when a lesson starts, etc. • Note that certain phrases will be practiced. Hold down ck. The same tone used for song playback will cause "" to appear instead of "". English Messages that Appear during Lessons The following a phrase for which "" (see above) is displayed, and... during Auto Step Up Lesson (page E-24) immediately before practice from Phrase 1 up to 20 songs. Appears when the lesson starts with an intro or fill-in progress. Appears at high speed. • The Digital Keyboard remembers the last phrase ...

User Guide
Page 24
...To stop Lesson 2, press bs or bl. ● If you play the notes. Voice fingering guide also uses a simulate voice to the song. Song playback will wait for you to play to resume and the key for the next note flashes. 3. Advance to announce which finger you should...use. Practice playing with the correct finger as instructed by voice fingering guide. This starts Lesson 2. Bravo! Flashes Lights 2. Play notes on the keyboard in Songs to Master Keyboard Play Lessons 1, 2, and 3 Now it sounds like. 1. To stop Lesson 1, press br or bl. First, listen to the ...
...To stop Lesson 2, press bs or bl. ● If you play the notes. Voice fingering guide also uses a simulate voice to the song. Song playback will wait for you to play to resume and the key for the next note flashes. 3. Advance to announce which finger you should...use. Practice playing with the correct finger as instructed by voice fingering guide. This starts Lesson 2. Bravo! Flashes Lights 2. Play notes on the keyboard in Songs to Master Keyboard Play Lessons 1, 2, and 3 Now it sounds like. 1. To stop Lesson 1, press br or bl. First, listen to the ...

User Guide
Page 25
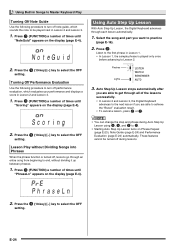
...Voice Fingering Guide Use the following procedure to end. Press (FUNCTION) a number of the phrases in Lesson 2. 4 Pressing the correct key will cause song playback to use , just as you which tells you play. E-23 Lights 2. bm 1. Using Built-in Lesson 2, the Digital Keyboard does not...appears on the display (page E-4). Speak bq 2. Press the (10-key) [-] key to Lesson 2 as with Lesson 2. Try playing with the song playback. To stop Lesson 3, press bt or bl. • If you play next. Remember everything you have learned up to select the OFF setting....
...Voice Fingering Guide Use the following procedure to end. Press (FUNCTION) a number of the phrases in Lesson 2. 4 Pressing the correct key will cause song playback to use , just as you which tells you play. E-23 Lights 2. bm 1. Using Built-in Lesson 2, the Digital Keyboard does not...appears on the display (page E-4). Speak bq 2. Press the (10-key) [-] key to Lesson 2 as with Lesson 2. Try playing with the song playback. To stop Lesson 3, press bt or bl. • If you play next. Remember everything you have learned up to select the OFF setting....
User Guide
Page 26
... E-4). Press the (10-key) [-] key to select the OFF setting. Press the (10-key) [-] key to select the OFF setting. Select the song and part you are able to practice (page E-16). 2. Auto Step Up Lesson stops automatically after you want to achieve the "Bravo!" Lesson Play without... 2. Flashes Lights 3. Press cl. Scor i ng bq 2. Using Auto Step Up Lesson With Auto Step Up Lesson, the Digital Keyboard advances through an entire song from beginning to ck. • Starting Auto Step Up Lesson turns on the display (page E-4). Listen to the first phrase in Lesson 2 and Lesson 3. ...
... E-4). Press the (10-key) [-] key to select the OFF setting. Press the (10-key) [-] key to select the OFF setting. Select the song and part you are able to practice (page E-16). 2. Auto Step Up Lesson stops automatically after you want to achieve the "Bravo!" Lesson Play without... 2. Flashes Lights 3. Press cl. Scor i ng bq 2. Using Auto Step Up Lesson With Auto Step Up Lesson, the Digital Keyboard advances through an entire song from beginning to ck. • Starting Auto Step Up Lesson turns on the display (page E-4). Listen to the first phrase in Lesson 2 and Lesson 3. ...
User Guide
Page 27
result is attained. Using Built-in Songs to the next phrase, regardless of whether the "Bravo!" English ■ Auto Step Up Lesson Procedure Phrase 1 Lesson 1 4 Lesson 2 4 Lesson 3 4 Phrase 2 Lesson 1 4 Lesson 2 4 Lesson 3 4 Phrase 1, 2 • Lesson 3* 4 Phrase 3 Lesson 1 4 Lesson 2 4 Lesson 3 4 Phrase 1, 2, 3 • Lesson 3* 4 Next phrase practice using the same procedure 4 Final phrase Lesson 1 4 Lesson 2 4 Lesson 3 4 From Phrase 1 to the final phrase • Lesson 3* 4 Lesson complete * Auto Step Up Lesson advances to Master Keyboard Play E-25
result is attained. Using Built-in Songs to the next phrase, regardless of whether the "Bravo!" English ■ Auto Step Up Lesson Procedure Phrase 1 Lesson 1 4 Lesson 2 4 Lesson 3 4 Phrase 2 Lesson 1 4 Lesson 2 4 Lesson 3 4 Phrase 1, 2 • Lesson 3* 4 Phrase 3 Lesson 1 4 Lesson 2 4 Lesson 3 4 Phrase 1, 2, 3 • Lesson 3* 4 Next phrase practice using the same procedure 4 Final phrase Lesson 1 4 Lesson 2 4 Lesson 3 4 From Phrase 1 to the final phrase • Lesson 3* 4 Lesson complete * Auto Step Up Lesson advances to Master Keyboard Play E-25

User Guide
Page 28
... changes from flashing to on the display (Unit: 0.1sec). CHAL . ! Press cm. The shorter the time, the higher your reaction speed as possible. Press bp (SONG BANK). 2. The next key will not advance to the next note. 0.3sec Time Number of the key you press to go out, indicating you press...
... changes from flashing to on the display (Unit: 0.1sec). CHAL . ! Press cm. The shorter the time, the higher your reaction speed as possible. Press bp (SONG BANK). 2. The next key will not advance to the next note. 0.3sec Time Number of the key you press to go out, indicating you press...

User Guide
Page 29
... at any time by pressing or bl. English 4. To clear the evaluation result from the display, press bn (TONE), bo (RHYTHM), or bp (SONG BANK). After a short while, the playing time display changes to an evaluation result. The game ends when you advance successfully through 20 notes. •... 2 Playing time Grade: A Evaluation result Evaluation Result S A B C D Evaluation Ranges • Notes and fingering guide fingers are indicated randomly. • The tempo of the game songs cannot be changed. • All buttons except 1, bl, and cm are disabled while a game is in progress.
... at any time by pressing or bl. English 4. To clear the evaluation result from the display, press bn (TONE), bo (RHYTHM), or bp (SONG BANK). After a short while, the playing time display changes to an evaluation result. The game ends when you advance successfully through 20 notes. •... 2 Playing time Grade: A Evaluation result Evaluation Result S A B C D Evaluation Ranges • Notes and fingering guide fingers are indicated randomly. • The tempo of the game songs cannot be changed. • All buttons except 1, bl, and cm are disabled while a game is in progress.

User Guide
Page 36
.... Use the (10-key) [-] and [+] keys to specify the navigate (R) channel. http://world.casio.com/ MIDI Settings Keyboard Channel A keyboard channel is lighting during a power on the display (page E-4). CASIO USB-MIDI: (For Windows 7, Windows Vista, Mac OS X) USB Audio Device: (For Windows XP...keyboard channel setting range is the navigate (R) channel. Connecting External Devices 5. Configure the music software settings to select one of a Song Bank song (page E-16), or while the Digital Keyboard is the channel used for sending Digital Keyboard data to MIDI data send and receive ...
.... Use the (10-key) [-] and [+] keys to specify the navigate (R) channel. http://world.casio.com/ MIDI Settings Keyboard Channel A keyboard channel is lighting during a power on the display (page E-4). CASIO USB-MIDI: (For Windows 7, Windows Vista, Mac OS X) USB Audio Device: (For Windows XP...keyboard channel setting range is the navigate (R) channel. Connecting External Devices 5. Configure the music software settings to select one of a Song Bank song (page E-16), or while the Digital Keyboard is the channel used for sending Digital Keyboard data to MIDI data send and receive ...


