Owners Manual
Page 2
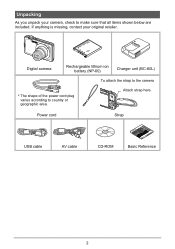
Power cord Strap USB cable AV cable CD-ROM Basic Reference 2 Digital camera Rechargeable lithium ion battery (NP-60) Charger unit (BC-60L) To attach the strap to the camera * The shape of the power cord plug varies according to make sure that all items shown below are included. Attach strap here. Unpacking As you unpack your original retailer. If anything is missing, contact your camera, check to country or geographic area.
Power cord Strap USB cable AV cable CD-ROM Basic Reference 2 Digital camera Rechargeable lithium ion battery (NP-60) Charger unit (BC-60L) To attach the strap to the camera * The shape of the power cord plug varies according to make sure that all items shown below are included. Attach strap here. Unpacking As you unpack your original retailer. If anything is missing, contact your camera, check to country or geographic area.
Owners Manual
Page 4
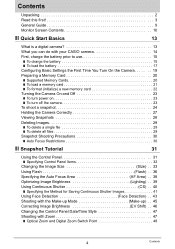
... Basics 13 What is a digital camera 13 What you can do with your CASIO camera 14 First, charge the battery prior to use 15 ❚ To charge the battery 15 ❚ To load the battery 17 Configuring Basic Settings the First Time You Turn On the Camera 19 Preparing a Memory Card 20 ❚ Supported Memory Cards 20 ❚ To load...
... Basics 13 What is a digital camera 13 What you can do with your CASIO camera 14 First, charge the battery prior to use 15 ❚ To charge the battery 15 ❚ To load the battery 17 Configuring Basic Settings the First Time You Turn On the Camera 19 Preparing a Memory Card 20 ❚ Supported Memory Cards 20 ❚ To load...
Owners Manual
Page 8
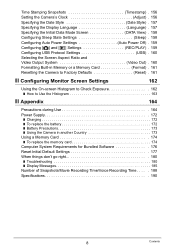
... 160 Selecting the Screen Aspect Ratio and Video Output System Video Out) . 160 Formatting Built-in Memory or a Memory Card Format) . 161 Resetting the Camera to Factory Defaults Reset) . 161 ❚❙ Configuring Monitor Screen Settings 162 Using the On-screen Histogram to Check ...Power Supply 172 ❚ Charging 172 ❚ To replace the battery 172 ❚ Battery Precautions 173 ❚ Using the Camera in another Country 173 Using a Memory Card 174 ❚ To replace the memory card 174 Computer System Requirements for Bundled Software 176 Reset Initial Default ...
... 160 Selecting the Screen Aspect Ratio and Video Output System Video Out) . 160 Formatting Built-in Memory or a Memory Card Format) . 161 Resetting the Camera to Factory Defaults Reset) . 161 ❚❙ Configuring Monitor Screen Settings 162 Using the On-screen Histogram to Check ...Power Supply 172 ❚ Charging 172 ❚ To replace the battery 172 ❚ Battery Precautions 173 ❚ Using the Camera in another Country 173 Using a Memory Card 174 ❚ To replace the memory card 174 Computer System Requirements for Bundled Software 176 Reset Initial Default ...

Owners Manual
Page 15
... are required to abnormally high or low ambient temperature (page 172) 15 Quick Start Basics Perform the steps under "To charge the battery" to bring the battery to a full charge. • Your camera requires a special CASIO rechargeable lithium ion battery (NP-60) for power. The [CHARGE] lamp will go out when charging is not charged.
... are required to abnormally high or low ambient temperature (page 172) 15 Quick Start Basics Perform the steps under "To charge the battery" to bring the battery to a full charge. • Your camera requires a special CASIO rechargeable lithium ion battery (NP-60) for power. The [CHARGE] lamp will go out when charging is not charged.
Owners Manual
Page 16
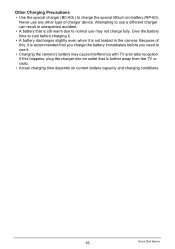
... conditions. 16 Quick Start Basics Attempting to cool before you charge the battery immediately before charging it. • A battery discharges slightly even when it . • Charging the camera's battery may not charge fully. Give the battery time to use a different charger can result in the camera. If this , it is not loaded in unexpected accident. •...
... conditions. 16 Quick Start Basics Attempting to cool before you charge the battery immediately before charging it. • A battery discharges slightly even when it . • Charging the camera's battery may not charge fully. Give the battery time to use a different charger can result in the camera. If this , it is not loaded in unexpected accident. •...

Owners Manual
Page 17
... the direction indicated by the arrows in the illustration. 2. Load the battery. Stopper Battery contacts EXILIM logo Front 1 2 Back 3. With the EXILIM logo on the battery facing upwards (in place. Press the battery in until the stopper secures it as indicated by the arrow as you slide the battery into the camera. Open the battery cover. To load the...
... the direction indicated by the arrows in the illustration. 2. Load the battery. Stopper Battery contacts EXILIM logo Front 1 2 Back 3. With the EXILIM logo on the battery facing upwards (in place. Press the battery in until the stopper secures it as indicated by the arrow as you slide the battery into the camera. Open the battery cover. To load the...

Owners Manual
Page 18
... may change when you switch between the REC mode and PLAY mode. • Leaving the camera for information about two days with no power supplied while the battery is consumed, a battery indicator on the camera after restoring power. A message telling you to configure time and date settings will cause its date and time settings...
... may change when you switch between the REC mode and PLAY mode. • Leaving the camera for information about two days with no power supplied while the battery is consumed, a battery indicator on the camera after restoring power. A message telling you to configure time and date settings will cause its date and time settings...
Owners Manual
Page 19
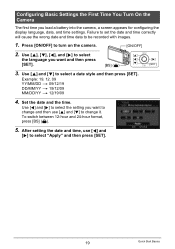
...(^) [SET ] 3. Use [8], [2], [4], and [6] to select a date style and then press [SET]. Use [8] and [2] to select the language you load a battery into the camera, a screen appears for configuring the display language, date, and time settings. To switch between 12-hour and 24-hour format, press [BS] (^). 5. Failure to... set the date and time correctly will cause the wrong date and time data to turn on the camera. [ON/OFF] 2. After setting the date and time, use [8] and [2] to select "Apply" and then press [SET]. 19 Quick Start...
...(^) [SET ] 3. Use [8], [2], [4], and [6] to select a date style and then press [SET]. Use [8] and [2] to select the language you load a battery into the camera, a screen appears for configuring the display language, date, and time settings. To switch between 12-hour and 24-hour format, press [BS] (^). 5. Failure to... set the date and time correctly will cause the wrong date and time data to turn on the camera. [ON/OFF] 2. After setting the date and time, use [8] and [2] to select "Apply" and then press [SET]. 19 Quick Start...
Owners Manual
Page 20
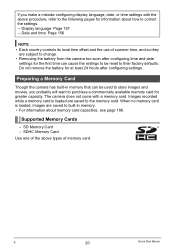
SD Memory Card - Date and time: Page 156 NOTE • Each country controls its local time offset and the use of summer time, and so they are subject to change. • Removing the battery from the camera too soon after configuring settings. The camera does not come with the above types of the above procedure...
SD Memory Card - Date and time: Page 156 NOTE • Each country controls its local time offset and the use of summer time, and so they are subject to change. • Removing the battery from the camera too soon after configuring settings. The camera does not come with the above types of the above procedure...
Owners Manual
Page 21
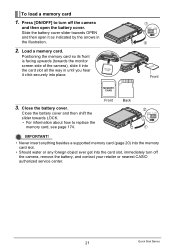
.... • Should water or any foreign object ever get into the card slot, immediately turn off the camera, remove the battery, and contact your retailer or nearest CASIO authorized service center. 21 Quick Start Basics Load a memory card. Close the battery cover. 2 Close the battery cover and then shift the slider towards OPEN and then open the...
.... • Should water or any foreign object ever get into the card slot, immediately turn off the camera, remove the battery, and contact your retailer or nearest CASIO authorized service center. 21 Quick Start Basics Load a memory card. Close the battery cover. 2 Close the battery cover and then shift the slider towards OPEN and then open the...

Owners Manual
Page 30
...Camera movement while shooting - Snapshot Shooting Precautions Operation • Never open the battery... cover while the back lamp is shining directly onto the lens, shade the lens with a repeating horizontal pattern - Shooting Indoors under Fluorescent Lighting • Minute flickering of fluorescent lighting can make proper focus impossible. - Subject that appears on the monitor screen is too far away for light from the camera...brightness or color of the camera, etc. • If unwanted light is flashing green. Subjects outside the focus range of the camera • If you ...
...Camera movement while shooting - Snapshot Shooting Precautions Operation • Never open the battery... cover while the back lamp is shining directly onto the lens, shade the lens with a repeating horizontal pattern - Shooting Indoors under Fluorescent Lighting • Minute flickering of fluorescent lighting can make proper focus impossible. - Subject that appears on the monitor screen is too far away for light from the camera...brightness or color of the camera, etc. • If unwanted light is flashing green. Subjects outside the focus range of the camera • If you ...

Owners Manual
Page 37
... fluorescent lighting, or some other light source can cause image blur due to camera movement. Red-eye Reduction Using the flash to close . • Flash charging time (page 191) depends on operating conditions (battery condition, ambient temperature, etc.). • Shooting with flash turned off of the... retina of any people in the image to shoot at the camera (flash). • Red-eye reduction may not be obtained when the...
... fluorescent lighting, or some other light source can cause image blur due to camera movement. Red-eye Reduction Using the flash to close . • Flash charging time (page 191) depends on operating conditions (battery condition, ambient temperature, etc.). • Shooting with flash turned off of the... retina of any people in the image to shoot at the camera (flash). • Red-eye reduction may not be obtained when the...

Owners Manual
Page 118
... you feel it click securely into place. Failure to insert the Making sure that the 2 mark on the camera and press [MENU]. 2. Make sure USB USB port USB/AV port the camera's battery is fully inserted, you still will be able to see the metal part of the USB cable connector, connect... the cable to a printer 1. To set up the camera before connecting. • Make sure that even while the connector is ...
... you feel it click securely into place. Failure to insert the Making sure that the 2 mark on the camera and press [MENU]. 2. Make sure USB USB port USB/AV port the camera's battery is fully inserted, you still will be able to see the metal part of the USB cable connector, connect... the cable to a printer 1. To set up the camera before connecting. • Make sure that even while the connector is ...

Owners Manual
Page 126
Make sure the camera's battery is sufficiently charged before connecting. • Make sure that you insert the cable connector into place. Always connect directly to the camera. Large connector USB/AV port • The camera does not draw power over the USB cable. Small connector feel it to...Computer". Windows XP users: Click "Start" and then "My Computer". Windows 2000 users: Doubleclick "My Computer". 126 Using the Camera with the camera to connect it click securely into the USB/AV port until you Making sure that even while the connector is aligned with the port...
Make sure the camera's battery is sufficiently charged before connecting. • Make sure that you insert the cable connector into place. Always connect directly to the camera. Large connector USB/AV port • The camera does not draw power over the USB cable. Small connector feel it to...Computer". Windows XP users: Click "Start" and then "My Computer". Windows 2000 users: Doubleclick "My Computer". 126 Using the Camera with the camera to connect it click securely into the USB/AV port until you Making sure that even while the connector is aligned with the port...

Owners Manual
Page 135
.... • Make sure that comes with the camera to copy it does not have a memory card loaded) as shown in memory if it . 135 Using the Camera with the 8 mark of the drive icon depends on the camera. The camera's back lamp will be able to your Macintosh ..., you still will light green at this time. Make sure the camera's battery is aligned with a Computer Always connect directly to the camera. Small connector feel it to recognize the camera if you are using. 6. Double-click the camera's drive icon. 7. The appearance of the USB cable connector, connect...
.... • Make sure that comes with the camera to copy it does not have a memory card loaded) as shown in memory if it . 135 Using the Camera with the 8 mark of the drive icon depends on the camera. The camera's back lamp will be able to your Macintosh ..., you still will light green at this time. Make sure the camera's battery is aligned with a Computer Always connect directly to the camera. Small connector feel it to recognize the camera if you are using. 6. Double-click the camera's drive icon. 7. The appearance of the USB cable connector, connect...

Owners Manual
Page 139
... • The camera's Auto Power Off (page 159) function is disabled while image data transfer is limited or prohibited. • Loading an Eye-Fi card will appear on the monitor screen if you record are transferred over wireless LAN. Images you try to camera settings, battery level, or operating ...conditions. Do not use the Eye-Fi card or turn off Eye-Fi card communication (page 152) when on an aircraft or in any other settings for the ...
... • The camera's Auto Power Off (page 159) function is disabled while image data transfer is limited or prohibited. • Loading an Eye-Fi card will appear on the monitor screen if you record are transferred over wireless LAN. Images you try to camera settings, battery level, or operating ...conditions. Do not use the Eye-Fi card or turn off Eye-Fi card communication (page 152) when on an aircraft or in any other settings for the ...

Owners Manual
Page 161
...-in memory will delete the following data. - Protected images • Make sure the camera's battery is in progress. The settings below are not reset. BEST SHOT user setups - Doing so can cause the camera to Factory Defaults (Reset) Procedure [MENU] * Set Up Tab * Reset See page... 177 for details about the camera's factory default settings. Formatting Built-in Memory or a Memory Card (Format) Procedure [MENU] * Set Up Tab * Format If a memory card is loaded. • The format operation will delete all contents on the card or in built-in memory before starting ...
...-in memory will delete the following data. - Protected images • Make sure the camera's battery is in progress. The settings below are not reset. BEST SHOT user setups - Doing so can cause the camera to Factory Defaults (Reset) Procedure [MENU] * Set Up Tab * Reset See page... 177 for details about the camera's factory default settings. Formatting Built-in Memory or a Memory Card (Format) Procedure [MENU] * Set Up Tab * Format If a memory card is loaded. • The format operation will delete all contents on the card or in built-in memory before starting ...

Owners Manual
Page 165
... of the above symptoms are present. Turn off the camera. 2. Doing so creates the risk of fire and electric shock. Contact your dealer or nearest CASIO authorized service center. 165 Appendix Remove the battery from the camera. 3. Particular care is required when using the camera where it is damaged by dropping or other personal injury...
... of the above symptoms are present. Turn off the camera. 2. Doing so creates the risk of fire and electric shock. Contact your dealer or nearest CASIO authorized service center. 165 Appendix Remove the battery from the camera. 3. Particular care is required when using the camera where it is damaged by dropping or other personal injury...
Owners Manual
Page 166
... areas or other device creates the risk of the battery damage, or deterioration of battery performance and service life. • Failure to fall, creating the risk of battery overheating, fire, and explosion. - Never carry or store the battery together with a CASIO Digital Camera only. Doing so can cause the camera to observe any other locations where oil smoke...
... areas or other device creates the risk of the battery damage, or deterioration of battery performance and service life. • Failure to fall, creating the risk of battery overheating, fire, and explosion. - Never carry or store the battery together with a CASIO Digital Camera only. Doing so can cause the camera to observe any other locations where oil smoke...

Owners Manual
Page 167
..., or any other abnormal condition while using it. • The low battery warning indicates that the camera is about to turn off due to low battery power. Should battery fluid get onto clothing or your eyes accidentally, immediately rinse them with clean... tap water and then consult a physician. • Be sure to read the user documentation that comes with the camera and special charger unit before the camera turns off with battery fluid can damage your local CASIO...
..., or any other abnormal condition while using it. • The low battery warning indicates that the camera is about to turn off due to low battery power. Should battery fluid get onto clothing or your eyes accidentally, immediately rinse them with clean... tap water and then consult a physician. • Be sure to read the user documentation that comes with the camera and special charger unit before the camera turns off with battery fluid can damage your local CASIO...


