Owners Manual
Page 2
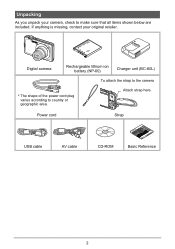
Digital camera Rechargeable lithium ion battery (NP-60) Charger unit (BC-60L) To attach the strap to the camera * The shape of the power cord plug varies according to make sure that all items shown below are included. Attach strap here. Power cord Strap USB cable AV cable CD-ROM Basic Reference 2 Unpacking As you unpack your original retailer. If anything is missing, contact your camera, check to country or geographic area.
Digital camera Rechargeable lithium ion battery (NP-60) Charger unit (BC-60L) To attach the strap to the camera * The shape of the power cord plug varies according to make sure that all items shown below are included. Attach strap here. Power cord Strap USB cable AV cable CD-ROM Basic Reference 2 Unpacking As you unpack your original retailer. If anything is missing, contact your camera, check to country or geographic area.
Owners Manual
Page 4
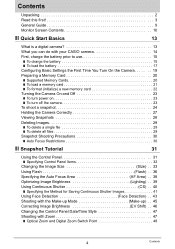
... Basics 13 What is a digital camera 13 What you can do with your CASIO camera 14 First, charge the battery prior to use 15 ❚ To charge the battery 15 ❚ To load the battery 17 Configuring Basic Settings the First Time You Turn On the Camera 19 Preparing a Memory Card 20 ❚ Supported Memory Cards 20 ❚ To load...
... Basics 13 What is a digital camera 13 What you can do with your CASIO camera 14 First, charge the battery prior to use 15 ❚ To charge the battery 15 ❚ To load the battery 17 Configuring Basic Settings the First Time You Turn On the Camera 19 Preparing a Memory Card 20 ❚ Supported Memory Cards 20 ❚ To load...
Owners Manual
Page 8
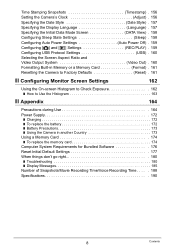
... 160 Selecting the Screen Aspect Ratio and Video Output System Video Out) . 160 Formatting Built-in Memory or a Memory Card Format) . 161 Resetting the Camera to Factory Defaults Reset) . 161 ❚❙ Configuring Monitor Screen Settings 162 Using the On-screen Histogram to Check ...Power Supply 172 ❚ Charging 172 ❚ To replace the battery 172 ❚ Battery Precautions 173 ❚ Using the Camera in another Country 173 Using a Memory Card 174 ❚ To replace the memory card 174 Computer System Requirements for Bundled Software 176 Reset Initial Default ...
... 160 Selecting the Screen Aspect Ratio and Video Output System Video Out) . 160 Formatting Built-in Memory or a Memory Card Format) . 161 Resetting the Camera to Factory Defaults Reset) . 161 ❚❙ Configuring Monitor Screen Settings 162 Using the On-screen Histogram to Check ...Power Supply 172 ❚ Charging 172 ❚ To replace the battery 172 ❚ Battery Precautions 173 ❚ Using the Camera in another Country 173 Using a Memory Card 174 ❚ To replace the memory card 174 Computer System Requirements for Bundled Software 176 Reset Initial Default ...

Owners Manual
Page 15
... charge. Never try to a full charge. • Your camera requires a special CASIO rechargeable lithium ion battery (NP-60) for power. terminals of the battery with those of the charger unit, load the battery into a household power outlet. Perform the steps under "To charge the battery" to bring the battery to use . Positioning the positive + and negative - Note...
... charge. Never try to a full charge. • Your camera requires a special CASIO rechargeable lithium ion battery (NP-60) for power. terminals of the battery with those of the charger unit, load the battery into a household power outlet. Perform the steps under "To charge the battery" to bring the battery to use . Positioning the positive + and negative - Note...
Owners Manual
Page 16
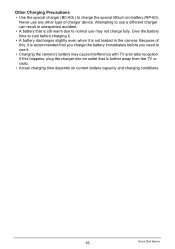
...-60). Never use may cause interference with TV and radio reception. Because of charger device. If this , it . • Charging the camera's battery may not charge fully. Other Charging Precautions • Use the special charger (BC-60L) to normal use any other type of this happens, plug the ...charger into an outlet that is further away from the TV or radio. • Actual charging time depends on current battery capacity and charging conditions. 16 Quick Start Basics Attempting to use a different charger can result in the...
...-60). Never use may cause interference with TV and radio reception. Because of charger device. If this , it . • Charging the camera's battery may not charge fully. Other Charging Precautions • Use the special charger (BC-60L) to normal use any other type of this happens, plug the ...charger into an outlet that is further away from the TV or radio. • Actual charging time depends on current battery capacity and charging conditions. 16 Quick Start Basics Attempting to use a different charger can result in the...

Owners Manual
Page 17
...), hold the stopper next to replace the battery, see page 172. 1 17 Quick Start Basics Open the battery cover. Stopper Battery contacts EXILIM logo Front 1 2 Back 3. Close the battery cover. 2 Close the battery cover and then shift the slider towards OPEN... and then open it in the illustration. 2. Load the battery. Press the battery in until the stopper secures it as you slide the battery into the camera...
...), hold the stopper next to replace the battery, see page 172. 1 17 Quick Start Basics Open the battery cover. Stopper Battery contacts EXILIM logo Front 1 2 Back 3. Close the battery cover. 2 Close the battery cover and then shift the slider towards OPEN... and then open it in the illustration. 2. Load the battery. Press the battery in until the stopper secures it as you slide the battery into the camera...

Owners Manual
Page 18
...configure time and date settings will cause its date and time settings to protect against wasting battery power when you switch between the REC mode and PLAY mode. • Leaving the camera for information about battery life and memory capacity. When this happens, configure date and time settings (page 156...). • See page 192 for about two days with no power supplied while the battery is dead will appear the next time you...
...configure time and date settings will cause its date and time settings to protect against wasting battery power when you switch between the REC mode and PLAY mode. • Leaving the camera for information about battery life and memory capacity. When this happens, configure date and time settings (page 156...). • See page 192 for about two days with no power supplied while the battery is dead will appear the next time you...
Owners Manual
Page 19
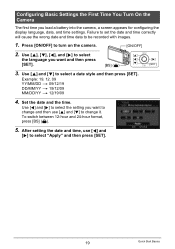
Use [8], [2], [4], and [6] to select the language you want to select the setting you load a battery into the camera, a screen appears for configuring the display language, date, and time settings. To switch between 12-hour and 24-hour format, press [BS] (^). 5. Press [ON/OFF] ...to select a date style and then press [SET]. Use [8] and [2] to turn on the camera. [ON/OFF] 2. Use [4] and [6] to change it. After setting the date and time, use [8] and [2] to change and then use [4] and [6] to be recorded with...
Use [8], [2], [4], and [6] to select the language you want to select the setting you load a battery into the camera, a screen appears for configuring the display language, date, and time settings. To switch between 12-hour and 24-hour format, press [BS] (^). 5. Press [ON/OFF] ...to select a date style and then press [SET]. Use [8] and [2] to turn on the camera. [ON/OFF] 2. Use [4] and [6] to change it. After setting the date and time, use [8] and [2] to change and then use [4] and [6] to be recorded with...
Owners Manual
Page 20
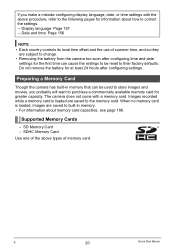
...Quick Start Basics Do not remove the battery for at least 24 hours after configuring time and date settings for greater capacity. SDHC Memory Card Use one of the above procedure, refer to change. • Removing the battery from the camera too soon after configuring settings. If you... probably will want to purchase a commercially available memory card for the first time can cause the...
...Quick Start Basics Do not remove the battery for at least 24 hours after configuring time and date settings for greater capacity. SDHC Memory Card Use one of the above procedure, refer to change. • Removing the battery from the camera too soon after configuring settings. If you... probably will want to purchase a commercially available memory card for the first time can cause the...
Owners Manual
Page 21
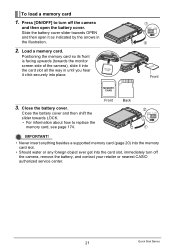
... upwards (towards the monitor screen side of the camera), slide it click securely into the card slot, immediately turn off the camera, remove the battery, and contact your retailer or nearest CASIO authorized service center. 21 Quick Start Basics Load a memory card. Close the battery cover. 2 Close the battery cover and then shift the slider towards OPEN and...
... upwards (towards the monitor screen side of the camera), slide it click securely into the card slot, immediately turn off the camera, remove the battery, and contact your retailer or nearest CASIO authorized service center. 21 Quick Start Basics Load a memory card. Close the battery cover. 2 Close the battery cover and then shift the slider towards OPEN and...

Owners Manual
Page 30
...color of the following can cause digital noise in memory, malfunction of the camera, etc. • If unwanted light is flashing green. Very shiny subject - Subject that is too far away for light from the camera - Subjects outside the focus range of the camera • If you just ...focus impossible. - Auto Focus Restrictions • Any of an image. Fast-moving subject - Snapshot Shooting Precautions Operation • Never open the battery cover while the back lamp is shining directly onto the lens, shade the lens with a repeating horizontal pattern - Solid color wall or other...
...color of the following can cause digital noise in memory, malfunction of the camera, etc. • If unwanted light is flashing green. Very shiny subject - Subject that is too far away for light from the camera - Subjects outside the focus range of the camera • If you just ...focus impossible. - Auto Focus Restrictions • Any of an image. Fast-moving subject - Snapshot Shooting Precautions Operation • Never open the battery cover while the back lamp is shining directly onto the lens, shade the lens with a repeating horizontal pattern - Solid color wall or other...

Owners Manual
Page 37
... chance of any people in the image to close . • Flash charging time (page 191) depends on operating conditions (battery condition, ambient temperature, etc.). • Shooting with exposure. Under such conditions, secure the camera with a tripod, etc. • With red eye reduction, the flash is fired automatically in accordance with flash turned...
... chance of any people in the image to close . • Flash charging time (page 191) depends on operating conditions (battery condition, ambient temperature, etc.). • Shooting with exposure. Under such conditions, secure the camera with a tripod, etc. • With red eye reduction, the flash is fired automatically in accordance with flash turned...

Owners Manual
Page 118
... cable to a printer that supports PictBridge and print images without going through a computer. . Connecting the Camera to a Printer Use the USB cable that USB cable comes bundled with the camera to connect the camera to select "PTP (PictBridge)", and then press [SET]. . Use [8] and [2] to your printer's...you insert the cable connector into place. Failure to insert the Making sure that the 2 mark on the camera and press [MENU]. 2. Make sure USB USB port USB/AV port the camera's battery is aligned with the port. 118 Printing On the "Set Up" tab, select "USB" and then...
... cable to a printer that supports PictBridge and print images without going through a computer. . Connecting the Camera to a Printer Use the USB cable that USB cable comes bundled with the camera to connect the camera to select "PTP (PictBridge)", and then press [SET]. . Use [8] and [2] to your printer's...you insert the cable connector into place. Failure to insert the Making sure that the 2 mark on the camera and press [MENU]. 2. Make sure USB USB port USB/AV port the camera's battery is aligned with the port. 118 Printing On the "Set Up" tab, select "USB" and then...

Owners Manual
Page 126
... not draw power over the USB cable. Make sure the camera's battery is sufficiently charged before connecting. • Make sure that you insert the cable connector into place. Windows 2000 users: Doubleclick "My Computer". 126 Using the Camera with the port. • Your computer may not be able to...with the 8 mark of the connector as shown in the illustration. • When connecting the USB cable to your computer. Turn on the camera is fully inserted, you connect via a USB hub. Always connect directly to connect it click securely into the USB/AV port until you ...
... not draw power over the USB cable. Make sure the camera's battery is sufficiently charged before connecting. • Make sure that you insert the cable connector into place. Windows 2000 users: Doubleclick "My Computer". 126 Using the Camera with the port. • Your computer may not be able to...with the 8 mark of the connector as shown in the illustration. • When connecting the USB cable to your computer. Turn on the camera is fully inserted, you connect via a USB hub. Always connect directly to connect it click securely into the USB/AV port until you ...

Owners Manual
Page 135
... it does not have a memory card loaded) as a drive. Double-click the camera's drive icon. 7. Always connect directly to see the metal part of the drive icon depends on the Mac OS version you want to the camera. Make sure the camera's battery is sufficiently charged before connecting. •...; Make sure that the 2 mark on the camera. Turn on the camera is fully inserted, you still will light green at this mode, your ...
... it does not have a memory card loaded) as a drive. Double-click the camera's drive icon. 7. Always connect directly to see the metal part of the drive icon depends on the Mac OS version you want to the camera. Make sure the camera's battery is sufficiently charged before connecting. •...; Make sure that the 2 mark on the camera. Turn on the camera is fully inserted, you still will light green at this mode, your ...

Owners Manual
Page 139
... or no transferable image data exists. Do this before formatting the card. Do not use the Eye-Fi card or turn off the camera while image data transfer is in progress. • A confirmation message will cause the Eye-Fi indicator to camera settings, battery level, or operating conditions. Follow the instructions in the messages (page...
... or no transferable image data exists. Do this before formatting the card. Do not use the Eye-Fi card or turn off the camera while image data transfer is in progress. • A confirmation message will cause the Eye-Fi indicator to camera settings, battery level, or operating conditions. Follow the instructions in the messages (page...

Owners Manual
Page 161
...Tab * Format If a memory card is sufficiently charged before you format it. • Formatting built-in memory will format built-in memory if no memory card is in progress. Protected images • Make sure the camera's battery is loaded in the camera, this operation will delete the following... data. - BEST SHOT user setups - Startup screen • Formatting a memory card will format the memory card. Doing so can cause the camera to ...
...Tab * Format If a memory card is sufficiently charged before you format it. • Formatting built-in memory will format built-in memory if no memory card is in progress. Protected images • Make sure the camera's battery is loaded in the camera, this operation will delete the following... data. - BEST SHOT user setups - Startup screen • Formatting a memory card will format the memory card. Doing so can cause the camera to ...

Owners Manual
Page 165
... yourself against burn injury. 3. . Contact your dealer or nearest CASIO authorized service center. 165 Appendix Remove the battery from the camera, taking care to fire, which can cause it in a bathroom. 1. Turn off the camera. 2. Turn off the camera. 2. Particular care is required when using the camera where it is overheating creates the risk of water...
... yourself against burn injury. 3. . Contact your dealer or nearest CASIO authorized service center. 165 Appendix Remove the battery from the camera, taking care to fire, which can cause it in a bathroom. 1. Turn off the camera. 2. Turn off the camera. 2. Particular care is required when using the camera where it is overheating creates the risk of water...
Owners Manual
Page 166
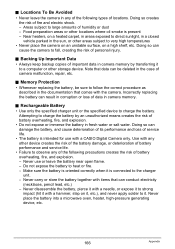
... (necklaces, pencil lead, etc.) - Use with a CASIO Digital Camera only. Make sure the battery is oriented correctly when it with the camera. Backing Up Important Data • Always keep backup copies of battery overheating, fire, and explosion. • Do not expose or immerse the battery in camera memory. . Attempting to charge the battery by an unauthorized means creates the...
... (necklaces, pencil lead, etc.) - Use with a CASIO Digital Camera only. Make sure the battery is oriented correctly when it with the camera. Backing Up Important Data • Always keep backup copies of battery overheating, fire, and explosion. • Do not expose or immerse the battery in camera memory. . Attempting to charge the battery by an unauthorized means creates the...

Owners Manual
Page 167
...CASIO authorized service center. Prolonged contact with clean tap water. Turn off the camera whenever you are not using it. • The low battery warning indicates that they handle the battery correctly. • Should fluid from the camera or charger unit and keep it off due to low battery... consult a physician. • Be sure to read the user documentation that comes with the camera and special charger unit before the camera turns off with battery fluid can lead to battery leakage and data corruption. 167 Appendix • Should you will be used by young children,...
...CASIO authorized service center. Prolonged contact with clean tap water. Turn off the camera whenever you are not using it. • The low battery warning indicates that they handle the battery correctly. • Should fluid from the camera or charger unit and keep it off due to low battery... consult a physician. • Be sure to read the user documentation that comes with the camera and special charger unit before the camera turns off with battery fluid can lead to battery leakage and data corruption. 167 Appendix • Should you will be used by young children,...


