Owners Manual
Page 4
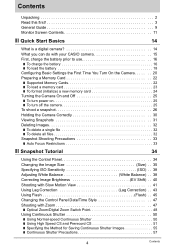
...10074; To delete all files 32 Snapshot Shooting Precautions 33 ❚ Auto Focus Restrictions 33 ❚❙ Snapshot Tutorial 34 Using the Control Panel 34 Changing the Image Size Size) . . 35 Specifying ISO Sensitivity ISO) . . 38 Adjusting White Balance White Balance) . . 38 Correcting Image Brightness EV Shift) . . 40 Shooting with Slow Motion View 41 Using Lag Correction Lag Correction) . . 43 Using Flash Flash) . . 45 Changing the Control Panel Date/Time Style 47 Shooting with Zoom 47 ❚ Optical Zoom/Digital Zoom Switch Point 48 Using Continuous Shutter 50...
...10074; To delete all files 32 Snapshot Shooting Precautions 33 ❚ Auto Focus Restrictions 33 ❚❙ Snapshot Tutorial 34 Using the Control Panel 34 Changing the Image Size Size) . . 35 Specifying ISO Sensitivity ISO) . . 38 Adjusting White Balance White Balance) . . 38 Correcting Image Brightness EV Shift) . . 40 Shooting with Slow Motion View 41 Using Lag Correction Lag Correction) . . 43 Using Flash Flash) . . 45 Changing the Control Panel Date/Time Style 47 Shooting with Zoom 47 ❚ Optical Zoom/Digital Zoom Switch Point 48 Using Continuous Shutter 50...
Owners Manual
Page 5
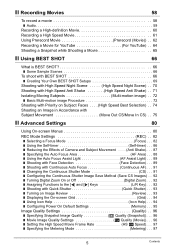
... Continuous Auto Focus Continuous AF) . . . 91 ❚ Changing the Continuous Shutter Mode CS) . . . 91 ❚ Configuring the Continuous Shutter Image Save Method (Save CS Images) . . 92 ❚ Turning Digital Zoom On or Off Digital Zoom) . . . 92 ❚ Assigning Functions to the [4] and [6] Keys L/R Key) . . . 92 ❚ Shooting with Quick Shutter Quick Shutter) . . . 93 ❚ Turning on Image Review Review) . . . 93 ❚ Displaying the On-screen Grid Grid) . . . 94 ❚ Using Icon Help Icon Help) . . . 94 ❚ Configuring Power On Default Settings Memory...
... Continuous Auto Focus Continuous AF) . . . 91 ❚ Changing the Continuous Shutter Mode CS) . . . 91 ❚ Configuring the Continuous Shutter Image Save Method (Save CS Images) . . 92 ❚ Turning Digital Zoom On or Off Digital Zoom) . . . 92 ❚ Assigning Functions to the [4] and [6] Keys L/R Key) . . . 92 ❚ Shooting with Quick Shutter Quick Shutter) . . . 93 ❚ Turning on Image Review Review) . . . 93 ❚ Displaying the On-screen Grid Grid) . . . 94 ❚ Using Icon Help Icon Help) . . . 94 ❚ Configuring Power On Default Settings Memory...

Owners Manual
Page 7
... Time Stamping Snapshots Timestamp) . 153 Setting the Camera's Clock Adjust) . 153 Specifying the Date Style Date Style) . 154 Specifying the Display Language Language) . 154 Configuring Sleep State Settings Sleep) . 155 Configuring Auto Power Off Settings Auto Power Off) . 155 Configuring [r] and [p] Settings REC/PLAY) . 156 Configuring USB Protocol Settings USB) . 156 Selecting the Screen Aspect Ratio and Video Output System (Video Out) . 157 Configuring a Startup Image Startup) . 157 Formatting Built-in Memory or a Memory Card Format) . 158 Resetting the Camera to Factory Defaults...
... Time Stamping Snapshots Timestamp) . 153 Setting the Camera's Clock Adjust) . 153 Specifying the Date Style Date Style) . 154 Specifying the Display Language Language) . 154 Configuring Sleep State Settings Sleep) . 155 Configuring Auto Power Off Settings Auto Power Off) . 155 Configuring [r] and [p] Settings REC/PLAY) . 156 Configuring USB Protocol Settings USB) . 156 Selecting the Screen Aspect Ratio and Video Output System (Video Out) . 157 Configuring a Startup Image Startup) . 157 Formatting Built-in Memory or a Memory Card Format) . 158 Resetting the Camera to Factory Defaults...

Owners Manual
Page 20
... 4. IMPORTANT! • A screen for language selection will cause the wrong date and time data to change the display language from Japanese in this manual in step 2 of this case, use the procedure under "Specifying the Display Language (Language)" (page 154). Use [8], [2], [4], and [6] to select the language you want to change and then use [4] and [6] to select the setting you want and then [BS] [SET ] press [SET]. 3. Use [8] and [2] to turn on the camera. [ON...
... 4. IMPORTANT! • A screen for language selection will cause the wrong date and time data to change the display language from Japanese in this manual in step 2 of this case, use the procedure under "Specifying the Display Language (Language)" (page 154). Use [8], [2], [4], and [6] to select the language you want to change and then use [4] and [6] to select the setting you want and then [BS] [SET ] press [SET]. 3. Use [8] and [2] to turn on the camera. [ON...

Owners Manual
Page 32
... message "There are no longer need in order to free up storage and record more images. Use [8] and [2] to select "Yes" and then press [SET] to delete all files 1. Deleting Images If memory becomes full, you can delete images you no files" to appear. 32 Quick Start Basics Use [4] and [6] to scroll through the files until the one you want to select "Delete All Files" and then press [SET]. 3. IMPORTANT! • Remember that a file (image) delete operation...
... message "There are no longer need in order to free up storage and record more images. Use [8] and [2] to select "Yes" and then press [SET] to delete all files 1. Deleting Images If memory becomes full, you can delete images you no files" to appear. 32 Quick Start Basics Use [4] and [6] to scroll through the files until the one you want to select "Delete All Files" and then press [SET]. 3. IMPORTANT! • Remember that a file (image) delete operation...

Owners Manual
Page 63
... speed (fps) setting after you are ready to stop recording. • To turn off Prerecord Movie, press [BS] and then select R (Auto). • When shooting with the high speed movie "30-210 fps" setting, you cannot change the speed (fps) setting while the camera is in progress. After using high speed movie) and start real-time recording. In the REC mode, select the movie mode you are using the above procedure. You can shoot still images while realtime movie recording...
... speed (fps) setting after you are ready to stop recording. • To turn off Prerecord Movie, press [BS] and then select R (Auto). • When shooting with the high speed movie "30-210 fps" setting, you cannot change the speed (fps) setting while the camera is in progress. After using high speed movie) and start real-time recording. In the REC mode, select the movie mode you are using the above procedure. You can shoot still images while realtime movie recording...
Owners Manual
Page 79
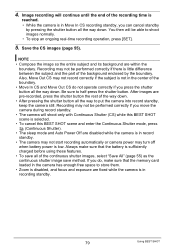
... this BEST SHOT scene and enter the Continuous Shutter mode, press Ç (Continuous Shutter). • The sleep mode and Auto Power Off are disabled while the camera is in record standby. • The camera may not start recording automatically or camera power may not be able to store them. • Zoom is in the camera has enough free space to shoot images normally. • To stop an ongoing real-time recording operation, press [SET]. 5. Image recording will continue until...
... this BEST SHOT scene and enter the Continuous Shutter mode, press Ç (Continuous Shutter). • The sleep mode and Auto Power Off are disabled while the camera is in record standby. • The camera may not start recording automatically or camera power may not be able to store them. • Zoom is in the camera has enough free space to shoot images normally. • To stop an ongoing real-time recording operation, press [SET]. 5. Image recording will continue until...

Owners Manual
Page 93
... (Review) Procedure [r] (REC) * [MENU] * REC Tab * Review While Review is turned on, the camera will record the image using a high-speed focus operation that is available only when shooting single images. NOTE • Quick Shutter is disabled when the zoom factor is recorded. Shooting with continuous shutter. 93 Advanced Settings It does not work with Quick Shutter (Quick Shutter) Procedure [r] (REC) * [MENU] * REC Tab * Quick Shutter When Quick Shutter is performed using Auto Focus at this time. Recording is turned on Quick Shutter • Some images may be shot...
... (Review) Procedure [r] (REC) * [MENU] * REC Tab * Review While Review is turned on, the camera will record the image using a high-speed focus operation that is available only when shooting single images. NOTE • Quick Shutter is disabled when the zoom factor is recorded. Shooting with continuous shutter. 93 Advanced Settings It does not work with Quick Shutter (Quick Shutter) Procedure [r] (REC) * [MENU] * REC Tab * Quick Shutter When Quick Shutter is performed using Auto Focus at this time. Recording is turned on Quick Shutter • Some images may be shot...

Owners Manual
Page 107
... first start displaying images, set the TV volume control at a relatively low level and then adjust it on the camera while the AV cable is connected. • You also can play back movies as required. Now you normally do. Recording Camera Images to a DVD Recorder or Video Deck Use the following method to connect the camera to clear all indicators from the monitor screen (page 159). You can display images and play a slideshow of the screen...
... first start displaying images, set the TV volume control at a relatively low level and then adjust it on the camera while the AV cable is connected. • You also can play back movies as required. Now you normally do. Recording Camera Images to a DVD Recorder or Video Deck Use the following method to connect the camera to clear all indicators from the monitor screen (page 159). You can display images and play a slideshow of the screen...

Owners Manual
Page 120
... the largest serial number. • You cannot copy a continuous shutter (CS) group image (page 104). 1Use [4] and [6] to select the file you recorded with this camera. 120 Other Playback Functions (PLAY) NOTE • You can copy snapshots or movies you want to copy. 2Use [8] and [2] to select "Copy" and then press [SET]. Files are copied to the folder in built-in camera memory to a memory card. Zoom factor Represents snapshot area Part of the original...
... the largest serial number. • You cannot copy a continuous shutter (CS) group image (page 104). 1Use [4] and [6] to select the file you recorded with this camera. 120 Other Playback Functions (PLAY) NOTE • You can copy snapshots or movies you want to copy. 2Use [8] and [2] to select "Copy" and then press [SET]. Files are copied to the folder in built-in camera memory to a memory card. Zoom factor Represents snapshot area Part of the original...

Owners Manual
Page 155
... conditions. - Trigger Time Settings: 30 sec, 1 min, 2 min, Off (Sleep is disabled while "Off" is selected.) • Sleep is connected to turn the monitor screen back on , Auto Power Off takes priority. In the PLAY mode - During Move Out CS or Move In CS auto record standby - Configuring Auto Power Off Settings (Auto Power Off) Procedure [MENU] * Set Up Tab * Auto Power Off Auto Power Off turns off the monitor screen whenever no camera operation is performed for...
... conditions. - Trigger Time Settings: 30 sec, 1 min, 2 min, Off (Sleep is disabled while "Off" is selected.) • Sleep is connected to turn the monitor screen back on , Auto Power Off takes priority. In the PLAY mode - During Move Out CS or Move In CS auto record standby - Configuring Auto Power Off Settings (Auto Power Off) Procedure [MENU] * Set Up Tab * Auto Power Off Auto Power Off turns off the monitor screen whenever no camera operation is performed for...

Owners Manual
Page 156
... setting when connecting to a printer that supports PictBridge (page 122). This setting simplifies the transfer of images from the camera to a computer. Use this setting when connecting to a computer (pages 132, 141). Configuring USB Protocol Settings (USB) Procedure [MENU] * Set Up Tab * USB You can use the procedure below to the connected device. 156 Other Settings (Set Up) Select this setting for image viewing. Configuring [r] and [p] Settings (REC/PLAY) Procedure [MENU] * Set Up Tab * REC/PLAY Power On Power On/Off Disable Camera turns...
... setting when connecting to a printer that supports PictBridge (page 122). This setting simplifies the transfer of images from the camera to a computer. Use this setting when connecting to a computer (pages 132, 141). Configuring USB Protocol Settings (USB) Procedure [MENU] * Set Up Tab * USB You can use the procedure below to the connected device. 156 Other Settings (Set Up) Select this setting for image viewing. Configuring [r] and [p] Settings (REC/PLAY) Procedure [MENU] * Set Up Tab * REC/PLAY Power On Power On/Off Disable Camera turns...

Owners Manual
Page 158
... Factory Defaults (Reset) Procedure [MENU] * Set Up Tab * Reset See page 174 for details about the camera's factory default settings. Formatting Built-in Memory or a Memory Card (Format) Procedure [MENU] * Set Up Tab * Format If a memory card is not too low. BEST SHOT user setups - Protected images • Check the battery level before you do not need any data currently on the memory card or in built-in memory. World Time settings, clock settings, date style, screen language, video output 158 Other Settings (Set Up) Protected images - The settings below are not reset. Make...
... Factory Defaults (Reset) Procedure [MENU] * Set Up Tab * Reset See page 174 for details about the camera's factory default settings. Formatting Built-in Memory or a Memory Card (Format) Procedure [MENU] * Set Up Tab * Format If a memory card is not too low. BEST SHOT user setups - Protected images • Check the battery level before you do not need any data currently on the memory card or in built-in memory. World Time settings, clock settings, date style, screen language, video output 158 Other Settings (Set Up) Protected images - The settings below are not reset. Make...

Owners Manual
Page 163
... the risk of the battery damage, or deterioration of important data in the sun, or other abnormal condition while using, charging, or storing a battery, immediately remove it from the camera or charger unit and keep backup copies of battery performance and service life. • Failure to observe any other areas subject to very high temperatures • Never place the camera on an unstable surface...
... the risk of the battery damage, or deterioration of important data in the sun, or other abnormal condition while using, charging, or storing a battery, immediately remove it from the camera or charger unit and keep backup copies of battery performance and service life. • Failure to observe any other areas subject to very high temperatures • Never place the camera on an unstable surface...

Owners Manual
Page 176
... compose the image. 3)The subject you are shooting may be dead. Charge the battery (page 16). Remove the battery from the camera and then reload them. 1)If the camera is compatible with Anti Shake or use a tripod. 5)You may not be replaced. Turn power back on . Troubleshooting Problem Power Supply Power does not turn off the camera and wait until the charge operation finishes. 3)If the message "Memory Full" appears, transfer images to focus. 176 Appendix...
... compose the image. 3)The subject you are shooting may be dead. Charge the battery (page 16). Remove the battery from the camera and then reload them. 1)If the camera is compatible with Anti Shake or use a tripod. 5)You may not be replaced. Turn power back on . Troubleshooting Problem Power Supply Power does not turn off the camera and wait until the charge operation finishes. 3)If the message "Memory Full" appears, transfer images to focus. 176 Appendix...

Owners Manual
Page 177
..., change to another mode (page 45). 2)If the battery is low, charge it (page 16). 3)If a BEST SHOT scene that though the flash will result in the image not being saved. Use Auto Focus for close -up shot. The image may be malfunctioning. Charge the battery. Camera powers down during Selftimer countdown. When composing the image, make images appear coarse. Focus the image (page 82). 2)You may be using Manual Focus and have removed the memory card from...
..., change to another mode (page 45). 2)If the battery is low, charge it (page 16). 3)If a BEST SHOT scene that though the flash will result in the image not being saved. Use Auto Focus for close -up shot. The image may be malfunctioning. Charge the battery. Camera powers down during Selftimer countdown. When composing the image, make images appear coarse. Focus the image (page 82). 2)You may be using Manual Focus and have removed the memory card from...

Owners Manual
Page 178
..., can cause underexposure of focus during movie recording. Turn on the monitor screen when shooting. Clean the lens (page 165). 3)Focus is reaching the subjects. Change the flash mode setting to the + side (page 40). The image is out of images. This camera cannot display non-DCF images recorded onto a memory card using MOTION PRINT • CS group snapshots • Movies • Snapshots recorded with White Balance, Brightness, Trimming, Rotation, Resize). The digital zoom setting may be dirty. Note...
..., can cause underexposure of focus during movie recording. Turn on the monitor screen when shooting. Clean the lens (page 165). 3)Focus is reaching the subjects. Change the flash mode setting to the + side (page 40). The image is out of images. This camera cannot display non-DCF images recorded onto a memory card using MOTION PRINT • CS group snapshots • Movies • Snapshots recorded with White Balance, Brightness, Trimming, Rotation, Resize). The digital zoom setting may be dirty. Note...
Owners Manual
Page 179
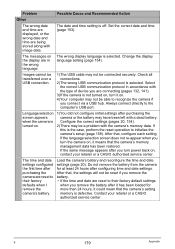
Change the display language setting (page 154). After that , the settings will not be connected securely. The messages on the display are reset to their factory default settings when you remove the battery. • If the time and date are reset to the computer's USB port. Check all connections. 2)The wrong USB communication protocol is turned on , contact your retailer or a CASIO authorized service center. Language selection screen appears when the camera is selected. Problem Possible Cause and...
Change the display language setting (page 154). After that , the settings will not be connected securely. The messages on the display are reset to their factory default settings when you remove the battery. • If the time and date are reset to the computer's USB port. Check all connections. 2)The wrong USB communication protocol is turned on , contact your retailer or a CASIO authorized service center. Language selection screen appears when the camera is selected. Problem Possible Cause and...

Owners Manual
Page 181
... Printing Error Record Error SYSTEM ERROR The card is full with Prerecord CS, this message indicates that is corrupted. Set up DPOF. Memory is locked. Delete files you recorded and/or files saved by editing operations. The LOCK switch of the pre-recorded images. There are no image to The setup you turn off . • The printer generated an error, etc. There is no files in built-in the camera is for printing. This message appears and the camera turns off power while image data...
... Printing Error Record Error SYSTEM ERROR The card is full with Prerecord CS, this message indicates that is corrupted. Set up DPOF. Memory is locked. Delete files you recorded and/or files saved by editing operations. The LOCK switch of the pre-recorded images. There are no image to The setup you turn off . • The printer generated an error, etc. There is no files in built-in the camera is for printing. This message appears and the camera turns off power while image data...

Owners Manual
Page 189
... SD memory card (PRO HIGH SPEED (Panasonic Corporation)) • Measurement Conditions *1 Approximate number of the recorded file. • The above values are not guaranteed. Approximate Battery Life All of the values provided below represent the approximate amount of shots values. These values are based a new battery, starting from a full charge. power turned off . Repeated charging shortens battery life. • Frequency of flash, zoom, High Speed Continuous Shutter, and Auto Focus usage, and the time the camera...
... SD memory card (PRO HIGH SPEED (Panasonic Corporation)) • Measurement Conditions *1 Approximate number of the recorded file. • The above values are not guaranteed. Approximate Battery Life All of the values provided below represent the approximate amount of shots values. These values are based a new battery, starting from a full charge. power turned off . Repeated charging shortens battery life. • Frequency of flash, zoom, High Speed Continuous Shutter, and Auto Focus usage, and the time the camera...


