
User Guide
Page 2
... could void the user's authority to operate the equipment. 703A-E-002A These limits are designed to other areas). This equipment generates, uses and can be determined by turning the equipment off and on a circuit different from that interference will not occur in a particular installation... user is connected. • Consult the dealer or an experienced radio/TV technician for help. GUIDELINES LAID DOWN BY FCC RULES FOR USE OF THE UNIT IN THE U.S.A. (not applicable to provide reasonable protection against harmful interference in a residential installation. If this equipment does ...
... could void the user's authority to operate the equipment. 703A-E-002A These limits are designed to other areas). This equipment generates, uses and can be determined by turning the equipment off and on a circuit different from that interference will not occur in a particular installation... user is connected. • Consult the dealer or an experienced radio/TV technician for help. GUIDELINES LAID DOWN BY FCC RULES FOR USE OF THE UNIT IN THE U.S.A. (not applicable to provide reasonable protection against harmful interference in a residential installation. If this equipment does ...
User Guide
Page 3
...happy family of the keyboard, be sure to carefully read this manual and keep all information for future reference. Please note the following important information before cleaning the product. Important! CASIO ELECTRONICS CO., LTD. Welcome... Never let children use an AC adaptor ...that is seriously damaged. • Never attempt to recharge batteries. • Do not use rechargeable batteries. • Never mix old batteries...
...happy family of the keyboard, be sure to carefully read this manual and keep all information for future reference. Please note the following important information before cleaning the product. Important! CASIO ELECTRONICS CO., LTD. Welcome... Never let children use an AC adaptor ...that is seriously damaged. • Never attempt to recharge batteries. • Do not use rechargeable batteries. • Never mix old batteries...

User Guide
Page 4
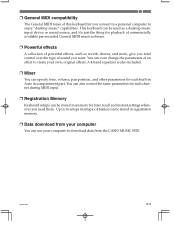
...all your selection of the preset tones are "Advanced Tones," which are using the Auto Accompaniment function. ❐ Synthesizer Mode Edit built in sounds to produce your computer and store up to six parts in keyboard memory. ❐ Auto Accompaniment Simply play a chord and the corresponding ...touch Presets instantly recalls the most suitable tone and tempo settings to match the rhythm you store your own original creations. 100 of this CASIO musical instrument. A builtin backlight keeps the display easy to read, even in total darkness. ❐ Song Memory Record up to pops...
...all your selection of the preset tones are "Advanced Tones," which are using the Auto Accompaniment function. ❐ Synthesizer Mode Edit built in sounds to produce your computer and store up to six parts in keyboard memory. ❐ Auto Accompaniment Simply play a chord and the corresponding ...touch Presets instantly recalls the most suitable tone and tempo settings to match the rhythm you store your own original creations. 100 of this CASIO musical instrument. A builtin backlight keeps the display easy to read, even in total darkness. ❐ Song Memory Record up to pops...
User Guide
Page 5
... a desktop music input device or sound source, and it's just the thing for each built-in registration memory. ❐ Data download from the CASIO MUSIC SITE. 703A-E-005A E-3 Up to 16 setups (4 setups x 4 banks) can be stored in Auto Accompaniment part. ❐ General MIDI compatibility... The General MIDI tones of this keyboard let you want. You can use your computer to download data from your computer You can even change the parameters of sound you connect to a personal computer ...
... a desktop music input device or sound source, and it's just the thing for each built-in registration memory. ❐ Data download from the CASIO MUSIC SITE. 703A-E-005A E-3 Up to 16 setups (4 setups x 4 banks) can be stored in Auto Accompaniment part. ❐ General MIDI compatibility... The General MIDI tones of this keyboard let you want. You can use your computer to download data from your computer You can even change the parameters of sound you connect to a personal computer ...

User Guide
Page 6
... example at left indicates that the power plug must be performed. Safety Precautions Symbols Various symbols are used in this user's guide and on the product itself to ensure that the product is used safely and correctly, and to prevent injury to the user and other persons as well as matters for...
... example at left indicates that the power plug must be performed. Safety Precautions Symbols Various symbols are used in this user's guide and on the product itself to ensure that the product is used safely and correctly, and to prevent injury to the user and other persons as well as matters for...

User Guide
Page 7
...damage to nearby objects, or to heat or dispose of the batteries are facing correctly. 703A-E-007A E-5 WARNING Smoke, Strange Odor, Overheating Continued use only the AC adap- Contact your eyes! Take the following precautions. • Never try to take batteries apart or allow them to become... your eyes can lead to loss of fire and electric shock. AC Adaptor Never touch the AC adapter while your original retailer or authorized CASIO Service Provider. AC Adaptor Misuse of the AC adaptor's electric cord can cause them by incineration. • Never mix old batteries with ...
...damage to nearby objects, or to heat or dispose of the batteries are facing correctly. 703A-E-007A E-5 WARNING Smoke, Strange Odor, Overheating Continued use only the AC adap- Contact your eyes! Take the following precautions. • Never try to take batteries apart or allow them to become... your eyes can lead to loss of fire and electric shock. AC Adaptor Never touch the AC adapter while your original retailer or authorized CASIO Service Provider. AC Adaptor Misuse of the AC adaptor's electric cord can cause them by incineration. • Never mix old batteries with ...

User Guide
Page 8
... of metal) getting into fire. Dropping and Impact Continued use of this precaution is required where small children are present. Keep off of suffocation. E-6 703A-E-008A Contact your original retailer or an authorized CASIO Service Provider. Particular care concerning this product after it has...product apart or modify it from the wall outlet. 3. If you are using the AC adaptor for power, unplug it in your original retailer or authorized CASIO Service Provider. If you are using the AC adaptor for power, unplug it to strong impact creates the risk...
... of metal) getting into fire. Dropping and Impact Continued use of this precaution is required where small children are present. Keep off of suffocation. E-6 703A-E-008A Contact your original retailer or an authorized CASIO Service Provider. Particular care concerning this product after it has...product apart or modify it from the wall outlet. 3. If you are using the AC adaptor for power, unplug it in your original retailer or authorized CASIO Service Provider. If you are using the AC adaptor for power, unplug it to strong impact creates the risk...

User Guide
Page 9
... subjects the product to explode, creating the risk of fire and personal injury. Always make sure you observe the following precautions. • Use only batteries that is built up in the area around the prongs of damage to the product's connectors. Leaving cords connected creates the risk...Connection of a non-specified device or equipment creates the risk of fire and electric shock. Always make sure you observe the following locations for use it will go. • Unplug the AC adaptor from the wall outlet during lightening storms or before leaving on a heated carpet, in areas...
... subjects the product to explode, creating the risk of fire and personal injury. Always make sure you observe the following precautions. • Use only batteries that is built up in the area around the prongs of damage to the product's connectors. Leaving cords connected creates the risk...Connection of a non-specified device or equipment creates the risk of fire and electric shock. Always make sure you observe the following locations for use it will go. • Unplug the AC adaptor from the wall outlet during lightening storms or before leaving on a heated carpet, in areas...

User Guide
Page 10
.... • Should the LCD panel ever crack or break, never touch the liquid inside your mouth, immediately wash out your mouth with it. When using headphones. ing from the one of the alternate power sources whenever you notice any of the following the assembly instructions that is required when... using batteries, be sure to replace them or shift to crack, creating the risk of power, sound distortion, or low volume when play- LCD panel ...
.... • Should the LCD panel ever crack or break, never touch the liquid inside your mouth, immediately wash out your mouth with it. When using headphones. ing from the one of the alternate power sources whenever you notice any of the following the assembly instructions that is required when... using batteries, be sure to replace them or shift to crack, creating the risk of power, sound distortion, or low volume when play- LCD panel ...

User Guide
Page 11
... high or low temperature can cause video or audio interference with a soft cloth dampened in the plastic, and are a result of the molding process used to temperature extremes. They are not cracks or breaks in a weak solution of this happens, move the instrument away from the TV or radio. ...Clean the instrument with TV and radio reception. Soak the cloth in the finish of the case of water and a neutral detergent. Do not use near an air conditioner, or in areas subjected to shape the plastic of your Instrument Avoid heat, humidity or direct sunlight. These lines are no...
... high or low temperature can cause video or audio interference with a soft cloth dampened in the plastic, and are a result of the molding process used to temperature extremes. They are not cracks or breaks in a weak solution of this happens, move the instrument away from the TV or radio. ...Clean the instrument with TV and radio reception. Soak the cloth in the finish of the case of water and a neutral detergent. Do not use near an air conditioner, or in areas subjected to shape the plastic of your Instrument Avoid heat, humidity or direct sunlight. These lines are no...

User Guide
Page 12
... E-12 About the display E-14 Playing a Demo Tune E-15 Power Supply E-16 Using batteries E-16 Using the AC Adaptor E-17 Auto Power Off E-17 Memory Contents E-18 Connections E-19 Basic Operations E-21 To play the keyboard E-21 Selecting a Tone E-21 Using an Advanced Tone E-22 Applying Effects to Tones ... E-23 Effect Blocks E-23 Selecting...
... E-12 About the display E-14 Playing a Demo Tune E-15 Power Supply E-16 Using batteries E-16 Using the AC Adaptor E-17 Auto Power Off E-17 Memory Contents E-18 Connections E-19 Basic Operations E-21 To play the keyboard E-21 Selecting a Tone E-21 Using an Advanced Tone E-22 Applying Effects to Tones ... E-23 Effect Blocks E-23 Selecting...

User Guide
Page 13
... Tracks E-52 Correcting Mistakes While Step Recording E-54 Editing Memory Contents E-55 Editing a Song E-57 Keyboard Settings E-59 Using Layer E-59 Using Split E-59 Using Layer and Split Together E-60 Using Touch Response E-61 Transposing the Keyboard E-62 Tuning the Keyboard E-62 Changing Other Settings E-63 MIDI E-66 What is MIDI E-66 General MIDI E-66 Sending and...
... Tracks E-52 Correcting Mistakes While Step Recording E-54 Editing Memory Contents E-55 Editing a Song E-57 Keyboard Settings E-59 Using Layer E-59 Using Split E-59 Using Layer and Split Together E-60 Using Touch Response E-61 Transposing the Keyboard E-62 Tuning the Keyboard E-62 Changing Other Settings E-63 MIDI E-66 What is MIDI E-66 General MIDI E-66 Sending and...

User Guide
Page 15
...MIDI IN SUSTAIN/ PHONES/ ASSIGNABLE JACK OUTPUT DC 9V 703A-E-015A E-13 b) [+]/[-] buttons (YES/NO) • Negative values can be changed only by using bold type. 1 Speaker C Tone list H a) CHORD root names 2 POWER button D a) INTRO/ENDING 1/2 buttons b) Chord types name 3 Power indicator ...SYNCHRO/FILL-IN NEXT I J K LM c * Attaching of the Score Stand Firmly press the music stand provided with the keyboard all the way into the groove on the top of the keyboard. c) [̄] ENTER button H a b Rear Panel I MIDI OUT terminal 5 VOLUME slider button J MIDI IN terminal ...
...MIDI IN SUSTAIN/ PHONES/ ASSIGNABLE JACK OUTPUT DC 9V 703A-E-015A E-13 b) [+]/[-] buttons (YES/NO) • Negative values can be changed only by using bold type. 1 Speaker C Tone list H a) CHORD root names 2 POWER button D a) INTRO/ENDING 1/2 buttons b) Chord types name 3 Power indicator ...SYNCHRO/FILL-IN NEXT I J K LM c * Attaching of the Score Stand Firmly press the music stand provided with the keyboard all the way into the groove on the top of the keyboard. c) [̄] ENTER button H a b Rear Panel I MIDI OUT terminal 5 VOLUME slider button J MIDI IN terminal ...
User Guide
Page 16
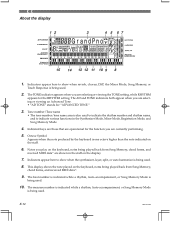
.../Tone name • The tone number/tone name area is one octave higher than the note indicated on the keyboard, notes being used . 8. Octave Symbol Appears when the note produced by the keyboard is also used to indicate the rhythm number and rhythm name, and to show when reverb, chorus, DSP, the Mixer Mode... 12 3 4 5 67 Gr andPno 15 14 13 12 11 10 9 8 1. E-14 703A-E-016A Indicators appear here to indicate various functions in the staff on the keyboard, notes being used . 10.
.../Tone name • The tone number/tone name area is one octave higher than the note indicated on the keyboard, notes being used . 8. Octave Symbol Appears when the note produced by the keyboard is also used to indicate the rhythm number and rhythm name, and to show when reverb, chorus, DSP, the Mixer Mode... 12 3 4 5 67 Gr andPno 15 14 13 12 11 10 9 8 1. E-14 703A-E-016A Indicators appear here to indicate various functions in the staff on the keyboard, notes being used . 10.

User Guide
Page 17
...play . The actual text and values that appear on the display without flashing while recording is playing. 703A-E-017A E-15 There are intended for your keyboard play , press either the DEMO button or the START/STOP button. ❚ NOTE • Pressing the [+]/[-] buttons skips to the next demo ...tune. • MIDI, Layer, and Split are indicated while a rhythm, Auto-accompaniment, or Song Memory Mode is being used. • The tempo area is received. ❚ NOTE • Display examples shown in sequence. You can turn on the display while Auto Accompaniment...
...play . The actual text and values that appear on the display without flashing while recording is playing. 703A-E-017A E-15 There are intended for your keyboard play , press either the DEMO button or the START/STOP button. ❚ NOTE • Pressing the [+]/[-] buttons skips to the next demo ...tune. • MIDI, Layer, and Split are indicated while a rhythm, Auto-accompaniment, or Song Memory Mode is being used. • The tempo area is received. ❚ NOTE • Display examples shown in sequence. You can turn on the display while Auto Accompaniment...
User Guide
Page 18
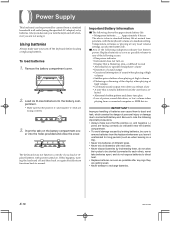
... life. Load six D-size batteries into the holes provided and close the cover. Power Supply This keyboard can be powered by current from a standard household wall outlet (using it unattended for long periods (such as indicated near the battery compartment. • To avoid damage...leaking batteries, be sure to remove batteries from the keyboard whenever you turn the keyboard off and then back on again should return functions back to normal. Using batteries Always make sure you leave it . To load batteries 1. The keyboard may not function correctly if you release a key ...
... life. Load six D-size batteries into the holes provided and close the cover. Power Supply This keyboard can be powered by current from a standard household wall outlet (using it unattended for long periods (such as indicated near the battery compartment. • To avoid damage...leaking batteries, be sure to remove batteries from the keyboard whenever you turn the keyboard off and then back on again should return functions back to normal. Using batteries Always make sure you leave it . To load batteries 1. The keyboard may not function correctly if you release a key ...
User Guide
Page 19
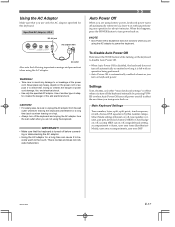
...it to the touch. IMPORTANT! • Make sure that you turn power back on. Settings Tone, rhythm, and other "main keyboard settings" in effect the next time you use only the AC adaptor specified for a long time can cause it to become warm to direct heat. Auto Power Off When you... turn on keyboard power. Using the AC Adaptor Make sure that the keyboard is turned off before connecting or disconnecting the AC adaptor. • Using the AC adaptor for this happens, press the POWER button to turn power back on...
...it to the touch. IMPORTANT! • Make sure that you turn power back on. Settings Tone, rhythm, and other "main keyboard settings" in effect the next time you use only the AC adaptor specified for a long time can cause it to become warm to direct heat. Auto Power Off When you... turn on keyboard power. Using the AC Adaptor Make sure that the keyboard is turned off before connecting or disconnecting the AC adaptor. • Using the AC adaptor for this happens, press the POWER button to turn power back on...

User Guide
Page 20
... data described above settings, data stored in the Registration Mode and Song Memory Mode is also retained when keyboard power is turned off. Initializing the Keyboard Use the procedure on page E-65 to initialize the keyboard, which clears all memory data and returns settings to their factory defaults and clears all settings to be...
... data described above settings, data stored in the Registration Mode and Song Memory Mode is also retained when keyboard power is turned off. Initializing the Keyboard Use the procedure on page E-65 to initialize the keyboard, which clears all memory data and returns settings to their factory defaults and clears all settings to be...

User Guide
Page 21
...-E-021A E-19 In this configuration, you normally set the volume of stereo channels. Musical Instrument Amplifier 3 Use a commercially available connecting cord to connect the keyboard to a musical instrument amplifier. ❚ NOTE • Be sure to use a connecting cord that has a stereo standard plug on the end you can play even late at either...
...-E-021A E-19 In this configuration, you normally set the volume of stereo channels. Musical Instrument Amplifier 3 Use a commercially available connecting cord to connect the keyboard to a musical instrument amplifier. ❚ NOTE • Be sure to use a connecting cord that has a stereo standard plug on the end you can play even late at either...
User Guide
Page 22
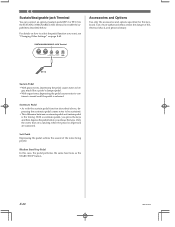
SUSTAIN/ASSIGNABLE JACK Terminal Accessories and Options Use only the accessories and options specified for this case, the pedal performs the same functions as the START/STOP button....and then depress the pedal before you want, see "Changing Other Settings" on page E-63. For details on how to lin- Use of non-authorized items creates the danger of the notes being played. pressing the sostenuto pedal causes notes to sound until the pedal ...8226; With organ tones, depressing the pedal causes notes to enable the capabilities described below. Rhythm Start/Stop Pedal In this keyboard.
SUSTAIN/ASSIGNABLE JACK Terminal Accessories and Options Use only the accessories and options specified for this case, the pedal performs the same functions as the START/STOP button....and then depress the pedal before you want, see "Changing Other Settings" on page E-63. For details on how to lin- Use of non-authorized items creates the danger of the notes being played. pressing the sostenuto pedal causes notes to sound until the pedal ...8226; With organ tones, depressing the pedal causes notes to enable the capabilities described below. Rhythm Start/Stop Pedal In this keyboard.


