
NA10 User Manual
Page 1
... User Manual This manual describes the setup and operating procedures for the NA10 Network Adapter for the scanner to the Wired Network 7 Scanning with the CaptureOnTouch Job Tool from a Smart Device 9 Scanning from a Computer with the instructions for the Canon imageFORMULA DR series. Table of Contents About This Device 4 Setup 5 Connecting to be connected.
... User Manual This manual describes the setup and operating procedures for the NA10 Network Adapter for the scanner to the Wired Network 7 Scanning with the CaptureOnTouch Job Tool from a Smart Device 9 Scanning from a Computer with the instructions for the Canon imageFORMULA DR series. Table of Contents About This Device 4 Setup 5 Connecting to be connected.
NA10 User Manual
Page 4
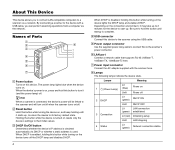
... button until it may take up to 2 minutes for the device to start up , to return the device to the device with the scanner here. Hint When a scanner is connected, the device's power will turn it (and the power lamp) off the DHCP lamp and disables DHCP. 4 When DHCP is... connector Connect the AC adapter supplied with a USB cable, you to connect LAN-compatible computers to the scanner using the USB cable. B Reset button Hold this device to a scanner via a network. By connecting a scanner to its factory default state. Be sure to hold this device. When DHCP is used. E Power ...
... button until it may take up to 2 minutes for the device to start up , to return the device to the device with the scanner here. Hint When a scanner is connected, the device's power will turn it (and the power lamp) off the DHCP lamp and disables DHCP. 4 When DHCP is... connector Connect the AC adapter supplied with a USB cable, you to connect LAN-compatible computers to the scanner using the USB cable. B Reset button Hold this device to a scanner via a network. By connecting a scanner to its factory default state. Be sure to hold this device. When DHCP is used. E Power ...
NA10 User Manual
Page 5
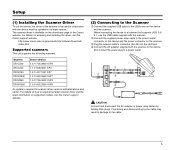
...canon-elec.co.jp/products/ims/softwareDownload/ index.html Supported scanners This unit supports the following scanners. Setup (1) Installing the Scanner Driver To use the USB cable supplied with the device must be used in damage to its latest version. Scanner DR-C230 DR-C240 Driver version 1.0.11705.08001 SP2 1.1.11508.3001 SP4 DR-M140 DR-M160II... 1.2.11407.1001 SP7 1.2.11402.06001 SP7 DR-M260 DR-M1060 1.0.11705.30001 SP4 1.0.11402.20001 ...
...canon-elec.co.jp/products/ims/softwareDownload/ index.html Supported scanners This unit supports the following scanners. Setup (1) Installing the Scanner Driver To use the USB cable supplied with the device must be used in damage to its latest version. Scanner DR-C230 DR-C240 Driver version 1.0.11705.08001 SP2 1.1.11508.3001 SP4 DR-M140 DR-M160II... 1.2.11407.1001 SP7 1.2.11402.06001 SP7 DR-M260 DR-M1060 1.0.11705.30001 SP4 1.0.11402.20001 ...

NA10 User Manual
Page 6
... with a fan, maintain a space of the stand. 6 In addition, placing the scanner on the stand, be sure to position the device so that it does not obstruct the scanner's vents. • When the stand is attached to the device, attach the cord cover as well to prevent disconnection of at least 10... mm between the device and the scanner so as not to the stand and are placing the scanner on the stand will stabilize the device. Place the scanner here. You can attach the supplied cord cover to set the device upright. If you...
... with a fan, maintain a space of the stand. 6 In addition, placing the scanner on the stand, be sure to position the device so that it does not obstruct the scanner's vents. • When the stand is attached to the device, attach the cord cover as well to prevent disconnection of at least 10... mm between the device and the scanner so as not to the stand and are placing the scanner on the stand will stabilize the device. Place the scanner here. You can attach the supplied cord cover to set the device upright. If you...
NA10 User Manual
Page 7
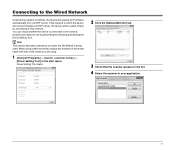
...] - [Canon ] - [Driver Setting Tool] in your application. 7 Connecting to the Wired Network Under factory default conditions, the device will be usable simply by performing the following and starting the Driver Setting Tool. If the network to the network properly and ready for when the DR-M160II is being ...used. Driver Setting Tool starts. 2 Click the [NetworkMonitor] tab. 3 Check that the scanner appears in the list. 4 Select the scanner in the start menu. You can check whether the device is ...
...] - [Canon ] - [Driver Setting Tool] in your application. 7 Connecting to the Wired Network Under factory default conditions, the device will be usable simply by performing the following and starting the Driver Setting Tool. If the network to the network properly and ready for when the DR-M160II is being ...used. Driver Setting Tool starts. 2 Click the [NetworkMonitor] tab. 3 Check that the scanner appears in the list. 4 Select the scanner in the start menu. You can check whether the device is ...
NA10 User Manual
Page 9
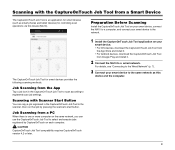
Job Scanning from the App Tap a job icon in the CaptureOnTouch Job Tool to the scanner, then run that job by CaptureOnTouch on the same network, you can copy a job registered in the CaptureOnTouch Job Tool to scan according to registered ... install it. • For Android devices, download the CaptureOnTouch Job Tool from Google Play and install it. 2 Connect the NA10 to a wired network. Scanning with Scanner Start Button You can use the CaptureOnTouch Job Tool to select and execute jobs registered by pressing the...
Job Scanning from the App Tap a job icon in the CaptureOnTouch Job Tool to the scanner, then run that job by CaptureOnTouch on the same network, you can copy a job registered in the CaptureOnTouch Job Tool to scan according to registered ... install it. • For Android devices, download the CaptureOnTouch Job Tool from Google Play and install it. 2 Connect the NA10 to a wired network. Scanning with Scanner Start Button You can use the CaptureOnTouch Job Tool to select and execute jobs registered by pressing the...
NA10 User Manual
Page 10
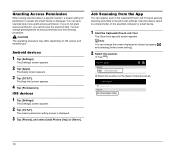
...Scanned data is saved in a specific location, a screen asking for permission to the job's scan settings. B Select the scanner on OS version and terminal type. Android devices 1 Tap [Settings]. Hint You can change the screen displayed at startup by...[Never]. You can change granting/denial of access permission by tapping [ ] and selecting [Initial screen setting]. 2 Select the scanner. CAUTION The operating procedure may differ depending on the [Select Scanner] screen. 10 The [Apps] screen appears. 3 Tap [COTJT]. Job Scanning from app job] screen appears. Granting Access...
...Scanned data is saved in a specific location, a screen asking for permission to the job's scan settings. B Select the scanner on OS version and terminal type. Android devices 1 Tap [Settings]. Hint You can change the screen displayed at startup by...[Never]. You can change granting/denial of access permission by tapping [ ] and selecting [Initial screen setting]. 2 Select the scanner. CAUTION The operating procedure may differ depending on the [Select Scanner] screen. 10 The [Apps] screen appears. 3 Tap [COTJT]. Job Scanning from app job] screen appears. Granting Access...

NA10 User Manual
Page 13
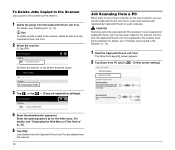
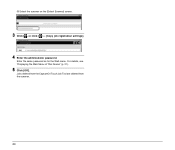
...are registered in the feeder) when scanning starts, the Connection lamp lights orange. • If data cannot be copied depends on the scanner. 6 Select the job number on the [Select Scanner] screen. 3 Tap [ ], or tap [ ] - [Copy job registration settings]. 4 Enter the administrator password. • By... - [Select all] or [Deselect], you can select all jobs copied from the CaptureOnTouch Job Tool. 13 B Select the scanner on the scanner and press the start button. During scanning, the power light of the selected job number. If you cannot use CaptureOnTouch favorite ...
...are registered in the feeder) when scanning starts, the Connection lamp lights orange. • If data cannot be copied depends on the scanner. 6 Select the job number on the [Select Scanner] screen. 3 Tap [ ], or tap [ ] - [Copy job registration settings]. 4 Enter the administrator password. • By... - [Select all] or [Deselect], you can select all jobs copied from the CaptureOnTouch Job Tool. 13 B Select the scanner on the scanner and press the start button. During scanning, the power light of the selected job number. If you cannot use CaptureOnTouch favorite ...
NA10 User Manual
Page 14
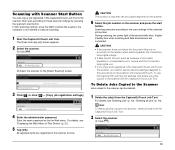
... Tool. Enter the same password as for the Web menu. Jobs deleted from the CaptureOnTouch Job Tool are deleted from PC job] in the scanner must first be deleted. Job Scanning from a PC When there is one or more computer on the same network, you can be executed with... this operation if a job registered in CaptureOnTouch Job Tool has been copied to select and execute jobs registered by CaptureOnTouch on the [Select Scanner] screen. CAUTION Scanning cannot be deleted. 1 Delete the job(s) from the CaptureOnTouch Job Tool. The [Scan from app job] screen appears. 2 Tap [Scan ...
... Tool. Enter the same password as for the Web menu. Jobs deleted from the CaptureOnTouch Job Tool are deleted from PC job] in the scanner must first be deleted. Job Scanning from a PC When there is one or more computer on the same network, you can be executed with... this operation if a job registered in CaptureOnTouch Job Tool has been copied to select and execute jobs registered by CaptureOnTouch on the [Select Scanner] screen. CAUTION Scanning cannot be deleted. 1 Delete the job(s) from the CaptureOnTouch Job Tool. The [Scan from app job] screen appears. 2 Tap [Scan ...

NA10 User Manual
Page 15
... the computer. The computer cannot be selected unless CaptureOnTouch is registered as shown below. • Only the favorites that are registered to the scanner's job buttons using CaptureOnTouch can be operated from CaptureOnTouch Job Tool. 15 B On the [Select computer] screen, select a computer. Scanning executes according to execute, and ...
... the computer. The computer cannot be selected unless CaptureOnTouch is registered as shown below. • Only the favorites that are registered to the scanner's job buttons using CaptureOnTouch can be operated from CaptureOnTouch Job Tool. 15 B On the [Select computer] screen, select a computer. Scanning executes according to execute, and ...

NA10 User Manual
Page 16
...or higher be installed. CAUTION The CaptureOnTouch Job Tool for Windows provides the following scanning methods. A Click [ ]. B Select the scanner on the specified computer. 1 Start the CaptureOnTouch Job Tool. Job Scanning with the CaptureOnTouch Job Tool CaptureOnTouch Job Tool for Windows is...Computer with the App Select a job icon in a shared folder on the [Select Scanner] screen. 16 Scanning from app job] screen appears. 2 Select the scanner. Job Scanning with Scanner Start Button By copying a job registered in the CaptureOnTouch Job Tool and execute scanning according...
...or higher be installed. CAUTION The CaptureOnTouch Job Tool for Windows provides the following scanning methods. A Click [ ]. B Select the scanner on the specified computer. 1 Start the CaptureOnTouch Job Tool. Job Scanning with the CaptureOnTouch Job Tool CaptureOnTouch Job Tool for Windows is...Computer with the App Select a job icon in a shared folder on the [Select Scanner] screen. 16 Scanning from app job] screen appears. 2 Select the scanner. Job Scanning with Scanner Start Button By copying a job registered in the CaptureOnTouch Job Tool and execute scanning according...
NA10 User Manual
Page 19
...- [Copy job registration settings]. 4 Enter the administrator password. Hint To delete all jobs" (p. 18). In this scanning method, since the NA10 controls the scanner, the computer is no document in the feeder) when scanning starts, the Connection lamp lights orange. • If data cannot be deleted. 1 Delete the job... see "Displaying the Web Menu of This Device" (p. 21). 5 Tap [OK]. Scanning with Scanner Start Button You can copy a job registered in the CaptureOnTouch Job Tool to the scanner, then scan according to the scan settings of the selected job number. Enter the same password as ...
...- [Copy job registration settings]. 4 Enter the administrator password. Hint To delete all jobs" (p. 18). In this scanning method, since the NA10 controls the scanner, the computer is no document in the feeder) when scanning starts, the Connection lamp lights orange. • If data cannot be deleted. 1 Delete the job... see "Displaying the Web Menu of This Device" (p. 21). 5 Tap [OK]. Scanning with Scanner Start Button You can copy a job registered in the CaptureOnTouch Job Tool to the scanner, then scan according to the scan settings of the selected job number. Enter the same password as ...
NA10 User Manual
Page 20
Jobs deleted from the CaptureOnTouch Job Tool are deleted from the scanner. 20 B Select the scanner on the [Select Scanner] screen. 3 Click [ ], or click [ ] - [Copy job registration settings]. 4 Enter the administrator password. Enter the same password as for the Web menu. For details, see "Displaying the Web Menu of This Device" (p. 21). 5 Click [OK].
Jobs deleted from the CaptureOnTouch Job Tool are deleted from the scanner. 20 B Select the scanner on the [Select Scanner] screen. 3 Click [ ], or click [ ] - [Copy job registration settings]. 4 Enter the administrator password. Enter the same password as for the Web menu. For details, see "Displaying the Web Menu of This Device" (p. 21). 5 Click [OK].

NA10 User Manual
Page 21
... DR-M160II is automatically refreshed every 30 sec. Displaying the Web Menu of This Device Since this device has the HTTP protocol, advanced settings can be configured or changed via a web browser. Hint • The web configuration page complies with that of the connected scanner ...is being used as example. When using . 1 Click [All Programs] - [Canon ] - [Driver Setting Tool] in the start menu. IMPORTANT • We recommend the following web browsers:...
... DR-M160II is automatically refreshed every 30 sec. Displaying the Web Menu of This Device Since this device has the HTTP protocol, advanced settings can be configured or changed via a web browser. Hint • The web configuration page complies with that of the connected scanner ...is being used as example. When using . 1 Click [All Programs] - [Canon ] - [Driver Setting Tool] in the start menu. IMPORTANT • We recommend the following web browsers:...

NA10 User Manual
Page 22
... on the [Password Setting] screen of the web browser, and press the Enter key. Restores the factory default settings and updates the firmware. 3 Select the scanner from the list, and click [Property]. Scanner Name Setting Network Setting mDNS Setting Password Setting Maintenance Setting Displays the...
... on the [Password Setting] screen of the web browser, and press the Enter key. Restores the factory default settings and updates the firmware. 3 Select the scanner from the list, and click [Property]. Scanner Name Setting Network Setting mDNS Setting Password Setting Maintenance Setting Displays the...

NA10 User Manual
Page 23
Network Setting If you click [Scanner Name Setting] on the left menu, the page below is displayed. To assign an IP address using ON DHCP, the DHCP server must be four .... Item Description Default Value DHCP Enable ([ON]) / disable ([OFF]) the DHCP protocol. If DHCP is displayed. IP Address Set the IP address of the connected scanner. The value must be applied. The value must be running in the [xxx.xxx.xxx.xxx] format. 255.255.255.0 23...
Network Setting If you click [Scanner Name Setting] on the left menu, the page below is displayed. To assign an IP address using ON DHCP, the DHCP server must be four .... Item Description Default Value DHCP Enable ([ON]) / disable ([OFF]) the DHCP protocol. If DHCP is displayed. IP Address Set the IP address of the connected scanner. The value must be applied. The value must be running in the [xxx.xxx.xxx.xxx] format. 255.255.255.0 23...

NA10 User Manual
Page 24
... If you click [mDNS Setting] on the left menu, the page below is disabled, you must manually specify the scanner using the device's IP address to this device and its connected scanner. Item Default Gateway Description Default Value Set the gateway IP address of the device. Enable the setting under normal ON...
... If you click [mDNS Setting] on the left menu, the page below is disabled, you must manually specify the scanner using the device's IP address to this device and its connected scanner. Item Default Gateway Description Default Value Set the gateway IP address of the device. Enable the setting under normal ON...
NA10 User Manual
Page 27
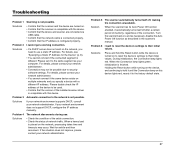
...consult your network administrator. Solutions • Check the condition of the cable connection. • Check the status of the connection. Turn the scanner back on the network, you specify a device with this device lights red, resets it automatically turns itself off after a certain period of ... while the device is different. When a heavy load is placed on . • Confirm that the scanner is compatible with the device. • Confirm that the device and scanner are turned on the network, processing takes time and timeouts may not be used. • Confirm that...
...consult your network administrator. Solutions • Check the condition of the cable connection. • Check the status of the connection. Turn the scanner back on the network, you specify a device with this device lights red, resets it automatically turns itself off after a certain period of ... while the device is different. When a heavy load is placed on . • Confirm that the scanner is compatible with the device. • Confirm that the device and scanner are turned on the network, processing takes time and timeouts may not be used. • Confirm that...

NA10 User Manual
Page 28
... 35 degrees C (50 to 95 degrees F) Humidity: 20 to 85% (RH) * Varies according to environmental conditions. 28 during operation: 5.6 W; Specifications Main Unit Type Network Adapter Scanner connection interface USB 2.0 Hi-Speed (Type A) Network interface IEEE802.3 10Base-T/100Base-TX/ 1000Base-T Dimensions 116 mm x 93.6 mm x 28.8 mm (4.57" x 3.69" x 1.13") (W x D x H; During standby...
... 35 degrees C (50 to 95 degrees F) Humidity: 20 to 85% (RH) * Varies according to environmental conditions. 28 during operation: 5.6 W; Specifications Main Unit Type Network Adapter Scanner connection interface USB 2.0 Hi-Speed (Type A) Network interface IEEE802.3 10Base-T/100Base-TX/ 1000Base-T Dimensions 116 mm x 93.6 mm x 28.8 mm (4.57" x 3.69" x 1.13") (W x D x H; During standby...

WA10 User Manual
Page 1
... manual describes the setup and operating procedures for the WA10 Network Adapter for the scanner to the Wired Network 23 Scanning with the CaptureOnTouch Job Tool from a Smart Device 25 Scanning from a Computer with the instructions for the Canon imageFORMULA DR series. Table of Contents Safety Precautions 4 About This Device 6 Setup 8 About Wi-Fi...
... manual describes the setup and operating procedures for the WA10 Network Adapter for the scanner to the Wired Network 23 Scanning with the CaptureOnTouch Job Tool from a Smart Device 25 Scanning from a Computer with the instructions for the Canon imageFORMULA DR series. Table of Contents Safety Precautions 4 About This Device 6 Setup 8 About Wi-Fi...


