User Manual
Page 1
User Manual • Please read this manual before operating this scanner. • After you finish reading this manual, store it in a safe place for future reference.
User Manual • Please read this manual before operating this scanner. • After you finish reading this manual, store it in a safe place for future reference.
User Manual
Page 2
... equipment. If such changes or modifications should be made, you could be determined by turning the equipment OFF and ON, the user is connected. - ONE CANON PARK, MELVILLE, NY 11747, U.S.A. This equipment generates, uses, and can be required to the equipment unless otherwise specified in accordance with the instructions, may cause...® Office Equipment Program This program is an open system in which can radiate radio frequency energy and, if not installed and used in the manual. If this machine meets the ENERGY STAR® Program guidelines for help.
... equipment. If such changes or modifications should be made, you could be determined by turning the equipment OFF and ON, the user is connected. - ONE CANON PARK, MELVILLE, NY 11747, U.S.A. This equipment generates, uses, and can be required to the equipment unless otherwise specified in accordance with the instructions, may cause...® Office Equipment Program This program is an open system in which can radiate radio frequency energy and, if not installed and used in the manual. If this machine meets the ENERGY STAR® Program guidelines for help.

User Manual
Page 5
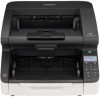
... (with both USB and wired LAN connection functions. Check your model before reading this manual. Model Serial No.* DR-G2140 (with LAN connector) JF DR-G2140 (without LAN JT connector) DR-G2090 JH USB Wired LAN Connection Connection Yes Yes Yes No Yes Yes Yes No Yes No *The serial number is alphanumeric characters printed on...
... (with both USB and wired LAN connection functions. Check your model before reading this manual. Model Serial No.* DR-G2140 (with LAN connector) JF DR-G2140 (without LAN JT connector) DR-G2090 JH USB Wired LAN Connection Connection Yes Yes Yes No Yes Yes Yes No Yes No *The serial number is alphanumeric characters printed on...
User Manual
Page 6
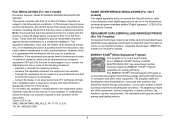
...; The cleaning cloth is for storing or transporting the machine. • The shape of the scanner. • Items included in this manual are missing or damaged, contact your local authorized Canon dealer or service representative. STEP 2 Checking the Accessories If any of the items listed below are subject to change without notice...
...; The cleaning cloth is for storing or transporting the machine. • The shape of the scanner. • Items included in this manual are missing or damaged, contact your local authorized Canon dealer or service representative. STEP 2 Checking the Accessories If any of the items listed below are subject to change without notice...

User Manual
Page 15
Hint • The manual (User Manual) for purchasing the Canon imageFORMULA DR-G2140/ DR-G2110/DR-G2090. After reading the manuals, store them in PDF format. • If you are using Windows, the User Manual (electronic manual) will be registered to ensure you sufficiently understand the functions and make the most of the scanner's capabilities. Please read the following manuals carefully and familiarize...
Hint • The manual (User Manual) for purchasing the Canon imageFORMULA DR-G2140/ DR-G2110/DR-G2090. After reading the manuals, store them in PDF format. • If you are using Windows, the User Manual (electronic manual) will be registered to ensure you sufficiently understand the functions and make the most of the scanner's capabilities. Please read the following manuals carefully and familiarize...
User Manual
Page 16
..., or damage to avoid machine breakdowns and damage. Reading these cautions. CAUTION Indicates operational requirements and restrictions. Symbols Used in This Manual The following symbols are used in this manual to these notes is registered at the following location. Indicates a warning concerning operations that may lead to death or injury to operate...
..., or damage to avoid machine breakdowns and damage. Reading these cautions. CAUTION Indicates operational requirements and restrictions. Symbols Used in This Manual The following symbols are used in this manual to these notes is registered at the following location. Indicates a warning concerning operations that may lead to death or injury to operate...

User Manual
Page 17
... Setup Guide 5 Interface Connector Locations 11 Power Supply Connection 11 Connecting to a Computer 12 Turning Off the Power 14 Introduction 15 Symbols Used in This Manual 16 Before Using the Scanner 19 Important Safety Instructions 19 Installation Location 19 Power Supply 20 Moving the Scanner 20 Handling 20 Disposal 22 Features... Scanning Conditions 79 More Advanced Scanning Methods (Batch Separation 92 Batch Separation (Insert blank page 92 Batch Separation Using Patch Code Sheets 93 About the Canon imageFORMULA Driver Setting Tool 96 17
... Setup Guide 5 Interface Connector Locations 11 Power Supply Connection 11 Connecting to a Computer 12 Turning Off the Power 14 Introduction 15 Symbols Used in This Manual 16 Before Using the Scanner 19 Important Safety Instructions 19 Installation Location 19 Power Supply 20 Moving the Scanner 20 Handling 20 Disposal 22 Features... Scanning Conditions 79 More Advanced Scanning Methods (Batch Separation 92 Batch Separation (Insert blank page 92 Batch Separation Using Patch Code Sheets 93 About the Canon imageFORMULA Driver Setting Tool 96 17

User Manual
Page 32
... the number of documents that can be displayed after turning the power ON. A maximum of registered job names. Description Separation Off The scanner becomes the manual feeding mode (non-continuous). Press the ▲▼ keys to select a menu item, and press the OK key to accept the selected item. New File...
... the number of documents that can be displayed after turning the power ON. A maximum of registered job names. Description Separation Off The scanner becomes the manual feeding mode (non-continuous). Press the ▲▼ keys to select a menu item, and press the OK key to accept the selected item. New File...

User Manual
Page 33
... an Imprinter Test. While scanning, information related to the Function key with the Canon imageFORMULA Driver Setting Tool. Items displayed on the [Menu] screen. "Assigning a Function to the Function Key" (See p. 58) • Counter clear • Count Only • Manual Feeding • Batch Separation The scanner's factory default Function key assignment is displayed...
... an Imprinter Test. While scanning, information related to the Function key with the Canon imageFORMULA Driver Setting Tool. Items displayed on the [Menu] screen. "Assigning a Function to the Function Key" (See p. 58) • Counter clear • Count Only • Manual Feeding • Batch Separation The scanner's factory default Function key assignment is displayed...

User Manual
Page 34
... (220") long. In that is dry before scanning it. • Scanning documents that are different sizes, thicknesses, or textures together could result in the DR-G2090. Read the following sizes and paper thicknesses can lead to 220") (when Long Document Mode is not available in a paper jam unless the leading...dry can cause problems with the scanner. Paper thickness Continuous Feeding: 20 g/m2 to 209 g/m2 (5 to 56 lb bond) (0.04 mm to 0.25 mm) Manual Feeding: 20 g/m2 to 255g/m2(5 lb to 64 lb bond) (0.04 mm to subsequent documents. Always clean the internal parts of the scanner after...
... (220") long. In that is dry before scanning it. • Scanning documents that are different sizes, thicknesses, or textures together could result in the DR-G2090. Read the following sizes and paper thicknesses can lead to 220") (when Long Document Mode is not available in a paper jam unless the leading...dry can cause problems with the scanner. Paper thickness Continuous Feeding: 20 g/m2 to 209 g/m2 (5 to 56 lb bond) (0.04 mm to 0.25 mm) Manual Feeding: 20 g/m2 to 255g/m2(5 lb to 64 lb bond) (0.04 mm to subsequent documents. Always clean the internal parts of the scanner after...

User Manual
Page 35
... invoice booklets, place the bound edge against the feeder inlet and scan by manual feeding. • To use the Long Document Mode, feed document pages manually, one after another. • In Folio document mode, fold sheets and feed them manually, one side at a time. Document Feeder Capacity Maximum of 500 sheets (80g/m2...
... invoice booklets, place the bound edge against the feeder inlet and scan by manual feeding. • To use the Long Document Mode, feed document pages manually, one after another. • In Folio document mode, fold sheets and feed them manually, one side at a time. Document Feeder Capacity Maximum of 500 sheets (80g/m2...
User Manual
Page 44
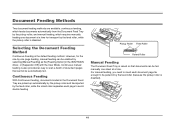
...is raised so that cannot be automatically fed. However, for transport by the feed roller, while the pickup roller is disabled. Continuous manual feeding is disabled). 44 Selecting the Document Feeding Method Continuous Feeding is the default feeding method. Continuous Feeding With Continuous Feeding, documents ...while the retard roller separates each document page far enough to scan a batch of document pages that documents can be enabled by selecting [Manual Feeding] as way to be pulled in by the feed roller (because the pickup roller is also provided as the [Feeding Option]...
...is raised so that cannot be automatically fed. However, for transport by the feed roller, while the pickup roller is disabled. Continuous manual feeding is disabled). 44 Selecting the Document Feeding Method Continuous Feeding is the default feeding method. Continuous Feeding With Continuous Feeding, documents ...while the retard roller separates each document page far enough to scan a batch of document pages that documents can be enabled by selecting [Manual Feeding] as way to be pulled in by the feed roller (because the pickup roller is also provided as the [Feeding Option]...

User Manual
Page 45
...bound multi-page documents such as invoice booklets, place the bound edge against the feed inlet and scan using Continuous Feeding. For the continuous manual feeding mode, a stack of documents is displayed on the Document Feed Tray and handfed from the User Mode when document pages do not ...separate properly using manual feeding. Hint • In the manual feed mode, the icon is placed on the display panel. • The User Mode's [Separation Off] setting corresponds to ...
...bound multi-page documents such as invoice booklets, place the bound edge against the feed inlet and scan using Continuous Feeding. For the continuous manual feeding mode, a stack of documents is displayed on the Document Feed Tray and handfed from the User Mode when document pages do not ...separate properly using manual feeding. Hint • In the manual feed mode, the icon is placed on the display panel. • The User Mode's [Separation Off] setting corresponds to ...
User Manual
Page 46
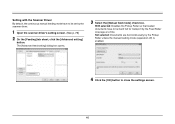
Not selected: Documents are fed continuously by the Pickup Roller unless the manual feeding mode (separation off) is enabled. 4 Click the [OK] button to be hand fed for transport by the scanner driver. 1 Open the scanner driver's setting ...screen. (See p. 76) 2 On the [Feeding] tab sheet, click the [Advanced setting] button. Setting with the Scanner Driver By default, the continuous manual feeding mode have to be set by the Feed Roller one page at a time. The [Advanced feed setting] dialog box opens. 3 Select the...
Not selected: Documents are fed continuously by the Pickup Roller unless the manual feeding mode (separation off) is enabled. 4 Click the [OK] button to be hand fed for transport by the scanner driver. 1 Open the scanner driver's setting ...screen. (See p. 76) 2 On the [Feeding] tab sheet, click the [Advanced setting] button. Setting with the Scanner Driver By default, the continuous manual feeding mode have to be set by the Feed Roller one page at a time. The [Advanced feed setting] dialog box opens. 3 Select the...
User Manual
Page 47
... image. 1 Open the scanner driver's setting screen. (See p. 76) 2 Set [Page Size] on the operation panel. Setting with User Mode The continuous manual feeding mode can be actually scanned, and set [Page Size] to [Folio]. The scan setting items are displayed. 3 Press the ▲▼ keys to...Manual Feed], and press [OK]. "Configuring Scanner Driver Settings" (See p. 62) 1 Press the Menu key on the [Basic] tab to a size that is half that loaded documents must be hand fed for transport by the Feed Roller one page at a time. [Off]: Documents are fed continuously by the Canon imageFORMULA...
... image. 1 Open the scanner driver's setting screen. (See p. 76) 2 Set [Page Size] on the operation panel. Setting with User Mode The continuous manual feeding mode can be actually scanned, and set [Page Size] to [Folio]. The scan setting items are displayed. 3 Press the ▲▼ keys to...Manual Feed], and press [OK]. "Configuring Scanner Driver Settings" (See p. 62) 1 Press the Menu key on the [Basic] tab to a size that is half that loaded documents must be hand fed for transport by the Feed Roller one page at a time. [Off]: Documents are fed continuously by the Canon imageFORMULA...

User Manual
Page 48
... close the settings screen. 5 Fold the document in the combined scanned image. IMPORTANT When [Scanning Side] is set [Page Size] on the [Feeding] tab to [Manual Feeding]. (See p. 44) IMPORTANT A portion of the scanned image will be missing at the fold line. 6 Place the document with the folded edge facing right.
... close the settings screen. 5 Fold the document in the combined scanned image. IMPORTANT When [Scanning Side] is set [Page Size] on the [Feeding] tab to [Manual Feeding]. (See p. 44) IMPORTANT A portion of the scanned image will be missing at the fold line. 6 Place the document with the folded edge facing right.

User Manual
Page 52
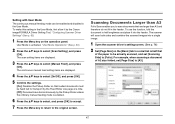
Be especially careful to avoid paper jams. • To scan long documents, enable the [Separation Off], and manually feed pages one . In this case, lower the resolution, scan the document in Long Document Mode can slow down the processing speed. • When Long ... to [Long Document (3000 mm)] or [Long Document (5588 mm)], the scanned image may react slowly when scanning long documents, which could result in the DR-G2090. 6 Press [OK] to accept. 7 Press the Menu key to return to the jammed documents. According to specify the long document mode. IMPORTANT • Scanning...
Be especially careful to avoid paper jams. • To scan long documents, enable the [Separation Off], and manually feed pages one . In this case, lower the resolution, scan the document in Long Document Mode can slow down the processing speed. • When Long ... to [Long Document (3000 mm)] or [Long Document (5588 mm)], the scanned image may react slowly when scanning long documents, which could result in the DR-G2090. 6 Press [OK] to accept. 7 Press the Menu key to return to the jammed documents. According to specify the long document mode. IMPORTANT • Scanning...

User Manual
Page 56
Hint The Count-Only Mode is executed from the Count-Only Mode (or entered manually) with the actual count of document pages scanned, and an error message is activated. "User Mode Operations" (See p. 60) 3 Press the ▲▼ keys to ...
Hint The Count-Only Mode is executed from the Count-Only Mode (or entered manually) with the actual count of document pages scanned, and an error message is activated. "User Mode Operations" (See p. 60) 3 Press the ▲▼ keys to ...
User Manual
Page 58
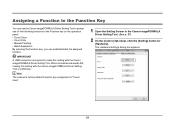
... key on the operation panel. • Count Clear • Count Only • Manual Feeding • Batch Separation By pressing the Function key, you can use the Canon imageFORMULA Driver Setting Tool to assign one of the following functions to make this setting with the...function. When connected via wired LAN, making this setting with the Canon imageFORMULA Driver Setting Tool is ineffective. The Hardware Settings dialog box appears. 58 IMPORTANT A USB connection is "Count clear". 1 Open the Setting Screen in the Canon imageFORMULA Driver Setting Tool. (See p. 97) 2 On the [Control...
... key on the operation panel. • Count Clear • Count Only • Manual Feeding • Batch Separation By pressing the Function key, you can use the Canon imageFORMULA Driver Setting Tool to assign one of the following functions to make this setting with the...function. When connected via wired LAN, making this setting with the Canon imageFORMULA Driver Setting Tool is ineffective. The Hardware Settings dialog box appears. 58 IMPORTANT A USB connection is "Count clear". 1 Open the Setting Screen in the Canon imageFORMULA Driver Setting Tool. (See p. 97) 2 On the [Control...
User Manual
Page 61
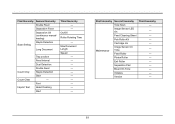
... Platen Roller Exit Roller Separation Pad Board On Time Initialize Version Third hierarchy - - - - - - 61 First hierarchy Second hierarchy Double Feed Separation Force Separation Off (continuous manual feeding) Scan Setting Staple Detection Long Document Count Only Count Clear Imprint Test Tray position Feed Interval Dust Detection Double Feed Staple Detection Start - Font...
... Platen Roller Exit Roller Separation Pad Board On Time Initialize Version Third hierarchy - - - - - - 61 First hierarchy Second hierarchy Double Feed Separation Force Separation Off (continuous manual feeding) Scan Setting Staple Detection Long Document Count Only Count Clear Imprint Test Tray position Feed Interval Dust Detection Double Feed Staple Detection Start - Font...


