iP4200 Easy Setup Instructions
Page 1
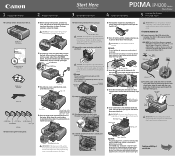
.... 2 Remove the orange protective cap from the printer. 5 Lower the print head lock lever carefully and press it down to remove the protective material before the printer is left . PIXMA iP4200 Photo Printer Documentation and Software Kit PIXMA iP4200 Print Head Power Cord CLI-8BK Black CLI-8Y... Yellow PGI-5BK Black CLI-8M Magenta CLI-8C Cyan Ink Tanks 1 Before turning on the printer. 2 Close the top cover...
.... 2 Remove the orange protective cap from the printer. 5 Lower the print head lock lever carefully and press it down to remove the protective material before the printer is left . PIXMA iP4200 Photo Printer Documentation and Software Kit PIXMA iP4200 Print Head Power Cord CLI-8BK Black CLI-8Y... Yellow PGI-5BK Black CLI-8M Magenta CLI-8C Cyan Ink Tanks 1 Before turning on the printer. 2 Close the top cover...

iP4200 Easy Setup Instructions
Page 2
...iP4200, then click Utility (Configure when using Mac OS X v.10.2.x) icon. Cassette If the printer is printed in the United States and other countries. NOTE: If the setup program does not run automatically. NOTE: · Print head alignment will take several minutes to exit the Canon IJ Printer... Start the print head alignment procedure. Move the cursor over items to register your printer and insert the Setup Software & User's Guide CD-ROM. d. a. QA7-3536-V02 © 2005 Canon Inc. For details, follow the on -screen instructions to display explanations of the ...
...iP4200, then click Utility (Configure when using Mac OS X v.10.2.x) icon. Cassette If the printer is printed in the United States and other countries. NOTE: If the setup program does not run automatically. NOTE: · Print head alignment will take several minutes to exit the Canon IJ Printer... Start the print head alignment procedure. Move the cursor over items to register your printer and insert the Setup Software & User's Guide CD-ROM. d. a. QA7-3536-V02 © 2005 Canon Inc. For details, follow the on -screen instructions to display explanations of the ...

iP4200 Quick Start Guide
Page 2
...use extended service program that provides up to three full years of the printer): Printer Driver CD-ROM number (located on the CD-ROM): Purchase Date: Customer Technical Support Sequence* 1. www.canonesp.com Canon CarePAK Extended Service Plan is our helpful tech support web site. Internet... - CarePAK must be purchased during your product's warranty period. Serial Number (located on the inside of the printer): Model Number (located on the top of...
...use extended service program that provides up to three full years of the printer): Printer Driver CD-ROM number (located on the CD-ROM): Purchase Date: Customer Technical Support Sequence* 1. www.canonesp.com Canon CarePAK Extended Service Plan is our helpful tech support web site. Internet... - CarePAK must be purchased during your product's warranty period. Serial Number (located on the inside of the printer): Model Number (located on the top of...
iP4200 Quick Start Guide
Page 4
... consent of Apple Computer, Inc., registered in part, without notice. As an ENERGY STAR partner, Canon U.S.A., Inc., has determined that it will be reproduced in any guides or related documents are believed reliable, but the accuracy and completeness thereof are not guaranteed or warranted, and they are subject to your Canon PIXMA iP4200 Photo Printer. Canon U.S.A., Inc.
... consent of Apple Computer, Inc., registered in part, without notice. As an ENERGY STAR partner, Canon U.S.A., Inc., has determined that it will be reproduced in any guides or related documents are believed reliable, but the accuracy and completeness thereof are not guaranteed or warranted, and they are subject to your Canon PIXMA iP4200 Photo Printer. Canon U.S.A., Inc.
iP4200 Quick Start Guide
Page 5
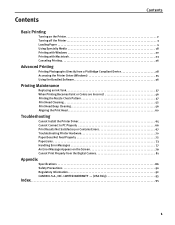
...20 Printing with Macintosh 23 Canceling Printing 26 Advanced Printing Printing Photographs Directly from a PictBridge Compliant Device 28 Accessing the Printer Driver (Windows 35 Using the Bundled Software 36 Printing Maintenance Replacing an Ink Tank 37 When Printing Becomes Faint or ...67 Troubleshooting Printer Hardware 70 Paper Does Not Feed Properly 72 Paper Jams 73 Handling Error Messages 77 An Error Message Appears on the Screen 79 Cannot Print Properly from the Digital Camera 81 Appendix Specifications 86 Safety Precautions 90 Regulatory Information 92 CANON U.S.A., INC...
...20 Printing with Macintosh 23 Canceling Printing 26 Advanced Printing Printing Photographs Directly from a PictBridge Compliant Device 28 Accessing the Printer Driver (Windows 35 Using the Bundled Software 36 Printing Maintenance Replacing an Ink Tank 37 When Printing Becomes Faint or ...67 Troubleshooting Printer Hardware 70 Paper Does Not Feed Properly 72 Paper Jams 73 Handling Error Messages 77 An Error Message Appears on the Screen 79 Cannot Print Properly from the Digital Camera 81 Appendix Specifications 86 Safety Precautions 90 Regulatory Information 92 CANON U.S.A., INC...
iP4200 Quick Start Guide
Page 6
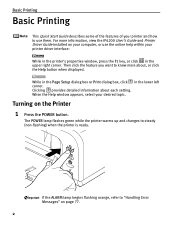
.... 2 Then click the feature you want to steady (non-flashing) when the printer is ready. The POWER lamp flashes green while the printer warms up and changes to know more information, view the iP4200 User's Guide and Printer Driver Guide installed on the Printer 1 Press the POWER button. Clicking provides detailed information about , or click...
.... 2 Then click the feature you want to steady (non-flashing) when the printer is ready. The POWER lamp flashes green while the printer warms up and changes to know more information, view the iP4200 User's Guide and Printer Driver Guide installed on the Printer 1 Press the POWER button. Clicking provides detailed information about , or click...
iP4200 Quick Start Guide
Page 7
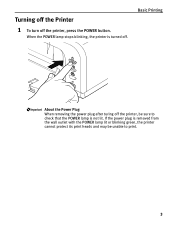
Basic Printing About the Power Plug When removing the power plug after turing off the printer, be unable to check that the POWER lamp is turned off the printer, press the POWER button. When the POWER lamp stops blinking, the printer is not lit. If the power plug is removed from the wall outlet with the POWER lamp lit or blinking green, the printer cannot protect its print heads and may be sure to print. 3 Turning off the Printer 1 To turn off .
Basic Printing About the Power Plug When removing the power plug after turing off the printer, be unable to check that the POWER lamp is turned off the printer, press the POWER button. When the POWER lamp stops blinking, the printer is not lit. If the power plug is removed from the wall outlet with the POWER lamp lit or blinking green, the printer cannot protect its print heads and may be sure to print. 3 Turning off the Printer 1 To turn off .
iP4200 Quick Start Guide
Page 8
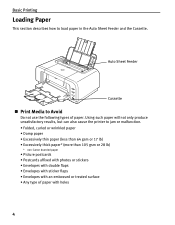
... paper (less than 64 gsm or 17 lb) • Excessively thick paper* (more than 105 gsm or 28 lb) * non-Canon branded paper • Picture postcards • Postcards affixed with photos or stickers • Envelopes with double flaps • Envelopes with sticker flaps • Envelopes with holes 4 Using such paper will not...
... paper (less than 64 gsm or 17 lb) • Excessively thick paper* (more than 105 gsm or 28 lb) * non-Canon branded paper • Picture postcards • Postcards affixed with photos or stickers • Envelopes with double flaps • Envelopes with sticker flaps • Envelopes with holes 4 Using such paper will not...
iP4200 Quick Start Guide
Page 9
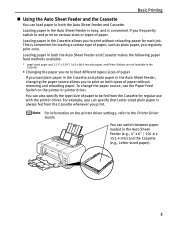
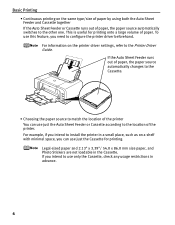
... Auto Sheet Feeder and Cassette makes the following paper feed methods available: * Legal-sized paper and 2.13" x 3.39"/ 54.0 x 86.0 mm size paper, and Photo Stickers are not loadable in both the Auto Sheet Feeder and Cassette. This is always fed from the Cassette whenever you to be fed from... the Cassette for loading a certain type of paper, such as plain paper, you to print on the printer driver settings, refer to feed different types/sizes of paper to print without removing and reloading paper. You can specify that Letter-sized plain paper...
... Auto Sheet Feeder and Cassette makes the following paper feed methods available: * Legal-sized paper and 2.13" x 3.39"/ 54.0 x 86.0 mm size paper, and Photo Stickers are not loadable in both the Auto Sheet Feeder and Cassette. This is always fed from the Cassette whenever you to be fed from... the Cassette for loading a certain type of paper, such as plain paper, you to print on the printer driver settings, refer to feed different types/sizes of paper to print without removing and reloading paper. You can specify that Letter-sized plain paper...
iP4200 Quick Start Guide
Page 10
... the location of the printer. This is useful for printing. If the Auto Sheet Feeder runs out of paper, the paper source automatically changes to the Cassette. • Choosing the paper source to the other one. Legal-sized paper and 2.13" x 3.39"/ 54.0 x 86.0 mm size paper, and Photo Stickers are not...
... the location of the printer. This is useful for printing. If the Auto Sheet Feeder runs out of paper, the paper source automatically changes to the Cassette. • Choosing the paper source to the other one. Legal-sized paper and 2.13" x 3.39"/ 54.0 x 86.0 mm size paper, and Photo Stickers are not...

iP4200 Quick Start Guide
Page 11
... to "Using Specialty Media" on how to load specialty media into the printer. 1 Flatten the four corners of the Front Cover and pull down to open it . When paper is curled, hold the opposing curled corners and gently .... 2 Pull out the Paper 1 Support Extension to support the paper. For details, refer to the Printer Driver Guide. 7 Basic Printing „ Loading Plain Paper in the Auto Sheet Feeder z For detailed information on the specialty media Canon provides for detailed instructions on page 18. z See "Printing Media" in the User's Guide for...
... to "Using Specialty Media" on how to load specialty media into the printer. 1 Flatten the four corners of the Front Cover and pull down to open it . When paper is curled, hold the opposing curled corners and gently .... 2 Pull out the Paper 1 Support Extension to support the paper. For details, refer to the Printer Driver Guide. 7 Basic Printing „ Loading Plain Paper in the Auto Sheet Feeder z For detailed information on the specialty media Canon provides for detailed instructions on page 18. z See "Printing Media" in the User's Guide for...
iP4200 Quick Start Guide
Page 13
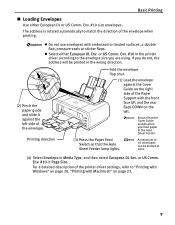
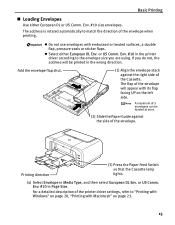
...with embossed or treated surfaces, a double flap, pressure seals or sticker flaps. Ensure that the Auto Sheet Feeder lamp lights. Env. #10 in the printer driver according to "Printing with Windows" on page 20, "Printing with Macintosh" on the left. z Do not use envelopes with the front face UP,... the rear flaps DOWN on page 23. 9 Printing direction Fold the envelope flap shut. (1) Load the envelope against the left side of the printer driver settings, refer to the envelope size you load paper in the wrong direction. (2) Pinch the paper guide and slide it against the Cover ...
...with embossed or treated surfaces, a double flap, pressure seals or sticker flaps. Ensure that the Auto Sheet Feeder lamp lights. Env. #10 in the printer driver according to "Printing with Windows" on page 20, "Printing with Macintosh" on the left. z Do not use envelopes with the front face UP,... the rear flaps DOWN on page 23. 9 Printing direction Fold the envelope flap shut. (1) Load the envelope against the left side of the printer driver settings, refer to the envelope size you load paper in the wrong direction. (2) Pinch the paper guide and slide it against the Cover ...
iP4200 Quick Start Guide
Page 14
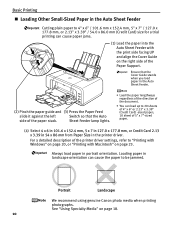
Loading paper in portrait orientation. Portrait Landscape We recommend using genuine Canon photo media when printing photographs. Ensure that the Cover Guide stands when you load paper in the Auto Sheet Feeder. (2) Pinch the paper guide and (3) Press ....4 mm, 5 x 7 in 127.0 x 177.8 mm, or Credit Card 2.13 x 3.39 in 54 x 86 mm from Paper Size in the printer driver. See "Using Specialty Media" on the right side of the printer driver settings, refer to "Printing with Windows" on page 20, or "Printing with the print side facing UP and align...
Loading paper in portrait orientation. Portrait Landscape We recommend using genuine Canon photo media when printing photographs. Ensure that the Cover Guide stands when you load paper in the Auto Sheet Feeder. (2) Pinch the paper guide and (3) Press ....4 mm, 5 x 7 in 127.0 x 177.8 mm, or Credit Card 2.13 x 3.39 in 54 x 86 mm from Paper Size in the printer driver. See "Using Specialty Media" on the right side of the printer driver settings, refer to "Printing with Windows" on page 20, or "Printing with the print side facing UP and align...
iP4200 Quick Start Guide
Page 15
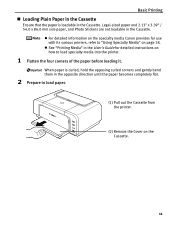
... 2.13" x 3.39" / 54.0 x 86.0 mm size paper, and Photo Stickers are not loadable in the opposite direction until the paper becomes completely flat. 2 Prepare to load paper. (1) Pull out the Cassette from the printer. (2) Remove the Cover on the Cassette. 11 When paper is loadable in the..."Using Specialty Media" on how to load specialty media into the printer. 1 Flatten the four corners of the paper before loading it. z See "Printing Media" in the Cassette. z For detailed information on the specialty media Canon provides for detailed instructions on page 18. Basic Printing „ ...
... 2.13" x 3.39" / 54.0 x 86.0 mm size paper, and Photo Stickers are not loadable in the opposite direction until the paper becomes completely flat. 2 Prepare to load paper. (1) Pull out the Cassette from the printer. (2) Remove the Cover on the Cassette. 11 When paper is loadable in the..."Using Specialty Media" on how to load specialty media into the printer. 1 Flatten the four corners of the paper before loading it. z See "Printing Media" in the Cassette. z For detailed information on the specialty media Canon provides for detailed instructions on page 18. Basic Printing „ ...

iP4200 Quick Start Guide
Page 18
... the Cassette has been extended to accommodate paper sizes larger than 5" x 7", the front edge of the cassette will extend beyond the front of the printer. 6 Prepare the Paper Output Tray. (1) 1 Put your fingers in the notches in either side of the Front Cover and pull down to the ...instructions packaged with the printer driver. Push the Cassette all the way into the printer. For details, refer to the Printer Driver Guide. Basic Printing 5 Insert the Cassette into the printer. (1) Set the Cover on the Cassette. (2) Insert the Cassette into ...
... the Cassette has been extended to accommodate paper sizes larger than 5" x 7", the front edge of the cassette will extend beyond the front of the printer. 6 Prepare the Paper Output Tray. (1) 1 Put your fingers in the notches in either side of the Front Cover and pull down to the ...instructions packaged with the printer driver. Push the Cassette all the way into the printer. For details, refer to the Printer Driver Guide. Basic Printing 5 Insert the Cassette into the printer. (1) Set the Cover on the Cassette. (2) Insert the Cassette into ...
iP4200 Quick Start Guide
Page 19
...Paper Feed Switch so that the Cassette lamp lights. (4) Select Envelope in the wrong direction. Env. #10 in Page Size. For a detailed description of the printer driver settings, refer to "Printing with Windows" on page 20, "Printing with Macintosh" on the left side. Fold the envelope flap shut. (1) Align the ... not use envelopes with its flap facing UP on page 23. 15 If you are using. The flap of the envelope. Env. #10 in the printer driver according to match the direction of the Cassette. or US Comm. A maximum of 5 envelopes can be printed in Media Type, and then select...
...Paper Feed Switch so that the Cassette lamp lights. (4) Select Envelope in the wrong direction. Env. #10 in Page Size. For a detailed description of the printer driver settings, refer to "Printing with Windows" on page 20, "Printing with Macintosh" on the left side. Fold the envelope flap shut. (1) Align the ... not use envelopes with its flap facing UP on page 23. 15 If you are using. The flap of the envelope. Env. #10 in the printer driver according to match the direction of the Cassette. or US Comm. A maximum of 5 envelopes can be printed in Media Type, and then select...

iP4200 Quick Start Guide
Page 21
Portrait Landscape We recommend using genuine Canon photo media when printing photographs. Basic Printing (5) Select 4 x 6 in 101.6 x 152.4 mm or 5 x 7 in 127.0 x 177.8 mm from Paper Size in portrait orientation. Loading paper in landscape orientation can cause the paper to "Printing with Windows" on page 20, or "Printing with Macintosh" on page 18. 17 Always load paper in the printer driver. For a detailed description of the printer driver settings, refer to be jammed. See "Using Specialty Media" on page 23.
Portrait Landscape We recommend using genuine Canon photo media when printing photographs. Basic Printing (5) Select 4 x 6 in 101.6 x 152.4 mm or 5 x 7 in 127.0 x 177.8 mm from Paper Size in portrait orientation. Loading paper in landscape orientation can cause the paper to "Printing with Windows" on page 20, or "Printing with Macintosh" on page 18. 17 Always load paper in the printer driver. For a detailed description of the printer driver settings, refer to be jammed. See "Using Specialty Media" on page 23.

iP4200 Quick Start Guide
Page 23
„ Canon Specialty Media Media Type Paper Support Load Limit Auto Sheet Feeder Cassette High Resolution Paper Up to 80 sheets Up to 80 sheets Super White Paper Up to 13 mm or 0.52 inches Up to 13 mm or 0.52 inches Glossy Photo Paper Letter: up to ... Transfers Up to 30 sheets 1 sheet Up to 30 sheets 1 sheet Basic Printing Printer Driver Setting for Media Type High Resolution Paper Plain Paper Glossy Photo Paper Matte Photo Paper Photo Paper Plus Double Sided Photo Paper Plus Glossy Photo Paper Plus Glossy Photo Paper Pro Photo Paper Plus Glossy Transparencies T-Shirt Transfers 19
„ Canon Specialty Media Media Type Paper Support Load Limit Auto Sheet Feeder Cassette High Resolution Paper Up to 80 sheets Up to 80 sheets Super White Paper Up to 13 mm or 0.52 inches Up to 13 mm or 0.52 inches Glossy Photo Paper Letter: up to ... Transfers Up to 30 sheets 1 sheet Up to 30 sheets 1 sheet Basic Printing Printer Driver Setting for Media Type High Resolution Paper Plain Paper Glossy Photo Paper Matte Photo Paper Photo Paper Plus Double Sided Photo Paper Plus Glossy Photo Paper Plus Glossy Photo Paper Pro Photo Paper Plus Glossy Transparencies T-Shirt Transfers 19
iP4200 Quick Start Guide
Page 24
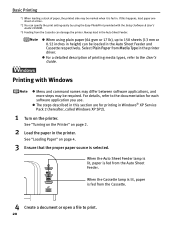
...z For a detailed description of paper, the printed side may be required. See "Loading Paper" on page 2. 2 Load the paper in height) can damage the printer. When the Cassette lamp is lit, paper is fed from the Cassette can be loaded in Windows® XP Service Pack 2 (hereafter, called Windows XP ...SP2). 1 Turn on the printer. Always load in this happens, load paper one sheet at a time. *2 You can specify the print setting easily by using plain paper (64 gsm or...
...z For a detailed description of paper, the printed side may be required. See "Loading Paper" on page 2. 2 Load the paper in height) can damage the printer. When the Cassette lamp is lit, paper is fed from the Cassette can be loaded in Windows® XP Service Pack 2 (hereafter, called Windows XP ...SP2). 1 Turn on the printer. Always load in this happens, load paper one sheet at a time. *2 You can specify the print setting easily by using plain paper (64 gsm or...

iP4200 Quick Start Guide
Page 25
5 Open the printer properties dialog box. (1) Select Print from Paper Source. (2) Click OK. 21 Basic Printing (2) Ensure that Paper Feed Switch is selected. (3) Click Preferences or Properties. 6 Specify the required settings. (1) Click Media Type to select the type of media loaded in the printer. Ensure that your printer is selected from the application software's File menu. The Print dialog box opens.
5 Open the printer properties dialog box. (1) Select Print from Paper Source. (2) Click OK. 21 Basic Printing (2) Ensure that Paper Feed Switch is selected. (3) Click Preferences or Properties. 6 Specify the required settings. (1) Click Media Type to select the type of media loaded in the printer. Ensure that your printer is selected from the application software's File menu. The Print dialog box opens.


