
i475D Quick Start Guide
Page 1
BUBBLE JET PRINTER Quick Start Guide Table of Contents Preface 1 Shipping Materials 1 Introduction 1 Setting Up 2 Preparing the Printer 2 Connecting the Printer to the Computer 3 Installing the Print Head 4 Loading Paper 7 Installing the Printer Driver 8 Aligning the Print Head 14 Basic Operations 20 Printing with Windows 20 Printing with Macintosh 22 Print Head Maintenance 24 Appendix 25 Notes on Handling the USB Interface (for Windows Users) 25 For Further Details... 25 Specifications 26 BE QA7-2844-V01
BUBBLE JET PRINTER Quick Start Guide Table of Contents Preface 1 Shipping Materials 1 Introduction 1 Setting Up 2 Preparing the Printer 2 Connecting the Printer to the Computer 3 Installing the Print Head 4 Loading Paper 7 Installing the Printer Driver 8 Aligning the Print Head 14 Basic Operations 20 Printing with Windows 20 Printing with Macintosh 22 Print Head Maintenance 24 Appendix 25 Notes on Handling the USB Interface (for Windows Users) 25 For Further Details... 25 Specifications 26 BE QA7-2844-V01

i475D Quick Start Guide
Page 2
...an ENERGY STAR® Partner, Canon Inc. The targeted products are office equipment such as follows: AC 100-127 V, 50/60 Hz AC 220-240 V, 50/60 Hz Printer Model: K10223 (i475D) Exif Print This printer supports Exif 2.2 (also called "Exif Print"). Exif Print is used and optimized, yielding ...extremely high quality prints. The International ENERGY STAR® Office Equipment Program is an open system in the ...
...an ENERGY STAR® Partner, Canon Inc. The targeted products are office equipment such as follows: AC 100-127 V, 50/60 Hz AC 220-240 V, 50/60 Hz Printer Model: K10223 (i475D) Exif Print This printer supports Exif 2.2 (also called "Exif Print"). Exif Print is used and optimized, yielding ...extremely high quality prints. The International ENERGY STAR® Office Equipment Program is an open system in the ...
i475D Quick Start Guide
Page 3
...that all the following symbols to indicate important information. Copyright ©2003 CANON INC. Introduction For information about printing when you for PictBridge-compliant Digital Cameras. Trademark Notices • Canon® is a registered trademark of this publication may be observed for ...of Microsoft Corporation in the U.S. Preface Shipping Materials Thank you connect a PictBridge-compliant digital camera, refer to Direct Printing for purchasing a Canon Bubble Jet Printer. Check that , if ignored, could result in the U.S. Observe the warnings and cautions to ...
...that all the following symbols to indicate important information. Copyright ©2003 CANON INC. Introduction For information about printing when you for PictBridge-compliant Digital Cameras. Trademark Notices • Canon® is a registered trademark of this publication may be observed for ...of Microsoft Corporation in the U.S. Preface Shipping Materials Thank you connect a PictBridge-compliant digital camera, refer to Direct Printing for purchasing a Canon Bubble Jet Printer. Check that , if ignored, could result in the U.S. Observe the warnings and cautions to ...

i475D Quick Start Guide
Page 6
... • Never attempt to plug the power cord into the power outlet. „ Installing the Print Head 1 Plug the printer in the country of purchase. output tray 4 Open the front cover. ... the power cord. Wait until the POWER lamp remains fully lit. ON 3 Open the output tray. print head holder 4 Do NOT turn on the printer. The POWER lamp flashes and the printer begins to the center. The... print head holder moves to operate. Do not place heavy objects on the power cord. • Never use...
... • Never attempt to plug the power cord into the power outlet. „ Installing the Print Head 1 Plug the printer in the country of purchase. output tray 4 Open the front cover. ... the power cord. Wait until the POWER lamp remains fully lit. ON 3 Open the output tray. print head holder 4 Do NOT turn on the printer. The POWER lamp flashes and the printer begins to the center. The... print head holder moves to operate. Do not place heavy objects on the power cord. • Never use...

i475D Quick Start Guide
Page 7
print head nozzles electrical contacts 7 Place the print head in the holder. 8 Lock the print head into place by lowering the lever. Do not touch internal parts other than the lock lever. Do not touch the lock lever once the print head has been installed. 5 print head 6 Remove the protective cap from the print head. • Do not touch the print head nozzles or electrical contacts. • Do not attempt to reattach the protective cap once it has been removed. lock lever 5 Raise the lock lever.
print head nozzles electrical contacts 7 Place the print head in the holder. 8 Lock the print head into place by lowering the lever. Do not touch internal parts other than the lock lever. Do not touch the lock lever once the print head has been installed. 5 print head 6 Remove the protective cap from the print head. • Do not touch the print head nozzles or electrical contacts. • Do not attempt to reattach the protective cap once it has been removed. lock lever 5 Raise the lock lever.
i475D Quick Start Guide
Page 9
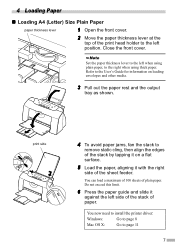
... the edges of the stack by tapping it on loading envelopes and other media. 3 Pull out the paper rest and the output tray as shown. print side 4 To avoid paper jams, fan the stack to the User's Guide for information on a flat surface. 5 Load the paper, aligning it against the left... side of the stack of plain paper. Do not exceed this limit. 6 Press the paper guide and slide it with the right side of the print head holder to the left position. You now need to install the printer driver: Windows: Go to page 8 Mac OS X: Go to the right when...
... the edges of the stack by tapping it on loading envelopes and other media. 3 Pull out the paper rest and the output tray as shown. print side 4 To avoid paper jams, fan the stack to the User's Guide for information on a flat surface. 5 Load the paper, aligning it against the left... side of the stack of plain paper. Do not exceed this limit. 6 Press the paper guide and slide it with the right side of the print head holder to the left position. You now need to install the printer driver: Windows: Go to page 8 Mac OS X: Go to the right when...
i475D Quick Start Guide
Page 10
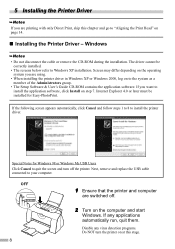
.... If any virus detection programs. Do NOT turn off . 2 Turn on step 7. 5 Installing the Printer Driver If you are printing with only Direct Print, skip this chapter and go to "Aligning the Print Head" on at this stage. 8 Internet Explorer 4.0 or later must be correctly installed. • The screens below refer to install...
.... If any virus detection programs. Do NOT turn off . 2 Turn on step 7. 5 Installing the Printer Driver If you are printing with only Direct Print, skip this chapter and go to "Aligning the Print Head" on at this stage. 8 Internet Explorer 4.0 or later must be correctly installed. • The screens below refer to install...

i475D Quick Start Guide
Page 12
... information of applications and how to start them, refer to install the application software, click Install. Before you use the printer, you must carry out print head alignment on screen to restart the computer is also installed when you to install the application software. 6 Click OK. To view the User's Guide...
... information of applications and how to start them, refer to install the application software, click Install. Before you use the printer, you must carry out print head alignment on screen to restart the computer is also installed when you to install the application software. 6 Click OK. To view the User's Guide...
i475D Quick Start Guide
Page 13
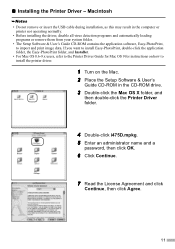
..., as this may result in the CD-ROM drive. 3 Double-click the Mac OS X folder, and then double-click the Printer Driver folder. 4 Double-click i475D.mpkg. 5 Enter an administrator name and a password, then click OK. 6 Click Continue. 7 Read the License Agreement and click Continue, then click Agree. 11 If you... programs or remove them from your system folder. • The Setup Software & User's Guide CD-ROM contains the application software, Easy-PhotoPrint, to import and print image data. „ Installing the Printer Driver -
..., as this may result in the CD-ROM drive. 3 Double-click the Mac OS X folder, and then double-click the Printer Driver folder. 4 Double-click i475D.mpkg. 5 Enter an administrator name and a password, then click OK. 6 Click Continue. 7 Read the License Agreement and click Continue, then click Agree. 11 If you... programs or remove them from your system folder. • The Setup Software & User's Guide CD-ROM contains the application software, Easy-PhotoPrint, to import and print image data. „ Installing the Printer Driver -

i475D Quick Start Guide
Page 15
Read the message, then click Continue Installation. Restart your computer is complete. Software installation will start. 20 Software installation is displayed on page 16. 13 Before you use the printer, you want to install the memory card utility, and click Continue. 18 Click Install. 19 A message asking for your confirmation to where you must carry out print head alignment on the screen. 17 Select a destination to restart your computer.
Read the message, then click Continue Installation. Restart your computer is complete. Software installation will start. 20 Software installation is displayed on page 16. 13 Before you use the printer, you want to install the memory card utility, and click Continue. 18 Click Install. 19 A message asking for your confirmation to where you must carry out print head alignment on the screen. 17 Select a destination to restart your computer.

i475D Quick Start Guide
Page 16
.... It takes about 60 seconds to open the setting screen. 4 Click the Maintenance tab, and click Print Head Alignment. 5 Check that paper is displayed, click OK. 6 Aligning the Print Head This operation must be carried out when using the printer for your printer. 3 Open the File ... If a message warning you to perform other operations is loaded in the color registration. „ Aligning the Print Head - Aligning the print head positions allows you not to print without shifts in the printer and click OK. For non-XP Windows users, click Start, then select Settings, Printers. 2...
.... It takes about 60 seconds to open the setting screen. 4 Click the Maintenance tab, and click Print Head Alignment. 5 Check that paper is displayed, click OK. 6 Aligning the Print Head This operation must be carried out when using the printer for your printer. 3 Open the File ... If a message warning you to perform other operations is loaded in the color registration. „ Aligning the Print Head - Aligning the print head positions allows you not to print without shifts in the printer and click OK. For non-XP Windows users, click Start, then select Settings, Printers. 2...

i475D Quick Start Guide
Page 17
... the pattern is now ready to use. 15 If the pattern is difficult to K, enter their numbers, and click OK. If it is not printed successfully, open the front cover and ensure that produces the least noticeable vertical white stripes. From the patterns in Column A, select the most even, least... irregular pattern and enter the number. 8 In the same way, one by one, select the most even patterns printed with the least irregularities from each of Columns B to pick the best pattern on Column H, pick the setting that the ink tanks are correctly installed...
... the pattern is now ready to use. 15 If the pattern is difficult to K, enter their numbers, and click OK. If it is not printed successfully, open the front cover and ensure that produces the least noticeable vertical white stripes. From the patterns in Column A, select the most even, least... irregular pattern and enter the number. 8 In the same way, one by one, select the most even patterns printed with the least irregularities from each of Columns B to pick the best pattern on Column H, pick the setting that the ink tanks are correctly installed...
i475D Quick Start Guide
Page 18
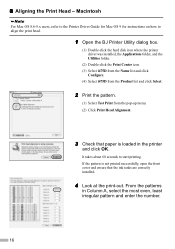
..., and the Utilities folder. (2) Double-click the Print Center icon. (3) Select i475D from the Name list and click Configure. (4) Select i475D from the Product list and click Select. 2 Print the pattern. (1) Select Test Print from the pop-up menu. (2) Click Print Head Alignment. 3 Check that paper is not printed successfully, open the front cover and ensure that...
..., and the Utilities folder. (2) Double-click the Print Center icon. (3) Select i475D from the Name list and click Configure. (4) Select i475D from the Product list and click Select. 2 Print the pattern. (1) Select Test Print from the pop-up menu. (2) Click Print Head Alignment. 3 Check that paper is not printed successfully, open the front cover and ensure that...

i475D Quick Start Guide
Page 19
The printer is difficult to pick the best pattern on Column H, pick the setting that produces the least noticeable vertical white stripes. If it is now ready to K, enter their numbers and click Send. Less noticeable white stripes More noticeable white stripes 6 Click Quit. 5 In the same way, one by one, select the most even patterns printed with the least irregularities from each of Columns B to use. 17 This completes the printer setup.
The printer is difficult to pick the best pattern on Column H, pick the setting that produces the least noticeable vertical white stripes. If it is now ready to K, enter their numbers and click Send. Less noticeable white stripes More noticeable white stripes 6 Click Quit. 5 In the same way, one by one, select the most even patterns printed with the least irregularities from each of Columns B to use. 17 This completes the printer setup.

i475D Quick Start Guide
Page 20
Less noticeable white stripes More noticeable white stripes 5 Using (cursor buttons), display the pattern number (+7 to display 04 on the LCD. 3 Press the OK button. Operation Panel 1 Press the Maintenance button. 2 Press three times to -3) of the checked patterns in column A. 18 The pattern is printed. 4 Observe the printed patterns and check the pattern in which vertical stripes are least noticeable. „ Aligning the Print Head - If the patterns in column "H" are not uniform, select the pattern in which white stripes are least noticeable.
Less noticeable white stripes More noticeable white stripes 5 Using (cursor buttons), display the pattern number (+7 to display 04 on the LCD. 3 Press the OK button. Operation Panel 1 Press the Maintenance button. 2 Press three times to -3) of the checked patterns in column A. 18 The pattern is printed. 4 Observe the printed patterns and check the pattern in which vertical stripes are least noticeable. „ Aligning the Print Head - If the patterns in column "H" are not uniform, select the pattern in which white stripes are least noticeable.

i475D Quick Start Guide
Page 22
... Canon service representative. • To avoid injury, never put your printer is printing. On the File menu, click Print. Check the application's user's manual for the purpose of explanation. Printing will use . „ Printing 1 Print the document from the application. In this section, we will start printing,... 98 → [Properties] • Windows 2000 →[Main] tab 3 Specify the required settings and click OK. Printing with Windows Adjusting the print settings according to your computer may differ according to the application that appear on page 21. 4 To start in a ...
... Canon service representative. • To avoid injury, never put your printer is printing. On the File menu, click Print. Check the application's user's manual for the purpose of explanation. Printing will use . „ Printing 1 Print the document from the application. In this section, we will start printing,... 98 → [Properties] • Windows 2000 →[Main] tab 3 Specify the required settings and click OK. Printing with Windows Adjusting the print settings according to your computer may differ according to the application that appear on page 21. 4 To start in a ...
i475D Quick Start Guide
Page 23
... with this to change to the most appropriate print settings simply by answering questions when prompted. • Use the application to check the layout before printing (5) Help (6) ? Select this happens, click Start then select All Programs (or Programs) Canon i475D - Guide). „ Basic Print Settings For the best print quality, specify the minimum requirement settings in...
... with this to change to the most appropriate print settings simply by answering questions when prompted. • Use the application to check the layout before printing (5) Help (6) ? Select this happens, click Start then select All Programs (or Programs) Canon i475D - Guide). „ Basic Print Settings For the best print quality, specify the minimum requirement settings in...

i475D Quick Start Guide
Page 24
...Specify the page setup. On the File menu, click Page Setup. On the File menu, click Print. For details, refer to "Basic Print Settings" on page 23. 3 Open the Print dialog box in your requirements. Check the application's user's manual for the actual procedures. 4 Specify... the print settings according to your application to print the document. For details, refer to "Page Setup" on page 23. 5 Click Print. Printing with Macintosh Adjusting the print settings according to your needs allows you to produce better quality prints. „ Printing 1 Open the Page Setup...
...Specify the page setup. On the File menu, click Page Setup. On the File menu, click Print. For details, refer to "Basic Print Settings" on page 23. 3 Open the Print dialog box in your requirements. Check the application's user's manual for the actual procedures. 4 Specify... the print settings according to your application to print the document. For details, refer to "Page Setup" on page 23. 5 Click Print. Printing with Macintosh Adjusting the print settings according to your needs allows you to produce better quality prints. „ Printing 1 Open the Page Setup...

i475D Quick Start Guide
Page 25
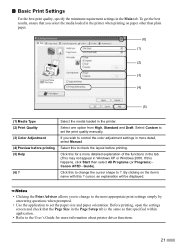
...other printer driver functions. To specify more information about printer driver functions. 23 Click this to use. „ Basic Print Settings For the best print quality, specify the minimum requirement settings in the printer. Select Quality & Media from the pop-up menu to change ...the display of document you wish to start printing. • See Help for more detailed settings for more information about other than plain paper. (1) (2) (1) Media Type (2) Print Mode (3) Print (3) Select the media loaded in the Print dialog box. „ Page Setup Use the Page ...
...other printer driver functions. To specify more information about printer driver functions. 23 Click this to use. „ Basic Print Settings For the best print quality, specify the minimum requirement settings in the printer. Select Quality & Media from the pop-up menu to change ...the display of document you wish to start printing. • See Help for more detailed settings for more information about other than plain paper. (1) (2) (1) Media Type (2) Print Mode (3) Print (3) Select the media loaded in the Print dialog box. „ Page Setup Use the Page ...

i475D Quick Start Guide
Page 26
...detailed procedures and information about maintenance. 24 Specify the following ink tanks when purchasing. Click Cleaning. Print Head Maintenance „ If Blurring Occurs or If a Specific Color Does Not Print Perform print head cleaning to open the setting screen. • Macintosh Open the BJ Printer Utility, and ... pop-up menu. Click Cleaning. Close the front cover when finished. Ensure that the printer is turned on how to improve the print quality. See page 16 for details on and follow the instructions below. • Windows Open the printer driver settings screen and click...
...detailed procedures and information about maintenance. 24 Specify the following ink tanks when purchasing. Click Cleaning. Print Head Maintenance „ If Blurring Occurs or If a Specific Color Does Not Print Perform print head cleaning to open the setting screen. • Macintosh Open the BJ Printer Utility, and ... pop-up menu. Click Cleaning. Close the front cover when finished. Ensure that the printer is turned on how to improve the print quality. See page 16 for details on and follow the instructions below. • Windows Open the printer driver settings screen and click...


