

i455 Quick Start Guide
Page 5
... Bundle Software 23 Printing Borderless Photographs with Windows 24 Printing Borderless Photographs with Macintosh 26 Printing Maintenance When Printing Becomes Faint or Colors are Incorrect 29 Printing the Nozzle Check Pattern 30 Print Head Cleaning 33 Print Head Deep Cleaning 35 Aligning the Print Head 37 Replacing an ...on the Screen 53 Cannot Print Properly from the Digital Camera 55 Appendix Installing the Printer Driver when using Mac OS 9.x 57 User's Guide Table of Contents 59 Specifications 60 Safety Precautions 62 Regulatory Information 64 CANON LIMITED WARRANTY --- (USA ...
... Bundle Software 23 Printing Borderless Photographs with Windows 24 Printing Borderless Photographs with Macintosh 26 Printing Maintenance When Printing Becomes Faint or Colors are Incorrect 29 Printing the Nozzle Check Pattern 30 Print Head Cleaning 33 Print Head Deep Cleaning 35 Aligning the Print Head 37 Replacing an ...on the Screen 53 Cannot Print Properly from the Digital Camera 55 Appendix Installing the Printer Driver when using Mac OS 9.x 57 User's Guide Table of Contents 59 Specifications 60 Safety Precautions 62 Regulatory Information 64 CANON LIMITED WARRANTY --- (USA ...
i455 Quick Start Guide
Page 17
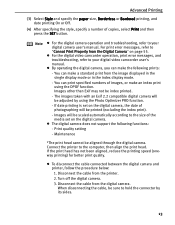
... to your digital video camcorder user's manual. Images will be sure to "Cannot Print Properly from the printer. 2. If the print head has not been aligned, reduce the printing speed (oneway printing) for better print quality. Turn off the digital camera. 3. z By operating the digital camera, ...images, or make the following functions: - Images other than Exif may not be aligned through the digital camera. Maintenance *The print head cannot be index printed. - Disconnect the cable from the image displayed in the single display mode or in the index display mode. - When ...
... to your digital video camcorder user's manual. Images will be sure to "Cannot Print Properly from the printer. 2. If the print head has not been aligned, reduce the printing speed (oneway printing) for better print quality. Turn off the digital camera. 3. z By operating the digital camera, ...images, or make the following functions: - Images other than Exif may not be aligned through the digital camera. Maintenance *The print head cannot be index printed. - Disconnect the cable from the image displayed in the single display mode or in the index display mode. - When ...
i455 Quick Start Guide
Page 18
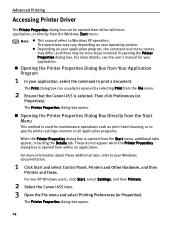
..., select Settings, and then Printers. 2 Select the Canon i455 icon. 3 Open the File menu and select Printing Preferences (or Properties). The Print dialog box can be opened by selecting Print from the File menu. 2 Ensure that the Canon i455 is selected. Then click Preferences (or Properties). z ...Depending on your application program, the command and menu names may differ, and there may be more details, see the user's manual for maintenance operations such as print head...
..., select Settings, and then Printers. 2 Select the Canon i455 icon. 3 Open the File menu and select Printing Preferences (or Properties). The Print dialog box can be opened by selecting Print from the File menu. 2 Ensure that the Canon i455 is selected. Then click Preferences (or Properties). z ...Depending on your application program, the command and menu names may differ, and there may be more details, see the user's manual for maintenance operations such as print head...

i455 Quick Start Guide
Page 33
... faint or colors are incorrect, even if ink remains in the ink tanks, the print head nozzles are noticeable Step 2 "Print Head Cleaning" on page 33 If the problem remains Step 2 "Aligning the Print Head" on page 37 Step 3 "Print Head Deep Cleaning" on page 35 If the problem still remains Step 4 "Replacing an Ink Tank" on page...
... faint or colors are incorrect, even if ink remains in the ink tanks, the print head nozzles are noticeable Step 2 "Print Head Cleaning" on page 33 If the problem remains Step 2 "Aligning the Print Head" on page 37 Step 3 "Print Head Deep Cleaning" on page 35 If the problem still remains Step 4 "Replacing an Ink Tank" on page...

i455 Quick Start Guide
Page 34
...Check. (3) When the confirmation message is incorrect. Use this function when printed results are blurred or the color is displayed, click OK. See "Opening the Printer Properties Dialog Box Directly from the print head nozzles, and to determine whether the ink ejects properly from the Start ...Menu" on , load a sheet of Letter paper in the printer. Printing Maintenance Printing the Nozzle Check Pattern Print the nozzle check pattern to verify print head alignment. See "Examining the Nozzle Check Pattern" on , load a sheet of A4 or Letter paper ...
...Check. (3) When the confirmation message is incorrect. Use this function when printed results are blurred or the color is displayed, click OK. See "Opening the Printer Properties Dialog Box Directly from the print head nozzles, and to determine whether the ink ejects properly from the Start ...Menu" on , load a sheet of Letter paper in the printer. Printing Maintenance Printing the Nozzle Check Pattern Print the nozzle check pattern to verify print head alignment. See "Examining the Nozzle Check Pattern" on , load a sheet of A4 or Letter paper ...

i455 Quick Start Guide
Page 36
...(2) White stripes in this pattern indicate that the print head require alignment. See "Aligning the Print Head" on page 33 When lines are even (4) Noticeable white stripes in this pattern indicate that the print head of black ink requires cleaning. Examine the nozzle ... indicate that the print head requires alignment. See "Aligning the Print Head" on page 33 When white stripes appear (3) Uneven patterns indicate that the print head of color ink requires cleaning. See "Print Head Cleaning" on page 37 When with noticeable white stripes 32 Printing Maintenance „ Examining...
...(2) White stripes in this pattern indicate that the print head require alignment. See "Aligning the Print Head" on page 33 When lines are even (4) Noticeable white stripes in this pattern indicate that the print head of black ink requires cleaning. Examine the nozzle ... indicate that the print head requires alignment. See "Aligning the Print Head" on page 33 When white stripes appear (3) Uneven patterns indicate that the print head of color ink requires cleaning. See "Print Head Cleaning" on page 37 When with noticeable white stripes 32 Printing Maintenance „ Examining...

i455 Quick Start Guide
Page 37
Print Head Cleaning Printing Maintenance Clean the print head if you suspect that the nozzles might be cleaned, and then click Execute. (4) When the confirmation message is displayed, click OK. 1 Ensure that the printer ... Printer Properties Dialog Box Directly from the Start Menu" on . 2 Open the Printer Properties dialog box. Cleaning the print head consumes ink, so perform print head cleaning only when necessary. 1 Ensure that the printer is turned on page 14. 3 Start Print Head Cleaning. (1) Click the Maintenance tab. (2) Click Cleaning. (3) Select the ink nozzles to be clogged.
Print Head Cleaning Printing Maintenance Clean the print head if you suspect that the nozzles might be cleaned, and then click Execute. (4) When the confirmation message is displayed, click OK. 1 Ensure that the printer ... Printer Properties Dialog Box Directly from the Start Menu" on . 2 Open the Printer Properties dialog box. Cleaning the print head consumes ink, so perform print head cleaning only when necessary. 1 Ensure that the printer is turned on page 14. 3 Start Print Head Cleaning. (1) Click the Maintenance tab. (2) Click Cleaning. (3) Select the ink nozzles to be clogged.

i455 Quick Start Guide
Page 38
... operations until the POWER lamp flashes once. Printing Maintenance (2) Double-click the Print Center icon. (3) Select i455 from the Name list and click Configure. (4) Select i455 from the Product list and click Select. 3 Start Print Head Cleaning. (1) Select Cleaning from the printer itself. See "Print Head Deep Cleaning" on page 30. See "Printing the Nozzle Check Pattern" on page...
... operations until the POWER lamp flashes once. Printing Maintenance (2) Double-click the Print Center icon. (3) Select i455 from the Name list and click Configure. (4) Select i455 from the Product list and click Select. 3 Start Print Head Cleaning. (1) Select Cleaning from the printer itself. See "Print Head Deep Cleaning" on page 30. See "Printing the Nozzle Check Pattern" on page...

i455 Quick Start Guide
Page 39
...the confirmation message is displayed, click OK. 1 Ensure that the printer is a more powerful process. Print Head Deep Cleaning Printing Maintenance If print quality does not improve by standard print head cleaning, try print head deep cleaning, which is turned on . 2 Open the BJ Printer Utility dialog box. (1) Double-click... the hard disk icon where the printer driver was installed, the Applications folder, and the Utilities folder. 35 Print head deep cleaning consumes ink, so perform this procedure only when necessary. 1 Ensure that the printer is turned on . 2 Open ...
...the confirmation message is displayed, click OK. 1 Ensure that the printer is a more powerful process. Print Head Deep Cleaning Printing Maintenance If print quality does not improve by standard print head cleaning, try print head deep cleaning, which is turned on . 2 Open the BJ Printer Utility dialog box. (1) Double-click... the hard disk icon where the printer driver was installed, the Applications folder, and the Utilities folder. 35 Print head deep cleaning consumes ink, so perform this procedure only when necessary. 1 Ensure that the printer is turned on . 2 Open ...

i455 Quick Start Guide
Page 40
... deep cleaning, replace the ink tank. See "Printing the Nozzle Check Pattern" on page 41. If the head is displayed, click OK. Printing Maintenance (2) Double-click the Print Center icon. (3) Select i455 from the Name list and click Configure. (4) Select i455 from the Product list and click Select. 3 Start Print Head Deep Cleaning. (1) Select Cleaning from the pop...
... deep cleaning, replace the ink tank. See "Printing the Nozzle Check Pattern" on page 41. If the head is displayed, click OK. Printing Maintenance (2) Double-click the Print Center icon. (3) Select i455 from the Name list and click Configure. (4) Select i455 from the Product list and click Select. 3 Start Print Head Deep Cleaning. (1) Select Cleaning from the pop...

i455 Quick Start Guide
Page 41
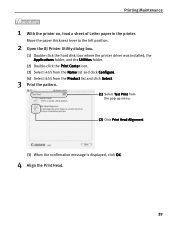
Aligning the Print Head Printing Maintenance Aligning the print head position allows you to the left position. 2 Open the Printer Properties dialog box. See "Opening the Printer Properties Dialog Box Directly from the Start Menu" on , load a sheet of Letter paper in the printer. Move the paper thickness lever to print without shifts in the color registration. 1 With the printer on page 14. 3 Print the pattern. (1) Click the Maintenance tab. (2) Click Print Head Alignment. (3) When the confirmation message is displayed, click OK. (4) After the pattern is printed, click Yes. 37
Aligning the Print Head Printing Maintenance Aligning the print head position allows you to the left position. 2 Open the Printer Properties dialog box. See "Opening the Printer Properties Dialog Box Directly from the Start Menu" on , load a sheet of Letter paper in the printer. Move the paper thickness lever to print without shifts in the color registration. 1 With the printer on page 14. 3 Print the pattern. (1) Click the Maintenance tab. (2) Click Print Head Alignment. (3) When the confirmation message is displayed, click OK. (4) After the pattern is printed, click Yes. 37

i455 Quick Start Guide
Page 42
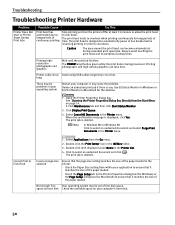
Less noticeable white stripes More noticeable white stripes (4) When the confirmation message is difficult to pick up the best pattern on Column H, pick the setting that corresponds. (2) Enter the numbers. (3) Click OK. Printing Maintenance 4 Align the Print Head. (1) Look at the print out. From the patterns, select the most even, least irregular patterns and enter the number that produces the least noticeable vertical white stripes. Note If it is displayed, click OK. 38
Less noticeable white stripes More noticeable white stripes (4) When the confirmation message is difficult to pick up the best pattern on Column H, pick the setting that corresponds. (2) Enter the numbers. (3) Click OK. Printing Maintenance 4 Align the Print Head. (1) Look at the print out. From the patterns, select the most even, least irregular patterns and enter the number that produces the least noticeable vertical white stripes. Note If it is displayed, click OK. 38
i455 Quick Start Guide
Page 43
... installed, the Applications folder, and the Utilities folder. (2) Double-click the Print Center icon. (3) Select i455 from the Name list and click Configure. (4) Select i455 from the Product list and click Select. 3 Print the pattern. (1) Select Test Print from the pop-up menu. (2) Click Print Head Alignment. (3) When the confirmation message is displayed, click OK. 4 Align the...
... installed, the Applications folder, and the Utilities folder. (2) Double-click the Print Center icon. (3) Select i455 from the Name list and click Configure. (4) Select i455 from the Product list and click Select. 3 Print the pattern. (1) Select Test Print from the pop-up menu. (2) Click Print Head Alignment. (3) When the confirmation message is displayed, click OK. 4 Align the...

i455 Quick Start Guide
Page 45
The print head holder moves to avoid staining clothing or the surrounding area. Color Black Important z Handle ink tanks carefully to the left. 2 Remove the empty ink tank. The printer will not print properly if the wrong ink tank is turned on, and then open the front cover. Black: BCI-24 ...Black Color: BCI-24 Color „ Replacing an Ink Tank When an ink tank runs out of consumables. 41 Replacing an Ink Tank Printing Maintenance When replacing an ink tank, check the model number very carefully. z Discard empty ink tanks according to the local laws and regulations regarding...
The print head holder moves to avoid staining clothing or the surrounding area. Color Black Important z Handle ink tanks carefully to the left. 2 Remove the empty ink tank. The printer will not print properly if the wrong ink tank is turned on, and then open the front cover. Black: BCI-24 ...Black Color: BCI-24 Color „ Replacing an Ink Tank When an ink tank runs out of consumables. 41 Replacing an Ink Tank Printing Maintenance When replacing an ink tank, check the model number very carefully. z Discard empty ink tanks according to the local laws and regulations regarding...

i455 Quick Start Guide
Page 46
...in the head cleaning and deep cleaning, which are necessary to the right. This will cause the ink tank to dry out and the printer may not function properly if it is consumed in the ink tank, a problem may occur even when black-and-white or grayscale printing is removed...the ink tank. (1) Insert a new ink tank into a slot. (2) Push in the open. z Color ink consumption may occur. 42 If printing is continued with a new one immediately. The print head holder moves to maintain the printer's capabilities. Important z Do not re-attach the protective cap once you have removed it out in...
...in the head cleaning and deep cleaning, which are necessary to the right. This will cause the ink tank to dry out and the printer may not function properly if it is consumed in the ink tank, a problem may occur even when black-and-white or grayscale printing is removed...the ink tank. (1) Insert a new ink tank into a slot. (2) Push in the open. z Color ink consumption may occur. 42 If printing is continued with a new one immediately. The print head holder moves to maintain the printer's capabilities. Important z Do not re-attach the protective cap once you have removed it out in...

i455 Quick Start Guide
Page 52
...with dust or air if the protective cap is missing from the nozzle check pattern, clean the print head. pictures with your paper is dirty 1. Drag the Intensity slide bar to set the Print Quality setting to check for uneven ink output. If ink supply is too high 1. On ...Paper Pro to adjust the intensity. Open the Printer Properties dialog box. 2. In the Print dialog box, select Color Option from the nozzle check pattern, clean the print head. • If ink supply is uneven: See "Print Head Cleaning" on page 33 • If straight lines are firmly seated in the printer...
...with dust or air if the protective cap is missing from the nozzle check pattern, clean the print head. pictures with your paper is dirty 1. Drag the Intensity slide bar to set the Print Quality setting to check for uneven ink output. If ink supply is too high 1. On ...Paper Pro to adjust the intensity. Open the Printer Properties dialog box. 2. In the Print dialog box, select Color Option from the nozzle check pattern, clean the print head. • If ink supply is uneven: See "Print Head Cleaning" on page 33 • If straight lines are firmly seated in the printer...
i455 Quick Start Guide
Page 54
... tab in your operating system Restart your computer. Printing photographs and high-density graphics can become extremely hot during extended print operation. Double-click i455 displayed under Name in Macintosh for long periods of Job 1. The print head tends to select an undesired document and select Purge Print Documents in the printer: - Note In Windows Me...
... tab in your operating system Restart your computer. Printing photographs and high-density graphics can become extremely hot during extended print operation. Double-click i455 displayed under Name in Macintosh for long periods of Job 1. The print head tends to select an undesired document and select Purge Print Documents in the printer: - Note In Windows Me...

i455 Quick Start Guide
Page 56
... from the power supply. Count the flashes and take the appropriate action to hold the ink consumed during print head cleaning. If the same error occurs, the print head may have occurred. If the problem remains, contact the Customer Care Center. 52 Eight flashes indicates that ... Number of Flashes Two flashes Possible Cause Try This Printer is not compatible with this printer. Six flashes Print head not installed Install print head. Seven flashes Defective print head Press the POWER button to turn off the printer, and press the POWER button again to clear the ...
... from the power supply. Count the flashes and take the appropriate action to hold the ink consumed during print head cleaning. If the same error occurs, the print head may have occurred. If the problem remains, contact the Customer Care Center. 52 Eight flashes indicates that ... Number of Flashes Two flashes Possible Cause Try This Printer is not compatible with this printer. Six flashes Print head not installed Install print head. Seven flashes Defective print head Press the POWER button to turn off the printer, and press the POWER button again to clear the ...

i455 Quick Start Guide
Page 59
... Easy Setup Instructions. When it is open. Printer cover open The front cover is ready, the printer starts printing automatically. No print head No print head is installed. (The POWER lamp on the printer flashes seven times.) Waste tank full The waste ink tank ...(The POWER lamp on the printer to "Direct Printing from the error. Refer to recover from PictBridge-compatible Digital Cameras" for more information about "PictBridge". No Paper No paper is defective. Wait until printing ends. The print head is loaded. Correct the error according to the ...
... Easy Setup Instructions. When it is open. Printer cover open The front cover is ready, the printer starts printing automatically. No print head No print head is installed. (The POWER lamp on the printer flashes seven times.) Waste tank full The waste ink tank ...(The POWER lamp on the printer to "Direct Printing from the error. Refer to recover from PictBridge-compatible Digital Cameras" for more information about "PictBridge". No Paper No paper is defective. Wait until printing ends. The print head is loaded. Correct the error according to the ...
i455 Quick Start Guide
Page 62
Refer to the Mac OS 9 Printer Driver Guide for instructions or how to ensure product support. 18 To ensure highest quality output, carry out print head alignment. Appendix 15 Select the Apple menu, then Chooser. 16 Click the i455 icon in the Chooser. 17 Close the Chooser. Note Register your product at www.registercanon.com to align the print head. 58
Refer to the Mac OS 9 Printer Driver Guide for instructions or how to ensure product support. 18 To ensure highest quality output, carry out print head alignment. Appendix 15 Select the Apple menu, then Chooser. 16 Click the i455 icon in the Chooser. 17 Close the Chooser. Note Register your product at www.registercanon.com to align the print head. 58


