XH G1 XH A1 Instruction Manual
Page 2
... Usage Instructions WARNING: TO REDUCE THE RISK OF FIRE OR ELECTRIC SHOCK, DO NOT EXPOSE THIS PRODUCT TO RAIN OR MOISTURE. One Canon Plaza, Lake Success, NY 11042, U.S.A. REFER SERVICING TO QUALIFIED SERVICE PERSONNEL. Note: This equipment has been tested and found to ...comply with the limits for help. Canon U.S.A. However, there is required to copyright laws. COPYRIGHT WARNING: Unauthorized recording of copyrighted materials may cause undesired operation. Digital Video Camcorder, XH G1 A/XH A1 A Systems. This device complies with class B limits in the ...
... Usage Instructions WARNING: TO REDUCE THE RISK OF FIRE OR ELECTRIC SHOCK, DO NOT EXPOSE THIS PRODUCT TO RAIN OR MOISTURE. One Canon Plaza, Lake Success, NY 11042, U.S.A. REFER SERVICING TO QUALIFIED SERVICE PERSONNEL. Note: This equipment has been tested and found to ...comply with the limits for help. Canon U.S.A. However, there is required to copyright laws. COPYRIGHT WARNING: Unauthorized recording of copyrighted materials may cause undesired operation. Digital Video Camcorder, XH G1 A/XH A1 A Systems. This device complies with class B limits in the ...
XH G1 XH A1 Instruction Manual
Page 3
... upon or against voltage surges and built-up static charges. IMPORTANT SAFETY INSTRUCTIONS In these safety instructions the word "product" refers to the Canon HD Video Camera Recorder XH G1 A/XH A1 A and all servicing to qualified service personnel. 3 Read Instructions - This will fit into this manual. 11. Power Cord Protection - Do not overload...
... upon or against voltage surges and built-up static charges. IMPORTANT SAFETY INSTRUCTIONS In these safety instructions the word "product" refers to the Canon HD Video Camera Recorder XH G1 A/XH A1 A and all servicing to qualified service personnel. 3 Read Instructions - This will fit into this manual. 11. Power Cord Protection - Do not overload...

XH G1 XH A1 Instruction Manual
Page 4
... adjustment of any liquid has been spilled onto, or objects have the same characteristics as the original part. Replacement Parts - Contact your Canon dealer for information about plug adapter for service. 20. If the product has been dropped or the cabinet has been damaged. Upon completion...sources including battery, and refer servicing to determine that are covered by a qualified technician to restore the product to the responsible nearest Canon Service Center and please replace it to its normal operation. If the product has been exposed to rain or water. If the product...
... adjustment of any liquid has been spilled onto, or objects have the same characteristics as the original part. Replacement Parts - Contact your Canon dealer for information about plug adapter for service. 20. If the product has been dropped or the cabinet has been damaged. Upon completion...sources including battery, and refer servicing to determine that are covered by a qualified technician to restore the product to the responsible nearest Canon Service Center and please replace it to its normal operation. If the product has been exposed to rain or water. If the product...
XH G1 XH A1 Instruction Manual
Page 5
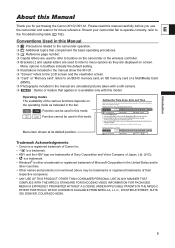
...are used in this mode. Menu options in boldface indicate the default setting. Illustrations included in the manual show the XH G1. "Screen" refers to the LCD screen and the viewfinder screen. "Card" or "Memory card" refers... 25) SYSTEM SETUP/ D/TIME SET DATE/TIME••• JAN.1,2006 12:00 AM Trademark Acknowledgements • Canon is a registered trademark of Canon Inc. • is a trademark. • HDV and the HDV logo are simulated pictures taken with a still camera...Set the time zone, date and time when you for purchasing the Canon XH G1/XH A1.
...are used in this mode. Menu options in boldface indicate the default setting. Illustrations included in the manual show the XH G1. "Screen" refers to the LCD screen and the viewfinder screen. "Card" or "Memory card" refers... 25) SYSTEM SETUP/ D/TIME SET DATE/TIME••• JAN.1,2006 12:00 AM Trademark Acknowledgements • Canon is a registered trademark of Canon Inc. • is a trademark. • HDV and the HDV logo are simulated pictures taken with a still camera...Set the time zone, date and time when you for purchasing the Canon XH G1/XH A1.
XH G1 XH A1 Instruction Manual
Page 6
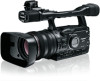
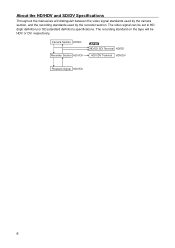
The video signal can be HDV or DV, respectively. The recording standard on the tape will distinguish between the video signal standards used by the camera section, and the recording standards used by the recorder section. Camera Section HD/SD Recorder Section HDV/DV HD/SD SDI Terminal HD/SD HDV/DV Terminal HDV/DV Playback Signal HDV/DV 6 About the HD/HDV and SD/DV Specifications Throughout the manual we will be set to HD (high definition) or SD (standard definition) specifications.
The video signal can be HDV or DV, respectively. The recording standard on the tape will distinguish between the video signal standards used by the camera section, and the recording standards used by the recorder section. Camera Section HD/SD Recorder Section HDV/DV HD/SD SDI Terminal HD/SD HDV/DV Terminal HDV/DV Playback Signal HDV/DV 6 About the HD/HDV and SD/DV Specifications Throughout the manual we will be set to HD (high definition) or SD (standard definition) specifications.
XH G1 XH A1 Instruction Manual
Page 7
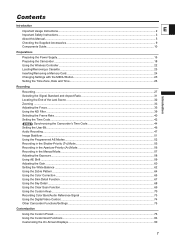
Contents Introduction Important Usage Instructions...2 E Important Safety Instructions...3 About this Manual...5 Checking the Supplied Accessories ...9 Components Guide...10 Preparations Preparing the Power Supply...15 Preparing the Camcorder ...18 Using the Wireless Controller ...22 Loading/Removing a Cassette ...23 Inserting/Removing a Memory Card...24 Changing Settings with the MENU Button...25 Setting the Time Zone, Date and Time...26 Recording Introduction Recording ...27 Selecting the Signal Standard and Aspect Ratio 31 Locating the End of the Last Scene ...32 Zooming ...33 ...
Contents Introduction Important Usage Instructions...2 E Important Safety Instructions...3 About this Manual...5 Checking the Supplied Accessories ...9 Components Guide...10 Preparations Preparing the Power Supply...15 Preparing the Camcorder ...18 Using the Wireless Controller ...22 Loading/Removing a Cassette ...23 Inserting/Removing a Memory Card...24 Changing Settings with the MENU Button...25 Setting the Time Zone, Date and Time...26 Recording Introduction Recording ...27 Selecting the Signal Standard and Aspect Ratio 31 Locating the End of the Last Scene ...32 Zooming ...33 ...
XH G1 XH A1 Instruction Manual
Page 8
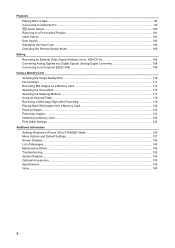
Playback Playing Back a Tape ...95 Connecting to a Monitor/TV...97 SD Audio Output ...100 Returning to a Pre-marked Position ...101 Index Search ...102 Date Search ...103 Displaying the Data Code...104 Changing the Remote Sensor Mode ...105 Editing Recording an External Video Signal (Analog Line-In, HDV/DV In 106 Converting Analog Signals into Digital Signals (Analog-Digital Converter 108 Connecting to a Computer (IEEE1394) ...109 Using a Memory Card Selecting the Image Quality/Size...110 File Numbers ...111 Recording Still Images on a Memory Card ...112 Selecting the Drive Mode ...115 ...
Playback Playing Back a Tape ...95 Connecting to a Monitor/TV...97 SD Audio Output ...100 Returning to a Pre-marked Position ...101 Index Search ...102 Date Search ...103 Displaying the Data Code...104 Changing the Remote Sensor Mode ...105 Editing Recording an External Video Signal (Analog Line-In, HDV/DV In 106 Converting Analog Signals into Digital Signals (Analog-Digital Converter 108 Connecting to a Computer (IEEE1394) ...109 Using a Memory Card Selecting the Image Quality/Size...110 File Numbers ...111 Recording Still Images on a Memory Card ...112 Selecting the Drive Mode ...115 ...
XH G1 XH A1 Instruction Manual
Page 9
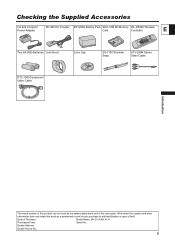
... number and other information here and retain this product can be found at the battery attachment unit of the camcorder. Date of Purchase: Model Name: XH G1 A/XH A1 A Purchased From: Serial No.: Dealer Address Dealer Phone No.: 9 Checking the Supplied Accessories CA-920 Compact Power Adapter DC-920 DC Coupler BP-950G...
... number and other information here and retain this product can be found at the battery attachment unit of the camcorder. Date of Purchase: Model Name: XH G1 A/XH A1 A Purchased From: Serial No.: Dealer Address Dealer Phone No.: 9 Checking the Supplied Accessories CA-920 Compact Power Adapter DC-920 DC Coupler BP-950G...

XH G1 XH A1 Instruction Manual
Page 10
Components Guide XH G1/XH A1 Left side view POWER dial External control mode VCR/PLAY mode Power off Auto Shutter-Priority Aperture-Priority Manual Spotlight Night Easy Recording Recording ...
Components Guide XH G1/XH A1 Left side view POWER dial External control mode VCR/PLAY mode Power off Auto Shutter-Priority Aperture-Priority Manual Spotlight Night Easy Recording Recording ...

XH G1 XH A1 Instruction Manual
Page 11
XLR MIC ATT. Right side view E Introduction Grip zoom lever ( 33) PHOTO button ( 112) Zoom speed adjustment dial ( 33) ZOOM SPEED switch ( 33) / (card/tape) switch ( 112) VIDEO2 terminal ( 99) TIME CODE switch* ( 44) LOCK switch ( 28) MIC (external microphone) terminal ( 47) * only. switches ( 48) LINE/MIC switch ( 48) Input channel selection switch ( 48) Lens hood ( 21) Lens hood locking screw ( 21) switches ( 48) CH1 input terminal ( 48) CH2 input terminal ( 48) Cassette compartment ( 23) 11
XLR MIC ATT. Right side view E Introduction Grip zoom lever ( 33) PHOTO button ( 112) Zoom speed adjustment dial ( 33) ZOOM SPEED switch ( 33) / (card/tape) switch ( 112) VIDEO2 terminal ( 99) TIME CODE switch* ( 44) LOCK switch ( 28) MIC (external microphone) terminal ( 47) * only. switches ( 48) LINE/MIC switch ( 48) Input channel selection switch ( 48) Lens hood ( 21) Lens hood locking screw ( 21) switches ( 48) CH1 input terminal ( 48) CH2 input terminal ( 48) Cassette compartment ( 23) 11
XH G1 XH A1 Instruction Manual
Page 12
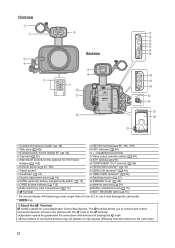
Front view Backview External microphone holder ( 48) Tally lamp ( 89) External sensor for the Instant AF ( 35) Grip belt ( 20) Attachment sockets for Local Application Control Bus System. Connect only devices with the mark to connect and control connected devices. RELEASE latch ( 15) * Do not use tripods with devices not bearing the mark. Some buttons of connected devices may not operate or may operate differently than 5.5 mm (0.2 in.) as it may damage the camcorder. ** only. About the Terminal (LANC) stands for the optional TA-100 Tripod Adapter ( 155) Remote sensor ( ...
Front view Backview External microphone holder ( 48) Tally lamp ( 89) External sensor for the Instant AF ( 35) Grip belt ( 20) Attachment sockets for Local Application Control Bus System. Connect only devices with the mark to connect and control connected devices. RELEASE latch ( 15) * Do not use tripods with devices not bearing the mark. Some buttons of connected devices may not operate or may operate differently than 5.5 mm (0.2 in.) as it may damage the camcorder. ** only. About the Terminal (LANC) stands for the optional TA-100 Tripod Adapter ( 155) Remote sensor ( ...

XH G1 XH A1 Instruction Manual
Page 13
PRESET switch ( 62) END SEARCH button ( 32) Strap mount ( 20) Microphone ( 47) Strap mount ( 20) Hot shoe ( 118) Handle zoom lever ( 33) PHOTO button ( 112) LCD display ( 19) 13 button ( 120) (play) button ( 95) / SLIDESHOW button ( 120) (fast forward) button ( 95) / + button ( 120) REC (record) button ( 106) Start/stop ) button ( 95) / (metering mode) button ( 117) (rewind) button ( 95) / - Top view E Introduction (pause) button ( 95) / DRIVE MODE button ( 115) (stop button ( 27) LOCK switch ( 28) OPEN/EJECT switch ( 23) Grip zoom lever ( 33) PHOTO button ( 112) Zoom speed adjustment...
PRESET switch ( 62) END SEARCH button ( 32) Strap mount ( 20) Microphone ( 47) Strap mount ( 20) Hot shoe ( 118) Handle zoom lever ( 33) PHOTO button ( 112) LCD display ( 19) 13 button ( 120) (play) button ( 95) / SLIDESHOW button ( 120) (fast forward) button ( 95) / + button ( 120) REC (record) button ( 106) Start/stop ) button ( 95) / (metering mode) button ( 117) (rewind) button ( 95) / - Top view E Introduction (pause) button ( 95) / DRIVE MODE button ( 115) (stop button ( 27) LOCK switch ( 28) OPEN/EJECT switch ( 23) Grip zoom lever ( 33) PHOTO button ( 112) Zoom speed adjustment...

XH G1 XH A1 Instruction Manual
Page 14
button ( 120) + button ( 120) MIX BALANCE buttons ( 100) / buttons ( 102, 103) PLAY button ( 95) FF button ( 95) button ( 95) STOP button ( 95) button ( 95) SLOW button ( 95) 14 WL-D5000 Wireless Controller PHOTO button ( 112) START/STOP button ( 27) MENU button ( 25) TV SCREEN button ( 90) SLIDESHOW button ( 120) DATA CODE button ( 104) INDEX WRITE button ( 71) AUDIO MONITOR button ( 100) END SEARCH button ( 32) SEARCH SELECT button ( 102, 103) REC PAUSE button ( 106) REW button ( 95) ZERO SET MEMORY button ( 101) button ( 95) PAUSE button ( 95) REMOTE SET button ( 105) AV DV button ( ...
button ( 120) + button ( 120) MIX BALANCE buttons ( 100) / buttons ( 102, 103) PLAY button ( 95) FF button ( 95) button ( 95) STOP button ( 95) button ( 95) SLOW button ( 95) 14 WL-D5000 Wireless Controller PHOTO button ( 112) START/STOP button ( 27) MENU button ( 25) TV SCREEN button ( 90) SLIDESHOW button ( 120) DATA CODE button ( 104) INDEX WRITE button ( 71) AUDIO MONITOR button ( 100) END SEARCH button ( 32) SEARCH SELECT button ( 102, 103) REC PAUSE button ( 106) REW button ( 95) ZERO SET MEMORY button ( 101) button ( 95) PAUSE button ( 95) REMOTE SET button ( 105) AV DV button ( ...

XH G1 XH A1 Instruction Manual
Page 15
Remove the terminal cover of the arrow to open the battery compartment cover. 3. Connect the power cord to OFF. 2. Push the OPEN switch in the direction of the arrow to open the battery compartment cover. 3. Close the battery compartment cover. 15 When the charging is completed. 4. To Remove the Battery 1. Attach the battery pack to OFF. 2. Preparing Preparations the Power Supply Charging the Battery Pack E Disconnect the DC coupler from the power outlet and disconnect it clicks. • The charge indicator starts flashing. Charge indicator ...
Remove the terminal cover of the arrow to open the battery compartment cover. 3. Connect the power cord to OFF. 2. Push the OPEN switch in the direction of the arrow to open the battery compartment cover. 3. Close the battery compartment cover. 15 When the charging is completed. 4. To Remove the Battery 1. Attach the battery pack to OFF. 2. Preparing Preparations the Power Supply Charging the Battery Pack E Disconnect the DC coupler from the power outlet and disconnect it clicks. • The charge indicator starts flashing. Charge indicator ...
XH G1 XH A1 Instruction Manual
Page 16
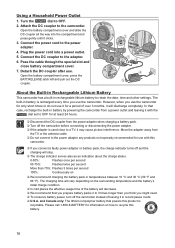
Using a Household Power Outlet 1. Turn the dial to the power adapter. 4. Open the battery compartment cover, press the BATT.RELEASE latch left and pull out the DC coupler. The charging time will vary depending on the surrounding temperature and the battery's initial charge condition. In cold places the effective usage time of the battery will decrease. We recommend that you prepare battery packs 2 to 3 times longer than 75%: Flashes 3 times per second More than you think you might need. To conserve battery power, turn off the camcorder instead of over 3 months...
Using a Household Power Outlet 1. Turn the dial to the power adapter. 4. Open the battery compartment cover, press the BATT.RELEASE latch left and pull out the DC coupler. The charging time will vary depending on the surrounding temperature and the battery's initial charge condition. In cold places the effective usage time of the battery will decrease. We recommend that you prepare battery packs 2 to 3 times longer than 75%: Flashes 3 times per second More than you think you might need. To conserve battery power, turn off the camcorder instead of over 3 months...

XH G1 XH A1 Instruction Manual
Page 17
LCD screen [NORMAL] 95 min. 145 min. 205 min. 290 min. Typical Recording Time* Viewfinder [NORMAL] 110 min. 165 min. 235 min. 330 min. LCD screen [NORMAL] 105 min. 160 min. 230 min. 320 min. Actual time may be shorter. 17 Battery Pack E BP-930 BP-945 BP-950G BP-970G Charging Time with repeated operations such as start/stop, zooming, power on/off. BP-930 170 min. 165 min. 165 min. 160 min. 100 min. 100 min. 100 min. 95 min. 180 min. Typical Recording Time* Viewfinder [BRIGHT] LCD screen [NORMAL] LCD screen [BRIGHT] Viewfinder [NORMAL] 160 min. 160 min. 155 min....
LCD screen [NORMAL] 95 min. 145 min. 205 min. 290 min. Typical Recording Time* Viewfinder [NORMAL] 110 min. 165 min. 235 min. 330 min. LCD screen [NORMAL] 105 min. 160 min. 230 min. 320 min. Actual time may be shorter. 17 Battery Pack E BP-930 BP-945 BP-950G BP-970G Charging Time with repeated operations such as start/stop, zooming, power on/off. BP-930 170 min. 165 min. 165 min. 160 min. 100 min. 100 min. 100 min. 95 min. 180 min. Typical Recording Time* Viewfinder [BRIGHT] LCD screen [NORMAL] LCD screen [BRIGHT] Viewfinder [NORMAL] 160 min. 160 min. 155 min....

XH G1 XH A1 Instruction Manual
Page 18
Prevent direct sunlight from getting in the same way. 5. Press the MENU button. 2. Select [CVF SETUP] and then select [BRIGHTNESS], [CONTRAST], [COLOR], [SHARPNESS] or [BACKLIGHT]. 4. Adjust the setting with the SELECT/SET dial and press the dial. • After the adjustment you will not affect your recording. Adjusting the Viewfinder You can adjust the brightness, contrast, color, sharpness and backlight of the light by the lens. MENU ( 25) DISPLAY SETUP/ CVF SETUP * The default value is [BRIGHT] while using the power adapter. Press the MENU button to concentration of...
Prevent direct sunlight from getting in the same way. 5. Press the MENU button. 2. Select [CVF SETUP] and then select [BRIGHTNESS], [CONTRAST], [COLOR], [SHARPNESS] or [BACKLIGHT]. 4. Adjust the setting with the SELECT/SET dial and press the dial. • After the adjustment you will not affect your recording. Adjusting the Viewfinder You can adjust the brightness, contrast, color, sharpness and backlight of the light by the lens. MENU ( 25) DISPLAY SETUP/ CVF SETUP * The default value is [BRIGHT] while using the power adapter. Press the MENU button to concentration of...

XH G1 XH A1 Instruction Manual
Page 19
Rotate the LCD panel and adjust it to the desired position. You can change the settings to be able to the [LCD SETUP] submenu. These adjustments will return to use the LCD panel. Press the MENU button. 2. Change additional settings in the direction of the LCD Panel. However, you use both displays simultaneously ( 20). BRIGHTNESS••• CONTRAST COLOR SHARPNESS•••• BACKLIGHT••••NORMAL* 1. Slide the OPEN switch in the same way as necessary. 5. Adjusting the LCD Panel You can change the LCD ...
Rotate the LCD panel and adjust it to the desired position. You can change the settings to be able to the [LCD SETUP] submenu. These adjustments will return to use the LCD panel. Press the MENU button. 2. Change additional settings in the direction of the LCD Panel. However, you use both displays simultaneously ( 20). BRIGHTNESS••• CONTRAST COLOR SHARPNESS•••• BACKLIGHT••••NORMAL* 1. Slide the OPEN switch in the same way as necessary. 5. Adjusting the LCD Panel You can change the LCD ...

XH G1 XH A1 Instruction Manual
Page 20
Press the MENU button. 2. Attaching the Shoulder Strap Pass the ends through the strap mount and adjust the length of them simultaneously. MENU ( 25) DISPLAY SETUP/ CVF+LCD ON•••OFF 1. Fastening the Grip Belt Adjust the grip belt so that you use both of them to black & white display mode. Changing the Viewfinder and the LCD Panel to select [DISPLAY SETUP/ ] and press the dial. 3. Turn the SELECT/SET dial to Black & White Display The LCD display and the viewfinder are both of the strap. Follow the procedure below to [ON] and press the ...
Press the MENU button. 2. Attaching the Shoulder Strap Pass the ends through the strap mount and adjust the length of them simultaneously. MENU ( 25) DISPLAY SETUP/ CVF+LCD ON•••OFF 1. Fastening the Grip Belt Adjust the grip belt so that you use both of them to black & white display mode. Changing the Viewfinder and the LCD Panel to select [DISPLAY SETUP/ ] and press the dial. 3. Turn the SELECT/SET dial to Black & White Display The LCD display and the viewfinder are both of the strap. Follow the procedure below to [ON] and press the ...
XH G1 XH A1 Instruction Manual
Page 21
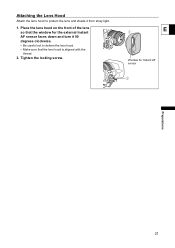
E Window for the external Instant AF sensor faces down and turn it 90 degrees clockwise. • Be careful not to protect the lens and shade it from stray light. 1. Tighten the locking screw. Attaching the Lens Hood Attach the lens hood to deform the lens hood. • Make sure that the window for Instant AF sensor Preparations 21 Place the lens hood on the front of the lens so that the lens hood is aligned with the thread. 2.
E Window for the external Instant AF sensor faces down and turn it 90 degrees clockwise. • Be careful not to protect the lens and shade it from stray light. 1. Tighten the locking screw. Attaching the Lens Hood Attach the lens hood to deform the lens hood. • Make sure that the window for Instant AF sensor Preparations 21 Place the lens hood on the front of the lens so that the lens hood is aligned with the thread. 2.
