

Photo Application Guide(Mac)
Page 14
... appears. When you install ImageBrowser onto you computer, you can be started by double-clicking its icon. Starting ImageBrowser manually As with other applications, ImageBrowser can select the option to create the Canon ImageBrowser icon (alias) on the desktop, open the ImageBrowser folder, in which the ImageBrowser program has been installed, and...
... appears. When you install ImageBrowser onto you computer, you can be started by double-clicking its icon. Starting ImageBrowser manually As with other applications, ImageBrowser can select the option to create the Canon ImageBrowser icon (alias) on the desktop, open the ImageBrowser folder, in which the ImageBrowser program has been installed, and...
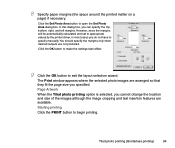
Photo Application Guide(Mac)
Page 94
... make the settings take effect. 9 Click the OK button to open the Set Photo Area dialog box. Starting printing Click the PRINT button to specify manually. 8 Specify paper margins (the space around the printed matter on a page) if necessary. Tiled photo printing (Borderless printing) 94 In this dialog box, you speci...
... make the settings take effect. 9 Click the OK button to open the Set Photo Area dialog box. Starting printing Click the PRINT button to specify manually. 8 Specify paper margins (the space around the printed matter on a page) if necessary. Tiled photo printing (Borderless printing) 94 In this dialog box, you speci...

Photo Application Guide(Mac)
Page 95
See your printer manuals for more information. Refer to quickly print images on Canon perforated paper. Canon perforated paper printing 95 Canon perforated paper printing • Selecting a layout • Starting printing The Canon perforated paper printing feature allows you to About Canon perforated paper for more information on the types of Canon perforated paper. Note ➤ Some printer models may not support the printing on Canon perforated paper.
See your printer manuals for more information. Refer to quickly print images on Canon perforated paper. Canon perforated paper printing 95 Canon perforated paper printing • Selecting a layout • Starting printing The Canon perforated paper printing feature allows you to About Canon perforated paper for more information on the types of Canon perforated paper. Note ➤ Some printer models may not support the printing on Canon perforated paper.

Photo Application Guide(Mac)
Page 105
Normally, you click the Manual button, the Details button becomes active as shown below: Click the Details button to activate photo color correction features such as Vivid Photo and Photo Optimizer PRO. Starting printing 105 If you should choose the Photo option when printing photos. In this dialog box, click the Special Effects button on the left side to display the Detailed Setting dialog box. 3 Specify a print mode.
Normally, you click the Manual button, the Details button becomes active as shown below: Click the Details button to activate photo color correction features such as Vivid Photo and Photo Optimizer PRO. Starting printing 105 If you should choose the Photo option when printing photos. In this dialog box, click the Special Effects button on the left side to display the Detailed Setting dialog box. 3 Specify a print mode.

S9000 User's Guide
Page 2
Table of Contents Table of Contents Introduction ...5 How to Use This Manual 6 Safety Precautions 8 Printer Parts and Their Functions 14 Front View 15 Rear View ...16 Inside the Printer 17 Operation Panel 18 Printer Driver Functions (Windows 19 Opening the Printer Properties Dialog Box 20 Printer Properties Dialog Box Description 22 BJ Status Monitor Functions 36 Cancelling a Print Job 39 Uninstalling Printer Drivers 40 Printer Driver Functions (Macintosh 41 Description of Print Settings 42 BJ Print Monitor 59 Cancelling a Print Job 61 2
Table of Contents Table of Contents Introduction ...5 How to Use This Manual 6 Safety Precautions 8 Printer Parts and Their Functions 14 Front View 15 Rear View ...16 Inside the Printer 17 Operation Panel 18 Printer Driver Functions (Windows 19 Opening the Printer Properties Dialog Box 20 Printer Properties Dialog Box Description 22 BJ Status Monitor Functions 36 Cancelling a Print Job 39 Uninstalling Printer Drivers 40 Printer Driver Functions (Macintosh 41 Description of Print Settings 42 BJ Print Monitor 59 Cancelling a Print Job 61 2

S9000 User's Guide
Page 6
How to Use This Manual How to Use This Manual To view this page. 6 Displays the previous page. Click to jump straight to this User's Guide, we recommend that screens displayed by Acrobat Reader 3.0 or 5.0 are for Acrobat Reader 4.0. Use this button in the tool bar and click within the screen. Please note that you were previously viewing. Displays the next page. Select this button to the page you use Acrobat Reader 3.0 or later. The screens shown below are slightly different. Returns to enlarge the viewing screen.
How to Use This Manual How to Use This Manual To view this page. 6 Displays the previous page. Click to jump straight to this User's Guide, we recommend that screens displayed by Acrobat Reader 3.0 or 5.0 are for Acrobat Reader 4.0. Use this button in the tool bar and click within the screen. Please note that you were previously viewing. Displays the next page. Select this button to the page you use Acrobat Reader 3.0 or later. The screens shown below are slightly different. Returns to enlarge the viewing screen.

S9000 User's Guide
Page 7
Displays the table of contents. Click the " " symbol to the topic. Click the heading to jump to close the headings. 7 How to Use This Manual Use this button to see the headings for a word. Click the " " symbol to search for each chapter.
Displays the table of contents. Click the " " symbol to the topic. Click the heading to jump to close the headings. 7 How to Use This Manual Use this button to see the headings for a word. Click the " " symbol to search for each chapter.

S9000 User's Guide
Page 8
... in any of these safety precautions. Safety Precautions Safety Precautions Please read the safety warnings and cautions provided in this manual to ensure that you ignore any way not described in this manual. Never damage, modify, stretch or excessively bend or twist the power cord. Always push the plug all the way...
... in any of these safety precautions. Safety Precautions Safety Precautions Please read the safety warnings and cautions provided in this manual to ensure that you ignore any way not described in this manual. Never damage, modify, stretch or excessively bend or twist the power cord. Always push the plug all the way...

S9000 User's Guide
Page 20
.... The Print dialog box can be opened from either within an application, or directly from the Windows Start menu. For further details, see the user's manual for opening the Printer Properties dialog box. Opening the Printer Properties Dialog Box 20 The Printer Properties dialog box opens. ® Depending on your application... only the general procedure for your application, select the command to specify printer settings just before printing. Then click the Properties button. Note 2 Ensure that Canon S9000 is generally used to print a document.
.... The Print dialog box can be opened from either within an application, or directly from the Windows Start menu. For further details, see the user's manual for opening the Printer Properties dialog box. Opening the Printer Properties Dialog Box 20 The Printer Properties dialog box opens. ® Depending on your application... only the general procedure for your application, select the command to specify printer settings just before printing. Then click the Properties button. Note 2 Ensure that Canon S9000 is generally used to print a document.

S9000 User's Guide
Page 24
... Printer Properties dialog box, click the ? Note ® To see a description of the printer driver. Guide. button. (4) Greyscale Printing Select to start the Print Advisor. Canon S9000 - To make detailed colour adjustments, select Manual, then click the Set...
... Printer Properties dialog box, click the ? Note ® To see a description of the printer driver. Guide. button. (4) Greyscale Printing Select to start the Print Advisor. Canon S9000 - To make detailed colour adjustments, select Manual, then click the Set...

S9000 User's Guide
Page 43
... media, and resizing the printed image. Custom 3 and click Custom. (2) Banner Printing Select this check box when printing on banner paper. To enter the size manually, select Custom 1 - To open the Page Setup dialog box, select Page Setup from the File menu in your application program. (1) (2) (7) (3) (10) (8) (4) (5) (6) (9) (1) Paper Size Select the...
... media, and resizing the printed image. Custom 3 and click Custom. (2) Banner Printing Select this check box when printing on banner paper. To enter the size manually, select Custom 1 - To open the Page Setup dialog box, select Page Setup from the File menu in your application program. (1) (2) (7) (3) (10) (8) (4) (5) (6) (9) (1) Paper Size Select the...

S9000 User's Guide
Page 49
Allows you are printing. (6) Apply... Specify the output destination, print order and page layout for the document you to register print settings or to manually set the print quality and colour settings in the Detailed Setting Dialog Box. (5) Options... Description of Print Settings 49 Allows you to implement a previously registered print setting. Printer Driver Functions (Macintosh) (4) Details...
Allows you are printing. (6) Apply... Specify the output destination, print order and page layout for the document you to register print settings or to manually set the print quality and colour settings in the Detailed Setting Dialog Box. (5) Options... Description of Print Settings 49 Allows you to implement a previously registered print setting. Printer Driver Functions (Macintosh) (4) Details...

S9000 User's Guide
Page 50
in the Print dialog box and (2) (1) (3) (1) Panel display icons Click these icons to switch between panels in the Detailed Setting dialog box. Description of Print Settings 50 Detailed Setting Dialog Box Printer Driver Functions (Macintosh) To open the Detailed Setting dialog box, select Manual then click Details....
in the Print dialog box and (2) (1) (3) (1) Panel display icons Click these icons to switch between panels in the Detailed Setting dialog box. Description of Print Settings 50 Detailed Setting Dialog Box Printer Driver Functions (Macintosh) To open the Detailed Setting dialog box, select Manual then click Details....

S9000 User's Guide
Page 99
... s Handling of the image may be blurred if printing extends into the printable area. Glossy Photo Paper GP-301/GP-301N 99 Canon recommends that you want to the user's manual for your application. two minutes). If you are using the same size as it fills the editing screen without leaving any...
... s Handling of the image may be blurred if printing extends into the printable area. Glossy Photo Paper GP-301/GP-301N 99 Canon recommends that you want to the user's manual for your application. two minutes). If you are using the same size as it fills the editing screen without leaving any...

S9000 User's Guide
Page 106
... you to set margins, set the left, right, top, and bottom margins to turn yellow. s Printable Area With some types of the paper to 0 mm. Canon recommends that you print within the printing area. ¬ Printing Area Note ® For photograph and illustration data that allows you want to the user...'s manual for your application. Photo Paper Pro PR-101 106 If you are using the same size as the paper size, and paste the data so ...
... you to set margins, set the left, right, top, and bottom margins to turn yellow. s Printable Area With some types of the paper to 0 mm. Canon recommends that you print within the printing area. ¬ Printing Area Note ® For photograph and illustration data that allows you want to the user...'s manual for your application. Photo Paper Pro PR-101 106 If you are using the same size as the paper size, and paste the data so ...

S9000 User's Guide
Page 126
Troubleshooting Macintosh 1 Open the Print dialog box. 2 For Print Mode, select Manual and then click Details. 3 Click the Quality icon and then drag the Print Quality slide bar to the Fine end. s In the printer driver settings, select a higher print quality setting. Print Quality is Poor or Contains Errors 126 Windows 1 Open the Printer Properties dialog box. 2 On the Main tab, click High for the Print Quality setting.
Troubleshooting Macintosh 1 Open the Print dialog box. 2 For Print Mode, select Manual and then click Details. 3 Click the Quality icon and then drag the Print Quality slide bar to the Fine end. s In the printer driver settings, select a higher print quality setting. Print Quality is Poor or Contains Errors 126 Windows 1 Open the Printer Properties dialog box. 2 On the Main tab, click High for the Print Quality setting.

S9000 User's Guide
Page 127
pictures with intense colours or photographs). Printed Paper Curls or Ink Blots Troubleshooting s Use high resolution paper or photo paper to adjust the intensity. Print Quality is Poor or Contains Errors 127 s Reduce the Intensity setting in the printer driver and try printing again. Windows 1 Open the Printer Properties dialog box. 2 On the Main tab, select Manual for Colour Adjustment, and then click Set. 3 Drag the Intensity slide bar to print images that require a lot of ink (i.e.
pictures with intense colours or photographs). Printed Paper Curls or Ink Blots Troubleshooting s Use high resolution paper or photo paper to adjust the intensity. Print Quality is Poor or Contains Errors 127 s Reduce the Intensity setting in the printer driver and try printing again. Windows 1 Open the Printer Properties dialog box. 2 On the Main tab, select Manual for Colour Adjustment, and then click Set. 3 Drag the Intensity slide bar to print images that require a lot of ink (i.e.

S9000 User's Guide
Page 128
Troubleshooting Macintosh 1 Open the Print dialog box. 2 For Print Mode, select Manual and then click Details. 3 Click the Colour icon and then drag the Intensity slide bar to set the intensity. Print Quality is Poor or Contains Errors 128
Troubleshooting Macintosh 1 Open the Print dialog box. 2 For Print Mode, select Manual and then click Details. 3 Click the Colour icon and then drag the Intensity slide bar to set the intensity. Print Quality is Poor or Contains Errors 128

S9000 User's Guide
Page 132
... the Colour icon and drag the Intensity slide bar to adjust the intensity. Windows 1 Open the Printer Properties dialog box. 2 On the Main tab, select Manual for Colour Adjustment, and then click Set. 3 Drag the Intensity slide bar to set the intensity. This may absorb too much ink and become scratched...
... the Colour icon and drag the Intensity slide bar to adjust the intensity. Windows 1 Open the Printer Properties dialog box. 2 On the Main tab, select Manual for Colour Adjustment, and then click Set. 3 Drag the Intensity slide bar to set the intensity. This may absorb too much ink and become scratched...

S9000 User's Guide
Page 134
Colours are Uneven or Streaked Troubleshooting s Increase the print quality setting in the printer driver settings. Print Quality is Poor or Contains Errors 134 Windows 1 Open the Printer Properties dialog box. 2 On the Main tab, click High for the Print Quality setting. Macintosh 1 Open the Print dialog box. 2 For Print Mode, select Manual and then click Details. 3 Click the Quality icon and then drag the Print Quality slide bar to the Fine end.
Colours are Uneven or Streaked Troubleshooting s Increase the print quality setting in the printer driver settings. Print Quality is Poor or Contains Errors 134 Windows 1 Open the Printer Properties dialog box. 2 On the Main tab, click High for the Print Quality setting. Macintosh 1 Open the Print dialog box. 2 For Print Mode, select Manual and then click Details. 3 Click the Quality icon and then drag the Print Quality slide bar to the Fine end.


